

thinking outside the box


XARA TUTORIAL
Text here...


Rectangles are by far the most common graphic shape used in almost every type of design. You might assume it’s easy to use the
Rectangle tool to add rectangles to your page, and it is very easy, but there’s a lot more to the Rectangle Tool than you might imagine. So
here’s a tutorial on getting the most from the Rectangle tool.
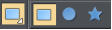
Xara provides three tools grouped together for drawing regular shapes – the Rectangle Tool for creating rectangles and squares, the
Ellipse Tool for creating circles and ellipses and the Quickshape Tool for creating polygons, stars and SmartShapes. These can be found
in all Xara products - Web Designer, Photo & Graphic Designer, Page & Layout Designer and Designer Pro.
I will use rectangles to create framed photos and panelled text and show you the basics of applying outlines, fills, transparencies, shadows
and bevels. For this tutorial I will use Xara Photo & Graphic Designer – you can download the trial version of Xara Photo & Graphic Designer
and give it a try!
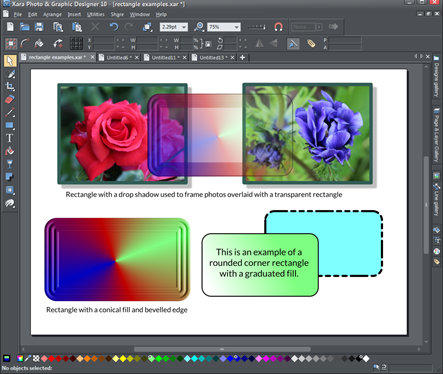 We will create a range of rectangles like these
 Click and drag the mouse on the page to draw a rectangle. It’s that easy to draw a simple rectangle.
Normally the rectangle is drawn from top left, to bottom right (although you can draw it in any direction if you so wish), but one corner is
where you start the drag - the other is where you end the drag. And the resulting rectangle is ‘straight’ which means the sides are exactly
vertical and horizontal.
But supposing you want to draw a square or rectangle centred on a given point. You can do that. On the Rectangle Tool InfoBar there are
three controls on the left that control the way the rectangles are drawn as you drag them out on the page.
Click and drag the mouse on the page to draw a rectangle. It’s that easy to draw a simple rectangle.
Normally the rectangle is drawn from top left, to bottom right (although you can draw it in any direction if you so wish), but one corner is
where you start the drag - the other is where you end the drag. And the resulting rectangle is ‘straight’ which means the sides are exactly
vertical and horizontal.
But supposing you want to draw a square or rectangle centred on a given point. You can do that. On the Rectangle Tool InfoBar there are
three controls on the left that control the way the rectangles are drawn as you drag them out on the page.
 By default the third mode is selected, so drags across the page define the corner and the opposite corner. But if you select the first icon
here and drag on the page you’ll see the rectangle is now drawn around the initial click position - it’s centered on this point. What’s more it
rotates as you drag. If you hold the Ctrl key down while dragging it will keep it straight. The last way to draw rectangles is like a
combination of the others - it draws a rectangle from one corner to the next, but at any angle. Again holding Ctrl will draw it straight at 0°
rotation.
By default the third mode is selected, so drags across the page define the corner and the opposite corner. But if you select the first icon
here and drag on the page you’ll see the rectangle is now drawn around the initial click position - it’s centered on this point. What’s more it
rotates as you drag. If you hold the Ctrl key down while dragging it will keep it straight. The last way to draw rectangles is like a
combination of the others - it draws a rectangle from one corner to the next, but at any angle. Again holding Ctrl will draw it straight at 0°
rotation.
 on the
InfoBar to make your rectangle have rounded corners. In the Rectangle Tool drag on any of the corner radius points to adjust the radius of
the corners.
on the
InfoBar to make your rectangle have rounded corners. In the Rectangle Tool drag on any of the corner radius points to adjust the radius of
the corners.
 Drag on any of the corner radius points (in this case top left) to adjust the roundedness.
 The selector shows the 8 resize handles around the shape (as with all selected shapes). Dragging the corner handles, as shown would
normally do a aspect-ratio locked resize (it retains its proportions). But if you un-lock the aspect ratio lock on the Selector Tool InfoBar
The selector shows the 8 resize handles around the shape (as with all selected shapes). Dragging the corner handles, as shown would
normally do a aspect-ratio locked resize (it retains its proportions). But if you un-lock the aspect ratio lock on the Selector Tool InfoBar  then when you drag the corner you can adjust its width or height. It’s best not to leave this option unlocked as it’s too easy to accidentally
squash or stretch objects.
then when you drag the corner you can adjust its width or height. It’s best not to leave this option unlocked as it’s too easy to accidentally
squash or stretch objects.
We will create a range of rectangles like these
The Basics – sizing, curved corners and outlines
Select the Rectangle Tool on the main Toolbar (or Shift-F3).
Click and drag the mouse on the page to draw a rectangle. It’s that easy to draw a simple rectangle.
Normally the rectangle is drawn from top left, to bottom right (although you can draw it in any direction if you so wish), but one corner is
where you start the drag - the other is where you end the drag. And the resulting rectangle is ‘straight’ which means the sides are exactly
vertical and horizontal.
But supposing you want to draw a square or rectangle centred on a given point. You can do that. On the Rectangle Tool InfoBar there are
three controls on the left that control the way the rectangles are drawn as you drag them out on the page.
By default the third mode is selected, so drags across the page define the corner and the opposite corner. But if you select the first icon
here and drag on the page you’ll see the rectangle is now drawn around the initial click position - it’s centered on this point. What’s more it
rotates as you drag. If you hold the Ctrl key down while dragging it will keep it straight. The last way to draw rectangles is like a
combination of the others - it draws a rectangle from one corner to the next, but at any angle. Again holding Ctrl will draw it straight at 0°
rotation.
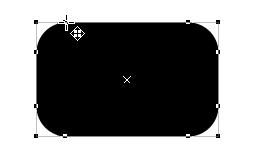
Rounded Rectangles
Almost as common as normal rectangles are rounded corners that soften your design. Just click the rounded corner icon
on the
InfoBar to make your rectangle have rounded corners. In the Rectangle Tool drag on any of the corner radius points to adjust the radius of
the corners.
Drag on any of the corner radius points (in this case top left) to adjust the roundedness.
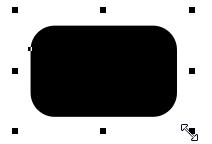
Resizing & Rotating Rectangles
You can resize rectangles using the Rectangle Tool or the Selector Tool, and they both provide different options.Using the Selector Tool
The selector shows the 8 resize handles around the shape (as with all selected shapes). Dragging the corner handles, as shown would
normally do a aspect-ratio locked resize (it retains its proportions). But if you un-lock the aspect ratio lock on the Selector Tool InfoBar
then when you drag the corner you can adjust its width or height. It’s best not to leave this option unlocked as it’s too easy to accidentally
squash or stretch objects.

