

thinking outside the box


XARA TUTORIAL
Text here...


Stacking Order
You may now have many different rectangles on your page and a common action is to arrange them so that a few overlap. The objects are arranged in the order that they were created so the last one will be on the top. To change them so they overlay each other in a different order, you will need to rearrange their order from front to back. The Page & Layer Gallery is useful for viewing and manipulating the stacking order of objects. It shows you the objects in their stacking order and you can drag them to re-order them – open the Page & Layer gallery, click to see the objects on the page and then click to see the objects on the current layer. Alternatively, the Arrange menu gives you four options - Bring to front ("Ctrl + F"), Move forward ("Ctrl +Shift + F"), Move backward ("Ctrl +Shift + B"): Put to back ("Ctrl + B").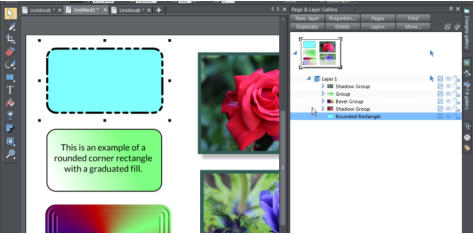 The Page & Layer Gallery showing all the objects on this page
Transparency
The use of transparency is ideal when you want to have overlapping objects, or where you want parts of objects to fade or blend with other objects or with the background. Arrange your rectangles on your page so that you have one overlapping another (I put my two photo rectangles side by side and positioned the bevelled rectangle across them.) Select the rectangle in the foreground (in my case, the bevelled rectangle) and select the Transparency Tool, then use the Transparency slider on the InfoBar to adjust the transparency of the foreground object so that you can see the content of the rear object through the foreground object. If you wish, you can fade the transparency (like a graduated color, except that it’s now a graduated transparency) by dragging your mouse across the object to create a directional arrow, in a similar way that you did with the Fill Tool earlier when creating your graduated color. Likewise, you can change the transparency shape and type, as you could with the Fill Tool.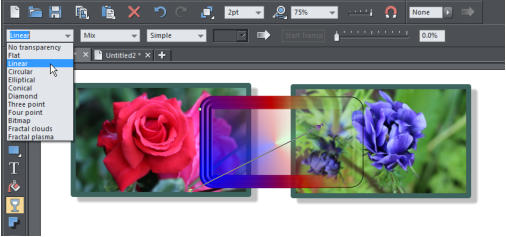 Graduated transparency being applied to the overlaid object so you can see the background images.
Why does my rectangle not work?
Sometimes you might find what looks like a rectangle on the page, but the Rectangle Tool doesn’t work with it, for example, you can’t set rounded corners. The reason is almost certainly that this is not a rectangle object as such, just a ‘shape’ that is drawn with four sides to look like a rectangle. Because it’s not really a rectangle object, the Rectangle tool can’t work with it. You can tell by looking at the status line on the bottom of screen. It will tell you what the selected object is, either a Rectangle or a Shape. You can convert a Rectangle to be a normal editable shape - which means you can use the shape editing tool on it, by selecting the Arrange > Convert to Editable Shapes, menu option.Other Shapes
In addition to the Shape Tools that enable you to create a wide range of effects, Xara also offer a selection of SmartShapes that are a useful range of everyday shapes that you can drop into your website or documents and then customize in a simple and intuitive way. Choose from Speech Bubbles, Arrows, Text boxes, Polygons, Stars, and many other shapes. These can be found in the Designs Gallery in the SmartShapes folder. See the tutorial on Using SmartShapes. ________________________ Xara Photo & Graphic Designer is a flexible and time-saving all-in-one creative tool that provides a wide range of photo editing and enhancement, illustration and graphic design features. At an unbeatable value for money price, it’s ideal for private and professional use: at home, in clubs, in academic institutions, and at work. Xara’s unique non-destructive nature maintains the high quality of your original photo regardless of how many times you open-edit-save it. As a result many people use Xara Photo and Graphic Designer as their primary, general purpose image and document composition tool. Download Xara Photo & Graphic Designer and try it!
