

thinking outside the box


XARA TUTORIAL
Text here...


Graduated Color Fills
I will now introduce you to various effects that you can apply to your rectangles starting with graduated color. Draw a new rectangle – as before, it will have adopted the same attributes as the rectangle that you had previously selected. Select the ‘curved corners’ button on the InfoBar and change the outline to 2pt. To change the colors drag a light green onto the rectangle and a dialogue asks which color you wish to change so select the ‘fill color’. Do the same to change the ‘line color’ to black. Replacing the colors of the rectangle
With the green rectangle selected, we shall now make this a graduated color. Select the Fill Tool
Replacing the colors of the rectangle
With the green rectangle selected, we shall now make this a graduated color. Select the Fill Tool  and then drag across the rectangle
from near the bottom left toward the top right to set the graduated area. To change the direction of the graduated fill drag the end of the
arrow.
Now select the handle at the ‘blunt’ end of the arrow and click on the blue on the color line to add it. You can click on the arrow point to
change the color at that end or use the Tab key to toggle between the ends of the fill arrow.
Instead of just fading from one color to another, it can go through a number of different color fill stages. To introduce a third color, double
click on the fill arrow to create a new fill handle and then select the red color. (To remove a fill stage handle, just click on it to select it, and
press ‘Del’.) Or just drag from color line onto the fill arrow. Once color stop point is selected, you can click or use Ctrl=E to open color editor.
You can experiment with the various effects using the Fill options provided in the drop down menus on the Fill Info Bar – there are 11 Fill
types, Fill Tiling (simple or repeated) and Fill Effect (Fade, Rainbow or Alt Rainbow). Many of the graduated color fill types support multi-
stage graduation fills.
and then drag across the rectangle
from near the bottom left toward the top right to set the graduated area. To change the direction of the graduated fill drag the end of the
arrow.
Now select the handle at the ‘blunt’ end of the arrow and click on the blue on the color line to add it. You can click on the arrow point to
change the color at that end or use the Tab key to toggle between the ends of the fill arrow.
Instead of just fading from one color to another, it can go through a number of different color fill stages. To introduce a third color, double
click on the fill arrow to create a new fill handle and then select the red color. (To remove a fill stage handle, just click on it to select it, and
press ‘Del’.) Or just drag from color line onto the fill arrow. Once color stop point is selected, you can click or use Ctrl=E to open color editor.
You can experiment with the various effects using the Fill options provided in the drop down menus on the Fill Info Bar – there are 11 Fill
types, Fill Tiling (simple or repeated) and Fill Effect (Fade, Rainbow or Alt Rainbow). Many of the graduated color fill types support multi-
stage graduation fills.
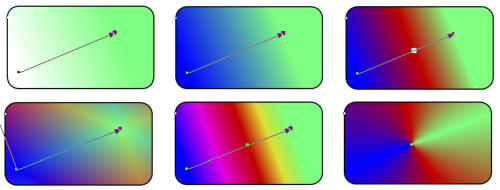 Example fill types - Linear 2 color (white to green) / Linear 2 color / Linear 3 color / 3 color repeating
/ Linear Rainbow effect / Conical 3 color.
Example fill types - Linear 2 color (white to green) / Linear 2 color / Linear 3 color / 3 color repeating
/ Linear Rainbow effect / Conical 3 color.
Re-using or Copying and Pasting Fill Styles
Each time you draw a new object, such as a rectangle, it takes the attributes from the last object you drew. But more than that it takes it from the last object you touched (ie, selected). This is a powerful way to set the style of the next thing you draw. For example, you could have a palette of styles off the page in the pasteboard area, a bit like the set of example fill styles above. Then you just need to touch the style you want, before drawing a new object.Copying and Pasting Styles
If you copy an object the normal way (Ctrl+C), you can paste the attributes (ie. the style) onto other objects using Edit > Paste > Format / Attributes or the short-cut of Ctrl+Shift+A.Resetting the the Style
But what if your last item was a green filled rectangle with a white outline, and you want to draw a black rectangle with no outline. In this case, before you draw the rectangle, click the black fill color on the color line, and Shift+click on the ‘no color’ patch on the left end.
which sets no outline color. Now when you draw the next object it will come out black filled with no outline.
Bevels
With the conical fill rectangle selected, I added a bevel by selecting the Bevel Tool
patch on the left end.
which sets no outline color. Now when you draw the next object it will come out black filled with no outline.
Bevels
With the conical fill rectangle selected, I added a bevel by selecting the Bevel Tool  . There are various effects offered but I chose the
Ruffled Frame 4.
. There are various effects offered but I chose the
Ruffled Frame 4.
 Adding a Bevel effect to the rectangle
Drag any of the eight handles that surround the selected objects. As you drag, you see the outline of the bevel. The bevel can be either
inside or outside of objects (outside bevels make the objects larger). To see the difference click on the Inner and Outer bevel buttons on the
Bevel InfoBar
Adding a Bevel effect to the rectangle
Drag any of the eight handles that surround the selected objects. As you drag, you see the outline of the bevel. The bevel can be either
inside or outside of objects (outside bevels make the objects larger). To see the difference click on the Inner and Outer bevel buttons on the
Bevel InfoBar  . You can make the bevel softer by reducing the contrast using the Bevel contrast slider. I reduced mine to 50% to
give this result:
. You can make the bevel softer by reducing the contrast using the Bevel contrast slider. I reduced mine to 50% to
give this result:
 Rectangle with a conical 3 color fill and bevelled edge
We will now add a bevel edge to a photo to simulate the appearance of being a photo on a mounted canvas. Drag a photo onto your page,
imported in reduced size. Then select the Bevel Tool and drag the corner handles inward to the required depth.
Rectangle with a conical 3 color fill and bevelled edge
We will now add a bevel edge to a photo to simulate the appearance of being a photo on a mounted canvas. Drag a photo onto your page,
imported in reduced size. Then select the Bevel Tool and drag the corner handles inward to the required depth.
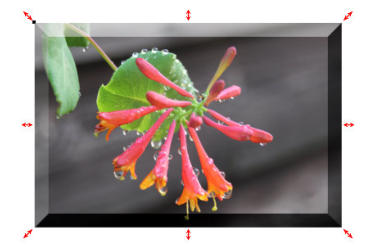 A photo with a bevelled edge showing the drag handles around the edge

