In the first part of our Guide to Photo Editing in Xara, we covered the basics of opening photos, zooming, sizing photos, saving and gave a brief
summary of the Photo Enhance Tool. The third tutorial in the series will go into more detail about the options in the Enhance Tool, the
workhorse controls that are used in just about every photo edit. In this tutorial we’ll introduce all the tools in the photo fly-out menu.
Note: This tutorial has been updated to cover changes to the Photo & Graphic Designer and Designer Pro photo tools in 2016.
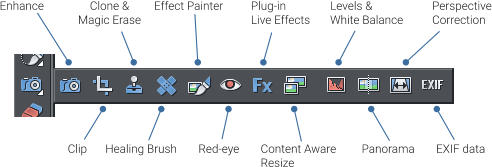
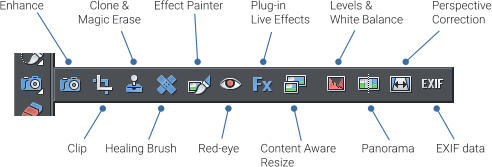
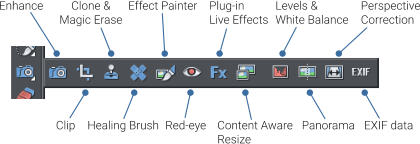
Below we give a summary of each of the main photo editing tools you will find in the Photo Tool fly-out menu shown below.
The main photo tools appear on a fly-out menu of controls under the camera icon.
To access the fly-out menu just hover the mouse pointer over the Camera icon tool. When you select any of the tools in the fly-out it will
replace the Camera icon (which is actually the Photo Enhance tool, the first in the list).
Click on any of these links to quickly jump to that section below:
Photo Enhance Tool
Whole Photo or Part: Regions
Color Select - or ‘enhance by color’
Clip Tool
Clone / Magic Erase Tool
Healing Tool
Effect Painter
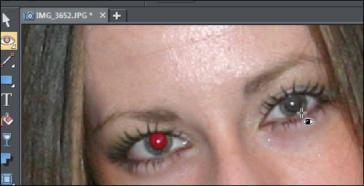
Red-eye removal
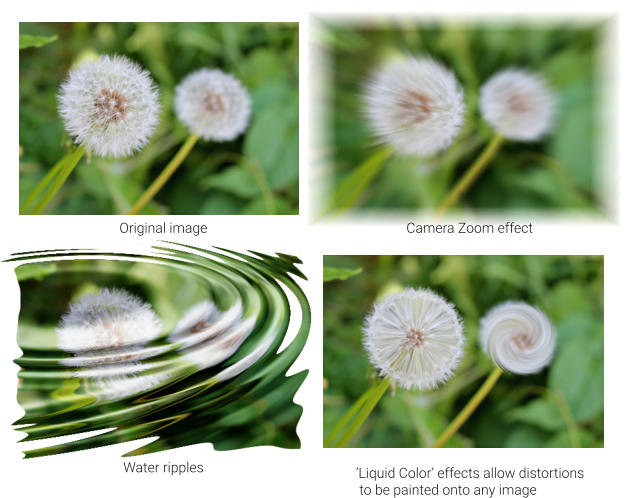
Live Effects
Content aware resize
Levels Dialog and White Balance
Panorama stitcher
Perspective Correction
Photo EXIF information
The Photo Enhance Tool:
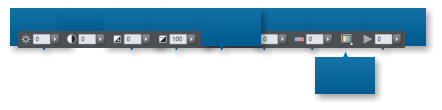
This provides the workhorse controls for the main photo enhance operations, such as adjusting the brightness, shadows, color, sharpen etc. When you select this tool the InfoBar shows this set of controls: Click the small right-arrow next to each to show a slider control to adjust each of these values. We have created a tutorial describing each of these controls. See Part 3 The Enhance Options for examples and details of each of these controls.Whole image or part?
If you select the image and adjust one of the above settings, the effect will usually be applied to the whole image. But what if you wanted to enhance just a part or region of a photo? Or maybe adjust only certain colors? Or a combination of these to adjust, say, the intensity of the blue sky, but no other blue items in the picture. This is all possible and remarkably easy using Regions and Color Select.Regions
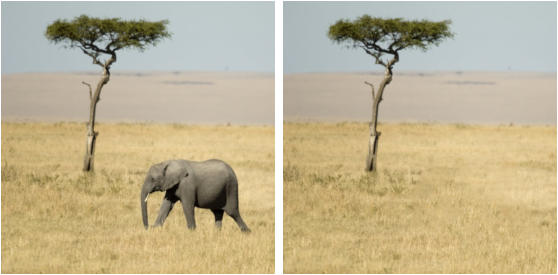
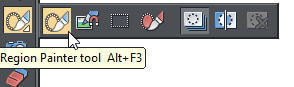
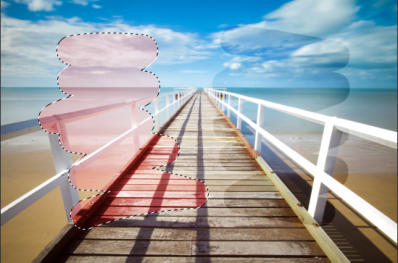
You can create Masks or Regions on a photo so the Enhance operations listed above apply only to the defined region. Use the set of Region Tools from the main tool bar: The Region Painter and other region and mask tools The Region Painter Tool allows you to ‘paint’ a region onto your photos - it’s shown with an animated dotted outline. Hold the Shift key down and you can un-paint, that is cut-away, parts of your region. If you now switch back into the Enhance Tool, now the various enhance operations listed will apply only to the region. Feather the edges : An important control when using Regions is the Feather Control on the top right of the toolbars. This allows you to blend the edge of the region. The other Region Tools on the fly-out menu shown above are: Magnetic Lasso Tool, which enables you to draw a freehand outline around a part of the photo, with ‘magnetic’ snap to the edges of objects. Rectangle Region Tool, which creates rectangular regions. Mask Painter Tool. The Mask Painter is like in inverted Region Painter. Instead of creating a region where effects are applied inside the region, a Mask is an area that protects the image from being altered. Masks are shown in pink. So if you want to adjust an image, with the exception of a small part, it’s easier using the Mask Painter to mask over the exclusion area first, then make the required adjustments. The masked area will remain unaffected. The last three icons represent: Show / Hide the dotted outline of the Mask or Region. Invert the Mask or Region - but NB this only works whilst creating the Region or Mask, once you’ve applied an effect, then you can’t invert it. Clear the Mask or Region.Color Select - ‘enhance by color’:
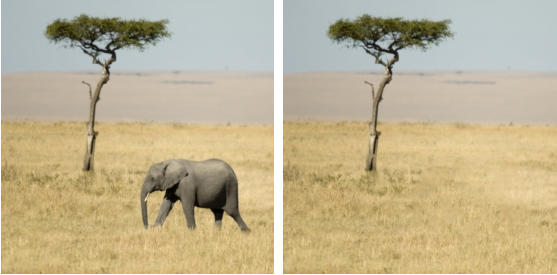
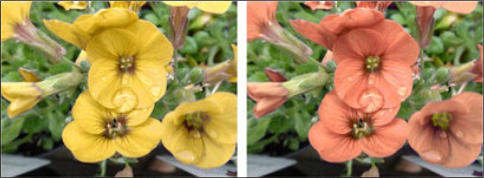
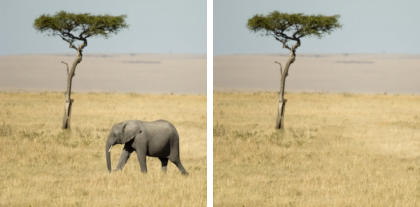
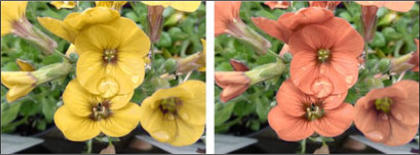
The second way to limit an enhance effect is by making it apply only to certain colors, and you can do this with the ‘Color Select’ feature. At the right hand end of the Enhance Tool InfoBar there’s another major photo editing control, Color Select, that allows you to apply any of the above enhance controls to selected colors only. This is useful, for example, if you want to change the brightness or perhaps the blueness of a blue sky without affecting other parts of the picture. Or perhaps you want to change a red dress to be a green one, or just tone down the grass in your photo. By selecting only the yellow colors on this image, and using the Color Tint control you can adjust the yellow to be just about any hue you like, without affecting the other colors in this image. Note that this has altered the lighter and darker yellows of the original to retain the correct shading in order to make this realistic. To limit any enhance operation to specific colors only, in the Enhance Tool first select the Color Select Tool, and now click on the color you want to select on the photo. As you do this you’ll see a brief ‘checker-board’ flash and a color select control handle will be placed on the image. You can click and hold to see exactly which parts of the photo will be affected, as shown by a checker-board pattern (or drag on your photo to adjust exactly which colors are selected). You can click again to apply multiple additional color-select handles. Right click on the handle to see additional options. Now when you use any of the normal Enhance controls the changes will be applied to only the selected colors, instead of the whole image. Color Select is a super-powerful tool, and there a dedicated tutorial describing this in more detail: Part 4, Changing Colors in Photos.The Clip Tool:
Dragging across the image when in the Photo Enhance Tool is an easy, direct way to crop photos as described in Part 1 of the Photo Editing Guide, but this dedicated Clip Tool provides additional controls to crop to a specific pixel size, or specific aspect ratio. This is a non-destructive operation so if you don’t like it you can adjust the crop later, or un-crop, even after a save. You can enter the crop size in the W and H fields, and use any unit you like. For example, enter 4in and it will create a crop region 4 inches in size (measurements are based on 96ppi - pixels per inch, the standard Windows screen measure). If you select the lock-aspect check-box you can set either the width or the height and the other measurement will automatically resize to keep your image aspect correct, or you can select from one of the pre-set aspect ratios shown. Click un-clip to restore the original full image.The Clone or Magic Erase Tool:
The Clone tool can perform two functions. It can copy (clone) any region of a photo to any other region. This is most often used to hide objects or cover up parts of a photo. It can even copy parts of one photo onto another. Secondly, it can perform a ‘magic erase’ around a drawn region which is an intelligent ‘fill’ that tries to remove objects, filling in with a background texture. You can feather the edges of the clone or filled region to make a more seamless blend with the background. For more information see the tutorials Magic Erase and Removing Unwanted Objects from your Photo.Healing Tool:
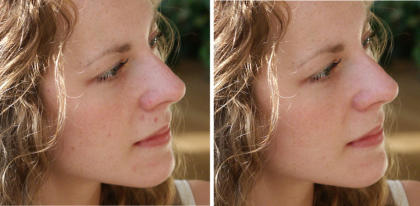
The Healing Tool can remove small blemishes with a single click, or you can paint over larger areas of objects to fill with background. One click erase of skin blemishes. Or for removal of larger objects. Just paint over it, and it’s erased. For larger objects it works best when there’s a consistently textured background around the ‘blemish’ that needs removing. Use the Ctrl+ Mouse Wheel zoom method as described in the Part 1 of the Photo Editing Guide to adjust the relative size of the healing brush radius, or use Alt+ Mouse Wheel to adjust the radius of the brush directly.Effect Painter
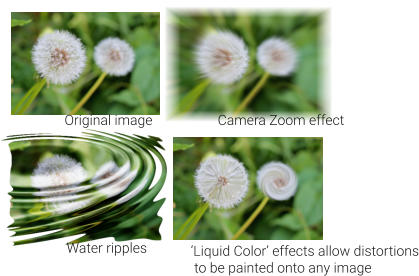
Using the Region or Color Select features described above, you can apply an effect to a defined area, or to certain colors only. There is another, more direct way to apply effects to regions, using the Effect Painter tool (5 th one along on the fly-out photo toolbar). When you select this tool the InfoBar shows this: You can select from a drop-down list of effects, and just paint on the photo. The Transparency control adjusts how this blends in with the photo - it’s like a strength control. The next controls the brush size - although, adjusting the zoom (hold the ctrl key and move the mouse scroll wheel) is often a quicker and easier way to adjust the relative size of the brush. The Softness control enables you to create a soft edged brush - when painting a region this is the same as applying a Feather value to the region to give it a soft edge. Here’s a photo with two areas painted using the Effect Painter tool. The left one is selected still as indicated by the dotted outline. This effect is called ‘Style Transparent Color’ which is a color tint you can paint on your photo. You can use the Color Editor to make this any color you like, and use the Transparency slider to adjust the strength of the effect. On the right there’s a ‘darken’ effect painted over part off the image. In real- world use it’s always better to have a soft edge (or use the Feather control) to blend the edges of the painted region. When you paint an effect on with this tool, each stroke of the brush will be part of the same region - the current selected region is always shown with a dotted outline. Painting with the Shift key down will un-paint, that is, remove areas from the painted region. With a region selected, you can change the effect by just selecting from the ‘list of effects’ menu. Brush size: You can adjust the brush size using the size slider, and there’s a short cut - hold down the Alt key and use the mouse scroll feature. But a better way to paint more or less detail is to use the zoom shortcut (Ctrl key with mouse-wheel). Zoom in and you paint more detail, zoom out and the brush is relatively larger on the image so is easier for painting over large areas. Pressing Esc, or clicking on the background will de-select the current region, and any new brush strokes now will be a new region which can be a different effect. Advanced users note: Regions and areas painted with the Effect Painter tool are vector layers placed on top of the original photo. These are non-destructive effects, that means your original photo underneath remains untouched. These layers of effects are in a special type of group (called a Photo Group). As with all groups there’s a trick to selecting things inside a group without having to ungroup. Simply press Ctrl+ click to select items inside the group. If you do this using the Selector tool you can move the overlaid effect around on top of the shape. Pressing Delete will delete the shape, and reveal the untouched image under.Red Eye Removal:
Red eye removal is a common requirement for photos that have been taken in darker conditions or with a flash. Simply select the red eye tool, place the ‘cross’ in the center of the red eye and drag it out to the edge of the eye pupil until all the red is removed.Live Effect Tool:
The Live Effect tool allows you to apply Photoshop Plug-in effects to an image, as well as access to a huge library of other image effects. You can even apply multiple successive effects to the same image. Just select the Fx tool, select the ‘New >’ control on the InfoBar to view a wide range of image effects. Each effect will bring up a dedicated dialog to control the parameters of that effect.Content-Aware Photo Resize:
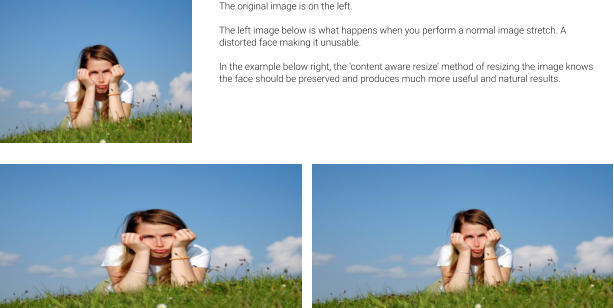
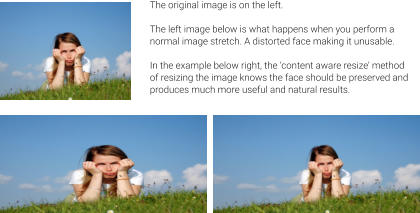
This tool performs intelligent image scaling that allows images to be stretched or squashed while retaining the proportions of important parts of the picture. For more information see the tutorial Intelligent Photo Rescaling and Zooming.Brightness Levels, Curves and White Balance:
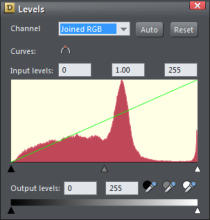
Selecting this icon will display the Levels Dialog that provides detailed control over many aspects of the brightness levels, in addition to showing a histogram of the brightness levels of the whole image. Unlike most of the Photo Editing Tools, this dialog can remain on screen for any selected image. As you adjust the enhance controls, such as the brightness, contrast, shadows and highlight, the histogram is updated (showing a before and after histogram), so you can see the effect these controls have on the brightness distribution. In addition, this dialog provides direct control over the ‘brightness mapping curve’ (the green line), which can be dragged to make detailed adjustments to the brightness levels. Finally it also provides a direct and simple way to adjust the white balance of the image. By dragging the grey eye-dropper control from the Levels Dialog, over any part of the image that’s intended to be gray, it adjusts the white balance of the whole image. The left example above has a classic ‘incandescent’ white balance that is too orange yellow. The right example was adjusted by dragging the ‘gray eye dropper’ control over the fireplace, which is gray stone. The image now has a much more accurate color reproduction. For more information see the tutorial Brightness Levels and Color Balance. This Level Dialog is also described and illustrated in part three of this series of this series of photo tutorial: The Enhance Options.Panorama Tool:
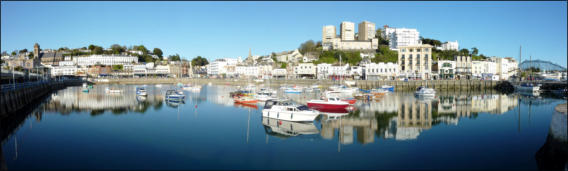
It’s easy to create stunning panoramas by stitching photos together so that none of the joins show. Just take your photos with some overlap, drag the the photo files into Xara Photo & Graphic Designer/ Designer Pro, select them all, press this Panorama button and watch it join them together with seamless blended edges to give you the perfect panorama! For more information see the tutorial Creating Stunning Panoramic Photos The panorama feature not only fits the separate images together, but adjusts any brightness difference and blends the edges to produce pixel perfect stitched results.Perspective Correction:
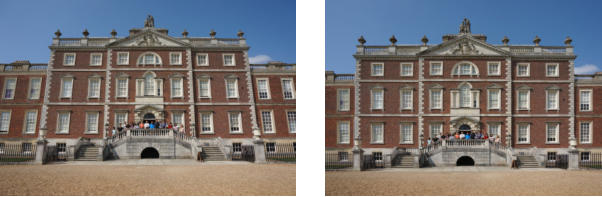
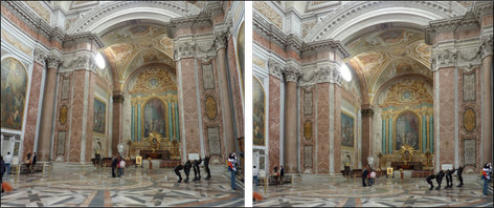
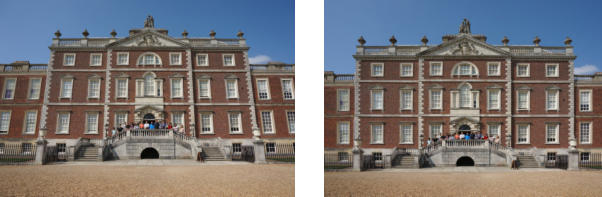
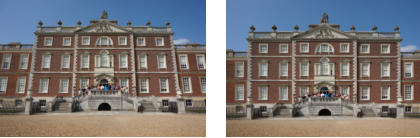
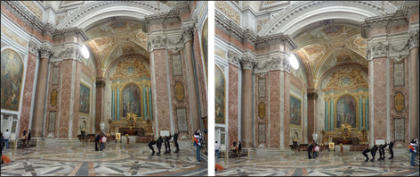
Images of tall buildings taken with wide-angle lenses typically have a leaning or distorted perspective effect than can often look unrealistic. There’s a one-click automatic perspective correction tool that can straighten the most common perspective problems. The image on the left, taken inside a very large basilica in Rome, shows the common perspective effects of photos taken with a camera close to the ground. To get a 'straight on' photo would require it to be taken from a height of probably 30 feet. The perspective correction tool can create a similar effect automatically (right example). Simply select the photo, and then the Perspective Correction tool and the process will start (it can take some time, depending on the resolution of the image). Another example: Left: A large building, taken with wide angle lens will always result in this ‘leaning building’ effect. Right: One click ‘perspective correction’ and the result is an upright image, that is similar to the effect of taking the image ‘straight on’ from a long distance with a very long telephoto lens.Photo EXIF Information:
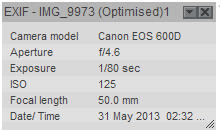
All photos from digital cameras contain exposure and other details about the photo, and the camera that took the photo. Selecting this icon will display a floating EXIF dialog that displays a simple subset of the most useful EXIF values: Like the Levels Dialog this stays floating (it’s semi-transparent as well) and updates itself as the selection changes. Clicking the small down arrow in the top right corner of this dialog provides a control where you can customize which fields are shown here. This is the second part of a series of guides to editing photos in Xara. 1. Beginner’s Guide to Photo Editing in Xara The basics of opening photos, zooming, sizing photos, and saving. 2. Summary of the Photo Tools A summary of the tools on the Photo Tool fly-out menu. 3. Photo Enhance options An overview of the ‘work-horse’ range of Enhance options. 4. Changing colors in photos How to select and enhance or adjust specific colors. 5. A real-world example Combining many of the techniques described above, to transform a poor photo. In addition there are more detailed guides covering other photo tools: The Shadow and Highlight controls Intelligent Photo Rescaling and Zooming Erasing Backgrounds and Combining Photos Brightness Levels and Color Balance Panoramic Photos For more tutorials by Xara and third parties, check out our Resource index, which offers a searchable and browsable list of movies and tutorials created by Xara and third parties. If you would like to try out these photo tools and you don’t already own Xara Photo & Graphic Designer or Designer Pro, you can download the trial version of Photo & Graphic Designer or Designer Pro and try it now.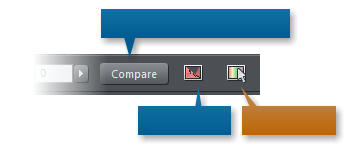


Copyright © 2016 Xara Group Limited.
Page created with Xara Designer Pro


Brightness
Contrast
Shadows
Highlights
Saturation
Warm / Cold
Sharpen / Blur
Color Tint
X-Process

Colour Select
Compare before / after toggle
Levels dialog


In the first part of our Guide to Photo Editing in Xara, we covered the basics of opening photos, zooming,
sizing photos, saving and gave a brief summary of the Photo Enhance Tool. The third tutorial in the series
will go into more detail about the options in the Enhance Tool, the workhorse controls that are used in just
about every photo edit. In this tutorial we’ll introduce all the tools in the photo fly-out menu.
Note: This tutorial has been updated to cover changes to the Photo & Graphic Designer and Designer Pro
photo tools in 2016.
Below we give a summary of each of the main photo editing tools you will find in the Photo Tool fly-out
menu shown below.
The main photo tools appear on a fly-out menu of controls under the camera icon.
To access the fly-out menu just hover the mouse pointer over the Camera icon tool. When you select
any of the tools in the fly-out it will replace the Camera icon (which is actually the Photo Enhance tool, the
first in the list).
Click on any of these links to quickly jump to that section below:
Photo Enhance Tool
Whole Photo or Part: Regions
Color Select - or ‘enhance by color’
Clip Tool
Clone / Magic Erase Tool
Healing Tool
Effect Painter
Red-eye removal
Live Effects
Content aware resize
Levels Dialog and White Balance
Panorama stitcher
Perspective Correction
Photo EXIF information
The Photo Enhance Tool:
This provides the workhorse controls for the main photo enhance operations, such as adjusting the brightness, shadows, color, sharpen etc. When you select this tool the InfoBar shows this set of controls: Click the small right-arrow next to each to show a slider control to adjust each of these values. We have created a tutorial describing each of these controls. See Part 3 The Enhance Options for examples and details of each of these controls.Whole image or part?
If you select the image and adjust one of the above settings, the effect will usually be applied to the whole image. But what if you wanted to enhance just a part or region of a photo? Or maybe adjust only certain colors? Or a combination of these to adjust, say, the intensity of the blue sky, but no other blue items in the picture. This is all possible and remarkably easy using Regions and Color Select.Regions
You can create Masks or Regions on a photo so the Enhance operations listed above apply only to the defined region. Use the set of Region Tools from the main tool bar: The Region Painter and other region and mask tools The Region Painter Tool allows you to ‘paint’ a region onto your photos - it’s shown with an animated dotted outline. Hold the Shift key down and you can un-paint, that is cut-away, parts of your region. If you now switch back into the Enhance Tool, now the various enhance operations listed will apply only to the region. Feather the edges : An important control when using Regions is the Feather Control on the top right of the toolbars. This allows you to blend the edge of the region. The other Region Tools on the fly-out menu shown above are: Magnetic Lasso Tool, which enables you to draw a freehand outline around a part of the photo, with ‘magnetic’ snap to the edges of objects. Rectangle Region Tool, which creates rectangular regions. Mask Painter Tool. The Mask Painter is like in inverted Region Painter. Instead of creating a region where effects are applied inside the region, a Mask is an area that protects the image from being altered. Masks are shown in pink. So if you want to adjust an image, with the exception of a small part, it’s easier using the Mask Painter to mask over the exclusion area first, then make the required adjustments. The masked area will remain unaffected. The last three icons represent: Show / Hide the dotted outline of the Mask or Region. Invert the Mask or Region - but NB this only works whilst creating the Region or Mask, once you’ve applied an effect, then you can’t invert it. Clear the Mask or Region.Color Select - ‘enhance by color’:
The second way to limit an enhance effect is by making it apply only to certain colors, and you can do this with the ‘Color Select’ feature. At the right hand end of the Enhance Tool InfoBar there’s another major photo editing control, Color Select, that allows you to apply any of the above enhance controls to selected colors only. This is useful, for example, if you want to change the brightness or perhaps the blueness of a blue sky without affecting other parts of the picture. Or perhaps you want to change a red dress to be a green one, or just tone down the grass in your photo. By selecting only the yellow colors on this image, and using the Color Tint control you can adjust the yellow to be just about any hue you like, without affecting the other colors in this image. Note that this has altered the lighter and darker yellows of the original to retain the correct shading in order to make this realistic. To limit any enhance operation to specific colors only, in the Enhance Tool first select the Color Select Tool, and now click on the color you want to select on the photo. As you do this you’ll see a brief ‘checker- board’ flash and a color select control handle will be placed on the image. You can click and hold to see exactly which parts of the photo will be affected, as shown by a checker-board pattern (or drag on your photo to adjust exactly which colors are selected). You can click again to apply multiple additional color- select handles. Right click on the handle to see additional options. Now when you use any of the normal Enhance controls the changes will be applied to only the selected colors, instead of the whole image. Color Select is a super-powerful tool, and there a dedicated tutorial describing this in more detail: Part 4, Changing Colors in Photos.The Clip Tool:
Dragging across the image when in the Photo Enhance Tool is an easy, direct way to crop photos as described in Part 1 of the Photo Editing Guide, but this dedicated Clip Tool provides additional controls to crop to a specific pixel size, or specific aspect ratio. This is a non-destructive operation so if you don’t like it you can adjust the crop later, or un-crop, even after a save. You can enter the crop size in the W and H fields, and use any unit you like. For example, enter 4in and it will create a crop region 4 inches in size (measurements are based on 96ppi - pixels per inch, the standard Windows screen measure). If you select the lock-aspect check-box you can set either the width or the height and the other measurement will automatically resize to keep your image aspect correct, or you can select from one of the pre-set aspect ratios shown. Click un-clip to restore the original full image.The Clone or Magic Erase Tool:
The Clone tool can perform two functions. It can copy (clone) any region of a photo to any other region. This is most often used to hide objects or cover up parts of a photo. It can even copy parts of one photo onto another. Secondly, it can perform a ‘magic erase’ around a drawn region which is an intelligent ‘fill’ that tries to remove objects, filling in with a background texture. You can feather the edges of the clone or filled region to make a more seamless blend with the background. For more information see the tutorials Magic Erase and Removing Unwanted Objects from your Photo.Healing Tool:
The Healing Tool can remove small blemishes with a single click, or you can paint over larger areas of objects to fill with background. One click erase of skin blemishes. Or for removal of larger objects. Just paint over it, and it’s erased. For larger objects it works best when there’s a consistently textured background around the ‘blemish’ that needs removing. Use the Ctrl+ Mouse Wheel zoom method as described in the Part 1 of the Photo Editing Guide to adjust the relative size of the healing brush radius, or use Alt+ Mouse Wheel to adjust the radius of the brush directly.Effect Painter
Using the Region or Color Select features described above, you can apply an effect to a defined area, or to certain colors only. There is another, more direct way to apply effects to regions, using the Effect Painter tool (5 th one along on the fly-out photo toolbar). When you select this tool the InfoBar shows this: You can select from a drop-down list of effects, and just paint on the photo. The Transparency control adjusts how this blends in with the photo - it’s like a strength control. The next controls the brush size - although, adjusting the zoom (hold the ctrl key and move the mouse scroll wheel) is often a quicker and easier way to adjust the relative size of the brush. The Softness control enables you to create a soft edged brush - when painting a region this is the same as applying a Feather value to the region to give it a soft edge. Here’s a photo with two areas painted using the Effect Painter tool. The left one is selected still as indicated by the dotted outline. This effect is called ‘Style Transparent Color’ which is a color tint you can paint on your photo. You can use the Color Editor to make this any color you like, and use the Transparency slider to adjust the strength of the effect. On the right there’s a ‘darken’ effect painted over part off the image. In real- world use it’s always better to have a soft edge (or use the Feather control) to blend the edges of the painted region. When you paint an effect on with this tool, each stroke of the brush will be part of the same region - the current selected region is always shown with a dotted outline. Painting with the Shift key down will un- paint, that is, remove areas from the painted region. With a region selected, you can change the effect by just selecting from the ‘list of effects’ menu. Brush size: You can adjust the brush size using the size slider, and there’s a short cut - hold down the Alt key and use the mouse scroll feature. But a better way to paint more or less detail is to use the zoom shortcut (Ctrl key with mouse-wheel). Zoom in and you paint more detail, zoom out and the brush is relatively larger on the image so is easier for painting over large areas. Pressing Esc, or clicking on the background will de-select the current region, and any new brush strokes now will be a new region which can be a different effect. Advanced users note: Regions and areas painted with the Effect Painter tool are vector layers placed on top of the original photo. These are non-destructive effects, that means your original photo underneath remains untouched. These layers of effects are in a special type of group (called a Photo Group). As with all groups there’s a trick to selecting things inside a group without having to ungroup. Simply press Ctrl+ click to select items inside the group. If you do this using the Selector tool you can move the overlaid effect around on top of the shape. Pressing Delete will delete the shape, and reveal the untouched image under.Red Eye Removal:
Red eye removal is a common requirement for photos that have been taken in darker conditions or with a flash. Simply select the red eye tool, place the ‘cross’ in the center of the red eye and drag it out to the edge of the eye pupil until all the red is removed.Live Effect Tool:
The Live Effect tool allows you to apply Photoshop Plug-in effects to an image, as well as access to a huge library of other image effects. You can even apply multiple successive effects to the same image. Just select the Fx tool, select the ‘New >’ control on the InfoBar to view a wide range of image effects. Each effect will bring up a dedicated dialog to control the parameters of that effect.Content-Aware Photo Resize:
This tool performs intelligent image scaling that allows images to be stretched or squashed while retaining the proportions of important parts of the picture. For more information see the tutorial Intelligent Photo Rescaling and Zooming.Brightness Levels, Curves and White Balance:
Selecting this icon will display the Levels Dialog that provides detailed control over many aspects of the brightness levels, in addition to showing a histogram of the brightness levels of the whole image. Unlike most of the Photo Editing Tools, this dialog can remain on screen for any selected image. As you adjust the enhance controls, such as the brightness, contrast, shadows and highlight, the histogram is updated (showing a before and after histogram), so you can see the effect these controls have on the brightness distribution. In addition, this dialog provides direct control over the ‘brightness mapping curve’ (the green line), which can be dragged to make detailed adjustments to the brightness levels. Finally it also provides a direct and simple way to adjust the white balance of the image. By dragging the grey eye-dropper control from the Levels Dialog, over any part of the image that’s intended to be gray, it adjusts the white balance of the whole image. The left example above has a classic ‘incandescent’ white balance that is too orange yellow. The right example was adjusted by dragging the ‘gray eye dropper’ control over the fireplace, which is gray stone. The image now has a much more accurate color reproduction. For more information see the tutorial Brightness Levels and Color Balance. This Level Dialog is also described and illustrated in part three of this series of this series of photo tutorial: The Enhance Options.Panorama Tool:
It’s easy to create stunning panoramas by stitching photos together so that none of the joins show. Just take your photos with some overlap, drag the the photo files into Xara Photo & Graphic Designer/ Designer Pro, select them all, press this Panorama button and watch it join them together with seamless blended edges to give you the perfect panorama! For more information see the tutorial Creating Stunning Panoramic Photos The panorama feature not only fits the separate images together, but adjusts any brightness difference and blends the edges to produce pixel perfect stitched results.Perspective Correction:
Images of tall buildings taken with wide-angle lenses typically have a leaning or distorted perspective effect than can often look unrealistic. There’s a one-click automatic perspective correction tool that can straighten the most common perspective problems. The image on the left, taken inside a very large basilica in Rome, shows the common perspective effects of photos taken with a camera close to the ground. To get a 'straight on' photo would require it to be taken from a height of probably 30 feet. The perspective correction tool can create a similar effect automatically (right example). Simply select the photo, and then the Perspective Correction tool and the process will start (it can take some time, depending on the resolution of the image). Another example: Left: A large building, taken with wide angle lens will always result in this ‘leaning building’ effect. Right: One click ‘perspective correction’ and the result is an upright image, that is similar to the effect of taking the image ‘straight on’ from a long distance with a very long telephoto lens.Photo EXIF Information:
All photos from digital cameras contain exposure and other details about the photo, and the camera that took the photo. Selecting this icon will display a floating EXIF dialog that displays a simple subset of the most useful EXIF values: Like the Levels Dialog this stays floating (it’s semi-transparent as well) and updates itself as the selection changes. Clicking the small down arrow in the top right corner of this dialog provides a control where you can customize which fields are shown here. This is the second part of a series of guides to editing photos in Xara. 1. Beginner’s Guide to Photo Editing in Xara The basics of opening photos, zooming, sizing photos, and saving. 2. Summary of the Photo Tools A summary of the tools on the Photo Tool fly-out menu. 3. Photo Enhance options An overview of the ‘work-horse’ range of Enhance options. 4. Changing colors in photos How to select and enhance or adjust specific colors. 5. A real-world example Combining many of the techniques described above, to transform a poor photo. In addition there are more detailed guides covering other photo tools: The Shadow and Highlight controls Intelligent Photo Rescaling and Zooming Erasing Backgrounds and Combining Photos Brightness Levels and Color Balance Panoramic Photos For more tutorials by Xara and third parties, check out our Resource index, which offers a searchable and browsable list of movies and tutorials created by Xara and third parties. If you would like to try out these photo tools and you don’t already own Xara Photo & Graphic Designer or Designer Pro, you can download the trial version of Photo & Graphic Designer or Designer Pro and try it now.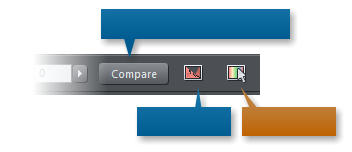


Colour Select
Compare before / after toggle
Levels dialog

Brightnes
s
Contrast
Shadow
s
Highlight
s
Saturatio
n
Warm /
Cold
Sharpen /
Blur
Color
Tint
X-
Process


Copyright © 2016 Xara Group Limited.
Page created with Xara Designer Pro
In the first part of our Guide to Photo Editing in Xara, we covered the
basics of opening photos, zooming, sizing photos, saving and gave a
brief summary of the Photo Enhance Tool. The third tutorial in the
series will go into more detail about the options in the Enhance Tool,
the workhorse controls that are used in just about every photo edit.
In this tutorial we’ll introduce all the tools in the photo fly-out menu.
Note: This tutorial has been updated to cover changes to the Photo &
Graphic Designer and Designer Pro photo tools in 2016.
Below we give a summary of each of the main photo editing tools
you will find in the Photo Tool fly-out menu shown below.
The main photo tools appear on a fly-out menu of controls under the
camera icon.
To access the fly-out menu just hover the mouse pointer over
the Camera icon tool. When you select any of the tools in the fly-out
it will replace the Camera icon (which is actually the Photo Enhance
tool, the first in the list).
Click on any of these links to quickly jump to that section below:
Photo Enhance Tool
Whole Photo or Part: Regions
Color Select - or ‘enhance by color’
Clip Tool
Clone / Magic Erase Tool
Healing Tool
Effect Painter
Red-eye removal
Live Effects
Content aware resize
Levels Dialog and White Balance
Panorama stitcher
Perspective Correction
Photo EXIF information
The Photo Enhance Tool:
This provides the workhorse controls for the main photo enhance operations, such as adjusting the brightness, shadows, color, sharpen etc. When you select this tool the InfoBar shows this set of controls: Click the small right-arrow next to each to show a slider control to adjust each of these values. We have created a tutorial describing each of these controls. See Part 3 The Enhance Options for examples and details of each of these controls.Whole image or part?
If you select the image and adjust one of the above settings, the effect will usually be applied to the whole image. But what if you wanted to enhance just a part or region of a photo? Or maybe adjust only certain colors? Or a combination of these to adjust, say, the intensity of the blue sky, but no other blue items in the picture. This is all possible and remarkably easy using Regions and Color Select.Regions
You can create Masks or Regions on a photo so the Enhance operations listed above apply only to the defined region. Use the set of Region Tools from the main tool bar: The Region Painter and other region and mask tools The Region Painter Tool allows you to ‘paint’ a region onto your photos - it’s shown with an animated dotted outline. Hold the Shift key down and you can un-paint, that is cut-away, parts of your region. If you now switch back into the Enhance Tool, now the various enhance operations listed will apply only to the region. Feather the edges : An important control when using Regions is the Feather Control on the top right of the toolbars. This allows you to blend the edge of the region. The other Region Tools on the fly-out menu shown above are: Magnetic Lasso Tool, which enables you to draw a freehand outline around a part of the photo, with ‘magnetic’ snap to the edges of objects. Rectangle Region Tool, which creates rectangular regions. Mask Painter Tool. The Mask Painter is like in inverted Region Painter. Instead of creating a region where effects are applied inside the region, a Mask is an area that protects the image from being altered. Masks are shown in pink. So if you want to adjust an image, with the exception of a small part, it’s easier using the Mask Painter to mask over the exclusion area first, then make the required adjustments. The masked area will remain unaffected. The last three icons represent: Show / Hide the dotted outline of the Mask or Region. Invert the Mask or Region - but NB this only works whilst creating the Region or Mask, once you’ve applied an effect, then you can’t invert it. Clear the Mask or Region.Color Select - ‘enhance by color’:
The second way to limit an enhance effect is by making it apply only to certain colors, and you can do this with the ‘Color Select’ feature. At the right hand end of the Enhance Tool InfoBar there’s another major photo editing control, Color Select, that allows you to apply any of the above enhance controls to selected colors only. This is useful, for example, if you want to change the brightness or perhaps the blueness of a blue sky without affecting other parts of the picture. Or perhaps you want to change a red dress to be a green one, or just tone down the grass in your photo. By selecting only the yellow colors on this image, and using the Color Tint control you can adjust the yellow to be just about any hue you like, without affecting the other colors in this image. Note that this has altered the lighter and darker yellows of the original to retain the correct shading in order to make this realistic. To limit any enhance operation to specific colors only, in the Enhance Tool first select the Color Select Tool, and now click on the color you want to select on the photo. As you do this you’ll see a brief ‘checker-board’ flash and a color select control handle will be placed on the image. You can click and hold to see exactly which parts of the photo will be affected, as shown by a checker-board pattern (or drag on your photo to adjust exactly which colors are selected). You can click again to apply multiple additional color- select handles. Right click on the handle to see additional options. Now when you use any of the normal Enhance controls the changes will be applied to only the selected colors, instead of the whole image. Color Select is a super-powerful tool, and there a dedicated tutorial describing this in more detail: Part 4, Changing Colors in Photos.The Clip Tool:
Dragging across the image when in the Photo Enhance Tool is an easy, direct way to crop photos as described in Part 1 of the Photo Editing Guide, but this dedicated Clip Tool provides additional controls to crop to a specific pixel size, or specific aspect ratio. This is a non-destructive operation so if you don’t like it you can adjust the crop later, or un-crop, even after a save. You can enter the crop size in the W and H fields, and use any unit you like. For example, enter 4in and it will create a crop region 4 inches in size (measurements are based on 96ppi - pixels per inch, the standard Windows screen measure). If you select the lock-aspect check-box you can set either the width or the height and the other measurement will automatically resize to keep your image aspect correct, or you can select from one of the pre-set aspect ratios shown. Click un-clip to restore the original full image.The Clone or Magic Erase Tool:
The Clone tool can perform two functions. It can copy (clone) any region of a photo to any other region. This is most often used to hide objects or cover up parts of a photo. It can even copy parts of one photo onto another. Secondly, it can perform a ‘magic erase’ around a drawn region which is an intelligent ‘fill’ that tries to remove objects, filling in with a background texture. You can feather the edges of the clone or filled region to make a more seamless blend with the background. For more information see the tutorials Magic Erase and Removing Unwanted Objects from your Photo.Healing Tool:
The Healing Tool can remove small blemishes with a single click, or you can paint over larger areas of objects to fill with background. One click erase of skin blemishes. Or for removal of larger objects. Just paint over it, and it’s erased. For larger objects it works best when there’s a consistently textured background around the ‘blemish’ that needs removing. Use the Ctrl+ Mouse Wheel zoom method as described in the Part 1 of the Photo Editing Guide to adjust the relative size of the healing brush radius, or use Alt+ Mouse Wheel to adjust the radius of the brush directly.Effect Painter
Using the Region or Color Select features described above, you can apply an effect to a defined area, or to certain colors only. There is another, more direct way to apply effects to regions, using the Effect Painter tool (5 th one along on the fly-out photo toolbar). When you select this tool the InfoBar shows this: You can select from a drop-down list of effects, and just paint on the photo. The Transparency control adjusts how this blends in with the photo - it’s like a strength control. The next controls the brush size - although, adjusting the zoom (hold the ctrl key and move the mouse scroll wheel) is often a quicker and easier way to adjust the relative size of the brush. The Softness control enables you to create a soft edged brush - when painting a region this is the same as applying a Feather value to the region to give it a soft edge. Here’s a photo with two areas painted using the Effect Painter tool. The left one is selected still as indicated by the dotted outline. This effect is called ‘Style Transparent Color’ which is a color tint you can paint on your photo. You can use the Color Editor to make this any color you like, and use the Transparency slider to adjust the strength of the effect. On the right there’s a ‘darken’ effect painted over part off the image. In real-world use it’s always better to have a soft edge (or use the Feather control) to blend the edges of the painted region. When you paint an effect on with this tool, each stroke of the brush will be part of the same region - the current selected region is always shown with a dotted outline. Painting with the Shift key down will un- paint, that is, remove areas from the painted region. With a region selected, you can change the effect by just selecting from the ‘list of effects’ menu. Brush size: You can adjust the brush size using the size slider, and there’s a short cut - hold down the Alt key and use the mouse scroll feature. But a better way to paint more or less detail is to use the zoom shortcut (Ctrl key with mouse-wheel). Zoom in and you paint more detail, zoom out and the brush is relatively larger on the image so is easier for painting over large areas. Pressing Esc, or clicking on the background will de-select the current region, and any new brush strokes now will be a new region which can be a different effect. Advanced users note: Regions and areas painted with the Effect Painter tool are vector layers placed on top of the original photo. These are non-destructive effects, that means your original photo underneath remains untouched. These layers of effects are in a special type of group (called a Photo Group). As with all groups there’s a trick to selecting things inside a group without having to ungroup. Simply press Ctrl+ click to select items inside the group. If you do this using the Selector tool you can move the overlaid effect around on top of the shape. Pressing Delete will delete the shape, and reveal the untouched image under.Red Eye Removal:
Red eye removal is a common requirement for photos that have been taken in darker conditions or with a flash. Simply select the red eye tool, place the ‘cross’ in the center of the red eye and drag it out to the edge of the eye pupil until all the red is removed.Live Effect Tool:
The Live Effect tool allows you to apply Photoshop Plug-in effects to an image, as well as access to a huge library of other image effects. You can even apply multiple successive effects to the same image. Just select the Fx tool, select the ‘New >’ control on the InfoBar to view a wide range of image effects. Each effect will bring up a dedicated dialog to control the parameters of that effect.Content-Aware Photo Resize:
This tool performs intelligent image scaling that allows images to be stretched or squashed while retaining the proportions of important parts of the picture. For more information see the tutorial Intelligent Photo Rescaling and Zooming.Brightness Levels, Curves and White Balance:
Selecting this icon will display the Levels Dialog that provides detailed control over many aspects of the brightness levels, in addition to showing a histogram of the brightness levels of the whole image. Unlike most of the Photo Editing Tools, this dialog can remain on screen for any selected image. As you adjust the enhance controls, such as the brightness, contrast, shadows and highlight, the histogram is updated (showing a before and after histogram), so you can see the effect these controls have on the brightness distribution. In addition, this dialog provides direct control over the ‘brightness mapping curve’ (the green line), which can be dragged to make detailed adjustments to the brightness levels. Finally it also provides a direct and simple way to adjust the white balance of the image. By dragging the grey eye-dropper control from the Levels Dialog, over any part of the image that’s intended to be gray, it adjusts the white balance of the whole image. The left example above has a classic ‘incandescent’ white balance that is too orange yellow. The right example was adjusted by dragging the ‘gray eye dropper’ control over the fireplace, which is gray stone. The image now has a much more accurate color reproduction. For more information see the tutorial Brightness Levels and Color Balance. This Level Dialog is also described and illustrated in part three of this series of this series of photo tutorial: The Enhance Options.Panorama Tool:
It’s easy to create stunning panoramas by stitching photos together so that none of the joins show. Just take your photos with some overlap, drag the the photo files into Xara Photo & Graphic Designer/ Designer Pro, select them all, press this Panorama button and watch it join them together with seamless blended edges to give you the perfect panorama! For more information see the tutorial Creating Stunning Panoramic Photos The panorama feature not only fits the separate images together, but adjusts any brightness difference and blends the edges to produce pixel perfect stitched results.Perspective Correction:
Images of tall buildings taken with wide-angle lenses typically have a leaning or distorted perspective effect than can often look unrealistic. There’s a one-click automatic perspective correction tool that can straighten the most common perspective problems. The image on the left, taken inside a very large basilica in Rome, shows the common perspective effects of photos taken with a camera close to the ground. To get a 'straight on' photo would require it to be taken from a height of probably 30 feet. The perspective correction tool can create a similar effect automatically (right example). Simply select the photo, and then the Perspective Correction tool and the process will start (it can take some time, depending on the resolution of the image). Another example: Left: A large building, taken with wide angle lens will always result in this ‘leaning building’ effect. Right: One click ‘perspective correction’ and the result is an upright image, that is similar to the effect of taking the image ‘straight on’ from a long distance with a very long telephoto lens.Photo EXIF Information:
All photos from digital cameras contain exposure and other details about the photo, and the camera that took the photo. Selecting this icon will display a floating EXIF dialog that displays a simple subset of the most useful EXIF values: Like the Levels Dialog this stays floating (it’s semi- transparent as well) and updates itself as the selection changes. Clicking the small down arrow in the top right corner of this dialog provides a control where you can customize which fields are shown here. This is the second part of a series of guides to editing photos in Xara. 1. Beginner’s Guide to Photo Editing in Xara The basics of opening photos, zooming, sizing photos, and saving. 2. Summary of the Photo Tools A summary of the tools on the Photo Tool fly-out menu. 3. Photo Enhance options An overview of the ‘work-horse’ range of Enhance options. 4. Changing colors in photos How to select and enhance or adjust specific colors. 5. A real-world example Combining many of the techniques described above, to transform a poor photo. In addition there are more detailed guides covering other photo tools: The Shadow and Highlight controls Intelligent Photo Rescaling and Zooming Erasing Backgrounds and Combining Photos Brightness Levels and Color Balance Panoramic Photos For more tutorials by Xara and third parties, check out our Resource index, which offers a searchable and browsable list of movies and tutorials created by Xara and third parties. If you would like to try out these photo tools and you don’t already own Xara Photo & Graphic Designer or Designer Pro, you can download the trial version of Photo & Graphic Designer or Designer Pro and try it now.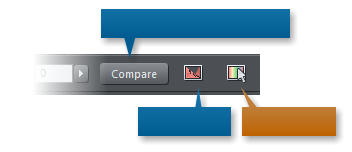


Colour Select
Compare before / after toggle
Levels dialog

Brightne
ss
Contrast
Shadow
s
Highlight
s
Saturati
on
Warm /
Cold
Sharpen
/ Blur
Color
Tint
X-
Process

Copyright © 2016 Xara Group Limited.
Page created with Xara Designer Pro
PHOTO EDITING PT 2: SUMMARY OF THE PHOTO TOOLS
PHOTO EDITING PT 2: SUMMARY OF THE PHOTO TOOLS
PHOTO EDITING 2: SUMMARY OF THE PHOTO TOOLS