Tourists, telegraph poles, wires, trees, plants and lights etc – why do they spoil so many photos?But, there is a cure – it’s called Magic Erase and you can find it in Xara Photo & Graphic Designer and Xara Designer Pro.It’s so simple to use and yet so powerful that it can transform an average picture into one of sheer beauty that you will be proud to show around. It is, without a doubt, one of the coolest tools that I have ever used!Take this lovely Vietnamese girl with her baby. The photo is spoilt by the telegraph wire and I’m not really too keen on the umbrella handle either as it is a little distracting. With the Magic Erase it took me a less than a minute to transform the photo into a professional image that shows off the lovely girl and the Vietnamese countryside.So how did I do it? ….I’ll show you how easy it is with another photo (see below) – I want to remove the man’s legs from the background and the part of the sign you can see on the left of the photo.Firstly, I drag the photo onto the title bar of the software which will open it directly in the photo editor (rather than on a new page) and then I select it. I select the Clone tool on the fly out photo toolbar and my mouse pointer will turn into a pen which I use to draw around the area that I wish to remove. As you see the area now shows as an animated dotted line.When I have drawn my shape I will have the ‘magic erase’ option in the centre of the top InfoBar so I select it and he’s disappeared! The area has been analysed and replaced with a suitable background.If the result isn’t what you want the first time you can click the Magic Erase button again, each time will generate a slightly different background.Tip – You don’t have to be too exact when drawing around the object that you wish to eliminate; it’s better to leave a gap around it as this gives the computer a clue as to the background that should be filled in. And below is my finished photo – you wouldn’t know the objects were ever there. The Magic Erase really is an amazing feature.Now here’s a challenge! Telephone wires and a parked bus formed part of the view out of my window. Firstly, I cropped the bottom to remove most of the bus, using the Photo Clip tool and then I used the clone tool several times to create the impression of rooftops or fields in the foreground. What a transformation and it only took me a few minutes. If I didn’t want to rely on the clone suggested by the computer then I can select my own clone area. I simply draw around the object as before. Then instead of selecting Magic Erase, I click my pointer in the area that I wish to eliminate and keep it selected whilst I drag the section around until I find a suitable area to make my photo look right. I could drag elsewhere on the image to specify the area to ‘clone’ and I can even clone from another photo. This can be useful if you want to add something or someone to your photo!Here’s a photo of a building in Luxembourg and to demonstrate the point, I’ll add some lights on the roof. As you will see below, I drew a shape in the sky and then cloned the lights from the other photo on the right. How silly, but you can see what fun you can have with the Clone tool!It’s great to experiment and don’t worry – unlike other photo software your original is not lost!One of the advanced, unique features of Xara Photo & Graphic Designer or Xara Designer Pro is that they do not destroy your original photo so, not only can you go and edit any of the clone areas at any time, but you can also get your original image back. Because they retain the original, successive edits are safe and avoid the cumulative distortion that usually occurs if you save, re-open and save a JPG file again.


 Tourists, telegraph poles, wires, trees, plants and lights etc – why do they spoil so many photos?
But, there is a cure – it’s called Magic Erase and you can find it in Xara Photo & Graphic Designer and Xara Designer Pro.
It’s so simple to use and yet so powerful that it can transform an average picture into one of sheer beauty that you will be proud to show around. It is,
without a doubt, one of the coolest tools that I have ever used!
Take this lovely Vietnamese girl with her baby. The photo is spoilt by the telegraph wire and I’m not really too keen on the umbrella handle either as it
is a little distracting. With the Magic Erase it took me a less than a minute to transform the photo into a professional image that shows off the lovely
girl and the Vietnamese countryside.
So how did I do it? ….
I’ll show you how easy it is with another photo (see below) – I want to remove the man’s legs from the background and the part of the sign you can see
on the left of the photo.
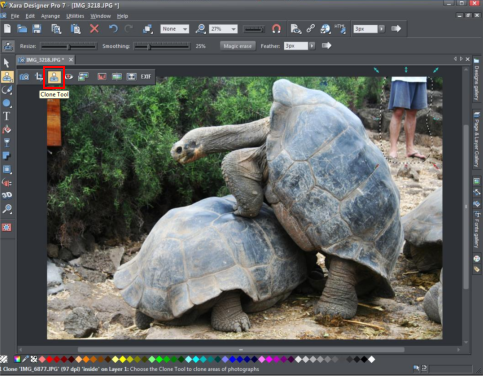
Firstly, I drag the photo onto the title bar of the software which will open it directly in the photo editor (rather than on a new page) and then I select
it. I select the Clone tool on the fly out photo toolbar and my mouse pointer will turn into a pen which I use to draw around the area that I wish to
remove. As you see the area now shows as an animated dotted line.
When I have drawn my shape I will have the ‘magic erase’ option in the centre of the top InfoBar so I select it and he’s disappeared! The area has been
analysed and replaced with a suitable background.
If the result isn’t what you want the first time you can click the Magic Erase button again, each time will generate a slightly different background.
Tip – You don’t have to be too exact when drawing around the object that you wish to eliminate; it’s better to leave a gap around it as this gives the
computer a clue as to the background that should be filled in. And below is my finished photo – you wouldn’t know the objects were ever there. The
Magic Erase really is an amazing feature.
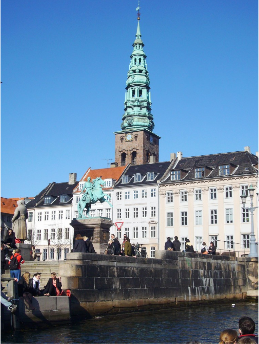
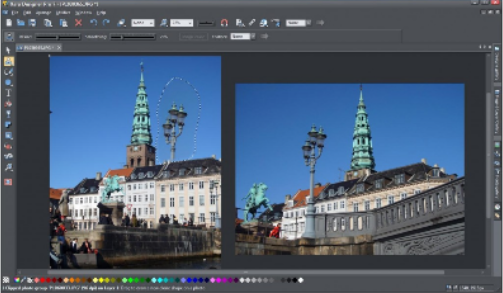
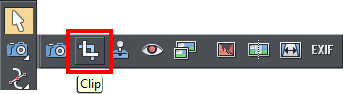
Now here’s a challenge! Telephone wires and a parked bus formed part of the view out of my window. Firstly, I cropped the bottom to remove most of
the bus, using the Photo Clip tool and then I used the clone tool several times to create the impression of rooftops or fields in the foreground. What a
transformation and it only took me a few minutes.
If I didn’t want to rely on the clone suggested by the computer then I can select my own clone area. I simply draw around the object as before. Then
instead of selecting Magic Erase, I click my pointer in the area that I wish to eliminate and keep it selected whilst I drag the section around until I find
a suitable area to make my photo look right. I could drag elsewhere on the image to specify the area to ‘clone’ and I can even clone from another
photo. This can be useful if you want to add something or someone to your photo!
Here’s a photo of a building in Luxembourg and to demonstrate the point, I’ll add some lights on the roof. As you will see below, I drew a shape in the
sky and then cloned the lights from the other photo on the right. How silly, but you can see what fun you can have with the Clone tool!
It’s great to experiment and don’t worry – unlike other photo software your original is not lost!
One of the advanced, unique features of Xara Photo & Graphic Designer or Xara Designer Pro is that they do not destroy your original photo so, not only
can you go and edit any of the clone areas at any time, but you can also get your original image back. Because they retain the original, successive edits
are safe and avoid the cumulative distortion that usually occurs if you save, re-open and save a JPG file again.
Tourists, telegraph poles, wires, trees, plants and lights etc – why do they spoil so many photos?
But, there is a cure – it’s called Magic Erase and you can find it in Xara Photo & Graphic Designer and Xara Designer Pro.
It’s so simple to use and yet so powerful that it can transform an average picture into one of sheer beauty that you will be proud to show around. It is,
without a doubt, one of the coolest tools that I have ever used!
Take this lovely Vietnamese girl with her baby. The photo is spoilt by the telegraph wire and I’m not really too keen on the umbrella handle either as it
is a little distracting. With the Magic Erase it took me a less than a minute to transform the photo into a professional image that shows off the lovely
girl and the Vietnamese countryside.
So how did I do it? ….
I’ll show you how easy it is with another photo (see below) – I want to remove the man’s legs from the background and the part of the sign you can see
on the left of the photo.
Firstly, I drag the photo onto the title bar of the software which will open it directly in the photo editor (rather than on a new page) and then I select
it. I select the Clone tool on the fly out photo toolbar and my mouse pointer will turn into a pen which I use to draw around the area that I wish to
remove. As you see the area now shows as an animated dotted line.
When I have drawn my shape I will have the ‘magic erase’ option in the centre of the top InfoBar so I select it and he’s disappeared! The area has been
analysed and replaced with a suitable background.
If the result isn’t what you want the first time you can click the Magic Erase button again, each time will generate a slightly different background.
Tip – You don’t have to be too exact when drawing around the object that you wish to eliminate; it’s better to leave a gap around it as this gives the
computer a clue as to the background that should be filled in. And below is my finished photo – you wouldn’t know the objects were ever there. The
Magic Erase really is an amazing feature.
Now here’s a challenge! Telephone wires and a parked bus formed part of the view out of my window. Firstly, I cropped the bottom to remove most of
the bus, using the Photo Clip tool and then I used the clone tool several times to create the impression of rooftops or fields in the foreground. What a
transformation and it only took me a few minutes.
If I didn’t want to rely on the clone suggested by the computer then I can select my own clone area. I simply draw around the object as before. Then
instead of selecting Magic Erase, I click my pointer in the area that I wish to eliminate and keep it selected whilst I drag the section around until I find
a suitable area to make my photo look right. I could drag elsewhere on the image to specify the area to ‘clone’ and I can even clone from another
photo. This can be useful if you want to add something or someone to your photo!
Here’s a photo of a building in Luxembourg and to demonstrate the point, I’ll add some lights on the roof. As you will see below, I drew a shape in the
sky and then cloned the lights from the other photo on the right. How silly, but you can see what fun you can have with the Clone tool!
It’s great to experiment and don’t worry – unlike other photo software your original is not lost!
One of the advanced, unique features of Xara Photo & Graphic Designer or Xara Designer Pro is that they do not destroy your original photo so, not only
can you go and edit any of the clone areas at any time, but you can also get your original image back. Because they retain the original, successive edits
are safe and avoid the cumulative distortion that usually occurs if you save, re-open and save a JPG file again.