
Note: You will find a version of this document in the Content Catalog of Photo & Graphic Designer 365 (you can open the Content Catalog in the Insert menu at the top of the
workspace, this Introduction is in First Look). Why not read it in Photo & Graphic Designer and explore the tools and features as they are introduced. If you don’t already own a copy
you can download the free trial here.
Although this program is a great photo editing tool, as the name implies, it’s a lot more than that. It’s also a high-powered illustration program, able to create graphic designs of
all types, from web graphics to logos and cartoons. Plus it’s an advanced page layout tool able to produce posters, flyers, PDF and printed material of all types.
Here’s an example cartoon (created by Estince Voi), a simple illustration and a logo design:
It’s also perfect for something as simple as social media icons, in fact symbols of all kinds:
Many of the bundled templates, such as these examples, automatically adapt to accommodate your text.
Demo Videos
The best way to learn the basics of selecting and manipulating items on the page is to view the set of three introductory movies (right side of page). We highly recommend you view them.Vector or Bitmap
Xara creates vector graphics. These are different from photos and the graphics usually created by photo editing tools (such as Photoshop ® ). Vector graphics are mathematical shape outlines, not pixels. You can enlarge vector graphics without loss of quality. Vector graphics are more flexible because you can edit any part of the drawing at any time. To see the outlines, you can adjust the view quality slider on the top bar to the minimum setting, and you’ll see the vector shapes that make up the images in your document. If you zoom in (and Designer can zoom to enormous values to allow you to create highly detailed, accurate work) you will see that everything remains sharp. More on vector graphics.Quick Tips
Here are a couple of productivity tips that can make a huge difference to the usability.Zoom
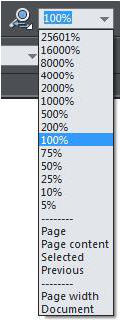
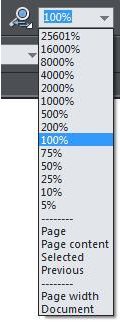
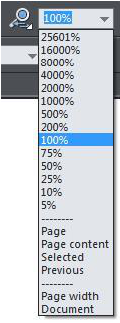
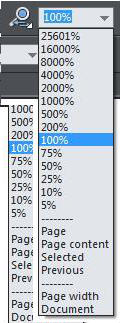
There’s a drop-down menu on the top bar that allows you to zoom, and also a Zoom Tool on the main toolbar, but the fastest way to zoom in or out of a document, which doesn’t involve changing tools, is to hold the Ctrl key and use the mouse wheel. This will zoom into the area where the mouse is on screen.Page Push
Similarly instead of selecting the hand shaped Push Tool (which can be found in the Magnify Tool fly-out) the quickest way of pushing the page around, without changing tools, is to simply press and hold the mouse wheel (it’s a button as well as a wheel) so then dragging the mouse will drag the page. In combination with the zoom these two operations allow very rapid scrolling and zooming from any tool, without having to select or change tool.Status Line
Along the bottom of the window the Status Line not only tells you what’s selected but also provides tips about what operations you can perform:Right click menu
You can use the right mouse button to display a menu of options related to the object you clicked on. This is sometimes called a context menu.Groups
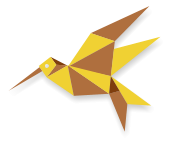
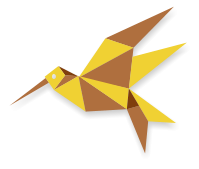
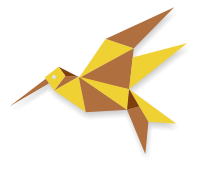
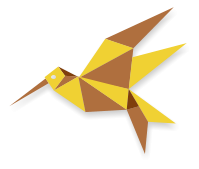
Groups are the building blocks of your graphics. You can tie a selection of objects together by putting them in a group. This bird drawing is a graphic consisting of 14 simple shapes but because it’s grouped the bird behaves as a single object when you move, rotate or resize it. The bird also has a Soft Shadow created with the Shadow Tool: You do not have to un-group the bird to select the component parts of the group - just hold the Ctrl key and click on the item in the Selector Tool. This is called select inside the group. This image is anchored to the text so that it moves with the text.SmartShapes
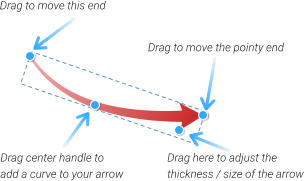
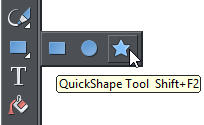
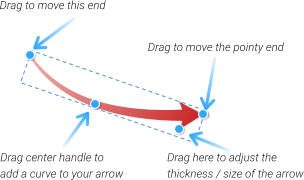
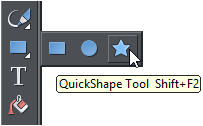
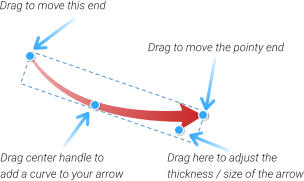
In addition to stretchy buttons and text panels, SmartShapes are another type of customizable graphic. You can find these under the Insert > Shape menu. These vary from simple basic shapes, such as stars and arrows, like this; to more complex designs such as this customizable Speech Bubble. To edit the text in any SmartShape just use the Text Tool and click in the text to edit. To edit any SmartShape, select any of the QuickShape Tools on the Rectangle tool fly-out menu. Fly-out menus: The main tools down the left side are collated into groups indicated by a small white arrow. If you hold the mouse over the tool, the fly-out appears to show the other related tools. This example shows the main shape tools (rectangle, ellipse, and QuickShapes). A shortcut to show SmartShape edit handles is simply to double-click on it in the Selector Tool. You’ll see control handles around the shape, which you can drag to adjust various aspects of the shape. For example, these are the handles on the arrow shape.Chart SmartShapes
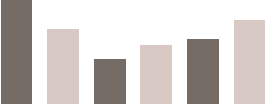
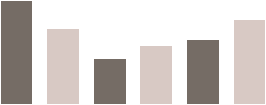
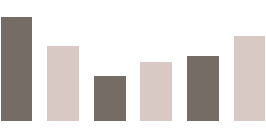
More powerful examples of SmartShape are the pie segments and bar charts. This is a pie chart infographic. In the Selector Tool double click this and drag the blue handles to see how easy it is to customize. You can even edit the % value and the chart adjusts (use the Text Tool). We also include some new bar and column chart examples. There’s no complex charting controls, just drag the bars, or enter the required values. SmartShapes are self-contained, intelligent graphic objects. Super-easy to use, you don’t need special dedicated tools. For example there is no Arrow Tool or Bar Chart tool. There are just controls on the SmartShape to manipulate it. What’s more we will add more SmartShapes to the Content Catalog, extending the functionality of Xara Photo & Graphic Designer through the year.Photo Editing
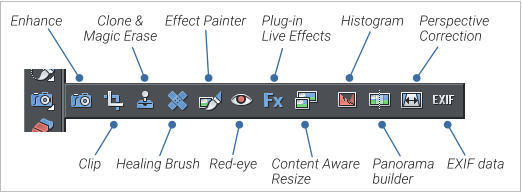
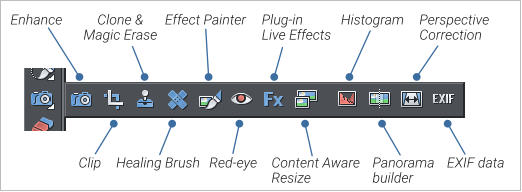
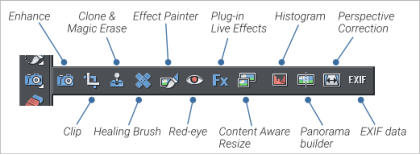
Xara Photo & Graphic Designer offers a comprehensive set of photo editing tools that are available on a fly-out menu from the camera icon. See above. First select the photo using the Selector Tool and then select the appropriate tool from the fly-out menu. As the Xara intro videos show, photos are just another object type on the page (bitmap not vector), and you can resize and rotate them just like any other object. The first tool on the fly-out provides access to the most used photo enhance options such as adjusting brightness, shadow levels, sharpness, etc. and has an auto- enhance which will work out the best settings for your photo. See these tutorials: Photo Editing Part I Beginner’s Guide to Photo Editing in Xara (covers basics, select, resize, zoom, InfoBar, load & save etc) Photo Editing Part II Photo Editing Guide, a summary of the Photo Tools (summary and example of each of the main fly-out tools) Photo Editing Part III Summary of the Enhance Tools One of the most important concepts (and differences to other photo editors) is that most of the edit operations are non-destructive. This means the original pixels of the image are untouched, so that you can undo the changes and the go back to previous edits at any time. This includes resizing. When you make a photo smaller, it just makes all the pixels smaller. When you import a 4000 pixel wide photo and place it on the page to be say 500px across the screen, all the 4000 pixels are just squashed into the smaller space. The smaller you make the image, the higher-resolution it becomes. If you enlarge the image or zoom in, all the resolution is there still. Once you’ve gained some experience of the various photo editing tools, it doesn’t take too long to turn this photo into the result below. The photo has been cropped, brightness and levels enhanced, perspective corrected and unwanted objects removed using the Photo Healing and Magic Erase tools. We have a great set of photo editing tutorials, that go into more depth: Photo Editing See how the photo above was edited The Shadow and Highlight Controls Intelligent Photo Rescaling and Zooming Erasing Backgrounds and Combining Photos Color Select Changing the colors of a selected area of your photoDrawing Tools
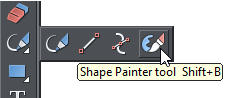
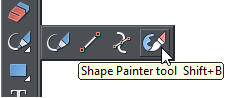
Xara Photo & Graphic Designer also includes a comprehensive set of drawing tools, the first of which is the Freehand Tool that draws simple lines and shapes. The drawing tools: Freehand & Brush Tool, Straight Line Tool, Shape Editor Tool and finally the Shape Painter Tool. The intro videos show the basics of drawing simple freehand lines, and closing them to create shapes using the Freehand & Brush Tool. This tool can also draw creative or textured brush strokes such as this one. The Straight Line Tool does exactly what it says - draws simple single straight lines. The Shape Editor Tool is a very powerful tool that can draw precise bezier vectors, and edit the outline of shapes. It’s best for creating very exact curves and editing the outline of shapes. The Shape Painter Tool can ‘paint’ a vector shape like a paint brush - hold down the Shift key and it also erases or ‘un-paints’ the shape. We have more information in this Drawing Tools Tutorial.Text Tool
There are three types of text you can create with the Text Tool: • Simple Text: Just click on the page and type. This creates an un-bounded line of text - it just grows as you enter more text. • Text Column: In the Text Tool, click and drag horizontally on the page to create an empty text column. Now type, or paste your text. You can adjust the column width in the Text Tool by dragging the ends of the red column indicator, or using the Selector Tool to drag the side handles. • Text Frame: Click and drag diagonally on the empty page to create an empty text box or frame. Text Tool Tip: Type Ctrl+Shift+L to fill your text column with pseudo-Latin. It saves a lot of typing! Find out more in this Text Tool Tutorial.Symbols and Icons:
Probably the most common type of graphic used in any document is the icon, which may be something as simple as a Facebook icon or an email icon , or perhaps a thumbs-up . It may be that you need to show that you accept Visa and MasterCard . You can right-click on any symbol and select ‘Replace symbol…’. To add these symbols into your text, or on the page as an editable vector graphic, select the menu Insert Font Symbol… This opens a window with a searchable choice of the more than 1500 symbols and icons.Learn More
We have a great set of short demo videos and online tutorials covering almost every aspect of using Xara Photo & Graphic Designer: Three beginner’s videosPhoto Editing
Photo Editing Part I Beginner’s Guide to Photo Editing in Xara (covers basics, select, resize, zoom, InfoBar, load & save etc) Photo Editing Part II A short guide to each of the main photo editing tools Photo Editing Part III A summary of the Enhance Tools and how to apply to regions and select-by-colorMore in-depth photo tutorials
Houses of Parliament Follow the steps as we enhance this example photo Color Select Select & enhance areas of your photo by color The Shadow and Highlight Controls Intelligent Photo Rescaling and Zooming Erasing Backgrounds and Combining PhotosText Tool and Layout
Text Tool and Text Layout SummaryDrawing Tools
Drawing Tools SummaryIcons and Symbols
Font Awesome Tutorial.Release Notes
A description of the new features of Photo & Graphic Designer 365 is available here.


800
580
350
453
500
652
Alpha
Bravo
Charlie
Delta
Echo
Foxtrot

64%


This is a speech bubble SmartShape. Double
click on it to show the control handles. You can
change rounded corners, the height and width,
and the size, position and angle of the ‘tail’.


Copyright © 2016 Xara Group Limited.
Page created with Xara Designer Pro

Note: You will find a version of this document in the Content Catalog of Photo & Graphic Designer 365 (you can open the Content Catalog in the
Insert menu at the top of the workspace, this Introduction is in First Look). Why not read it in Photo & Graphic Designer and explore the tools and
features as they are introduced. If you don’t already own a copy you can download the free trial here.
Although this program is a great photo editing tool, as the name implies, it’s a lot more than that. It’s also a high-powered illustration program,
able to create graphic designs of all types, from web graphics to logos and cartoons. Plus it’s an advanced page layout tool able to produce
posters, flyers, PDF and printed material of all types.
Here’s an example cartoon (created by Estince Voi), a simple illustration and a logo design:
It’s also perfect for something as simple as social media icons, in fact symbols of all kinds:
Many of the bundled templates, such as these examples, automatically adapt to accommodate your text.
Demo Videos
The best way to learn the basics of selecting and manipulating items on the page is to view the set of three introductory movies (right side of page). We highly recommend you view them.Vector or Bitmap
Xara creates vector graphics. These are different from photos and the graphics usually created by photo editing tools (such as Photoshop ® ). Vector graphics are mathematical shape outlines, not pixels. You can enlarge vector graphics without loss of quality. Vector graphics are more flexible because you can edit any part of the drawing at any time. To see the outlines, you can adjust the view quality slider on the top bar to the minimum setting, and you’ll see the vector shapes that make up the images in your document. If you zoom in (and Designer can zoom to enormous values to allow you to create highly detailed, accurate work) you will see that everything remains sharp. More on vector graphics.Quick Tips
Here are a couple of productivity tips that can make a huge difference to the usability.Zoom
There’s a drop-down menu on the top bar that allows you to zoom, and also a Zoom Tool on the main toolbar, but the fastest way to zoom in or out of a document, which doesn’t involve changing tools, is to hold the Ctrl key and use the mouse wheel. This will zoom into the area where the mouse is on screen.Page Push
Similarly instead of selecting the hand shaped Push Tool (which can be found in the Magnify Tool fly-out) the quickest way of pushing the page around, without changing tools, is to simply press and hold the mouse wheel (it’s a button as well as a wheel) so then dragging the mouse will drag the page. In combination with the zoom these two operations allow very rapid scrolling and zooming from any tool, without having to select or change tool.Status Line
Along the bottom of the window the Status Line not only tells you what’s selected but also provides tips about what operations you can perform:Right click menu
You can use the right mouse button to display a menu of options related to the object you clicked on. This is sometimes called a context menu.Groups
Groups are the building blocks of your graphics. You can tie a selection of objects together by putting them in a group. This bird drawing is a graphic consisting of 14 simple shapes but because it’s grouped the bird behaves as a single object when you move, rotate or resize it. The bird also has a Soft Shadow created with the Shadow Tool: You do not have to un-group the bird to select the component parts of the group - just hold the Ctrl key and click on the item in the Selector Tool. This is called select inside the group. This image is anchored to the text so that it moves with the text.SmartShapes
In addition to stretchy buttons and text panels, SmartShapes are another type of customizable graphic. You can find these under the Insert > Shape menu. These vary from simple basic shapes, such as stars and arrows, like this; to more complex designs such as this customizable Speech Bubble. To edit the text in any SmartShape just use the Text Tool and click in the text to edit. To edit any SmartShape, select any of the QuickShape Tools on the Rectangle tool fly-out menu. Fly-out menus: The main tools down the left side are collated into groups indicated by a small white arrow. If you hold the mouse over the tool, the fly-out appears to show the other related tools. This example shows the main shape tools (rectangle, ellipse, and QuickShapes). A shortcut to show SmartShape edit handles is simply to double-click on it in the Selector Tool. You’ll see control handles around the shape, which you can drag to adjust various aspects of the shape. For example, these are the handles on the arrow shape.Chart SmartShapes
More powerful examples of SmartShape are the pie segments and bar charts. This is a pie chart infographic. In the Selector Tool double click this and drag the blue handles to see how easy it is to customize. You can even edit the % value and the chart adjusts (use the Text Tool). We also include some new bar and column chart examples. There’s no complex charting controls, just drag the bars, or enter the required values. SmartShapes are self-contained, intelligent graphic objects. Super-easy to use, you don’t need special dedicated tools. For example there is no Arrow Tool or Bar Chart tool. There are just controls on the SmartShape to manipulate it. What’s more we will add more SmartShapes to the Content Catalog, extending the functionality of Xara Photo & Graphic Designer through the year.Photo Editing
Xara Designer offers a comprehensive set of photo editing tools that are available on a fly-out menu from the Camera icon. See above. First select the photo using the Selector Tool and then select the appropriate tool from the fly-out menu. As the Xara intro videos show, photos (which are bitmaps) are just another object type on the page, and you can resize and rotate just like any other object. The first tool provides access to the most used Photo Enhance options such as adjusting brightness, shadow levels, sharpness, etc. and has an auto-enhance which will work out the best settings for your photo. See these tutorials: Photo Editing Part I Beginner’s Guide to Photo Editing in Xara (covers basics, select, resize, zoom, InfoBar, load & save etc) Photo Editing Part II Photo Editing Guide, a summary of the Photo Tools (summary and example of each of the main fly-out tools) Photo Editing Part III Summary of the Enhance Tools One of the most important concepts (and differences to other photo editors) is that most of the edit operations are non-destructive. This means the original pixels of the image are untouched, so that you can undo the changes and the go back to previous edits at any time. This includes resizing. When you make a photo smaller, it just makes all the pixels smaller. When you import a 4000 pixel wide photo and place it on the page to be say 500px across the screen, all the 4000 pixels are just squashed into the smaller space. The smaller you make the image, the higher-resolution it becomes. If you enlarge the image or zoom in, all the resolution is there still. Once you’ve gained some experience of the various photo editing tools, it doesn’t take too long to turn this photo into the result below. The photo has been cropped, brightness and levels enhanced, perspective corrected and unwanted objects removed using the Photo Healing and Magic Erase tools. We have a great set of photo editing tutorials, that go into more depth: Photo Editing See how the photo above was edited The Shadow and Highlight Controls Intelligent Photo Rescaling and Zooming Erasing Backgrounds and Combining Photos Color Select Changing the colors of a selected area of your photoDrawing Tools
Xara Photo & Graphic Designer also includes a comprehensive set of drawing tools, the first of which is the Freehand Tool that draws simple lines and shapes. The drawing tools: Freehand & Brush Tool, Straight Line Tool, Shape Editor Tool and finally the Shape Painter Tool. The intro videos show the basics of drawing simple freehand lines, and closing them to create shapes using the Freehand & Brush Tool. This tool can also draw creative or textured brush strokes such as this one. The Straight Line Tool does exactly what it says - draws simple single straight lines. The Shape Editor Tool is a very powerful tool that can draw precise bezier vectors, and edit the outline of shapes. It’s best for creating very exact curves and editing the outline of shapes. The Shape Painter Tool can ‘paint’ a vector shape like a paint brush - hold down the Shift key and it also erases or ‘un-paints’ the shape. We have more information in this Drawing Tools Tutorial.Text Tool
There are three types of text you can create with the Text Tool: • Simple Text: Just click on the page and type. This creates an un-bounded line of text - it just grows as you enter more text. • Text Column: In the Text Tool, click and drag horizontally on the page to create an empty text column. Now type, or paste your text. You can adjust the column width in the Text Tool by dragging the ends of the red column indicator, or using the Selector Tool to drag the side handles. • Text Frame: Click and drag diagonally on the empty page to create an empty text box or frame. Text Tool Tip: Type Ctrl+Shift+L to fill your text column with pseudo-Latin. It saves a lot of typing! Find out more in this Text Tool Tutorial.Symbols and Icons:
Probably the most common type of graphic used in any document is the icon, which may be something as simple as a Facebook icon or an email icon , or perhaps a thumbs-up . It may be that you need to show that you accept Visa and MasterCard . You can right-click on any symbol and select ‘Replace symbol…’. To add these symbols into your text, or on the page as an editable vector graphic, select the menu Insert Font Symbol… This opens a window with a searchable choice of the more than 1500 symbols and icons.Learn More
We have a great set of short demo videos and online tutorials covering almost every aspect of using Xara Photo & Graphic Designer: Three beginner’s videosPhoto Editing
Photo Editing Part I Beginner’s Guide to Photo Editing in Xara (covers basics, select, resize, zoom, InfoBar, load & save etc) Photo Editing Part II A short guide to each of the main photo editing tools Photo Editing Part III A summary of the Enhance Tools and how to apply to regions and select-by-colorMore in-depth photo tutorials
Houses of Parliament Follow the steps as we enhance this example photo Color Select Select & enhance areas of your photo by color The Shadow and Highlight Controls Intelligent Photo Rescaling and Zooming Erasing Backgrounds and Combining PhotosText Tool and Layout
Text Tool and Text Layout SummaryDrawing Tools
Drawing Tools SummaryIcons and Symbols
Font Awesome Tutorial.Release Notes
A description of the new features of Photo & Graphic Designer 365 is available here.


800
580
350
453
500
652
Alpha
Bravo
Charlie
Delta
Echo
Foxtrot

64%

This is a speech bubble SmartShape. Double
click on it to show the control handles. You can
change rounded corners, the height and width,
and the size, position and angle of the ‘tail’.


Copyright © 2016 Xara Group Limited.
Page created with Xara Designer Pro


Note: You will find a version of this document in the Content Catalog of Photo & Graphic Designer 365 (you
can open the Content Catalog in the Insert menu at the top of the workspace, this Introduction is in First
Look). Why not read it in Photo & Graphic Designer and explore the tools and features as they are introduced.
If you don’t already own a copy you can download the free trial here.
Although this program is a great photo editing tool, as the name implies, it’s a lot more than that. It’s also a
high-powered illustration program, able to create graphic designs of all types, from web graphics to logos
and cartoons. Plus it’s an advanced page layout tool able to produce posters, flyers, PDF and printed
material of all types.
Here’s an example cartoon (created by Estince Voi), a simple illustration and a logo design:
It’s also perfect for something as simple as social media icons, in fact symbols of all kinds:
Many of the bundled templates, such as these examples, automatically adapt to accommodate your text
Demo Videos
The best way to learn the basics of selecting and manipulating items on the page is to view the set of three introductory movies (right side of page). We highly recommend you view them.Vector or Bitmap
Xara creates vector graphics. These are different from photos and the graphics usually created by photo editing tools (such as Photoshop ® ). Vector graphics are mathematical shape outlines, not pixels. You can enlarge vector graphics without loss of quality. Vector graphics are more flexible because you can edit any part of the drawing at any time. To see the outlines, you can adjust the view quality slider on the top bar to the minimum setting, and you’ll see the vector shapes that make up the images in your document. If you zoom in (and Designer can zoom to enormous values to allow you to create highly detailed, accurate work) you will see that everything remains sharp. More on vector graphics.Quick Tips
Here are a couple of productivity tips that can make a huge difference to the usability.Zoom
There’s a drop-down menu on the top bar that allows you to zoom, and also a Zoom Tool on the main toolbar, but the fastest way to zoom in or out of a document, which doesn’t involve changing tools, is to hold the Ctrl key and use the mouse wheel. This will zoom into the area where the mouse is on screen.Page Push
Similarly instead of selecting the hand shaped Push Tool (which can be found in the Magnify Tool fly-out) the quickest way of pushing the page around, without changing tools, is to simply press and hold the mouse wheel (it’s a button as well as a wheel) so then dragging the mouse will drag the page. In combination with the zoom these two operations allow very rapid scrolling and zooming from any tool, without having to select or change tool.Status Line
Along the bottom of the window the Status Line not only tells you what’s selected but also provides tips about what operations you can perform:Right click menu
You can use the right mouse button to display a menu of options related to the object you clicked on. This is sometimes called a context menu.Groups
Groups are the building blocks of your graphics. You can tie a selection of objects together by putting them in a group. This bird drawing is a graphic consisting of 14 simple shapes but because it’s grouped the bird behaves as a single object when you move, rotate or resize it. The bird also has a Soft Shadow created with the Shadow Tool: You do not have to un-group the bird to select the component parts of the group - just hold the Ctrl key and click on the item in the Selector Tool. This is called select inside the group. This image is anchored to the text so that it moves with the text.SmartShapes
In addition to stretchy buttons and text panels, SmartShapes are another type of customizable graphic. You can find these under the Insert > Shape menu. These vary from simple basic shapes, such as stars and arrows, like this; to more complex designs such as this customizable Speech Bubble. To edit the text in any SmartShape just use the Text Tool and click in the text to edit. To edit any SmartShape, select any of the QuickShape Tools on the Rectangle tool fly-out menu. Fly-out menus: The main tools down the left side are collated into groups indicated by a small white arrow. If you hold the mouse over the tool, the fly-out appears to show the other related tools. This example shows the main shape tools (rectangle, ellipse, and QuickShapes). A shortcut to show SmartShape edit handles is simply to double-click on it in the Selector Tool. You’ll see control handles around the shape, which you can drag to adjust various aspects of the shape. For example, these are the handles on the arrow shape.Chart SmartShapes
More powerful examples of SmartShape are the pie segments and bar charts. This is a pie chart infographic. In the Selector Tool double click this and drag the blue handles to see how easy it is to customize. You can even edit the % value and the chart adjusts (use the Text Tool). We also include some new bar and column chart examples. There’s no complex charting controls, just drag the bars, or enter the required values. SmartShapes are self-contained, intelligent graphic objects. Super-easy to use, you don’t need special dedicated tools. For example there is no Arrow Tool or Bar Chart tool. There are just controls on the Smart- Shape to manipulate it. What’s more we will add more SmartShapes to the Content Catalog, extending the functionality of Xara Photo & Graphic Designer through the year.Photo Editing
Xara Photo & Graphic Designer offers a comprehensive set of photo editing tools that are available on a fly- out menu from the camera icon. See above. First select the photo using the Selector Tool and then select the appropriate tool from the fly-out menu. As the Xara intro videos show, photos are just another object type on the page (bitmap not vector), and you can resize and rotate them just like any other object. The first tool on the fly-out provides access to the most used photo enhance options such as adjusting brightness, shadow levels, sharpness, etc. and has an auto-enhance which will work out the best settings for your photo. See these tutorials: Photo Editing Part I Beginner’s Guide to Photo Editing in Xara (covers basics, select, resize, zoom, InfoBar, load & save etc) Photo Editing Part II Photo Editing Guide, a summary of the Photo Tools (summary and example of each of the main fly-out tools) Photo Editing Part III Summary of the Enhance Tools One of the most important concepts (and differences to other photo editors) is that most of the edit operations are non-destructive. This means the original pixels of the image are untouched, so that you can undo the changes and the go back to previous edits at any time. This includes resizing. When you make a photo smaller, it just makes all the pixels smaller. When you import a 4000 pixel wide photo and place it on the page to be say 500px across the screen, all the 4000 pixels are just squashed into the smaller space. The smaller you make the image, the higher-resolution it becomes. If you enlarge the image or zoom in, all the resolution is there still. Once you’ve gained some experience of the various photo editing tools, it doesn’t take too long to turn this photo into the result below. The photo has been cropped, brightness and levels enhanced, perspective corrected and unwanted objects removed using the Photo Healing and Magic Erase tools. We have a great set of photo editing tutorials, that go into more depth: Photo Editing See how the photo above was edited The Shadow and Highlight Controls Intelligent Photo Rescaling and Zooming Erasing Backgrounds and Combining Photos Color Select Changing the colors of a selected area of your photoDrawing Tools
Xara Photo & Graphic Designer also includes a comprehensive set of drawing tools, the first of which is the Freehand Tool that draws simple lines and shapes. The drawing tools: Freehand & Brush Tool, Straight Line Tool, Shape Editor Tool and finally the Shape Painter Tool. The intro videos show the basics of drawing simple freehand lines, and closing them to create shapes using the Freehand & Brush Tool. This tool can also draw creative or textured brush strokes such as this one. The Straight Line Tool does exactly what it says - draws simple single straight lines. The Shape Editor Tool is a very powerful tool that can draw precise bezier vectors, and edit the outline of shapes. It’s best for creating very exact curves and editing the outline of shapes. The Shape Painter Tool can ‘paint’ a vector shape like a paint brush - hold down the Shift key and it also erases or ‘un-paints’ the shape. We have more information in this Drawing Tools Tutorial.Text Tool
There are three types of text you can create with the Text Tool: • Simple Text: Just click on the page and type. This creates an un-bounded line of text - it just grows as you enter more text. • Text Column: In the Text Tool, click and drag horizontally on the page to create an empty text column. Now type, or paste your text. You can adjust the column width in the Text Tool by dragging the ends of the red column indicator, or using the Selector Tool to drag the side handles. • Text Frame: Click and drag diagonally on the empty page to create an empty text box or frame. Text Tool Tip: Type Ctrl+Shift+L to fill your text column with pseudo-Latin. It saves a lot of typing! Find out more in this Text Tool Tutorial.Symbols and Icons:
Probably the most common type of graphic used in any document is the icon, which may be something as simple as a Facebook icon or an email icon , or perhaps a thumbs-up . It may be that you need to show that you accept Visa and MasterCard . You can right-click on any symbol and select ‘Replace symbol…’. To add these symbols into your text, or on the page as an editable vector graphic, select the menu Insert Font Symbol… This opens a window with a searchable choice of the more than 1500 symbols and icons.Learn More
We have a great set of short demo videos and online tutorials covering almost every aspect of using Xara Photo & Graphic Designer: Three beginner’s videosPhoto Editing
Photo Editing Part I Beginner’s Guide to Photo Editing in Xara (covers basics, select, resize, zoom, InfoBar, load & save etc) Photo Editing Part II A short guide to each of the main photo editing tools Photo Editing Part III A summary of the Enhance Tools and how to apply to regions and select-by-colorMore in-depth photo tutorials
Houses of Parliament Follow the steps as we enhance this example photo Color Select Select & enhance areas of your photo by color The Shadow and Highlight Controls Intelligent Photo Rescaling and Zooming Erasing Backgrounds and Combining PhotosText Tool and Layout
Text Tool and Text Layout SummaryDrawing Tools
Drawing Tools SummaryIcons and Symbols
Font Awesome Tutorial.Release Notes
A description of the new features of Photo & Graphic Designer 365 is available here.


800
580
350
453
500
652
Alpha
Bravo
Charlie
Delta
Echo
Foxtrot

64%

This is a speech bubble SmartShape. Double
click on it to show the control handles. You can
change rounded corners, the height and width,
and the size, position and angle of the ‘tail’.


Copyright © 2015 Xara Group Limited.
Page created with Xara Designer Pro


Note: You will find a version of this document in the Content Catalog
of Photo & Graphic Designer 365 (you can open the Content Catalog
in the Insert menu at the top of the workspace, this Introduction is in
First Look). Why not read it in Photo & Graphic Designer and explore
the tools and features as they are introduced. If you don’t already own
a copy you can download the free trial here.
Although this program is a great photo editing tool, as the name
implies, it’s a lot more than that. It’s also a high-powered illustration
program, able to create graphic designs of all types, from web
graphics to logos and cartoons. Plus it’s an advanced page layout
tool able to produce posters, flyers, PDF and printed material of all
types.
Here’s an example cartoon (created by Estince Voi), a simple
illustration and a logo design:
It’s also perfect for something as simple as social media icons, in
fact symbols of all kinds:
Many of the bundled templates, such as these examples,
automatically adapt to accommodate your text.
Demo Videos
The best way to learn the basics of selecting and manipulating items on the page is to view the set of three introductory movies (right side of page). We highly recommend you view them.Vector or Bitmap
Xara creates vector graphics. These are different from photos and the graphics usually created by photo editing tools (such as Photoshop ® ). Vector graphics are mathematical shape outlines, not pixels. You can enlarge vector graphics without loss of quality. Vector graphics are more flexible because you can edit any part of the drawing at any time. To see the outlines, you can adjust the view quality slider on the top bar to the minimum setting, and you’ll see the vector shapes that make up the images in your document. If you zoom in (and Designer can zoom to enormous values to allow you to create highly detailed, accurate work) you will see that everything remains sharp. More on vector graphics.Quick Tips
Here are a couple of productivity tips that can make a huge difference to the usability.Zoom
There’s a drop-down menu on the top bar that allows you to zoom, and also a Zoom Tool on the main toolbar, but the fastest way to zoom in or out of a document, which doesn’t involve changing tools, is to hold the Ctrl key and use the mouse wheel. This will zoom into the area where the mouse is on screen.Page Push
Similarly instead of selecting the hand shaped Push Tool (which can be found in the Magnify Tool fly-out) the quickest way of pushing the page around, without changing tools, is to simply press and hold the mouse wheel (it’s a button as well as a wheel) so then dragging the mouse will drag the page. In combination with the zoom these two operations allow very rapid scrolling and zooming from any tool, without having to select or change tool.Status Line
Along the bottom of the window the Status Line not only tells you what’s selected but also provides tips about what operations you can perform:Right click menu
You can use the right mouse button to display a menu of options related to the object you clicked on. This is sometimes called a context menu.Groups
Groups are the building blocks of your graphics. You can tie a selection of objects together by putting them in a group. This bird drawing is a graphic consisting of 14 simple shapes but because it’s grouped the bird behaves as a single object when you move, rotate or resize it. The bird also has a Soft Shadow created with the Shadow Tool: You do not have to un-group the bird to select the component parts of the group - just hold the Ctrl key and click on the item in the Selector Tool. This is called select inside the group. This image is anchored to the text so that it moves with the text.SmartShapes
In addition to stretchy buttons and text panels, SmartShapes are another type of customizable graphic. You can find these under the Insert > Shape menu. These vary from simple basic shapes, such as stars and arrows, like this; to more complex designs such as this customizable Speech Bubble. To edit the text in any SmartShape just use the Text Tool and click in the text to edit. To edit any SmartShape, select any of the QuickShape Tools on the Rectangle tool fly-out menu. Fly-out menus: The main tools down the left side are collated into groups indicated by a small white arrow. If you hold the mouse over the tool, the fly-out appears to show the other related tools. This example shows the main shape tools (rectangle, ellipse, and QuickShapes). A shortcut to show SmartShape edit handles is simply to double- click on it in the Selector Tool. You’ll see control handles around the shape, which you can drag to adjust various aspects of the shape. For example, these are the handles on the arrow shape.Chart SmartShapes
More powerful examples of SmartShape are the pie segments and bar charts. This is a pie chart infographic. In the Selector Tool double click this and drag the blue handles to see how easy it is to customize. You can even edit the % value and the chart adjusts (use the Text Tool). We also include some new bar and column chart examples. There’s no complex charting controls, just drag the bars, or enter the required values. SmartShapes are self-contained, intelligent graphic objects. Super- easy to use, you don’t need special dedicated tools. For example there is no Arrow Tool or Bar Chart tool. There are just controls on the SmartShape to manipulate it. What’s more we will add more SmartShapes to the Content Catalog, extending the functionality of Xara Photo & Graphic Designer through the year.Photo Editing
Xara Photo & Graphic Designer offers a comprehensive set of photo editing tools that are available on a fly-out menu from the camera icon. See above. First select the photo using the Selector Tool and then select the appropriate tool from the fly-out menu. As the Xara intro videos show, photos are just another object type on the page (bitmap not vector), and you can resize and rotate them just like any other object. The first tool on the fly-out provides access to the most used photo enhance options such as adjusting brightness, shadow levels, sharpness, etc. and has an auto-enhance which will work out the best settings for your photo. See these tutorials: Photo Editing Part I Beginner’s Guide to Photo Editing in Xara (covers basics, select, resize, zoom, InfoBar, load & save etc) Photo Editing Part II Photo Editing Guide, a summary of the Photo Tools (summary and example of each of the main fly-out tools) Photo Editing Part III Summary of the Enhance Tools One of the most important concepts (and differences to other photo editors) is that most of the edit operations are non-destructive. This means the original pixels of the image are untouched, so that you can undo the changes and the go back to previous edits at any time. This includes resizing. When you make a photo smaller, it just makes all the pixels smaller. When you import a 4000 pixel wide photo and place it on the page to be say 500px across the screen, all the 4000 pixels are just squashed into the smaller space. The smaller you make the image, the higher-resolution it becomes. If you enlarge the image or zoom in, all the resolution is there still. Once you’ve gained some experience of the various photo editing tools, it doesn’t take too long to turn this photo into the result below. The photo has been cropped, brightness and levels enhanced, perspective corrected and unwanted objects removed using the Photo Healing and Magic Erase tools. We have a great set of photo editing tutorials, that go into more depth: Photo Editing See how the photo above was edited The Shadow and Highlight Controls Intelligent Photo Rescaling and Zooming Erasing Backgrounds and Combining Photos Color Select Changing the colors of a selected area of your photoDrawing Tools
Xara Photo & Graphic Designer also includes a comprehensive set of drawing tools, the first of which is the Freehand Tool that draws simple lines and shapes. The drawing tools: Freehand & Brush Tool, Straight Line Tool, Shape Editor Tool and finally the Shape Painter Tool. The intro videos show the basics of drawing simple freehand lines, and closing them to create shapes using the Freehand & Brush Tool. This tool can also draw creative or textured brush strokes such as this one. The Straight Line Tool does exactly what it says - draws simple single straight lines. The Shape Editor Tool is a very powerful tool that can draw precise bezier vectors, and edit the outline of shapes. It’s best for creating very exact curves and editing the outline of shapes. The Shape Painter Tool can ‘paint’ a vector shape like a paint brush - hold down the Shift key and it also erases or ‘un-paints’ the shape. We have more information in this Drawing Tools Tutorial.Text Tool
There are three types of text you can create with the Text Tool: • Simple Text: Just click on the page and type. This creates an un-bounded line of text - it just grows as you enter more text. • Text Column: In the Text Tool, click and drag horizontally on the page to create an empty text column. Now type, or paste your text. You can adjust the column width in the Text Tool by dragging the ends of the red column indicator, or using the Selector Tool to drag the side handles. • Text Frame: Click and drag diagonally on the empty page to create an empty text box or frame. Text Tool Tip: Type Ctrl+Shift+L to fill your text column with pseudo- Latin. It saves a lot of typing! Find out more in this Text Tool Tutorial.Symbols and Icons:
Probably the most common type of graphic used in any document is the icon, which may be something as simple as a Facebook icon or an email icon , or perhaps a thumbs-up . It may be that you need to show that you accept Visa and MasterCard . You can right-click on any symbol and select ‘Replace symbol…’. To add these symbols into your text, or on the page as an editable vector graphic, select the menu Insert Font Symbol… This opens a window with a searchable choice of the more than 1500 symbols and icons.Learn More
We have a great set of short demo videos and online tutorials covering almost every aspect of using Xara Photo & Graphic Designer: Three beginner’s videosPhoto Editing
Photo Editing Part I Beginner’s Guide to Photo Editing in Xara (covers basics, select, resize, zoom, InfoBar, load & save etc) Photo Editing Part II A short guide to each of the main photo editing tools Photo Editing Part III A summary of the Enhance Tools and how to apply to regions and select-by-colorMore in-depth photo tutorials
Houses of Parliament Follow the steps as we enhance this example photo Color Select Select & enhance areas of your photo by color The Shadow and Highlight Controls Intelligent Photo Rescaling and Zooming Erasing Backgrounds and Combining PhotosText Tool and Layout
Text Tool and Text Layout SummaryDrawing Tools
Drawing Tools SummaryIcons and Symbols
Font Awesome Tutorial.Release Notes
A description of the new features of Photo & Graphic Designer 365 is available here.


This is a speech bubble SmartShape. Double
click on it to show the control handles. You can
change rounded corners, the height and width,
and the size, position and angle of the ‘tail’.


64%
800
580
350
453
500
652
Alpha
Bravo
Charlie
Delta
Echo
Foxtrot


Copyright © 2015 Xara Group Limited.
Page created with Xara Designer Pro


INTRODUCTION TO PHOTO & GRAPHIC DESIGNER 365
INTRODUCTION TO PHOTO & GRAPHIC DESIGNER 365
INTRODUCTION TO PHOTO & GRAPHIC DESIGNER 365
INTRODUCTION TO PHOTO &
GRAPHIC DESIGNER 365