Erasing or changing the background behind complex shapes such as fur, hair, trees, etc, can be tedious and sometimes impossible to mask
manually. With Xara Photo & Graphic Designer or Designer Pro this can be done with ease using the new automated background erase feature.
You only need to indicate the approximate areas to erase (with the Eraser tool) and the areas to protect (with the Mask Painter tool), and then
click the 'Erase background' button.
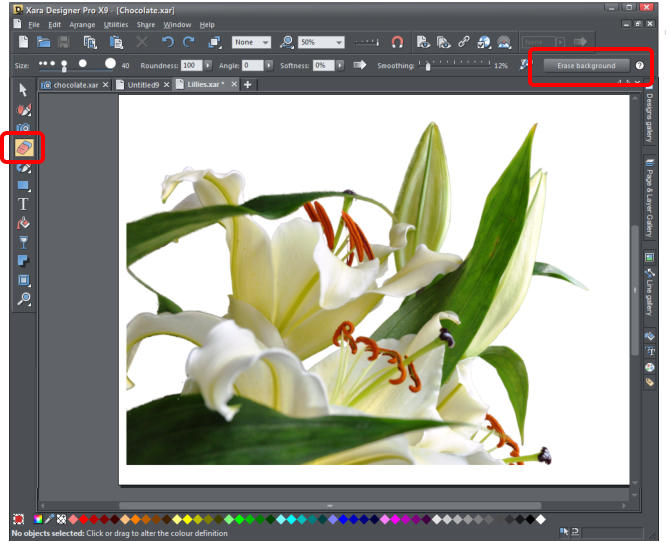
In this photo, the background was removed from a photo of lilies and then the image has been placed on this photo to give the happy couple
some flowers.
Download the trial version of Xara Photo & Graphic Designer or Designer Pro and I will show you how easy it is to do this.
So, now let’s start the tutorial!
Open up Xara Photo & Graphic Designer and then drag a photo onto the page. With today's digital cameras your photo is probably going to be
quite large so select to import it in a reduced size.
Chocolate
Many photos like this chocolate example are on a plain background, which you may want to erase, so the objects can be placed on a different background. 1. Use the Eraser Tool to roughly paint over the background parts of the picture that you want to erase. Be careful not to paint on any of the foreground that you want to keep. Tip: You can select the size of your brush in the tool options on the top InfoBar or you can use zoom instead (Ctrl+Wheel) to vary the relative size of the brush Tip: If you make a mistake hold Shift to un-paint the mistake. Because there is a high contrast between background and foreground you just need to erase a few of the white areas to tell the program what the background is. 2. Select the Mask Painter tool and paint over some of the parts of the foreground you want to keep whilst trying not to mask over any background area. Tip: Be sure to cover the various different shades of color in the foreground. If the foreground is all a similar color then you only need to cover part of it with the mask. The two marked parts - erased some of the background and masked some of the foreground. 3. Select the Eraser tool again and then click on 'Erase background' on the top InfoBar. Your photo is now on a transparent background. 4. If you wish to add a color to the background, put your mouse pointer on the background and right-click, then select 'Page background' and 'Edit page color'. Click on the color of your choice. By changing the page color you can test the result on different backgrounds. Tip: If it didn't work as well as you hoped, or you made an error, just click Undo, and you'll get the erased and masked areas back - then just repeat the above steps to try erasing or masking another area.Lilies
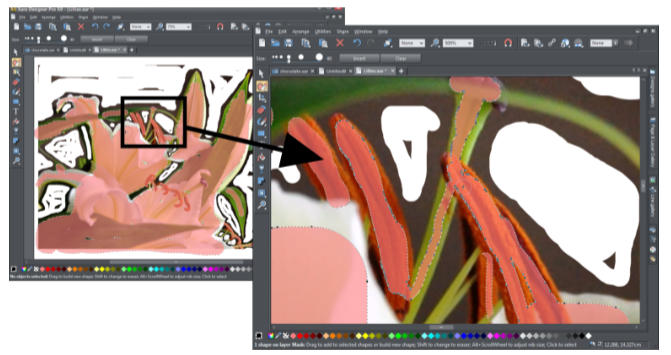
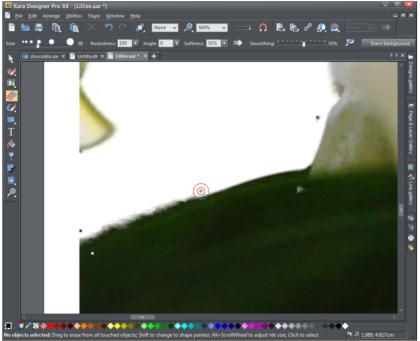
I shall now show you how to process a more complex photo such as this one that has a varied foreground and background. Open a new blank document by clicking the + tab at the end of the document tabs. A photo with a more varied background requires a little more care to mark the background and foreground Use the eraser tool as step 1 on the previous page. The background is more varied in color so you will need to cover more of the area including areas between the flowers and leaves. Tip: Use zoom (Ctrl+mouse wheel) to enlarge the photo so you can mask in more detail, especially in the areas between the leaves and the flower. I've erased more of the background to get the best results. Use the Mask Painter tool as step 2 on the previous page, being sure to zoom in to cover all the different colors and shades. In my photo I paid particular attention to the orange stamens and the small black stigma. I've masked more of the foreground to get the best results. Select the Eraser tool again and then click on 'Erase background' on the top InfoBar. Notice that my lilies have retained the orange stamens and the small black stigma. The result is a near perfect cut out of the flowers, ready to be placed on any background.Post erase touch-up:
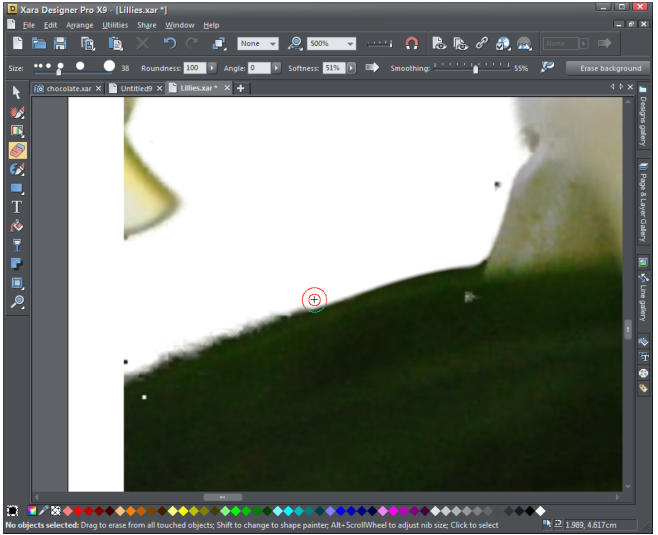
With complex images, especially where there's poor contrast between background and foreground, it may be that you need to do some tidying up of the result. Using the Eraser brush (you will be in the Eraser tool still), you can erase any unwanted remaining areas. In my image I have an uneven edge on the leaf so, using the eraser brush, I set the softness of the brush to be 50% using the softness slider on the InfoBar, (this softens the edge of the brush so that the edge of the erased background will blend in more) and the smoothing to be 55% (this adjusts how accurately the nib follows your mouse movement), which enabled me to clean up the edge of the leaf. Zoom in using the Ctrl+mouse wheel to allow erasing of the detail. Now that the image has a transparent background I shall place the cut-out images on top of another photo. I can simply copy the cut out photos and paste on top of any other image on another page. Or I can just drag a new image onto the existing page and place it 'under' using 'Arrange' and then 'Move to back'. And of course I can use the usual Selector tool to resize and rotate and the flip controls to position the cut out images in any required direction. In this case I have dragged a new image of a couple onto a new page, then copy and paste my lilies onto the new image and position them (I flipped the lilies to align the straight edge to the right of the picture). What a happy couple! Xara Photo & Graphic Designer is the most flexible and time-saving all-in-one creative tool that provides a range of photo, graphic design and DTP functions. At an unbeatable value for money cost, it's ideal for private and professional use: at home, in clubs, in academic institutions, and at work. For more tutorials by Xara and third parties, check out our Resource index, which offers a searchable and browsable list of movies and tutorials created by Xara and third parties.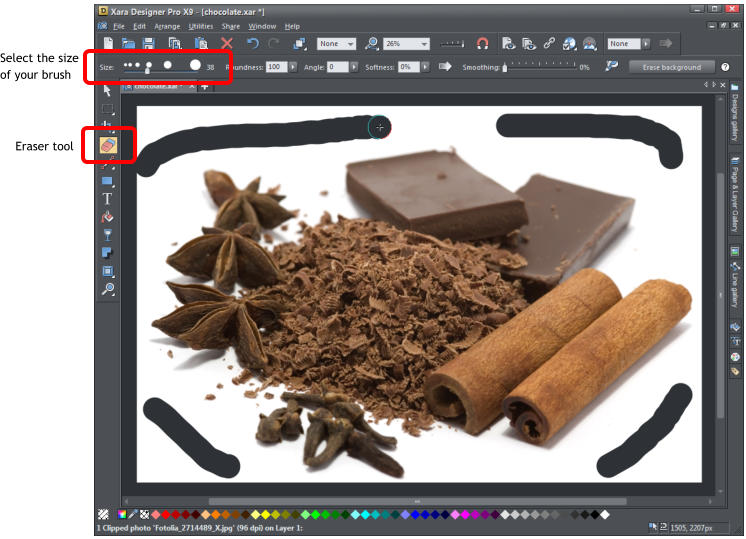


Copyright © 2013 Xara Group Limited.
Page created with Xara Designer Pro
Erasing or changing the background behind complex shapes such as fur, hair, trees, etc, can be tedious and
sometimes impossible to mask manually. With Xara Photo & Graphic Designer or Designer Pro this can be
done with ease using the new automated background erase feature. You only need to indicate the
approximate areas to erase (with the Eraser tool) and the areas to protect (with the Mask Painter tool), and
then click the 'Erase background' button.
In this photo, the background was removed from a photo of lilies and then the image has been placed on
this photo to give the happy couple some flowers.
Download the trial version of Xara Photo & Graphic Designer or Designer Pro and I will show you how easy
it is to do this.
So, now let’s start the tutorial!
Open up Xara Photo & Graphic Designer and then drag a photo onto the page. With today's digital cameras
your photo is probably going to be quite large so select to import it in a reduced size.
Chocolate
Many photos like this chocolate example are on a plain background, which you may want to erase, so the objects can be placed on a different background. 1. Use the Eraser Tool to roughly paint over the background parts of the picture that you want to erase. Be careful not to paint on any of the foreground that you want to keep. Tip: You can select the size of your brush in the tool options on the top InfoBar or you can use zoom instead (Ctrl+Wheel) to vary the relative size of the brush Tip: If you make a mistake hold Shift to un-paint the mistake. Because there is a high contrast between background and foreground you just need to erase a few of the white areas to tell the program what the background is. 2. Select the Mask Painter tool and paint over some of the parts of the foreground you want to keep whilst trying not to mask over any background area. Tip: Be sure to cover the various different shades of color in the foreground. If the foreground is all a similar color then you only need to cover part of it with the mask. The two marked parts - erased some of the background and masked some of the foreground. 3. Select the Eraser tool again and then click on 'Erase background' on the top InfoBar. Your photo is now on a transparent background. 4. If you wish to add a color to the background, put your mouse pointer on the background and right-click, then select 'Page background' and 'Edit page color'. Click on the color of your choice. By changing the page color you can test the result on different backgrounds. Tip: If it didn't work as well as you hoped, or you made an error, just click Undo, and you'll get the erased and masked areas back - then just repeat the above steps to try erasing or masking another area.Lilies
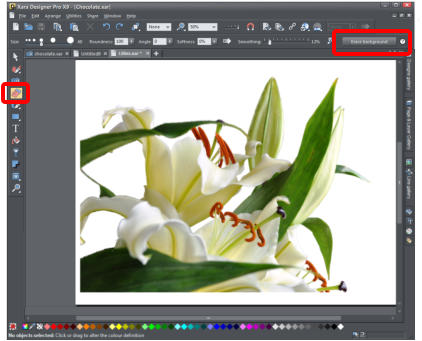
I shall now show you how to process a more complex photo such as this one that has a varied foreground and background. Open a new blank document by clicking the + tab at the end of the document tabs. A photo with a more varied background requires a little more care to mark the background and foreground Use the eraser tool as step 1 on the previous page. The background is more varied in color so you will need to cover more of the area including areas between the flowers and leaves. Tip: Use zoom (Ctrl+mouse wheel) to enlarge the photo so you can mask in more detail, especially in the areas between the leaves and the flower. I've erased more of the background to get the best results. Use the Mask Painter tool as step 2 on the previous page, being sure to zoom in to cover all the different colors and shades. In my photo I paid particular attention to the orange stamens and the small black stigma. I've masked more of the foreground to get the best results. Select the Eraser tool again and then click on 'Erase background' on the top InfoBar. Notice that my lilies have retained the orange stamens and the small black stigma. The result is a near perfect cut out of the flowers, ready to be placed on any background.Post erase touch-up:
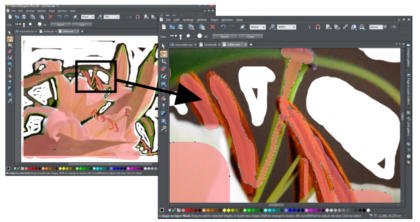
With complex images, especially where there's poor contrast between background and foreground, it may be that you need to do some tidying up of the result. Using the Eraser brush (you will be in the Eraser tool still), you can erase any unwanted remaining areas. In my image I have an uneven edge on the leaf so, using the eraser brush, I set the softness of the brush to be 50% using the softness slider on the InfoBar, (this softens the edge of the brush so that the edge of the erased background will blend in more) and the smoothing to be 55% (this adjusts how accurately the nib follows your mouse movement), which enabled me to clean up the edge of the leaf. Zoom in using the Ctrl+mouse wheel to allow erasing of the detail. Now that the image has a transparent background I shall place the cut-out images on top of another photo. I can simply copy the cut out photos and paste on top of any other image on another page. Or I can just drag a new image onto the existing page and place it 'under' using 'Arrange' and then 'Move to back'. And of course I can use the usual Selector tool to resize and rotate and the flip controls to position the cut out images in any required direction. In this case I have dragged a new image of a couple onto a new page, then copy and paste my lilies onto the new image and position them (I flipped the lilies to align the straight edge to the right of the picture). What a happy couple! Xara Photo & Graphic Designer is the most flexible and time-saving all-in-one creative tool that provides a range of photo, graphic design and DTP functions. At an unbeatable value for money cost, it's ideal for private and professional use: at home, in clubs, in academic institutions, and at work. For more tutorials by Xara and third parties, check out our Resource index, which offers a searchable and browsable list of movies and tutorials created by Xara and third parties.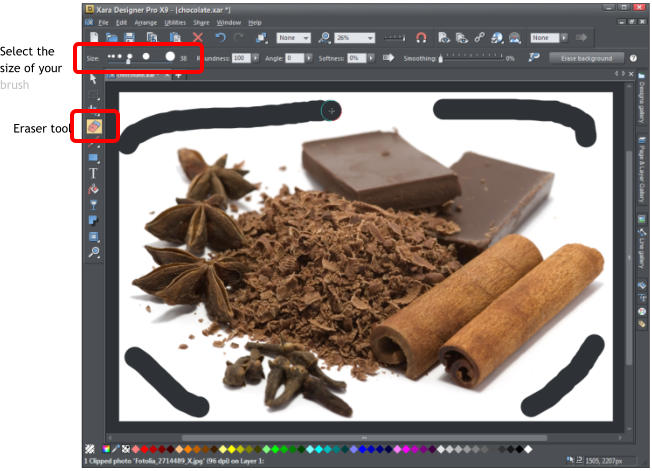


Copyright © 2013 Xara Group Limited.
Page created with Xara Designer Pro
Erasing or changing the background behind complex shapes such as
fur, hair, trees, etc, can be tedious and sometimes impossible to
mask manually. With Xara Photo & Graphic Designer or Designer Pro
this can be done with ease using the new automated background
erase feature. You only need to indicate the approximate areas to
erase (with the Eraser tool) and the areas to protect (with the Mask
Painter tool), and then click the 'Erase background' button.
In this photo, the background was removed from a photo of lilies and
then the image has been placed on this photo to give the happy
couple some flowers.
Download the trial version of Xara Photo & Graphic Designer or
Designer Pro and I will show you how easy it is to do this.
So, now let’s start the tutorial!
Open up Xara Photo & Graphic Designer and then drag a photo onto
the page. With today's digital cameras your photo is probably going
to be quite large so select to import it in a reduced size.
Chocolate
Many photos like this chocolate example are on a plain background, which you may want to erase, so the objects can be placed on a different background. 1. Use the Eraser Tool to roughly paint over the background parts of the picture that you want to erase. Be careful not to paint on any of the foreground that you want to keep. Tip: You can select the size of your brush in the tool options on the top InfoBar or you can use zoom instead (Ctrl+Wheel) to vary the relative size of the brush Tip: If you make a mistake hold Shift to un-paint the mistake. Because there is a high contrast between background and foreground you just need to erase a few of the white areas to tell the program what the background is. 2. Select the Mask Painter tool and paint over some of the parts of the foreground you want to keep whilst trying not to mask over any background area. Tip: Be sure to cover the various different shades of color in the foreground. If the foreground is all a similar color then you only need to cover part of it with the mask. The two marked parts - erased some of the background and masked some of the foreground. 3. Select the Eraser tool again and then click on 'Erase background' on the top InfoBar. Your photo is now on a transparent background. 4. If you wish to add a color to the background, put your mouse pointer on the background and right-click, then select 'Page background' and 'Edit page color'. Click on the color of your choice. By changing the page color you can test the result on different backgrounds. Tip: If it didn't work as well as you hoped, or you made an error, just click Undo, and you'll get the erased and masked areas back - then just repeat the above steps to try erasing or masking another area.Lilies
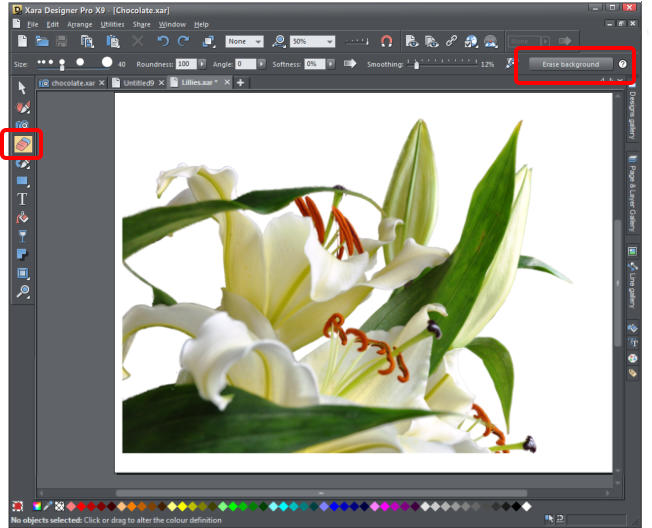
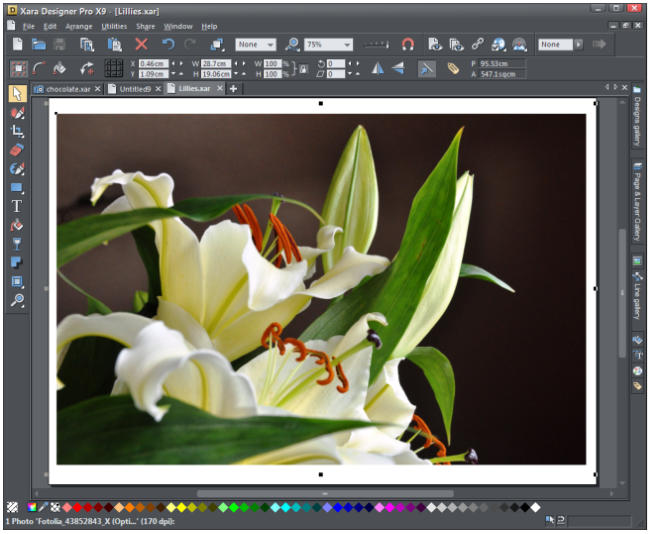
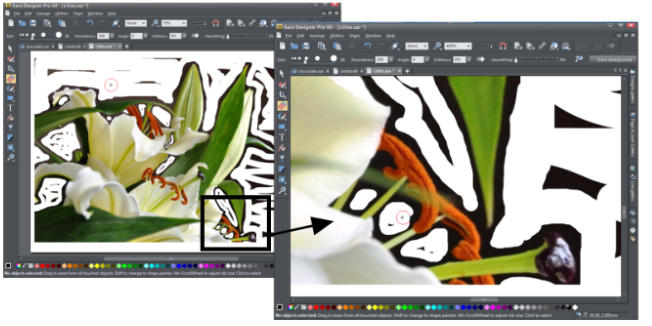
I shall now show you how to process a more complex photo such as this one that has a varied foreground and background. Open a new blank document by clicking the + tab at the end of the document tabs. A photo with a more varied background requires a little more care to mark the background and foreground Use the eraser tool as step 1 on the previous page. The background is more varied in color so you will need to cover more of the area including areas between the flowers and leaves. Tip: Use zoom (Ctrl+mouse wheel) to enlarge the photo so you can mask in more detail, especially in the areas between the leaves and the flower. I've erased more of the background to get the best results. Use the Mask Painter tool as step 2 on the previous page, being sure to zoom in to cover all the different colors and shades. In my photo I paid particular attention to the orange stamens and the small black stigma. I've masked more of the foreground to get the best results. Select the Eraser tool again and then click on 'Erase background' on the top InfoBar. Notice that my lilies have retained the orange stamens and the small black stigma. The result is a near perfect cut out of the flowers, ready to be placed on any background.Post erase touch-up:
With complex images, especially where there's poor contrast between background and foreground, it may be that you need to do some tidying up of the result. Using the Eraser brush (you will be in the Eraser tool still), you can erase any unwanted remaining areas. In my image I have an uneven edge on the leaf so, using the eraser brush, I set the softness of the brush to be 50% using the softness slider on the InfoBar, (this softens the edge of the brush so that the edge of the erased background will blend in more) and the smoothing to be 55% (this adjusts how accurately the nib follows your mouse movement), which enabled me to clean up the edge of the leaf. Zoom in using the Ctrl+mouse wheel to allow erasing of the detail. Now that the image has a transparent background I shall place the cut-out images on top of another photo. I can simply copy the cut out photos and paste on top of any other image on another page. Or I can just drag a new image onto the existing page and place it 'under' using 'Arrange' and then 'Move to back'. And of course I can use the usual Selector tool to resize and rotate and the flip controls to position the cut out images in any required direction. In this case I have dragged a new image of a couple onto a new page, then copy and paste my lilies onto the new image and position them (I flipped the lilies to align the straight edge to the right of the picture). What a happy couple! Xara Photo & Graphic Designer is the most flexible and time-saving all-in-one creative tool that provides a range of photo, graphic design and DTP functions. At an unbeatable value for money cost, it's ideal for private and professional use: at home, in clubs, in academic institutions, and at work. For more tutorials by Xara and third parties, check out our Resource index, which offers a searchable and browsable list of movies and tutorials created by Xara and third parties.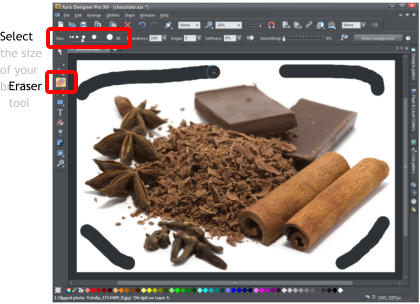


Copyright © 2013 Xara Group Limited.
Page created with Xara Designer Pro
ERASING BACKGROUNDS & COMBINING PHOTOS
ERASING BACKGROUNDS & COMBINING PHOTOS
ERASING BACKGROUNDS & COMBINING PHOTOS