Fitting an image into a different size space so that it looks right can be challenging, and often results in distorted images. Stretched images,
where the aspect ratio has changed, is one of the tell-tale signs of an amateur non-professional document. The human eye is particularly
sensitive to changes in aspect ratio of everyday objects, and most people can tell something is wrong with images that are even slightly
squashed or stretched.
There are times when cropping or simple resizing is not suitable and it would be better to change the composition of the picture. This is an
easy task in Xara Designer Pro or Photo & Graphic Designer. The 'Content Aware Resize' tool analyses the photo and can then intelligently
stretch or scale regions of the photo that contain less detail, or zoom in to objects within the photo.
Here’s an example of rescaling to illustrate my point. This is my original photo:
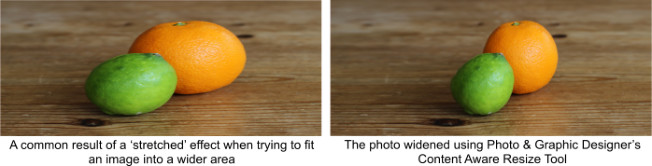
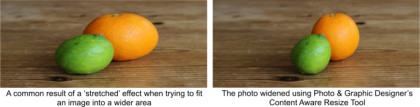
The photo on the left below has been stretched and it's immediately obvious there’s something wrong with the fruit. The photo on the right has
been widened with the Content Aware Resize tool - the background has been stretched, but the key foreground objects remain unaffected.
Download the trial version of Xara Photo & Graphic Designer or Designer Pro and I will show you how easy it is to achieve results like this...
Intelligent Scaling
Open up Designer Pro or Photo & Graphic Designer and then drag a photo onto the page. With today’s digital cameras your photo is probably going to be quite large, so select to import it in a reduced size. For comparison, take a copy with CTRL+C and CTRL+V and place it below the original. Tip: A good shortcut for copying any image is to drag on it with your right mouse button selected.Basic operation
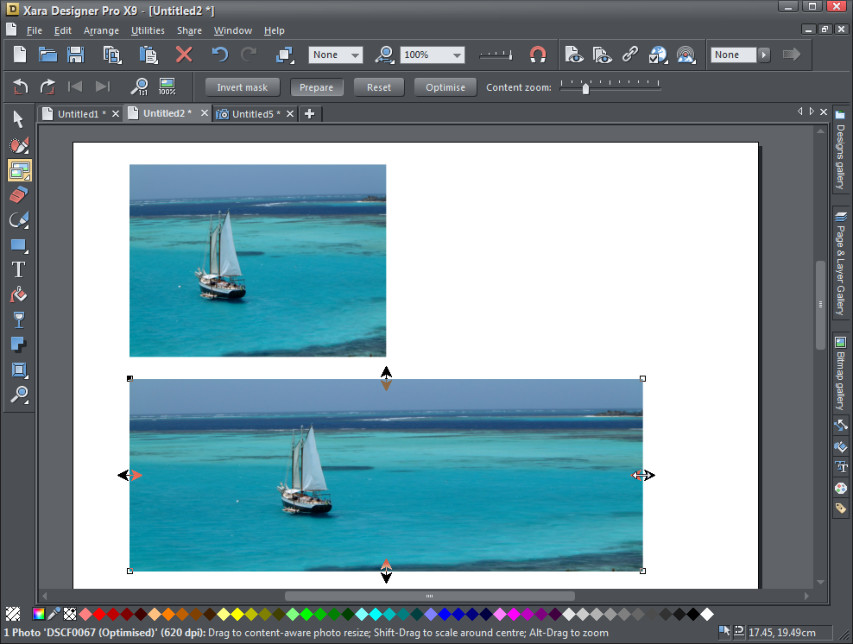
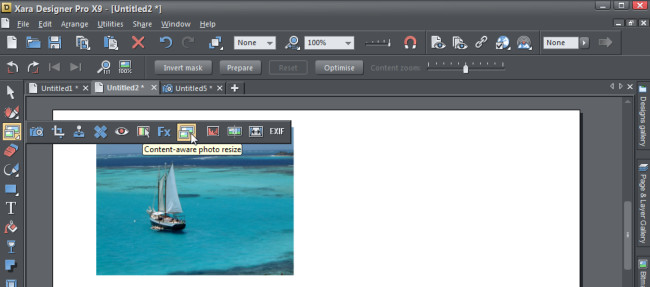
Select one of the photos and from the Photo Tool fly-out bar select the Content Aware Resize tool. The Photo fly-out tool bar showing the Content Aware Resize option On the InfoBar, click the Prepare button to prepare the photo for the scaling. This starts an analysis of the photo to calculate which parts of the image can be stretched and which parts should be retained intact. After preparing the image, new resize arrows will appear on the sides of the photo. Just drag on these to stretch or squash the image in the desired direction. The bottom photo has been stretched but the sailing boat has retained its correct aspect ratio.Using Masks With Content Aware Scaling
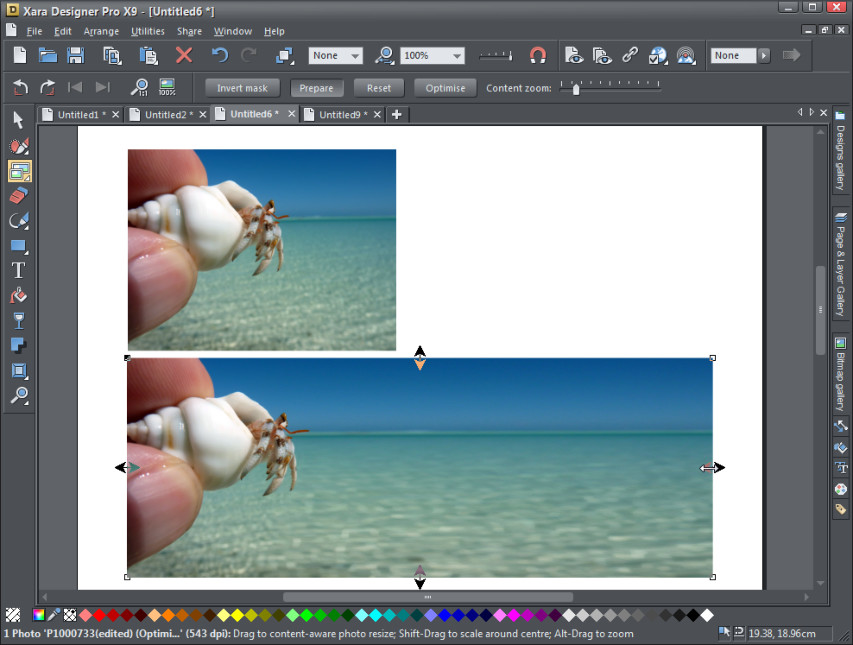
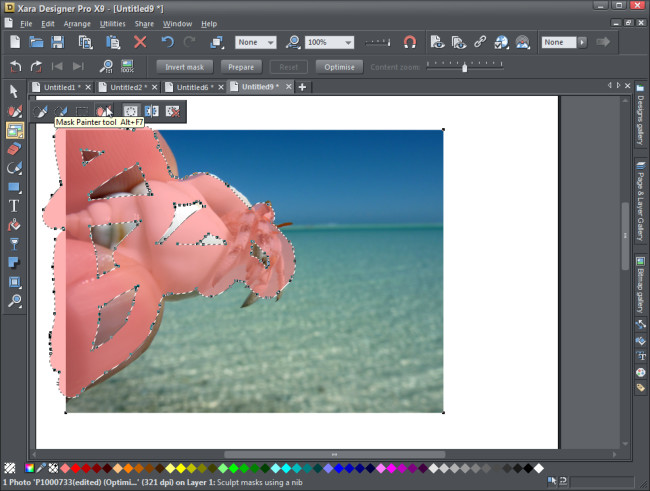
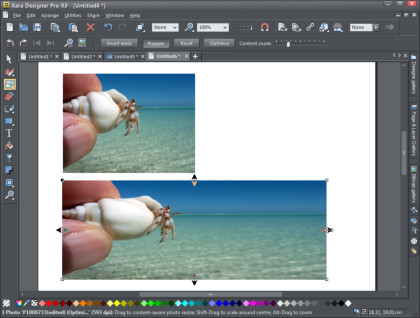
While the Content Aware Resize tool can attempt to guess which parts of the image should not be stretched, it will not always get it perfectly right. This is not a problem because you can use the Mask Painter tool to mask specific parts of the image so that they remain unaffected by the resize operation. Note that you can only use the mask on an original image, so if you are using the same image as you used above select Reset to return it to its original state. I will use a different image to demonstrate the masking feature. In this image the thumb and shell have been stretched as well as the sea. To prevent this we can use the Masking Tool. The thumb and shell have stretched as well as the sea To protect one or more areas from being distorted like this, select the Mask Painter Tool on the Painter Tools flyout menu, then roughly paint over the area you want to protect. The protected area will show in a pink colored mask. The hand and shell masked out Now select the Content Aware Resize tool, select Prepare and then drag the resize arrows. (Note that you can't mask more than half the image). The thumb and shell are now the same size as the original photo, with only the sea area having been stretched. The area protected by the mask has not been stretchedIntelligent Zooming
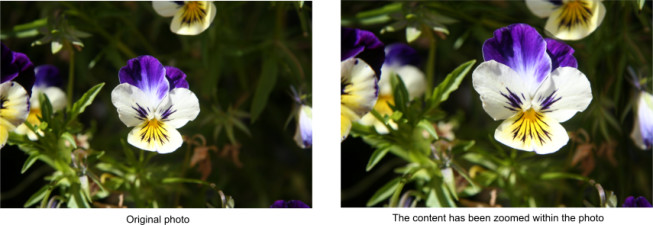
In addition to allowing images to be stretched intelligently, the Content Aware Resize tool can also be used to resize objects within the photo so that the photo remains the same size and the content is intelligently zoomed inside it. Select the Content Aware Scaling button and select Prepare, as before. Then use the Content zoom slider control on the InfoBar to scale the content. The picture remains the same size, but Designer Pro / Photo & Graphic Designer automatically detects and scales the 'interesting' content. If you find that an area is becoming distorted you can use the mask tool to protect that area as we did before. For more tutorials by Xara and third parties, check out our Resource index, which offers a searchable and browsable list of movies and tutorials created by Xara and third parties.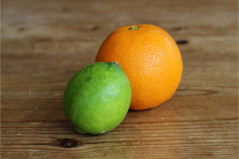

Copyright © 2013 Xara Group Limited.
Page created with Xara Designer Pro


Fitting an image into a different size space so that it looks right can be challenging, and often results in
distorted images. Stretched images, where the aspect ratio has changed, is one of the tell-tale signs of an
amateur non-professional document. The human eye is particularly sensitive to changes in aspect ratio of
everyday objects, and most people can tell something is wrong with images that are even slightly
squashed or stretched.
There are times when cropping or simple resizing is not suitable and it would be better to change the
composition of the picture. This is an easy task in Xara Designer Pro or Photo & Graphic Designer. The
'Content Aware Resize' tool analyses the photo and can then intelligently stretch or scale regions of the
photo that contain less detail, or zoom in to objects within the photo.
Here’s an example of rescaling to illustrate my point. This is my original photo:
The photo on the left below has been stretched and it's immediately obvious there’s something wrong with
the fruit. The photo on the right has been widened with the Content Aware Resize tool - the background
has been stretched, but the key foreground objects remain unaffected.
Download the trial version of Xara Photo & Graphic Designer or Designer Pro and I will show you how easy
it is to achieve results like this...
Intelligent Scaling
Open up Designer Pro or Photo & Graphic Designer and then drag a photo onto the page. With today’s digital cameras your photo is probably going to be quite large, so select to import it in a reduced size. For comparison, take a copy with CTRL+C and CTRL+V and place it below the original. Tip: A good shortcut for copying any image is to drag on it with your right mouse button selected.Basic operation
Select one of the photos and from the Photo Tool fly-out bar select the Content Aware Resize tool. The Photo fly-out tool bar showing the Content Aware Resize option On the InfoBar, click the Prepare button to prepare the photo for the scaling. This starts an analysis of the photo to calculate which parts of the image can be stretched and which parts should be retained intact. After preparing the image, new resize arrows will appear on the sides of the photo. Just drag on these to stretch or squash the image in the desired direction. The bottom photo has been stretched but the sailing boat has retained its correct aspect ratio.Using Masks With Content Aware Scaling
While the Content Aware Resize tool can attempt to guess which parts of the image should not be stretched, it will not always get it perfectly right. This is not a problem because you can use the Mask Painter tool to mask specific parts of the image so that they remain unaffected by the resize operation. Note that you can only use the mask on an original image, so if you are using the same image as you used above select Reset to return it to its original state. I will use a different image to demonstrate the masking feature. In this image the thumb and shell have been stretched as well as the sea. To prevent this we can use the Masking Tool. The thumb and shell have stretched as well as the sea To protect one or more areas from being distorted like this, select the Mask Painter Tool on the Painter Tools flyout menu, then roughly paint over the area you want to protect. The protected area will show in a pink colored mask. The hand and shell masked out Now select the Content Aware Resize tool, select Prepare and then drag the resize arrows. (Note that you can't mask more than half the image). The thumb and shell are now the same size as the original photo, with only the sea area having been stretched. The area protected by the mask has not been stretchedIntelligent Zooming
In addition to allowing images to be stretched intelligently, the Content Aware Resize tool can also be used to resize objects within the photo so that the photo remains the same size and the content is intelligently zoomed inside it. Select the Content Aware Scaling button and select Prepare, as before. Then use the Content zoom slider control on the InfoBar to scale the content. The picture remains the same size, but Designer Pro / Photo & Graphic Designer automatically detects and scales the 'interesting' content. If you find that an area is becoming distorted you can use the mask tool to protect that area as we did before. For more tutorials by Xara and third parties, check out our Resource index, which offers a searchable and browsable list of movies and tutorials created by Xara and third parties.


Copyright © 2013 Xara Group Limited.
Page created with Xara Designer Pro
Fitting an image into a different size space so that it looks right can
be challenging, and often results in distorted images. Stretched
images, where the aspect ratio has changed, is one of the tell-tale
signs of an amateur non-professional document. The human eye is
particularly sensitive to changes in aspect ratio of everyday objects,
and most people can tell something is wrong with images that are
even slightly squashed or stretched.
There are times when cropping or simple resizing is not suitable and
it would be better to change the composition of the picture. This is
an easy task in Xara Designer Pro or Photo & Graphic Designer. The
'Content Aware Resize' tool analyses the photo and can then
intelligently stretch or scale regions of the photo that contain less
detail, or zoom in to objects within the photo.
Here’s an example of rescaling to illustrate my point. This is my
original photo:
The photo on the left below has been stretched and it's immediately
obvious there’s something wrong with the fruit. The photo on the
right has been widened with the Content Aware Resize tool - the
background has been stretched, but the key foreground objects
remain unaffected.
Download the trial version of Xara Photo & Graphic Designer or
Designer Pro and I will show you how easy it is to achieve results like
this...
Intelligent Scaling
Open up Designer Pro or Photo & Graphic Designer and then drag a photo onto the page. With today’s digital cameras your photo is probably going to be quite large, so select to import it in a reduced size. For comparison, take a copy with CTRL+C and CTRL+V and place it below the original. Tip: A good shortcut for copying any image is to drag on it with your right mouse button selected.Basic operation
Select one of the photos and from the Photo Tool fly-out bar select the Content Aware Resize tool. The Photo fly-out tool bar showing the Content Aware Resize option On the InfoBar, click the Prepare button to prepare the photo for the scaling. This starts an analysis of the photo to calculate which parts of the image can be stretched and which parts should be retained intact. After preparing the image, new resize arrows will appear on the sides of the photo. Just drag on these to stretch or squash the image in the desired direction. The bottom photo has been stretched but the sailing boat has retained its correct aspect ratio.Using Masks With Content Aware Scaling
While the Content Aware Resize tool can attempt to guess which parts of the image should not be stretched, it will not always get it perfectly right. This is not a problem because you can use the Mask Painter tool to mask specific parts of the image so that they remain unaffected by the resize operation. Note that you can only use the mask on an original image, so if you are using the same image as you used above select Reset to return it to its original state. I will use a different image to demonstrate the masking feature. In this image the thumb and shell have been stretched as well as the sea. To prevent this we can use the Masking Tool. The thumb and shell have stretched as well as the sea To protect one or more areas from being distorted like this, select the Mask Painter Tool on the Painter Tools flyout menu, then roughly paint over the area you want to protect. The protected area will show in a pink colored mask. The hand and shell masked out Now select the Content Aware Resize tool, select Prepare and then drag the resize arrows. (Note that you can't mask more than half the image). The thumb and shell are now the same size as the original photo, with only the sea area having been stretched. The area protected by the mask has not been stretchedIntelligent Zooming
In addition to allowing images to be stretched intelligently, the Content Aware Resize tool can also be used to resize objects within the photo so that the photo remains the same size and the content is intelligently zoomed inside it. Select the Content Aware Scaling button and select Prepare, as before. Then use the Content zoom slider control on the InfoBar to scale the content. The picture remains the same size, but Designer Pro / Photo & Graphic Designer automatically detects and scales the 'interesting' content. If you find that an area is becoming distorted you can use the mask tool to protect that area as we did before. For more tutorials by Xara and third parties, check out our Resource index, which offers a searchable and browsable list of movies and tutorials created by Xara and third parties.


Copyright © 2013 Xara Group Limited.
Page created with Xara Designer Pro
INTELLIGENT PHOTO RESCALE & ZOOM
INTELLIGENT PHOTO RESCALE & ZOOM
INTELLIGENT PHOTO RESCALE & ZOOM