
Xara Photo and Graphic Designer is a high-powered general purpose graphics creation tool, able to create graphic designs of all types, from web graphics to page layouts such
as posters and flyers, cartoons, and the most complex illustrations.
In our Introduction Part 1 we gave a general overview of Photo & Graphic Designer, in Part 2 we covered the Text Tool, and this month in Part 3 we are taking a closer look at
the drawing tools.
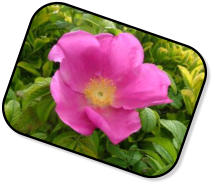
Example graphics and photo frame:
Simple social media icons
Drawing Tools
Xara Photo & Graphic Designer has several basic drawing tools that let you create rectangles, ellipses, regular polygons, stars or any shape you like. These are vector drawing tools, which means you can resize, edit the outline shape and re-color your the images you create with no loss of quality. You can zoom in to see almost infinite detail, and all edits can be undone. These basic drawing tools are the Freehand & Brush tool, Straight Line tool, Shape tool and the Shape Painter tool. The drawing toolsThe Freehand & Brush Tool
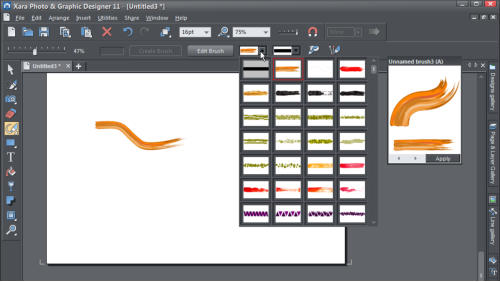
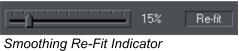
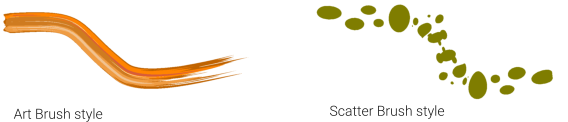
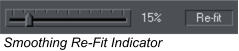
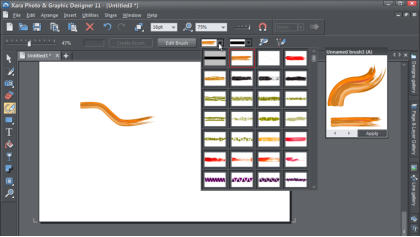
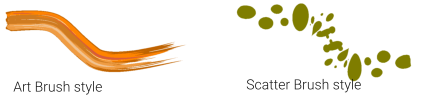
This is the easiest way to draw simple lines, curves and shapes and it acts rather like a pencil. Shapes are created when you join the end point of your line to the start point. To draw a line or curve, position the pointer at the start position then press and hold the mouse button and as you drag the pointer, your line will be drawn. After you've drawn a freehand line you can control how smooth the curve is (i.e. how many control points it has) by adjusting the smoothing control slider on the InfoBar. Low values make the line follow your mouse movement more closely by creating more control points, and higher values produce smoother curves with fewer control points. (The re-fit indicator on the InfoBar tells you when you can still change the smoothing). To draw a series of connected straight lines, for example a triangle, hold down the "Alt" key, move the pointer to a new position and release "Alt", then hold down the "Alt" key again to draw the next segment. This Freehand and Brush tool can also draw creative or textured brush strokes. There are two types of brush strokes in Photo & Graphic Designer - Art Brushes that stretch the brush shape along a line and Scatter Brushes that repeatedly stamp the shape at intervals along a line. To draw a brush stroke simply select the style and brush profile from the drop down menus on the InfoBar. You can also select the line width of the brush stroke on the top tool bar. Brush stroke styles drop down menu You can also browse the many different brush types using the Line Gallery which categorizes them into folders. You can also select an existing line in your document and then choose a different brush or stroke shape, to change the appearance of the line. The Freehand and Brush Tool supports pressure sensitive drawing using compatible tablet devices. This allows you to draw variable width strokes - the more pressure you apply, the wider the stroke. This option is located on the InfoBar.The Straight Line Tool
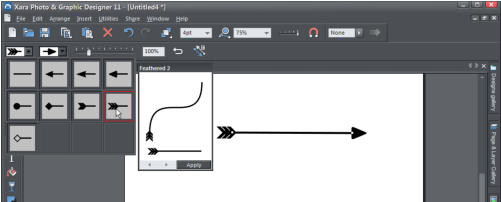
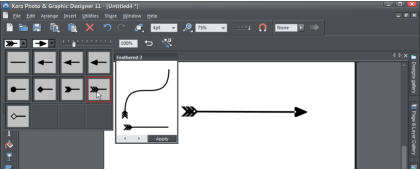
This does exactly what it says - draws simple single-segment straight lines. Simply click and drag on the page to draw a straight line. You can click on any existing line to select it, and once selected you can click-drag on either end to move the end of the line around. The InfoBar has two dropdown lists on the left which allow you to choose an arrow head or tail style for each end of the selected line, and the slider on the InfoBar allows you to change the size of the arrow head and tail on the current selected line. Or you can enter a percentage value into the size text field to the right of the slider or select the ‘Reverse path’ button to switch around the head and tail of the selected line. Choice of arrow head and tail Select the last icon on the InfoBar to have immediate access to the Line Gallery where you will find hundreds of ready made lines that have been categorized into folders. Lines created with the Straight Line tool are fully compatible with the other drawing tools. So if you want to add more segments to a line, make it curved, or perhaps even turn it into a closed shape, use the Shape Tool.
The Shape Tool
This is a very powerful tool that can draw precise bezier curves and lines and also edit the outline of shapes. All lines and shapes in Xara Photo & Graphic Designer are made from a sequence of curve and line sections. (Curves are sometimes called "Bézier" curves after the mathematician who first described them). A sequence of curve and line sections. The sections or segments of a line are marked by small black ‘point handles’. You can drag, add and delete these handles to manipulate the shape of the line or outline. The Shape tool InfoBar To draw a straight line, select the 'Make Line' button on the InfoBar, then click where you want to start the line which will put a point handle on the page. This is displayed as a red square to indicate that it is the selected handle. Either click where you want the next point handle to be, or click and drag, and then release the mouse button when the line is correct. You can start a line at either end; you don't have to work left to right, or top-to-bottom. (Shortcut to switch to straight line = select 'L' on your keyboard if you are in the Shape tool). To draw a curved line, select the 'Make curve' button on the InfoBar, then click where you want to start the line. Either click or click and drag, then release, to create a second point handle, and a curve segment will be added to the line. A curve segment has Curve handles associated with the selected point handle. You can drag these to adjust the angle and radius of the curve. To create an object which is a mixture of straight and curved segments, just switch between the ‘Make Curve’ and ‘Make Line’ buttons as you create the object (or press "L" or "C" on the keyboard, if you are in the Shape tool). Editing an existing shape Some objects such as quickshapes, rectangles, ellipses and text have to be converted into editable shapes before you can use the Shape Tool on them. Select the Convert to Editable Shape in the Arrange menu (shortcut "Ctrl + Shift + S") to do this.The Shape Painter Tool
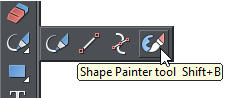
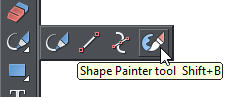
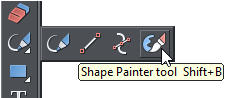
This tool allows you to ‘paint’ a vector shape like a paint brush. It can be used to draw new shapes or extend existing shapes. The painted strokes form filled shapes. Shape Painter InfoBar The InfoBar for this tool provides controls over Nib size, the Roundness, Angle and the Softness, as well as a smoothing control which adjusts how accurately the nib follows your mouse movement (this is exactly like the Freehand tool smoothness control). You can also adjust the nib size by holding down the Alt key and using the mouse wheel. Simply click on the page and the new strokes will create new shapes. If a shape is already selected, or you click on a shape to select it, then strokes on the page will adjust the outline of the selected shape. Hold down the Shift key and it erases or ‘un-paints’ the shape. The size of the nib can be controlled by dragging the slider. As you zoom out on your page, the nib size changes, relative to the objects on the page. Click the ‘Size’ button to set whether the nib size zooms in when you zoom into the page or stays the same size. If you keep the nib size the same then it effectively becomes smaller relative to the objects on the page allowing you to erase smaller details. Increasing the ‘Roundness’ of the nib will change it into a horizontal ellipse nib, whilst decreasing it will make it a vertical ellipse nib. Adjusting the ‘Softness’ will add a feathered edge to the shape. The Shape Painter tool supports pressure sensitive drawing using compatible tablet devices. This allows you to draw variable width strokes - the more pressure you apply, the wider the stroke. Liquify plugins, accessed from the dropdown menu on the InfoBar enable you to use a range of effects to modify the outlines of simple shapes, lines and rectangles.
More Drawing Tools
As well as these drawing tools, Photo & Graphic Designer has many other ways to add ready made, customizable graphic objects to your page: • SmartShapes - arrows, speech bubbles, text boxes and geometric components. See Introduction Part 1. • QuickShapes - rectangles, ellipses, spirals, polygons, stars, etc. • Page elements - buttons, stickers, graphics, icons, bullets, dividers, logos, etc. • Photo objects - frames, collages and albumsDemo Videos
A good way to learn the basics of the Photo Graphic & Designer tools, including selecting and manipulating objects on the page, is to view the set of three very short demo movies. We highly recommend you view them. Next month we’ll cover color editing. In the meantime if you don’t already own Photo & Graphic Designer why not download it now and give it a try!


Copyright © 2015 Xara Group Limited, a MAGIX company.
Page created with Xara Designer Pro

Xara Photo and Graphic Designer is a high-powered general purpose graphics creation tool, able to create graphic designs of all types, from
web graphics to page layouts such as posters and flyers, cartoons, and the most complex illustrations.
In our Introduction Part 1 we gave a general overview of Photo & Graphic Designer, in Part 2 we covered the Text Tool, and this month in Part
3 we are taking a closer look at the drawing tools.
Example graphics and photo frame:
Simple social media icons
Drawing Tools
Xara Photo & Graphic Designer has several basic drawing tools that let you create rectangles, ellipses, regular polygons, stars or any shape you like. These are vector drawing tools, which means you can resize, edit the outline shape and re-color your the images you create with no loss of quality. You can zoom in to see almost infinite detail, and all edits can be undone. These basic drawing tools are the Freehand & Brush tool, Straight Line tool, Shape tool and the Shape Painter tool. The drawing toolsThe Freehand & Brush Tool
This is the easiest way to draw simple lines, curves and shapes and it acts rather like a pencil. Shapes are created when you join the end point of your line to the start point. To draw a line or curve, position the pointer at the start position then press and hold the mouse button and as you drag the pointer, your line will be drawn. After you've drawn a freehand line you can control how smooth the curve is (i.e. how many control points it has) by adjusting the smoothing control slider on the InfoBar. Low values make the line follow your mouse movement more closely by creating more control points, and higher values produce smoother curves with fewer control points. (The re-fit indicator on the InfoBar tells you when you can still change the smoothing). To draw a series of connected straight lines, for example a triangle, hold down the "Alt" key, move the pointer to a new position and release "Alt", then hold down the "Alt" key again to draw the next segment. This Freehand and Brush tool can also draw creative or textured brush strokes. There are two types of brush strokes in Photo & Graphic Designer - Art Brushes that stretch the brush shape along a line and Scatter Brushes that repeatedly stamp the shape at intervals along a line. To draw a brush stroke simply select the style and brush profile from the drop down menus on the InfoBar. You can also select the line width of the brush stroke on the top tool bar. Brush stroke styles drop down menu You can also browse the many different brush types using the Line Gallery which categorizes them into folders. You can also select an existing line in your document and then choose a different brush or stroke shape, to change the appearance of the line. The Freehand and Brush Tool supports pressure sensitive drawing using compatible tablet devices. This allows you to draw variable width strokes - the more pressure you apply, the wider the stroke. This option is located on the InfoBar.The Straight Line Tool
This does exactly what it says - draws simple single-segment straight lines. Simply click and drag on the page to draw a straight line. You can click on any existing line to select it, and once selected you can click-drag on either end to move the end of the line around. The InfoBar has two dropdown lists on the left which allow you to choose an arrow head or tail style for each end of the selected line, and the slider on the InfoBar allows you to change the size of the arrow head and tail on the current selected line. Or you can enter a percentage value into the size text field to the right of the slider or select the ‘Reverse path’ button to switch around the head and tail of the selected line. Choice of arrow head and tail Select the last icon on the InfoBar to have immediate access to the Line Gallery where you will find hundreds of ready made lines that have been categorized into folders. Lines created with the Straight Line tool are fully compatible with the other drawing tools. So if you want to add more segments to a line, make it curved, or perhaps even turn it into a closed shape, use the Shape Tool.
The Shape Tool
This is a very powerful tool that can draw precise bezier curves and lines and also edit the outline of shapes. All lines and shapes in Xara Photo & Graphic Designer are made from a sequence of curve and line sections. (Curves are sometimes called "Bézier" curves after the mathematician who first described them). A sequence of curve and line sections. The sections or segments of a line are marked by small black ‘point handles’. You can drag, add and delete these handles to manipulate the shape of the line or outline. The Shape tool InfoBar To draw a straight line, select the 'Make Line' button on the InfoBar, then click where you want to start the line which will put a point handle on the page. This is displayed as a red square to indicate that it is the selected handle. Either click where you want the next point handle to be, or click and drag, and then release the mouse button when the line is correct. You can start a line at either end; you don't have to work left to right, or top-to-bottom. (Shortcut to switch to straight line = select 'L' on your keyboard if you are in the Shape tool). To draw a curved line, select the 'Make curve' button on the InfoBar, then click where you want to start the line. Either click or click and drag, then release, to create a second point handle, and a curve segment will be added to the line. A curve segment has Curve handles associated with the selected point handle. You can drag these to adjust the angle and radius of the curve. To create an object which is a mixture of straight and curved segments, just switch between the ‘Make Curve’ and ‘Make Line’ buttons as you create the object (or press "L" or "C" on the keyboard, if you are in the Shape tool). Editing an existing shape Some objects such as quickshapes, rectangles, ellipses and text have to be converted into editable shapes before you can use the Shape Tool on them. Select the Convert to Editable Shape in the Arrange menu (shortcut "Ctrl + Shift + S") to do this.The Shape Painter Tool
This tool allows you to ‘paint’ a vector shape like a paint brush. It can be used to draw new shapes or extend existing shapes. The painted strokes form filled shapes. Shape Painter InfoBar The InfoBar for this tool provides controls over Nib size, the Roundness, Angle and the Softness, as well as a smoothing control which adjusts how accurately the nib follows your mouse movement (this is exactly like the Freehand tool smoothness control). You can also adjust the nib size by holding down the Alt key and using the mouse wheel. Simply click on the page and the new strokes will create new shapes. If a shape is already selected, or you click on a shape to select it, then strokes on the page will adjust the outline of the selected shape. Hold down the Shift key and it erases or ‘un-paints’ the shape. The size of the nib can be controlled by dragging the slider. As you zoom out on your page, the nib size changes, relative to the objects on the page. Click the ‘Size’ button to set whether the nib size zooms in when you zoom into the page or stays the same size. If you keep the nib size the same then it effectively becomes smaller relative to the objects on the page allowing you to erase smaller details. Increasing the ‘Roundness’ of the nib will change it into a horizontal ellipse nib, whilst decreasing it will make it a vertical ellipse nib. Adjusting the ‘Softness’ will add a feathered edge to the shape. The Shape Painter tool supports pressure sensitive drawing using compatible tablet devices. This allows you to draw variable width strokes - the more pressure you apply, the wider the stroke. Liquify plugins, accessed from the dropdown menu on the InfoBar enable you to use a range of effects to modify the outlines of simple shapes, lines and rectangles.
More Drawing Tools
As well as these drawing tools, Photo & Graphic Designer has many other ways to add ready made, customizable graphic objects to your page: • SmartShapes - arrows, speech bubbles, text boxes and geometric components. See Introduction Part 1. • QuickShapes - rectangles, ellipses, spirals, polygons, stars, etc. • Page elements - buttons, stickers, graphics, icons, bullets, dividers, logos, etc. • Photo objects - frames, collages and albumsDemo Videos
A good way to learn the basics of the Photo Graphic & Designer tools, including selecting and manipulating objects on the page, is to view the set of three very short demo movies. We highly recommend you view them. Next month we’ll cover color editing. In the meantime if you don’t already own Photo & Graphic Designer why not download it now and give it a try!


Copyright © 2015 Xara Group Limited, a MAGIX company.
Page created with Xara Designer Pro

Xara Photo and Graphic Designer is a high-powered general purpose graphics creation tool, able to create
graphic designs of all types, from web graphics to page layouts such as posters and flyers, cartoons, and
the most complex illustrations.
In our Introduction Part 1 we gave a general overview of Photo & Graphic Designer, in Part 2 we covered
the Text Tool, and this month in Part 3 we are taking a closer look at the drawing tools.
Example graphics and photo frame:
Simple social media icons
Drawing Tools
Xara Photo & Graphic Designer has several basic drawing tools that let you create rectangles, ellipses, regular polygons, stars or any shape you like. These are vector drawing tools, which means you can resize, edit the outline shape and re-color your the images you create with no loss of quality. You can zoom in to see almost infinite detail, and all edits can be undone. These basic drawing tools are the Freehand & Brush tool, Straight Line tool, Shape tool and the Shape Painter tool. The drawing toolsThe Freehand & Brush Tool
This is the easiest way to draw simple lines, curves and shapes and it acts rather like a pencil. Shapes are created when you join the end point of your line to the start point. To draw a line or curve, position the pointer at the start position then press and hold the mouse button and as you drag the pointer, your line will be drawn. After you've drawn a freehand line you can control how smooth the curve is (i.e. how many control points it has) by adjusting the smoothing control slider on the InfoBar. Low values make the line follow your mouse movement more closely by creating more control points, and higher values produce smoother curves with fewer control points. (The re-fit indicator on the InfoBar tells you when you can still change the smoothing). To draw a series of connected straight lines, for example a triangle, hold down the "Alt" key, move the pointer to a new position and release "Alt", then hold down the "Alt" key again to draw the next segment. This Freehand and Brush tool can also draw creative or textured brush strokes. There are two types of brush strokes in Photo & Graphic Designer - Art Brushes that stretch the brush shape along a line and Scatter Brushes that repeatedly stamp the shape at intervals along a line. To draw a brush stroke simply select the style and brush profile from the drop down menus on the InfoBar. You can also select the line width of the brush stroke on the top tool bar. Brush stroke styles drop down menu You can also browse the many different brush types using the Line Gallery which categorizes them into folders. You can also select an existing line in your document and then choose a different brush or stroke shape, to change the appearance of the line. The Freehand and Brush Tool supports pressure sensitive drawing using compatible tablet devices. This allows you to draw variable width strokes - the more pressure you apply, the wider the stroke. This option is located on the InfoBar.The Straight Line Tool
This does exactly what it says - draws simple single-segment straight lines. Simply click and drag on the page to draw a straight line. You can click on any existing line to select it, and once selected you can click- drag on either end to move the end of the line around. The InfoBar has two dropdown lists on the left which allow you to choose an arrow head or tail style for each end of the selected line, and the slider on the InfoBar allows you to change the size of the arrow head and tail on the current selected line. Or you can enter a percentage value into the size text field to the right of the slider or select the ‘Reverse path’ button to switch around the head and tail of the selected line. Choice of arrow head and tail Select the last icon on the InfoBar to have immediate access to the Line Gallery where you will find hundreds of ready made lines that have been categorized into folders. Lines created with the Straight Line tool are fully compatible with the other drawing tools. So if you want to add more segments to a line, make it curved, or perhaps even turn it into a closed shape, use the Shape Tool.
The Shape Tool
This is a very powerful tool that can draw precise bezier curves and lines and also edit the outline of shapes. All lines and shapes in Xara Photo & Graphic Designer are made from a sequence of curve and line sections. (Curves are sometimes called "Bézier" curves after the mathematician who first described them). A sequence of curve and line sections. The sections or segments of a line are marked by small black ‘point handles’. You can drag, add and delete these handles to manipulate the shape of the line or outline. The Shape tool InfoBar To draw a straight line, select the 'Make Line' button on the InfoBar, then click where you want to start the line which will put a point handle on the page. This is displayed as a red square to indicate that it is the selected handle. Either click where you want the next point handle to be, or click and drag, and then release the mouse button when the line is correct. You can start a line at either end; you don't have to work left to right, or top-to-bottom. (Shortcut to switch to straight line = select 'L' on your keyboard if you are in the Shape tool). To draw a curved line, select the 'Make curve' button on the InfoBar, then click where you want to start the line. Either click or click and drag, then release, to create a second point handle, and a curve segment will be added to the line. A curve segment has Curve handles associated with the selected point handle. You can drag these to adjust the angle and radius of the curve. To create an object which is a mixture of straight and curved segments, just switch between the ‘Make Curve’ and ‘Make Line’ buttons as you create the object (or press "L" or "C" on the keyboard, if you are in the Shape tool). Editing an existing shape Some objects such as quickshapes, rectangles, ellipses and text have to be converted into editable shapes before you can use the Shape Tool on them. Select the Convert to Editable Shape in the Arrange menu (shortcut "Ctrl + Shift + S") to do this.The Shape Painter Tool
This tool allows you to ‘paint’ a vector shape like a paint brush. It can be used to draw new shapes or extend existing shapes. The painted strokes form filled shapes. Shape Painter InfoBar The InfoBar for this tool provides controls over Nib size, the Roundness, Angle and the Softness, as well as a smoothing control which adjusts how accurately the nib follows your mouse movement (this is exactly like the Freehand tool smoothness control). You can also adjust the nib size by holding down the Alt key and using the mouse wheel. Simply click on the page and the new strokes will create new shapes. If a shape is already selected, or you click on a shape to select it, then strokes on the page will adjust the outline of the selected shape. Hold down the Shift key and it erases or ‘un-paints’ the shape. The size of the nib can be controlled by dragging the slider. As you zoom out on your page, the nib size changes, relative to the objects on the page. Click the ‘Size’ button to set whether the nib size zooms in when you zoom into the page or stays the same size. If you keep the nib size the same then it effectively becomes smaller relative to the objects on the page allowing you to erase smaller details. Increasing the ‘Roundness’ of the nib will change it into a horizontal ellipse nib, whilst decreasing it will make it a vertical ellipse nib. Adjusting the ‘Softness’ will add a feathered edge to the shape. The Shape Painter tool supports pressure sensitive drawing using compatible tablet devices. This allows you to draw variable width strokes - the more pressure you apply, the wider the stroke. Liquify plugins, accessed from the dropdown menu on the InfoBar enable you to use a range of effects to modify the outlines of simple shapes, lines and rectangles.
More Drawing Tools
As well as these drawing tools, Photo & Graphic Designer has many other ways to add ready made, customizable graphic objects to your page: • SmartShapes - arrows, speech bubbles, text boxes and geometric components. See Introduction Part 1. • QuickShapes - rectangles, ellipses, spirals, polygons, stars, etc. • Page elements - buttons, stickers, graphics, icons, bullets, dividers, logos, etc. • Photo objects - frames, collages and albumsDemo Videos
A good way to learn the basics of the Photo Graphic & Designer tools, including selecting and manipulating objects on the page, is to view the set of three very short demo movies. We highly recommend you view them. Next month we’ll cover color editing. In the meantime if you don’t already own Photo & Graphic Designer why not download it now and give it a try!


Copyright © 2015 Xara Group Limited, a MAGIX company.
Page created with Xara Designer Pro

Xara Photo and Graphic Designer is a high-powered general purpose
graphics creation tool, able to create graphic designs of all types,
from web graphics to page layouts such as posters and flyers,
cartoons, and the most complex illustrations.
In our Introduction Part 1 we gave a general overview of Photo &
Graphic Designer, in Part 2 we covered the Text Tool, and this month
in Part 3 we are taking a closer look at the drawing tools.
Example graphics and photo frame:
Simple social media icons
Drawing Tools
Xara Photo & Graphic Designer has several basic drawing tools that let you create rectangles, ellipses, regular polygons, stars or any shape you like. These are vector drawing tools, which means you can resize, edit the outline shape and re-color your the images you create with no loss of quality. You can zoom in to see almost infinite detail, and all edits can be undone. These basic drawing tools are the Freehand & Brush tool, Straight Line tool, Shape tool and the Shape Painter tool. The drawing toolsThe Freehand & Brush Tool
This is the easiest way to draw simple lines, curves and shapes and it acts rather like a pencil. Shapes are created when you join the end point of your line to the start point. To draw a line or curve, position the pointer at the start position then press and hold the mouse button and as you drag the pointer, your line will be drawn. After you've drawn a freehand line you can control how smooth the curve is (i.e. how many control points it has) by adjusting the smoothing control slider on the InfoBar. Low values make the line follow your mouse movement more closely by creating more control points, and higher values produce smoother curves with fewer control points. (The re-fit indicator on the InfoBar tells you when you can still change the smoothing). To draw a series of connected straight lines, for example a triangle, hold down the "Alt" key, move the pointer to a new position and release "Alt", then hold down the "Alt" key again to draw the next segment. This Freehand and Brush tool can also draw creative or textured brush strokes. There are two types of brush strokes in Photo & Graphic Designer - Art Brushes that stretch the brush shape along a line and Scatter Brushes that repeatedly stamp the shape at intervals along a line. To draw a brush stroke simply select the style and brush profile from the drop down menus on the InfoBar. You can also select the line width of the brush stroke on the top tool bar. Brush stroke styles drop down menu You can also browse the many different brush types using the Line Gallery which categorizes them into folders. You can also select an existing line in your document and then choose a different brush or stroke shape, to change the appearance of the line. The Freehand and Brush Tool supports pressure sensitive drawing using compatible tablet devices. This allows you to draw variable width strokes - the more pressure you apply, the wider the stroke. This option is located on the InfoBar.The Straight Line Tool
This does exactly what it says - draws simple single-segment straight lines. Simply click and drag on the page to draw a straight line. You can click on any existing line to select it, and once selected you can click-drag on either end to move the end of the line around. The InfoBar has two dropdown lists on the left which allow you to choose an arrow head or tail style for each end of the selected line, and the slider on the InfoBar allows you to change the size of the arrow head and tail on the current selected line. Or you can enter a percentage value into the size text field to the right of the slider or select the ‘Reverse path’ button to switch around the head and tail of the selected line. Choice of arrow head and tail Select the last icon on the InfoBar to have immediate access to the Line Gallery where you will find hundreds of ready made lines that have been categorized into folders. Lines created with the Straight Line tool are fully compatible with the other drawing tools. So if you want to add more segments to a line, make it curved, or perhaps even turn it into a closed shape, use the Shape Tool.
The Shape Tool
This is a very powerful tool that can draw precise bezier curves and lines and also edit the outline of shapes. All lines and shapes in Xara Photo & Graphic Designer are made from a sequence of curve and line sections. (Curves are sometimes called "Bézier" curves after the mathematician who first described them). A sequence of curve and line sections. The sections or segments of a line are marked by small black ‘point handles’. You can drag, add and delete these handles to manipulate the shape of the line or outline. The Shape tool InfoBar To draw a straight line, select the 'Make Line' button on the InfoBar, then click where you want to start the line which will put a point handle on the page. This is displayed as a red square to indicate that it is the selected handle. Either click where you want the next point handle to be, or click and drag, and then release the mouse button when the line is correct. You can start a line at either end; you don't have to work left to right, or top-to-bottom. (Shortcut to switch to straight line = select 'L' on your keyboard if you are in the Shape tool). To draw a curved line, select the 'Make curve' button on the InfoBar, then click where you want to start the line. Either click or click and drag, then release, to create a second point handle, and a curve segment will be added to the line. A curve segment has Curve handles associated with the selected point handle. You can drag these to adjust the angle and radius of the curve. To create an object which is a mixture of straight and curved segments, just switch between the ‘Make Curve’ and ‘Make Line’ buttons as you create the object (or press "L" or "C" on the keyboard, if you are in the Shape tool). Editing an existing shape Some objects such as quickshapes, rectangles, ellipses and text have to be converted into editable shapes before you can use the Shape Tool on them. Select the Convert to Editable Shape in the Arrange menu (shortcut "Ctrl + Shift + S") to do this.The Shape Painter Tool
This tool allows you to ‘paint’ a vector shape like a paint brush. It can be used to draw new shapes or extend existing shapes. The painted strokes form filled shapes. Shape Painter InfoBar The InfoBar for this tool provides controls over Nib size, the Roundness, Angle and the Softness, as well as a smoothing control which adjusts how accurately the nib follows your mouse movement (this is exactly like the Freehand tool smoothness control). You can also adjust the nib size by holding down the Alt key and using the mouse wheel. Simply click on the page and the new strokes will create new shapes. If a shape is already selected, or you click on a shape to select it, then strokes on the page will adjust the outline of the selected shape. Hold down the Shift key and it erases or ‘un-paints’ the shape. The size of the nib can be controlled by dragging the slider. As you zoom out on your page, the nib size changes, relative to the objects on the page. Click the ‘Size’ button to set whether the nib size zooms in when you zoom into the page or stays the same size. If you keep the nib size the same then it effectively becomes smaller relative to the objects on the page allowing you to erase smaller details. Increasing the ‘Roundness’ of the nib will change it into a horizontal ellipse nib, whilst decreasing it will make it a vertical ellipse nib. Adjusting the ‘Softness’ will add a feathered edge to the shape. The Shape Painter tool supports pressure sensitive drawing using compatible tablet devices. This allows you to draw variable width strokes - the more pressure you apply, the wider the stroke. Liquify plugins, accessed from the dropdown menu on the InfoBar enable you to use a range of effects to modify the outlines of simple shapes, lines and rectangles.
More Drawing Tools
As well as these drawing tools, Photo & Graphic Designer has many other ways to add ready made, customizable graphic objects to your page: • SmartShapes - arrows, speech bubbles, text boxes and geometric components. See Introduction Part 1. • QuickShapes - rectangles, ellipses, spirals, polygons, stars, etc. • Page elements - buttons, stickers, graphics, icons, bullets, dividers, logos, etc. • Photo objects - frames, collages and albumsDemo Videos
A good way to learn the basics of the Photo Graphic & Designer tools, including selecting and manipulating objects on the page, is to view the set of three very short demo movies. We highly recommend you view them. Next month we’ll cover color editing. In the meantime if you don’t already own Photo & Graphic Designer why not download it now and give it a try!


Copyright © 2015 Xara Group Limited, a MAGIX company.
Page created with Xara Designer Pro
INTRODUCTION TO PHOTO & GRAPHIC DESIGNER PART 3
INTRODUCTION TO PHOTO & GRAPHIC DESIGNER PART 3
INTRODUCTION TO PHOTO &
GRAPHIC DESIGNER PART 3
INTRODUCTION TO PHOTO &
GRAPHIC DESIGNER PART 3