


© Xara Group Limited
Photo Sizing for Print
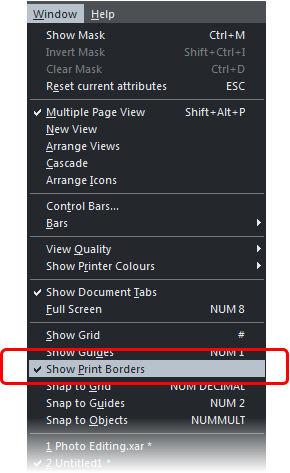
It is possible to print directly from a photo document but it is tricky to judge the sizes i.e. how big will it be, as it's not on a 'page' and the measurement
on the InfoBar is shown in pixels. Selecting the 'Show print borders' from the Window menu will help, but probably it's best to put the photo on a print document - either 'copy and paste' or drag the JPG photo from your computer file manager onto the page.
Use the Selector tool to resize the photo as required, or type in the required width and/or height. Take care when dragging the side handles as
it will squash the image - drag on the corner handles only. Make sure the padlock icon is set to 'lock aspect ratio' if you enter only one
dimension. As well as pixels you can enter a value in inches, mm etc. for example, a width of '2in'. The Status bar at the bottom will show the
resolution of image in dpi (dots per inch).
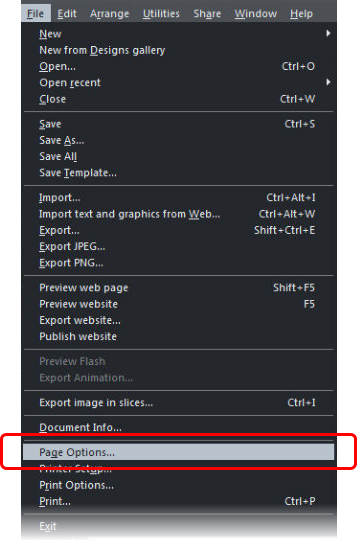
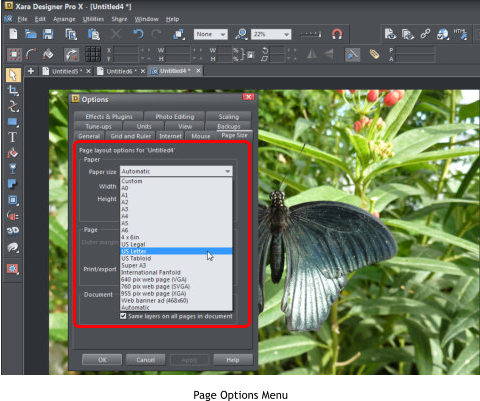
Go to 'File' and 'Page Options' to set the size of the page, the margins and the orientation. Go to the 'Window' menu and select 'Show Print Borders' to
show the margin because most printers can't go right to the edge. Don't forget to select the correct paper size for your printer before printing.
Tip - Even with the best quality printers it's not necessary for your images to be more than 150 dpi for print - try a print of 300dpi and 150dpi and see if
you can notice any difference.
Photo Optimisation
With the ever increasing resolution and file size of digital camera JPEGs, if you have a document containing many images, the file size can quickly
become very large. For example, a multi-page document containing 20 full resolution JPEGs, each of 5MB, would produce a file of over 100MB.
Furthermore, these photos are often unnecessarily high resolution. Reducing a photo from a 10 megapixel digital camera to be 2 inches (5 cm) wide on
the page will result in this image being around 1800 dpi. Whilst a very high resolution image gives greater flexibility for printing (and you can zoom in, or
enlarge small parts of the photo), this is far higher than required for even the best quality commercial printing, and even more so for web graphics or
HTML production.
Another size issue is that if you clip to a small part of the image, or cut-out only a small part of your photos, there could be large parts of hidden image
outside the visible area. For editing purposes this "live crop" is a great feature, as you can un-crop, alter the size, position and scale and everything
remains as sharp as possible. But for finished documents you may want to remove the invisible parts.
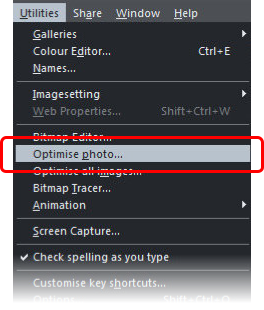
Xara provides a solution to both these issues with an Optimize feature. To reduce the resolution of any image, first ensure its size on the page is the
required size and then go to Utilities -> Optimize photo ... By default for JPEG images the settings are such that the photo will be optimized to a 96dpi
(normal screen resolution). This is normally what you will want for photos in a website. However, you can change settings for the resolution by entering a
different dpi (eg. 150dpi if you want print quality).
This optimisation can make a dramatic saving to file (and memory) sizes, sometimes reducing it to 15% or less.
EXIF data
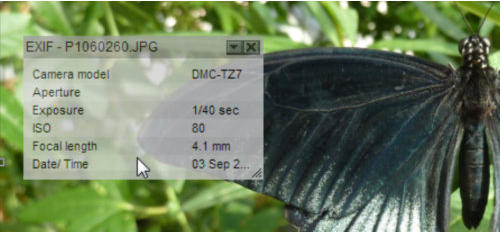
All photo files carry extra data known as EXIF and many camera owners use this data to compare successful photos to those that are not. An option of
the Xara Photo tool flyout enables you to see the data for camera model, aperture, exposure, ISO, focal length, date and time taken, in a small floating
semi-transparent window.
Xara Photo & Graphic Designer and Designer Pro include very fast photo editing tools that offer all the common photo editing features and many
sophisticated and powerful features such as a 'Magic' Photo Erase feature (which makes it easy to seamlessly remove unwanted objects from your photo),
Content Aware Scaling and Zooming (which allows images to be stretched or squashed while retaining the proportions of important parts of the picture),
and a Color Select and Erase tool (to re-color selected areas or remove colored backgrounds). In next month’s tutorial I’m going to introduce you to
these tools.
Go to Part 2, an introduction to the photo tools
Go to Part 3, a closer look at the Brightness Levels tool
document - either 'copy and paste' or drag the JPG photo from your computer file manager onto the page.
Use the Selector tool to resize the photo as required, or type in the required width and/or height. Take care when dragging the side handles as
it will squash the image - drag on the corner handles only. Make sure the padlock icon is set to 'lock aspect ratio' if you enter only one
dimension. As well as pixels you can enter a value in inches, mm etc. for example, a width of '2in'. The Status bar at the bottom will show the
resolution of image in dpi (dots per inch).
Go to 'File' and 'Page Options' to set the size of the page, the margins and the orientation. Go to the 'Window' menu and select 'Show Print Borders' to
show the margin because most printers can't go right to the edge. Don't forget to select the correct paper size for your printer before printing.
Tip - Even with the best quality printers it's not necessary for your images to be more than 150 dpi for print - try a print of 300dpi and 150dpi and see if
you can notice any difference.
Photo Optimisation
With the ever increasing resolution and file size of digital camera JPEGs, if you have a document containing many images, the file size can quickly
become very large. For example, a multi-page document containing 20 full resolution JPEGs, each of 5MB, would produce a file of over 100MB.
Furthermore, these photos are often unnecessarily high resolution. Reducing a photo from a 10 megapixel digital camera to be 2 inches (5 cm) wide on
the page will result in this image being around 1800 dpi. Whilst a very high resolution image gives greater flexibility for printing (and you can zoom in, or
enlarge small parts of the photo), this is far higher than required for even the best quality commercial printing, and even more so for web graphics or
HTML production.
Another size issue is that if you clip to a small part of the image, or cut-out only a small part of your photos, there could be large parts of hidden image
outside the visible area. For editing purposes this "live crop" is a great feature, as you can un-crop, alter the size, position and scale and everything
remains as sharp as possible. But for finished documents you may want to remove the invisible parts.
Xara provides a solution to both these issues with an Optimize feature. To reduce the resolution of any image, first ensure its size on the page is the
required size and then go to Utilities -> Optimize photo ... By default for JPEG images the settings are such that the photo will be optimized to a 96dpi
(normal screen resolution). This is normally what you will want for photos in a website. However, you can change settings for the resolution by entering a
different dpi (eg. 150dpi if you want print quality).
This optimisation can make a dramatic saving to file (and memory) sizes, sometimes reducing it to 15% or less.
EXIF data
All photo files carry extra data known as EXIF and many camera owners use this data to compare successful photos to those that are not. An option of
the Xara Photo tool flyout enables you to see the data for camera model, aperture, exposure, ISO, focal length, date and time taken, in a small floating
semi-transparent window.
Xara Photo & Graphic Designer and Designer Pro include very fast photo editing tools that offer all the common photo editing features and many
sophisticated and powerful features such as a 'Magic' Photo Erase feature (which makes it easy to seamlessly remove unwanted objects from your photo),
Content Aware Scaling and Zooming (which allows images to be stretched or squashed while retaining the proportions of important parts of the picture),
and a Color Select and Erase tool (to re-color selected areas or remove colored backgrounds). In next month’s tutorial I’m going to introduce you to
these tools.
Go to Part 2, an introduction to the photo tools
Go to Part 3, a closer look at the Brightness Levels tool