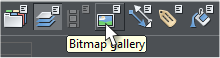
 Find the image of the wood fill here and bring it onto the page. Select the wedge shape above 12 o’clock. Open the Bitmap Gallery (F11), select the
wood bitmap and press Fill. Switch to the Fill tool (F5). Click twice on the wedge shape. On the Infobar change the Bitmap Resolution to 96 dpi.
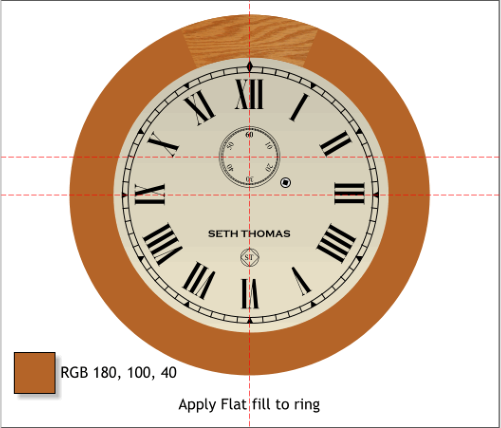
Apply a flat fill to the O-shape.
Apply the two flat colors shown to the key hole and metal thing. (If you know the name of the protrusion the key fits over, let me know).
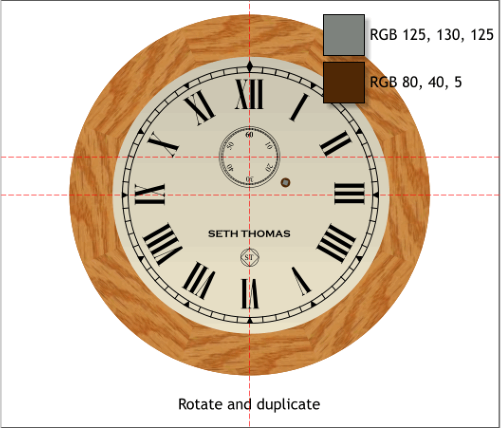
Duplicate the wedge shape and rotate -45 degrees. Repeat until all 8 sections are in place. Rotate around the intersected guidelines.
TIP: Click twice on the wedge shape to enable rotate/skew mode. Drag the center of rotation to the cross section of the two guidelines. Hold down the
Ctrl key and drag any of the corner arrow rotation handles with the RIGHT mouse key. When you release the mouse key a duplicate shape will be
dropped. Repeat.
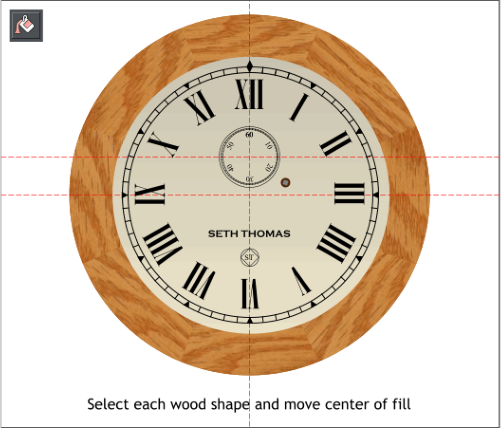
Select the Fill tool (F5). Click on each wood shape, then click the center of the fill (where the two fill path arrows meet) and drag the fill to create a
different fills. Repeat this for the other shapes. This makes the round face appear to be made up of several different pieces of wood and not just the
same piece each time.
Hold down the Alt key and click twice on one of the wood filled sections to “drill down” to the O-shape below. Press Ctrl k (Clone).
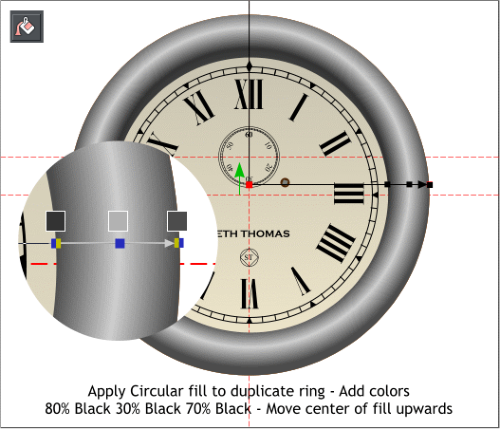
Select the cloned O-shape with the Fill tool. From the Fill Type drop down menu, select Circular.
Zoom to 300%. Double click on the right fill path arrow at the inside edge of the O-shape to add a new color. Double click in the center of the shape to
add a second color. Click the inside new color and change the color to 80% Black. Change the fill for the new center color to 30% Black. Make the
outside color 70% Black. Click the center of the fill where the fill path arrows come together. Use the up arrow key on your keyboard to move the
center of the fill upwards about 12 pixels.
TIP I: You can press 1, 2, 3, or 4 on the keyboard (above the alphabetical keys) to zoom to 100%, 200%, 300% and 400%. Press 5 to zoom to 50%. I like to
zoom in and out for close work.
TIP II: You can also create a New View (Window > New View). Zoom in tight in the new view. Then press Ctrl Tab to toggle back and forth between
views. You can create many views.
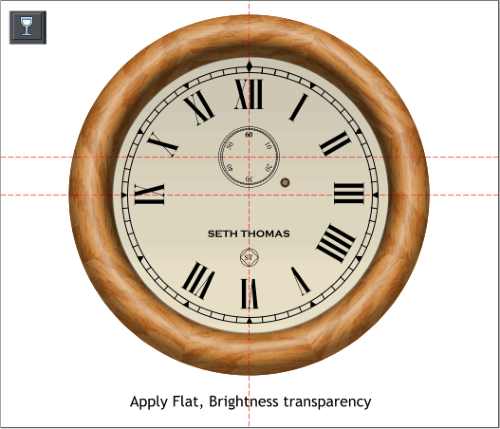
Select the Transparency tool (F6). Click on the O-shape. Select Brightness from the Transparency Type drop down list.
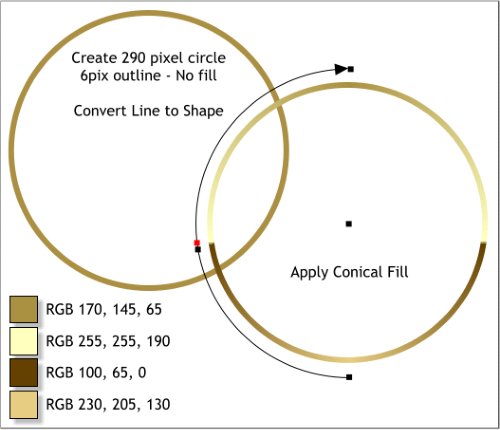
Create a new 290 pixel circle. Change the outline to 6px and the fill to none. From the Arrange menu, select Convert Line to Shapes.
NOTE: The designation for pixels used to be pix, as in 12pix. In Designer 6 Pro this has been changed to px to be consistent with the rest of the industry.
You can use either px or pix in Designer.
Select the Fill tool (F5). From the Fill Type drop down list, select Conical. Drag the end of the fill path arrow so that the arrow is centered over the top
of the ring. Double click on the fill path arrow to add two new colors a little below halfway down. Apply the colors shown. The two middle color control
points should be very close to create a sharp edge.
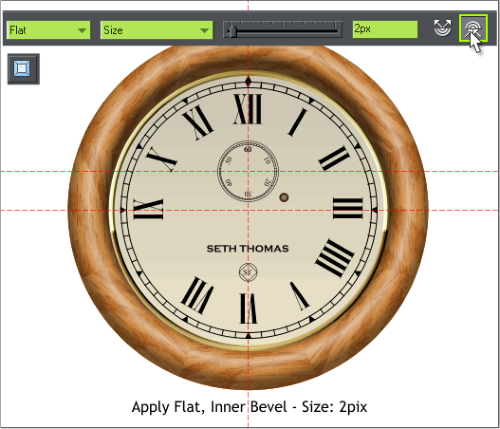
Select the new ring shape with the Bevel tool (Ctrl F3). Select Flat from the Bevel Type drop down list. Select Size from the Slider Types drop down list
and change the Size to 2px. Press Enter to apply the change. Press the Inner Bevel icon to move the bevel inwards.
Save your drawing and take a short break.
Find the image of the wood fill here and bring it onto the page. Select the wedge shape above 12 o’clock. Open the Bitmap Gallery (F11), select the
wood bitmap and press Fill. Switch to the Fill tool (F5). Click twice on the wedge shape. On the Infobar change the Bitmap Resolution to 96 dpi.
Apply a flat fill to the O-shape.
Apply the two flat colors shown to the key hole and metal thing. (If you know the name of the protrusion the key fits over, let me know).
Duplicate the wedge shape and rotate -45 degrees. Repeat until all 8 sections are in place. Rotate around the intersected guidelines.
TIP: Click twice on the wedge shape to enable rotate/skew mode. Drag the center of rotation to the cross section of the two guidelines. Hold down the
Ctrl key and drag any of the corner arrow rotation handles with the RIGHT mouse key. When you release the mouse key a duplicate shape will be
dropped. Repeat.
Select the Fill tool (F5). Click on each wood shape, then click the center of the fill (where the two fill path arrows meet) and drag the fill to create a
different fills. Repeat this for the other shapes. This makes the round face appear to be made up of several different pieces of wood and not just the
same piece each time.
Hold down the Alt key and click twice on one of the wood filled sections to “drill down” to the O-shape below. Press Ctrl k (Clone).
Select the cloned O-shape with the Fill tool. From the Fill Type drop down menu, select Circular.
Zoom to 300%. Double click on the right fill path arrow at the inside edge of the O-shape to add a new color. Double click in the center of the shape to
add a second color. Click the inside new color and change the color to 80% Black. Change the fill for the new center color to 30% Black. Make the
outside color 70% Black. Click the center of the fill where the fill path arrows come together. Use the up arrow key on your keyboard to move the
center of the fill upwards about 12 pixels.
TIP I: You can press 1, 2, 3, or 4 on the keyboard (above the alphabetical keys) to zoom to 100%, 200%, 300% and 400%. Press 5 to zoom to 50%. I like to
zoom in and out for close work.
TIP II: You can also create a New View (Window > New View). Zoom in tight in the new view. Then press Ctrl Tab to toggle back and forth between
views. You can create many views.
Select the Transparency tool (F6). Click on the O-shape. Select Brightness from the Transparency Type drop down list.
Create a new 290 pixel circle. Change the outline to 6px and the fill to none. From the Arrange menu, select Convert Line to Shapes.
NOTE: The designation for pixels used to be pix, as in 12pix. In Designer 6 Pro this has been changed to px to be consistent with the rest of the industry.
You can use either px or pix in Designer.
Select the Fill tool (F5). From the Fill Type drop down list, select Conical. Drag the end of the fill path arrow so that the arrow is centered over the top
of the ring. Double click on the fill path arrow to add two new colors a little below halfway down. Apply the colors shown. The two middle color control
points should be very close to create a sharp edge.
Select the new ring shape with the Bevel tool (Ctrl F3). Select Flat from the Bevel Type drop down list. Select Size from the Slider Types drop down list
and change the Size to 2px. Press Enter to apply the change. Press the Inner Bevel icon to move the bevel inwards.
Save your drawing and take a short break.


 © Gary W. Priester