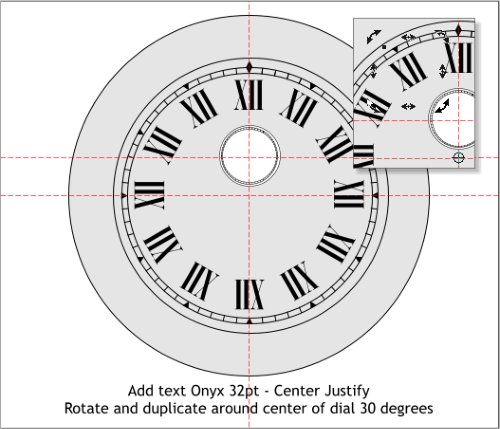
 Select the Text tool (t) and click on the center line under the 12:00 o’clock position. Select a condensed, serif font from the Fonts drop down list such
as Onyx. Set the Size to 32pt (this may vary from font to font). Press the Center Justify icon on the Infobar and key in XII (Roman Numeral for 12). Click
here for a free DaFont Condensed Serif font that is appropriate for this tutorial.
Clone and rotate the text -30 degrees around the two guidelines. Repeat this step until you have 12 Roman Numerals.
With the Text tool, double click on each of the numbers (except for IV), to select the text and change the Roman Numerals accordingly. Change the IV
to IIII instead. This is the convention for clocks.
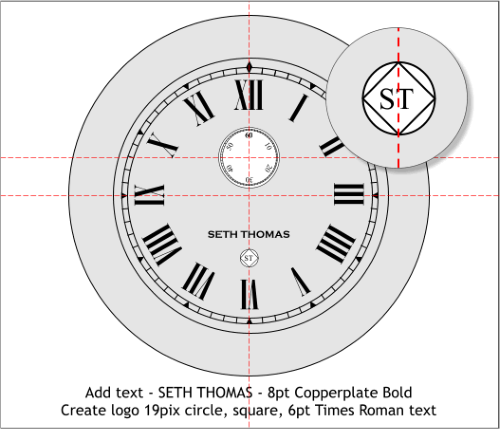
Repeating these steps, add small 6pt Times Roman numerals to the small dial as shown above.
Add the manufacturer’s name SETH THOMAS in small Copperplate Bold text, or a similar font. Create a small 19 pixel circle and square (rotate the
square 45 degrees and reduce the square to fit inside the circle. Add ST to create the Seth Thomas logo. Click here for more information about Seth
Thomas, American Clockmaker 1785 — 1859).
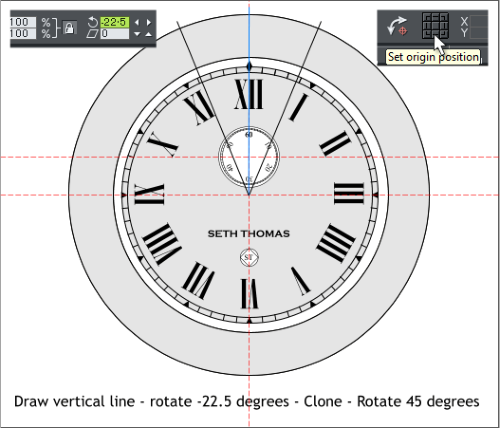
Select the two largest circles and press Ctrl j or Arrange > Join Shapes to create an O-shape. Clone the O-shape (Ctrl k).
Save your drawing.
Use the Shape Editor tool or the Straight Line tool to draw a vertical line from the center of the two guidelines and extending above the O- shape. Click
the bottom, center button on the Set Origin Position icon on the Infobar to set the angle of rotation to the bottom.
Key in -22.5 (1/2 of 45 degrees) in the Angle of Rotation text entry box and press Enter. Clone the line and rotate the clone 45 degrees.
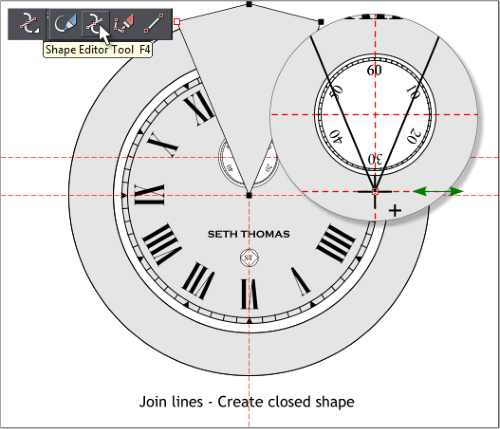
Select both lines. Switch to the Shape Editor tool (F4). Select one of the bottom control points and drag the point away a very short distance then drag
back (as shown above top right). The cursor will change to a + to indicate the two lines are about to be joined.
Click on either of the top control points, click a new point above the 12 o’clock position and then press Enter to close the shape.
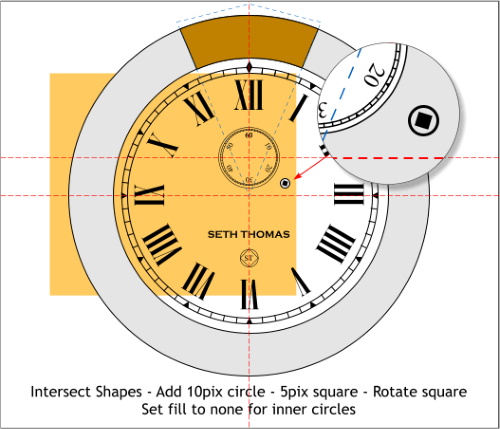
Select the wedge shape you just created and the cloned ring shape. From the Arrange menu, select Combine Shapes > Intersect Shapes or press Ctrl 3.
This removes all of the ring shape except a keystone shape shown above in dark yellow.
Hold down the Ctrl key and click on each of the inside dial circles and set the fill to none. I have placed a yellow rectangle in the back to show the
results of setting the fill color to none.
Add a small circle and smaller rotated square as shown. This is the key hole for winding the clock. There is only one hole as this is not a chiming clock.
Chiming clocks have two or three key holes.
Draw a new 292 pixel circle centered on the two guidelines. Send the circle to the back (Ctrl b or Arrange > Put to Back).
With the new circle selected, select the Fill tool (F5). From the Fill Type drop down list, select Linear. Drag the ends o the fill path arrows until the fill
path arrow goes from 6 o’clock to 12 o’clock.
Open the Color Editor (Ctrl e) and edit the colors in the RGB Color Model. Click on the small square at either end of the fill path arrow to edit the color.
The values are shown in this order, Red, Blue, Green.
NOTE: If your RGB colors are displayed in percent instead of 0- 255, open the Page Options menu (right click on the page and select Page Options >
Units). Change the Color Units to 0-255. Click Apply then OK to close the dialog.
Select the Text tool (t) and click on the center line under the 12:00 o’clock position. Select a condensed, serif font from the Fonts drop down list such
as Onyx. Set the Size to 32pt (this may vary from font to font). Press the Center Justify icon on the Infobar and key in XII (Roman Numeral for 12). Click
here for a free DaFont Condensed Serif font that is appropriate for this tutorial.
Clone and rotate the text -30 degrees around the two guidelines. Repeat this step until you have 12 Roman Numerals.
With the Text tool, double click on each of the numbers (except for IV), to select the text and change the Roman Numerals accordingly. Change the IV
to IIII instead. This is the convention for clocks.
Repeating these steps, add small 6pt Times Roman numerals to the small dial as shown above.
Add the manufacturer’s name SETH THOMAS in small Copperplate Bold text, or a similar font. Create a small 19 pixel circle and square (rotate the
square 45 degrees and reduce the square to fit inside the circle. Add ST to create the Seth Thomas logo. Click here for more information about Seth
Thomas, American Clockmaker 1785 — 1859).
Select the two largest circles and press Ctrl j or Arrange > Join Shapes to create an O-shape. Clone the O-shape (Ctrl k).
Save your drawing.
Use the Shape Editor tool or the Straight Line tool to draw a vertical line from the center of the two guidelines and extending above the O- shape. Click
the bottom, center button on the Set Origin Position icon on the Infobar to set the angle of rotation to the bottom.
Key in -22.5 (1/2 of 45 degrees) in the Angle of Rotation text entry box and press Enter. Clone the line and rotate the clone 45 degrees.
Select both lines. Switch to the Shape Editor tool (F4). Select one of the bottom control points and drag the point away a very short distance then drag
back (as shown above top right). The cursor will change to a + to indicate the two lines are about to be joined.
Click on either of the top control points, click a new point above the 12 o’clock position and then press Enter to close the shape.
Select the wedge shape you just created and the cloned ring shape. From the Arrange menu, select Combine Shapes > Intersect Shapes or press Ctrl 3.
This removes all of the ring shape except a keystone shape shown above in dark yellow.
Hold down the Ctrl key and click on each of the inside dial circles and set the fill to none. I have placed a yellow rectangle in the back to show the
results of setting the fill color to none.
Add a small circle and smaller rotated square as shown. This is the key hole for winding the clock. There is only one hole as this is not a chiming clock.
Chiming clocks have two or three key holes.
Draw a new 292 pixel circle centered on the two guidelines. Send the circle to the back (Ctrl b or Arrange > Put to Back).
With the new circle selected, select the Fill tool (F5). From the Fill Type drop down list, select Linear. Drag the ends o the fill path arrows until the fill
path arrow goes from 6 o’clock to 12 o’clock.
Open the Color Editor (Ctrl e) and edit the colors in the RGB Color Model. Click on the small square at either end of the fill path arrow to edit the color.
The values are shown in this order, Red, Blue, Green.
NOTE: If your RGB colors are displayed in percent instead of 0- 255, open the Page Options menu (right click on the page and select Page Options >
Units). Change the Color Units to 0-255. Click Apply then OK to close the dialog.


 © Gary W. Priester