thinking outside the box
Photo Pop-ups & Galleries For Your Website


XARA TUTORIAL
Text here...


Photo Gallery Widgets
There are a few photo gallery Widgets that you can add to your web page. These are ‘ready made’ galleries consisting of a certain number of columns and rows of image thumbnails, that when clicked will pop-up a larger version of the image. I’ll cover very briefly how to use these, but spend most of this tutorial on creating hand-made galleries. In the Designs Gallery in the folder Page Elements & Widgets > Photo Elements & Widgets > Photo Slideshows & Galleries there are a few gallery Widgets. I’m going to use the one called Gallery slideshow (5 col). This is the one that I used to make the example 5 column gallery shown on page 1. Note: there are other photo galleries in the collection of Widgets, for example the ones called Portrait Gallery and Landscape Gallery that work in a very similar way. These have some advantages in that you can set any number of columns, and they have some fancy mouse-over effects. However, they are limited to being all Landscape or all Portrait orientation. As the name suggests Gallery slideshow (5 col) is a 5 column arrangement of thumbnails, but you can add as many images as you like - it automatically adds more rows as necessary. There are 3 and 8 column variants of the same widget that work the same way. This Widget also allows mixed portrait and landscape images. You can resize the gallery on your page so the thumbnails are smaller, or larger, as desired. To add this gallery to your web page, just drag the Widget thumbnail from the Designs Gallery onto your page. It’s pre-populated with 8 images, and looks like this. What you see on the page is a static preview. In order to check the operation of the gallery it’s necessary to preview the web page, using the usual icon: on the top toolbar.
You can resize this gallery on your page by using the normal Selector Tool to drag the corner handle.
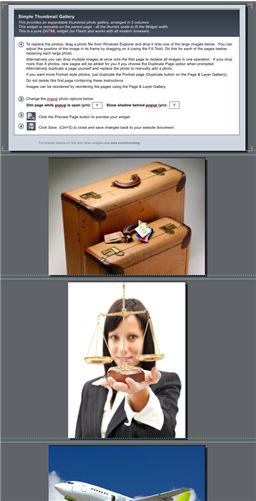
To edit the Widget, just double-click it, and it will open a new document tab, containing a page of instructions, with a set of images below
(which is really just a set of pages).
When you double-click to edit the Widget you see a page of instructions followed by all the images in this gallery.
The instructions should be self-explanatory, but here are some key points:
•
Replace any image by dragging a photo file from your Windows File Explorer onto the image you want to replace
•
If you are importing an upright (portrait) image, then drag it onto an existing upright photo
•
If you want more portrait style images, using the Page & Layer Gallery again, select one of the portrait images, and the ‘Duplicate’
button on the top of the Gallery. You can then re-order as required
•
You can re-order the images by using the Page & Layer Gallery on the right of the screen. Just drag the thumbnail up or down the list of
images
•
To delete an image, select it in the Page & Layer Gallery and click the Delete button at the top.
•
If you want to adjust the size, crop or rotation of the image in its frame, select the Fill Tool , click on the picture and then drag one
of the arrow ends, or drag on the image to move it within the frame.
•
You can preview the gallery using the normal web preview icon . Simply close the tab (or Ctrl+S) to save these changes back to your
main document. After a few seconds the preview on the page will update.
If you’ve added a lot of images you might see the gallery is cropped, like this.
A cropped gallery, showing scroll bar
This is just because you added more rows than fit in the current size of the gallery. You may want it like this - so you have to scroll the gallery
to see all the images. But if not, it’s easy to change. Using the Selector Tool select the gallery on the page, and drag the center bottom resize
handle down a bit. This will show the whole gallery stretched briefly while you drag it, but will correct itself and update the preview after a
few seconds. It might take a few attempts to get the exact vertical size that you want.
To resize the whole gallery drag the bottom right resize handle.
on the top toolbar.
You can resize this gallery on your page by using the normal Selector Tool to drag the corner handle.
To edit the Widget, just double-click it, and it will open a new document tab, containing a page of instructions, with a set of images below
(which is really just a set of pages).
When you double-click to edit the Widget you see a page of instructions followed by all the images in this gallery.
The instructions should be self-explanatory, but here are some key points:
•
Replace any image by dragging a photo file from your Windows File Explorer onto the image you want to replace
•
If you are importing an upright (portrait) image, then drag it onto an existing upright photo
•
If you want more portrait style images, using the Page & Layer Gallery again, select one of the portrait images, and the ‘Duplicate’
button on the top of the Gallery. You can then re-order as required
•
You can re-order the images by using the Page & Layer Gallery on the right of the screen. Just drag the thumbnail up or down the list of
images
•
To delete an image, select it in the Page & Layer Gallery and click the Delete button at the top.
•
If you want to adjust the size, crop or rotation of the image in its frame, select the Fill Tool , click on the picture and then drag one
of the arrow ends, or drag on the image to move it within the frame.
•
You can preview the gallery using the normal web preview icon . Simply close the tab (or Ctrl+S) to save these changes back to your
main document. After a few seconds the preview on the page will update.
If you’ve added a lot of images you might see the gallery is cropped, like this.
A cropped gallery, showing scroll bar
This is just because you added more rows than fit in the current size of the gallery. You may want it like this - so you have to scroll the gallery
to see all the images. But if not, it’s easy to change. Using the Selector Tool select the gallery on the page, and drag the center bottom resize
handle down a bit. This will show the whole gallery stretched briefly while you drag it, but will correct itself and update the preview after a
few seconds. It might take a few attempts to get the exact vertical size that you want.
To resize the whole gallery drag the bottom right resize handle.