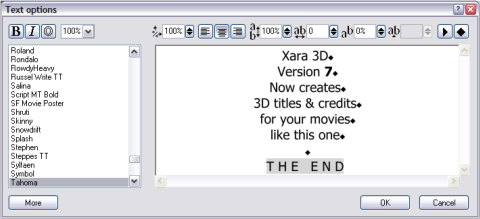
 There's one other subtle point about this example - one character, the '7' and 'THE END' is a different color. You can select any part of the text and apply
completely different settings - not just color, but also font, bevel and extrude. There are 2 ways to do this. One option is to open the text editor (click
the Aa button) and drag-select across parts of the text, and then adjust any of the settings in the text editor dialog, such as font, aspect ratio, even
tracking and letter spacing. Here you can see 'THE END' selected.
If you want to change the color of some of the text you have to select the text in a different way. Close the text dialog, and select the
'editing cursor' button from the button bar at the top. Although you can edit the text while it's animating (as you can adjust all settings), it's best to do
this with the animation stopped. And then using the keyboard arrow keys you can move the text cursor through the text. The Up/Down arrows move
from one line to the text. Use Shift and arrow to select text - and now you can use the option tabs on the right to adjust the values of just the selected
region.
Here's a Star Wars-like receding example, again in reflective gold.
Another new feature of 3D maker 7 is that you can adjust the perspective or view point. There's a new View tab (Options -> View) with pop-up sliders
that control all aspects of the object angles, plus the viewpoint. The viewpoint adjusts how close to the text the view is which gives the effect of
adjusting the perspective from a more-fish-eye like lens to a 'from a distance' point of view.
Here's the same file as before but with the Viewpoint and angles changed in the View options tab. Oh and the light positions were adjusted to get the
right gold reflections on the side of the text.
Before we move onto the more advanced scroll IN/OUT examples here's another nice scroll example.
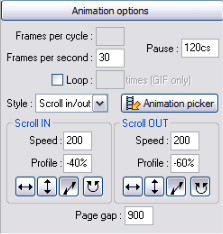
This has a pause in the middle (set to 1 second here), you can probably tell the Start speed is quite high, and the exit speed after the pause is slower.
One important point is that Xara 3D eases from one speed to another to produce nice acceleration or deceleration effects - it's not an instant speed
change.
So now let's look at some more advanced examples.
This uses the 'scroll in/out' animation type. The 'scroll in' part is a Z axis animation from behind the view to the center of the screen where it pauses.
The second part is simply the reverse of this, with the text coming back out.
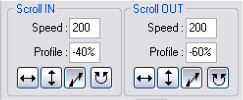
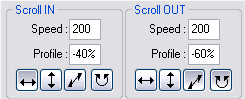
The example InPauseBackBlue.x3d is very similar but in this case it also uses acceleration.
So you can see you can set a separate axis for the 'in' and 'out' stages. In this case both are Z axis, but the second case has been reversed.
It's great fun to just experiment and play with the settings. Try changing just one setting.
There's one other subtle point about this example - one character, the '7' and 'THE END' is a different color. You can select any part of the text and apply
completely different settings - not just color, but also font, bevel and extrude. There are 2 ways to do this. One option is to open the text editor (click
the Aa button) and drag-select across parts of the text, and then adjust any of the settings in the text editor dialog, such as font, aspect ratio, even
tracking and letter spacing. Here you can see 'THE END' selected.
If you want to change the color of some of the text you have to select the text in a different way. Close the text dialog, and select the
'editing cursor' button from the button bar at the top. Although you can edit the text while it's animating (as you can adjust all settings), it's best to do
this with the animation stopped. And then using the keyboard arrow keys you can move the text cursor through the text. The Up/Down arrows move
from one line to the text. Use Shift and arrow to select text - and now you can use the option tabs on the right to adjust the values of just the selected
region.
Here's a Star Wars-like receding example, again in reflective gold.
Another new feature of 3D maker 7 is that you can adjust the perspective or view point. There's a new View tab (Options -> View) with pop-up sliders
that control all aspects of the object angles, plus the viewpoint. The viewpoint adjusts how close to the text the view is which gives the effect of
adjusting the perspective from a more-fish-eye like lens to a 'from a distance' point of view.
Here's the same file as before but with the Viewpoint and angles changed in the View options tab. Oh and the light positions were adjusted to get the
right gold reflections on the side of the text.
Before we move onto the more advanced scroll IN/OUT examples here's another nice scroll example.
This has a pause in the middle (set to 1 second here), you can probably tell the Start speed is quite high, and the exit speed after the pause is slower.
One important point is that Xara 3D eases from one speed to another to produce nice acceleration or deceleration effects - it's not an instant speed
change.
So now let's look at some more advanced examples.
This uses the 'scroll in/out' animation type. The 'scroll in' part is a Z axis animation from behind the view to the center of the screen where it pauses.
The second part is simply the reverse of this, with the text coming back out.
The example InPauseBackBlue.x3d is very similar but in this case it also uses acceleration.
So you can see you can set a separate axis for the 'in' and 'out' stages. In this case both are Z axis, but the second case has been reversed.
It's great fun to just experiment and play with the settings. Try changing just one setting.

 © Xara Group 2011