


© Xara Group Limited


Page 2
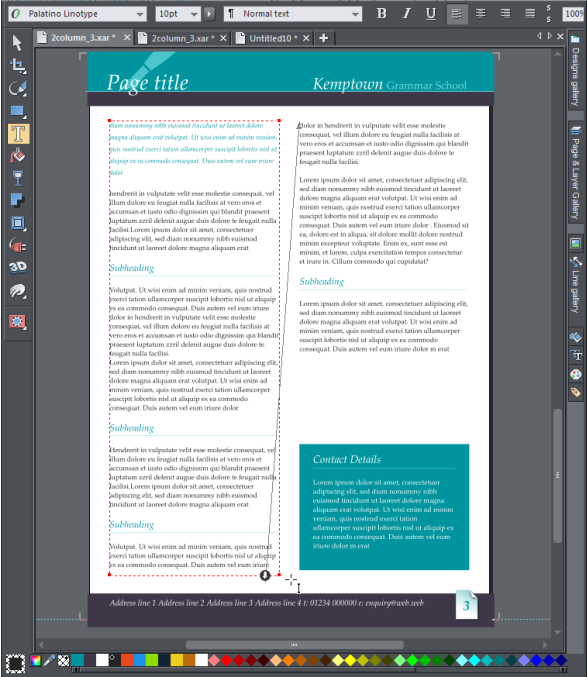
Now scroll down to edit page 2. Customize the heading as before by moving the pen graphic to the left, add a page title and the school name heading. Also customize the page number with the same graphic as on page 1. Replace the picture on the page by dragging one of your own photos from your
computer and dropping it on the picture.
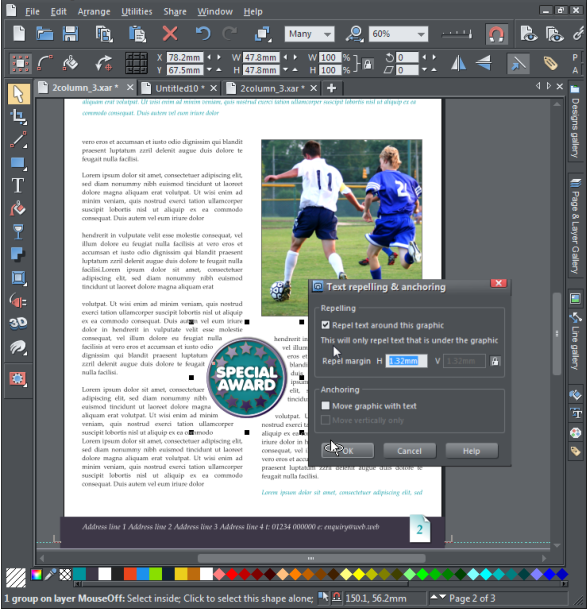
I will show you how to flow text around a graphic by adding an 'Award' graphic. Drag the special_award.xar file that we supplied onto the page. Select
to 'Match' the color theme. Most of the template graphics in Xara Photo & Graphic Designer, like this one, are set to repel text around them, so as you
move the graphic around the page the text instantly adjusts to flow around it. To achieve this action on images and graphics you have created or
imported, right click on the photo or graphic and then select 'Repel text under'. In my example I've enlarged the graphic (using the Selector tool as
usual) and dragged it between the two columns so that the text flows around either side.
Tip: You can adjust the margin around the repelling object by right clicking on it, then select 'Repelling & Anchoring (you need to be in the
Selector tool when you right-click).
Text flow around a graphic
Page 3
In our example (still using the latin text) the text now flows off the end of our left hand column on page 3, because we moved the text start position
down on the first page, which gives us the opportunity to demonstrate some more text handling. We'll reduce the size of the existing right-hand column
of text, then create a new text box on the right into which we will extend the excess of our left hand text.
Highlight some of the text in the right hand column and delete it. Then click on the bottom right corner of the text box and drag the text area up to
shorten it. Now go to the Selector tool, select the blue rectangular background and drag it up using the lower center marker until it is just below the
text. We will move the panel of text down to the bottom of the right hand column, so we need to group the text and background together. Use the
Selector tool to lasso select both the text and background panel and then Ctrl+G to group it. Now move it into position at the bottom of the right
column.
We will now add a new text column on the right side and set the text that has gone off the left column to overflow into it. Select the Text tool and
create a text box area by using your mouse to drag the boundary from the top left of the column, across the width of the column and then down to just
above the panelled text. Now put the cursor in the left column, and you'll see a red 'down arrow' on the bottom of the text box. Just drag on this arrow
and drop it over the new empty text box, which will cause all the excess text in the left column to overflow into the new text column on the right.
Replace the text on the page with your own and perhaps include a few subheadings and dividers.
Adding and Removing Pages
To add another page in the same design, it's probably easier to duplicate an existing page rather than create a blank empty page, because then all the
heading and footer graphics are in place, and you can just replace the old text with new. To do this click on the background of the page you want to
duplicate, select the menu option Edit -> Pages > Duplicate page.
To delete a page, first make sure nothing is selected (press Esc or click the background) and select the Page & Layer Gallery on a vertical tab on the
right and it will fly out to reveal all the pages in the newsletter. Select the page you want to delete and select the Delete button on the top of the
gallery, or just press the Delete key. You can change the order of the pages by dragging a page in the gallery into its new position.
Finally, we need to save the newsletter as a PDF document so we can send it to students, teachers and parents. Ensure that nothing is selected then go
to File > Export > 'Save as type:' choose PDF format and select Export. You'll be given a choice of PDF quality settings depending on whether you want to
send it by email or require higher quality for print purposes (the higher the quality the larger the PDF file).
That's it! See the finished newsletter.
It's so quick and simple. I hope you enjoy using Xara Photo & Graphic Designer 2013.
Also customize the page number with the same graphic as on page 1. Replace the picture on the page by dragging one of your own photos from your
computer and dropping it on the picture.
I will show you how to flow text around a graphic by adding an 'Award' graphic. Drag the special_award.xar file that we supplied onto the page. Select
to 'Match' the color theme. Most of the template graphics in Xara Photo & Graphic Designer, like this one, are set to repel text around them, so as you
move the graphic around the page the text instantly adjusts to flow around it. To achieve this action on images and graphics you have created or
imported, right click on the photo or graphic and then select 'Repel text under'. In my example I've enlarged the graphic (using the Selector tool as
usual) and dragged it between the two columns so that the text flows around either side.
Tip: You can adjust the margin around the repelling object by right clicking on it, then select 'Repelling & Anchoring (you need to be in the
Selector tool when you right-click).
Text flow around a graphic
Page 3
In our example (still using the latin text) the text now flows off the end of our left hand column on page 3, because we moved the text start position
down on the first page, which gives us the opportunity to demonstrate some more text handling. We'll reduce the size of the existing right-hand column
of text, then create a new text box on the right into which we will extend the excess of our left hand text.
Highlight some of the text in the right hand column and delete it. Then click on the bottom right corner of the text box and drag the text area up to
shorten it. Now go to the Selector tool, select the blue rectangular background and drag it up using the lower center marker until it is just below the
text. We will move the panel of text down to the bottom of the right hand column, so we need to group the text and background together. Use the
Selector tool to lasso select both the text and background panel and then Ctrl+G to group it. Now move it into position at the bottom of the right
column.
We will now add a new text column on the right side and set the text that has gone off the left column to overflow into it. Select the Text tool and
create a text box area by using your mouse to drag the boundary from the top left of the column, across the width of the column and then down to just
above the panelled text. Now put the cursor in the left column, and you'll see a red 'down arrow' on the bottom of the text box. Just drag on this arrow
and drop it over the new empty text box, which will cause all the excess text in the left column to overflow into the new text column on the right.
Replace the text on the page with your own and perhaps include a few subheadings and dividers.
Adding and Removing Pages
To add another page in the same design, it's probably easier to duplicate an existing page rather than create a blank empty page, because then all the
heading and footer graphics are in place, and you can just replace the old text with new. To do this click on the background of the page you want to
duplicate, select the menu option Edit -> Pages > Duplicate page.
To delete a page, first make sure nothing is selected (press Esc or click the background) and select the Page & Layer Gallery on a vertical tab on the
right and it will fly out to reveal all the pages in the newsletter. Select the page you want to delete and select the Delete button on the top of the
gallery, or just press the Delete key. You can change the order of the pages by dragging a page in the gallery into its new position.
Finally, we need to save the newsletter as a PDF document so we can send it to students, teachers and parents. Ensure that nothing is selected then go
to File > Export > 'Save as type:' choose PDF format and select Export. You'll be given a choice of PDF quality settings depending on whether you want to
send it by email or require higher quality for print purposes (the higher the quality the larger the PDF file).
That's it! See the finished newsletter.
It's so quick and simple. I hope you enjoy using Xara Photo & Graphic Designer 2013.