
Presentations are traditionally done using Microsoft PowerPoint or Apple Keynote, but they can now be created more easily using Xara
Designer Pro X or Web Designer Premium, bringing the benefits of the powerful text, vector graphics and image editing of these programs.
Xara presentations with animated transitions can be deployed directly to the web to share with others. Shared presentations are just normal
HTML web documents that are compatible with all modern browsers as well as phones and tablets. They automatically scale to fit any
browser window size. You publish them just as you would a normal web document.
What’s more if you use Xara Online Designer (currently included with Designer Pro X and Web Designer Premium) it enables you to collaborate
on your presentation in real-time with your team. Right now control of the presentation steps has to be done in the desktop version, however
other editing, such as replacement of the photos and text, can be done online.
In this tutorial we’ll cover using the customizable presentation templates and also show you how to create a new slide from scratch.
If you don’t already own one of the Designer titles, you can download the free trial for Designer Pro X or Web Designer Premium.
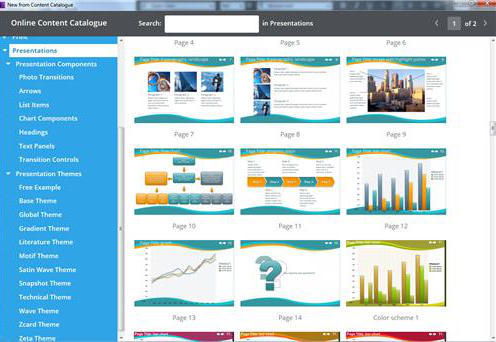
An example few pages of a presentation
Xara provides many professionally designed templates that enable you to create your own presentations quickly and easily. Select File > New
from Content Catalog > Presentations and you will see a list of the available presentation themes, together with a variety of pages with
differing content. Scroll through the thumbnails to see the designs.
List of presentation themes showing the ‘Wave’ theme
Click on the ‘Free example’ theme and then click on the first thumbnail, named ‘Presentation’, to open it. A new presentation document will
open with each page containing different content and a number of transition steps.
You can either view the pages one at a time in the editor or you can select Window > Multiple page view to have all pages in the editor
viewable when you scroll up and down.
Select the ‘Preview whole presentation’ icon
to see a preview in a web browser. Use the directional arrow keys and page up/down on your
keyboard or use the arrows in the top right of the presentation to move between the slides. When viewing your presentation each step
animates onto the screen. Also try moving the mouse pointer to the lower left corner of the presentation preview window to see the pop-up
navigation controls. Close the preview.
Tip: select the Preview current web page icon
to preview a single page
Tip 2: If you’re viewing a published presentation on an iPhone or iPad, you can swipe the screen to move to the next or previous step.
The Basics of Presentations
To customize your presentation simply replace the content with your own text, photos and graphics, and add or delete new pages as required. These are the basic principles to creating your presentation: • Each slide is a separate page • To share the presentation you need to publish it online - it’s basically just a website with animations • Each slide has a number of animated steps. When viewing the presentation online, click the right arrow and the next step on that page will animate in. Pressing page up and down will move to the next / previous page • Each step on a slide is basically a new layer animated onto the page. As you go through the steps, each new step slides-in or fades-in on top of the base page, known as the background layer • When you move from one slide to the next there’s an animated transition that you can control • There’s a simple set of controls to do most basic operations (creating new steps, controlling the animation of each step, etc.) but a lot of these can also be controlled using the Page & Layer Gallery.Adding pages
When adding new pages (new slides), it’s common and easy to duplicate an existing one and then change the duplicate. Use the menu Edit > Pages > Duplicate page. You can also use the Page & Layer Gallery buttons to duplicate pages, create new blank pages or delete pages.Deleting pages
To delete a page, right-click on the page and choose ‘Delete Page’, or you can delete multiple pages at once by selecting all the unwanted pages in the Page & Layer Gallery and hitting ‘Delete’.Reordering pages
You can re-order pages using the Page & Layer Gallery, just drag any page up or down.About the layers
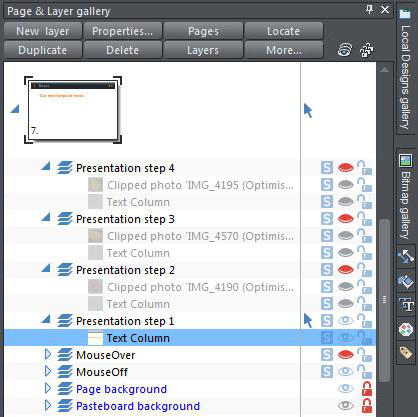
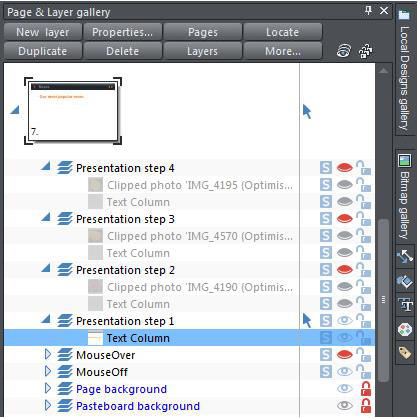
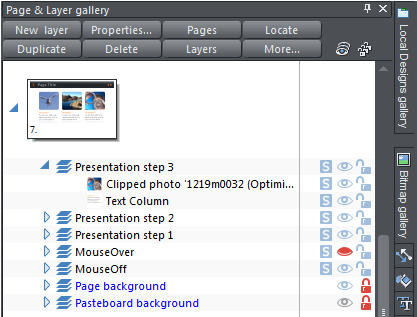
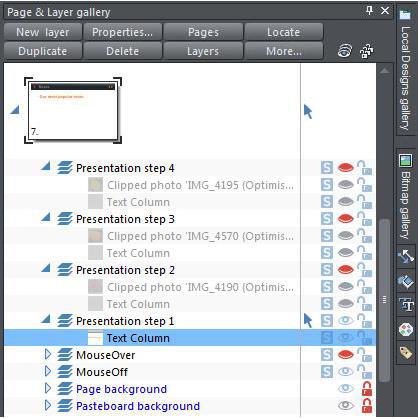
I will use the ‘Free Example’ Presentation and show you how to customize page 7, which has both photo and text content. Open the document, select page 7 (just click on it) and preview the page by clicking the Preview icon to see the steps on the slide. You will note that it has 3 steps with a picture and text coming onto the slide at each step. Click on the Page & Layer Gallery to see the detail of the construction of the presentation. The steps that make up the page are arranged bottom to top with the last step - step 3 in this case - at the top. Click the arrow to open up the step and you’ll see that it contains a photo and a text object. The 3 transition steps of page 7 The steps within a presentation document are just different layers on the page. Starting at the bottom there are two background layers - the Pasteboard Background and the Page Background - these usually stay the same throughout the presentation, so you can ignore them. The Mouse Off layer is composed of static items that typically stay visible for this slide. You can ignore the Mouse Over layer - as this is used for things like buttons, navigation bars, 'next page' arrows and so on, that highlight as you move the mouse over them on the final published presentation. When you first view a new slide (a new page) you see everything on the Mouse Off layer. This is basically the background upon which additional layers appear. It’s important to understand that the typical sequence of going through the steps of a presentation, builds up one layer at a time on this background. It’s not possible to remove content on a slide, only to add new content. On this Page 7 example there are the three presentation steps. These are the steps that contain the animations which make up this particular page. In the Page & Layer Gallery open up Step 1 to see that it contains a photo and text that are going to slide onto the page. Each step just animates successive layers on top of the base Mouse Off layer. The Presentation Tool Bar, shown top right of the tool bars You can jump to any step either by using the Page & Layer Gallery and just clicking on the step, or by using the ‘Current step’ drop-down menu on the Presentation controls, shown above. Note: It’s important to understand that you only see the content up to and including the step you are on. For example, if you jump to step 2, then you can see the content of all the steps up to 2, but later steps are not visible (these layers are hidden). So if you are on the final step (when you open a presentation file it always puts you on the last step of the page) then you see all the steps up to that point. You can select (using the Selector Tool) any items on any step – the status line at the bottom of the window tells you what step (layer) the selected object is on.Adding your own content
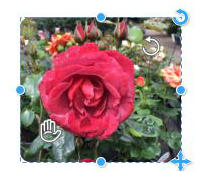
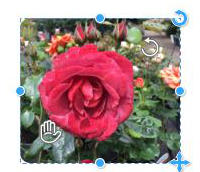
To change a picture, simply drag one of your own photos from your computer file explorer and drop it over an existing photo on the page. It will fill the existing frame but you can use the controls to rotate or resize the image in the frame. (See the Photo Editing Basics tutorial) The new photo showing the editing handles To replace the text, select the Text Tool, delete the existing text and type or paste your own text. If you are pasting from a word-processor you will be asked about the import format – select ‘unformatted text’ which will result in the text adopting the style of the text it is replacing.Presentation controls
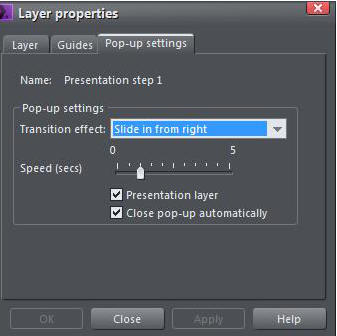
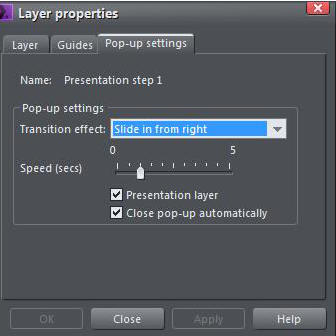
Let’s take a look at the controls on the InfoBar and see what they do: The Presentation Tool Bar • Make a New Step - this adds a new step at the top of the stack • Pin to Background, this moves the selected item/s to the Background Layer for this slide • Duplicate Step - the easiest way of creating a new step • Delete Step - deletes the current step • The drop down menu enables you to jump to a step within the page • Step Transition Effect - this opens the Layer Properties Dialog that allows you to apply and change the animation style (transitions) between the steps.Managing the steps
I am going to show you how to perform common operations on your presentation, such as adding new steps, merging steps, re-ordering the steps and deleting steps. I will add a new line of text above the 3 pictures and then re-order the steps so that the new text is Step 1 and the other steps all move down a level. First, we need to move the 3 photos and corresponding text down on the page to make room for the new text. Using the Selector Tool, marquee select around the 3 photos and their text, and move them all down the page to make room for a new heading. See the finished screen shot below.Adding new steps
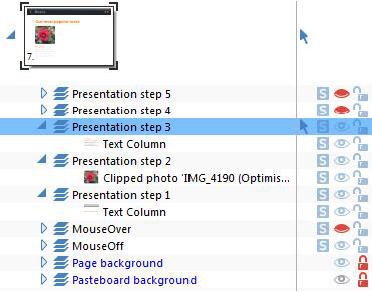
We want to add a new step, so using the Selector Tool, select the text object and click on Make new step which will create a new Step 4. New steps are always placed at the end of the sequence - we’ll move it to be Step 1 later. Now anything we draw onto the page will appear on this new Step 4. To add the text heading ‘Our most popular roses’, click on the page and type the heading, resize and make the font the desired size and color. Page 7 after customization. I’ve added a new heading step and adjusted the 3 photo sections. This has been created as Step 4 so, to make this step 1 open the Page & Layer Gallery and drag this Step 4 down in between Step 1 and the Mouse Over layers. The result of this is that Step 4 has now been renamed as Step 1 and all the other steps have moved down a number. To check the new steps are working correctly, preview the current page again. Tip: A quick way to create a new step from an existing step is to use the ‘Duplicate step’ button and then adjust the content. Step 4 has been moved to become Step 1.Moving content from a step
You may not want your presentation steps to be the same as the template so I will now separate Step 2 so that the picture comes in on its own and the text comes in after (currently they both slide in together). Using the Selector Tool, select the text and then select Make new step. This will be created as the next step, i.e. Step 5. Simply drag it into position 3, and Steps 3 and 4 will be renumbered. Step 2 split into two steps and moved into orderMerging Steps
I will now merge the text on Step 1 with the photo on Step 2, so the easiest way is to ‘select’ the photo and perform a ‘cut’ (Ctrl+X), then go to the ‘Jump to’ drop down menu on the Presentation Toolbar and select Step 1 and ‘paste-in-place’ (SHIFT+Ctrl+V). Now they are both on Step 3 and Step 4 is empty. Note: If you leave a layer empty, it will be automatically deleted (and steps re-numbered) when you Preview or Save the document.Step Animation Transitions
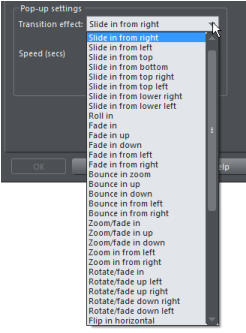
When you create a new step it takes the transition style from the last step. But it’s easy to change the animation style of any step. Just select any object on the step you want to change and click the Step Transition icon on the Presentations menu, . This will display the available options with a drop-down list of animation styles and the speed adjustment control. As you see there are many transition styles. The Layer Properties dialog controls how the step (layer) animates onto the slide. And shows the drop down list of transition effects.Presentation components
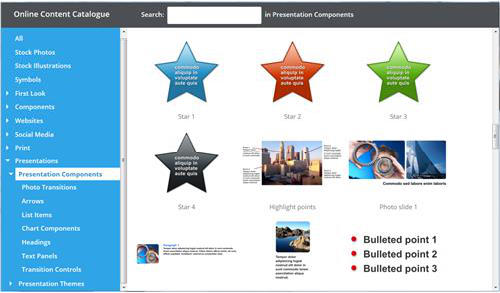
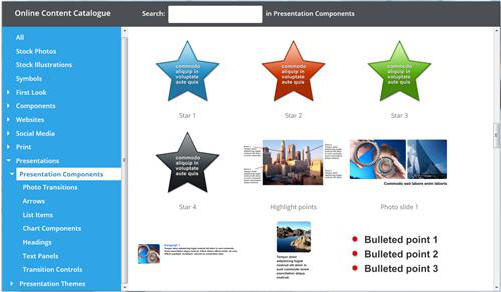
The Online Content Catalog contains many useful presentation components such as photo transitions, arrows, stars, lists, charts, headings, text panels and transition controls. When you add a bulleted list it is automatically set for the transition of each point. Select File > New from Content Catalog > Presentations > Presentation components to access them. Presentation componentsBullet and Numbered Lists
Bullet and numbered list items can either be made to appear item by item in sequential steps or the whole list can be treated as a single step. You can control this using the right click menu option Presentation > Present by paragraph.Creating a presentation without using the templates
To create a presentation from the start simply select File > New and you will have the choice of widescreen or 4:3 formats. The 16 x 10 widescreen format is suitable for TVs and wide monitors. You can then bring in all the required elements, text, graphics and photos onto the page and order the content into the presentation steps and pages as you require.Save & Publish
To save your presentation, select the menu File > Save which will save it as a .xar file, which is the working format for Xara. This is the file to use to edit and make further changes in future. To share your Presentation with your audience you can publish it online. Select the menu File > Publish Presentation. You will be asked to enter the details of where you want your website published (FTP details). Alternatively you can save the HTML to your local disc, and from there open the file in your browser to make a local Presentation. To do this select the menu File > Export Presentation. This will create a .htm file and associated folder of content.Xara Online Designer
Xara Online Designer is a great way to edit and share presentations - you don’t even need website hosting. You can use the one-click share to very quickly get a link to your presentation. You can also invite other team members to collaborate on the editing of your presentation. So, for example, you could be working on slide 1, while a colleague is working on slide 6. To open your presentation in Xara Online Designer, first you need to save the .xar file to a cloud drive - which can be either Dropbox, Google Drive or One Drive (the latter is included free with Windows 10). Then go to cloud.ixara.com sign in and select the file to open. You can see an introduction to Xara Online Designer in our earlier tutorial here. Note: At present, using Xara Online Designer you can edit any of your content (and the steps of any page), edit the text, replace and add new pictures and content, etc, but it provides no layer or presentation controls - for now these things have to be controlled using a desktop version of Designer. These features will be enabled in later updates of Xara Online Designer. For more tutorials by Xara and third parties, check out our Resource index, which offers a searchable and browsable list of movies and tutorials created by Xara and third parties.
Copyright © 2017 Xara Group Limited.
Page created with Xara Designer Pro


Presentations are traditionally done using Microsoft PowerPoint or Apple Keynote, but they can now be
created more easily using Xara Designer Pro X or Web Designer Premium, bringing the benefits of the
powerful text, vector graphics and image editing of these programs.
Xara presentations with animated transitions can be deployed directly to the web to share with others.
Shared presentations are just normal HTML web documents that are compatible with all modern browsers
as well as phones and tablets. They automatically scale to fit any browser window size. You publish them
just as you would a normal web document.
What’s more if you use Xara Online Designer (currently included with Designer Pro X and Web Designer
Premium) it enables you to collaborate on your presentation in real-time with your team. Right now control
of the presentation steps has to be done in the desktop version, however other editing, such as
replacement of the photos and text, can be done online.
In this tutorial we’ll cover using the customizable presentation templates and also show you how to create
a new slide from scratch.
If you don’t already own one of the Designer titles, you can download the free trial for Designer Pro X or
Web Designer Premium.
An example few pages of a presentation
Xara provides many professionally designed templates that enable you to create your own presentations
quickly and easily. Select File > New from Content Catalog > Presentations and you will see a list of the
available presentation themes, together with a variety of pages with differing content. Scroll through the
thumbnails to see the designs.
List of presentation themes showing the ‘Wave’ theme
Click on the ‘Free example’ theme and then click on the first thumbnail, named ‘Presentation’, to open it. A
new presentation document will open with each page containing different content and a number of
transition steps.
You can either view the pages one at a time in the editor or you can select Window > Multiple page view to
have all pages in the editor viewable when you scroll up and down.
Select the ‘Preview whole presentation’ icon
to see a preview in a web browser. Use the directional
arrow keys and page up/down on your keyboard or use the arrows in the top right of the presentation to
move between the slides. When viewing your presentation each step animates onto the screen. Also try
moving the mouse pointer to the lower left corner of the presentation preview window to see the pop-up
navigation controls. Close the preview.
Tip: select the Preview current web page icon
to preview a single page
Tip 2: If you’re viewing a published presentation on an iPhone or iPad, you can swipe the screen to move to
the next or previous step.
The Basics of Presentations
To customize your presentation simply replace the content with your own text, photos and graphics, and add or delete new pages as required. These are the basic principles to creating your presentation: • Each slide is a separate page • To share the presentation you need to publish it online - it’s basically just a website with animations • Each slide has a number of animated steps. When viewing the presentation online, click the right arrow and the next step on that page will animate in. Pressing page up and down will move to the next / previous page • Each step on a slide is basically a new layer animated onto the page. As you go through the steps, each new step slides-in or fades-in on top of the base page, known as the background layer • When you move from one slide to the next there’s an animated transition that you can control • There’s a simple set of controls to do most basic operations (creating new steps, controlling the animation of each step, etc.) but a lot of these can also be controlled using the Page & Layer Gallery.Adding pages
When adding new pages (new slides), it’s common and easy to duplicate an existing one and then change the duplicate. Use the menu Edit > Pages > Duplicate page. You can also use the Page & Layer Gallery buttons to duplicate pages, create new blank pages or delete pages.Deleting pages
To delete a page, right-click on the page and choose ‘Delete Page’, or you can delete multiple pages at once by selecting all the unwanted pages in the Page & Layer Gallery and hitting ‘Delete’.Reordering pages
You can re-order pages using the Page & Layer Gallery, just drag any page up or down.About the layers
I will use the ‘Free Example’ Presentation and show you how to customize page 7, which has both photo and text content. Open the document, select page 7 (just click on it) and preview the page by clicking the Preview icon to see the steps on the slide. You will note that it has 3 steps with a picture and text coming onto the slide at each step. Click on the Page & Layer Gallery to see the detail of the construction of the presentation. The steps that make up the page are arranged bottom to top with the last step - step 3 in this case - at the top. Click the arrow to open up the step and you’ll see that it contains a photo and a text object. The 3 transition steps of page 7 The steps within a presentation document are just different layers on the page. Starting at the bottom there are two background layers - the Pasteboard Background and the Page Background - these usually stay the same throughout the presentation, so you can ignore them. The Mouse Off layer is composed of static items that typically stay visible for this slide. You can ignore the Mouse Over layer - as this is used for things like buttons, navigation bars, 'next page' arrows and so on, that highlight as you move the mouse over them on the final published presentation. When you first view a new slide (a new page) you see everything on the Mouse Off layer. This is basically the background upon which additional layers appear. It’s important to understand that the typical sequence of going through the steps of a presentation, builds up one layer at a time on this background. It’s not possible to remove content on a slide, only to add new content. On this Page 7 example there are the three presentation steps. These are the steps that contain the animations which make up this particular page. In the Page & Layer Gallery open up Step 1 to see that it contains a photo and text that are going to slide onto the page. Each step just animates successive layers on top of the base Mouse Off layer. The Presentation Tool Bar, shown top right of the tool bars You can jump to any step either by using the Page & Layer Gallery and just clicking on the step, or by using the ‘Current step’ drop-down menu on the Presentation controls, shown above. Note: It’s important to understand that you only see the content up to and including the step you are on. For example, if you jump to step 2, then you can see the content of all the steps up to 2, but later steps are not visible (these layers are hidden). So if you are on the final step (when you open a presentation file it always puts you on the last step of the page) then you see all the steps up to that point. You can select (using the Selector Tool) any items on any step – the status line at the bottom of the window tells you what step (layer) the selected object is on.Adding your own content
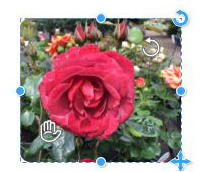
To change a picture, simply drag one of your own photos from your computer file explorer and drop it over an existing photo on the page. It will fill the existing frame but you can use the controls to rotate or resize the image in the frame. (See the Photo Editing Basics tutorial) The new photo showing the editing handles To replace the text, select the Text Tool, delete the existing text and type or paste your own text. If you are pasting from a word-processor you will be asked about the import format – select ‘unformatted text’ which will result in the text adopting the style of the text it is replacing.Presentation controls
Let’s take a look at the controls on the InfoBar and see what they do: The Presentation Tool Bar • Make a New Step - this adds a new step at the top of the stack • Pin to Background, this moves the selected item/s to the Background Layer for this slide • Duplicate Step - the easiest way of creating a new step • Delete Step - deletes the current step • The drop down menu enables you to jump to a step within the page • Step Transition Effect - this opens the Layer Properties Dialog that allows you to apply and change the animation style (transitions) between the steps.Managing the steps
I am going to show you how to perform common operations on your presentation, such as adding new steps, merging steps, re-ordering the steps and deleting steps. I will add a new line of text above the 3 pictures and then re-order the steps so that the new text is Step 1 and the other steps all move down a level. First, we need to move the 3 photos and corresponding text down on the page to make room for the new text. Using the Selector Tool, marquee select around the 3 photos and their text, and move them all down the page to make room for a new heading. See the finished screen shot below.Adding new steps
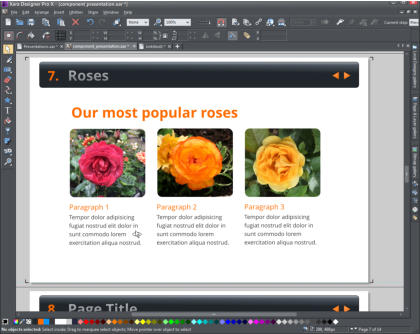
We want to add a new step, so using the Selector Tool, select the text object and click on Make new step which will create a new Step 4. New steps are always placed at the end of the sequence - we’ll move it to be Step 1 later. Now anything we draw onto the page will appear on this new Step 4. To add the text heading ‘Our most popular roses’, click on the page and type the heading, resize and make the font the desired size and color. Page 7 after customization. I’ve added a new heading step and adjusted the 3 photo sections. This has been created as Step 4 so, to make this step 1 open the Page & Layer Gallery and drag this Step 4 down in between Step 1 and the Mouse Over layers. The result of this is that Step 4 has now been renamed as Step 1 and all the other steps have moved down a number. To check the new steps are working correctly, preview the current page again. Tip: A quick way to create a new step from an existing step is to use the ‘Duplicate step’ button and then adjust the content. Step 4 has been moved to become Step 1.Moving content from a step
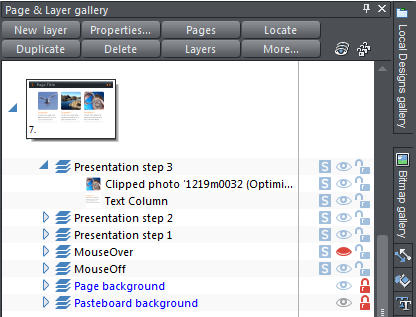
You may not want your presentation steps to be the same as the template so I will now separate Step 2 so that the picture comes in on its own and the text comes in after (currently they both slide in together). Using the Selector Tool, select the text and then select Make new step. This will be created as the next step, i.e. Step 5. Simply drag it into position 3, and Steps 3 and 4 will be renumbered. Step 2 split into two steps and moved into orderMerging Steps
I will now merge the text on Step 1 with the photo on Step 2, so the easiest way is to ‘select’ the photo and perform a ‘cut’ (Ctrl+X), then go to the ‘Jump to’ drop down menu on the Presentation Toolbar and select Step 1 and ‘paste-in-place’ (SHIFT+Ctrl+V). Now they are both on Step 3 and Step 4 is empty. Note: If you leave a layer empty, it will be automatically deleted (and steps re-numbered) when you Preview or Save the document.Step Animation Transitions
When you create a new step it takes the transition style from the last step. But it’s easy to change the animation style of any step. Just select any object on the step you want to change and click the Step Transition icon on the Presentations menu, . This will display the available options with a drop-down list of animation styles and the speed adjustment control. As you see there are many transition styles. The Layer Properties dialog controls how the step (layer) animates onto the slide. And shows the drop down list of transition effects.Presentation components
The Online Content Catalog contains many useful presentation components such as photo transitions, arrows, stars, lists, charts, headings, text panels and transition controls. When you add a bulleted list it is automatically set for the transition of each point. Select File > New from Content Catalog > Presentations > Presentation components to access them. Presentation componentsBullet and Numbered Lists
Bullet and numbered list items can either be made to appear item by item in sequential steps or the whole list can be treated as a single step. You can control this using the right click menu option Presentation > Present by paragraph.Creating a presentation without using the templates
To create a presentation from the start simply select File > New and you will have the choice of widescreen or 4:3 formats. The 16 x 10 widescreen format is suitable for TVs and wide monitors. You can then bring in all the required elements, text, graphics and photos onto the page and order the content into the presentation steps and pages as you require.Save & Publish
To save your presentation, select the menu File > Save which will save it as a .xar file, which is the working format for Xara. This is the file to use to edit and make further changes in future. To share your Presentation with your audience you can publish it online. Select the menu File > Publish Presentation. You will be asked to enter the details of where you want your website published (FTP details). Alternatively you can save the HTML to your local disc, and from there open the file in your browser to make a local Presentation. To do this select the menu File > Export Presentation. This will create a .htm file and associated folder of content.Xara Online Designer
Xara Online Designer is a great way to edit and share presentations - you don’t even need website hosting. You can use the one-click share to very quickly get a link to your presentation. You can also invite other team members to collaborate on the editing of your presentation. So, for example, you could be working on slide 1, while a colleague is working on slide 6. To open your presentation in Xara Online Designer, first you need to save the .xar file to a cloud drive - which can be either Dropbox, Google Drive or One Drive (the latter is included free with Windows 10). Then go to cloud.ixara.com sign in and select the file to open. You can see an introduction to Xara Online Designer in our earlier tutorial here. Note: At present, using Xara Online Designer you can edit any of your content (and the steps of any page), edit the text, replace and add new pictures and content, etc, but it provides no layer or presentation controls - for now these things have to be controlled using a desktop version of Designer. These features will be enabled in later updates of Xara Online Designer. For more tutorials by Xara and third parties, check out our Resource index, which offers a searchable and browsable list of movies and tutorials created by Xara and third parties.


Copyright © 2017 Xara Group Limited.
Page created with Xara Designer Pro

Presentations are traditionally done using Microsoft PowerPoint or
Apple Keynote, but they can now be created more easily using Xara
Designer Pro X or Web Designer Premium, bringing the benefits of
the powerful text, vector graphics and image editing of these
programs.
Xara presentations with animated transitions can be deployed
directly to the web to share with others. Shared presentations are
just normal HTML web documents that are compatible with all
modern browsers as well as phones and tablets. They automatically
scale to fit any browser window size. You publish them just as you
would a normal web document.
What’s more if you use Xara Online Designer (currently included with
Designer Pro X and Web Designer Premium) it enables you to
collaborate on your presentation in real-time with your team. Right
now control of the presentation steps has to be done in the desktop
version, however other editing, such as replacement of the photos
and text, can be done online.
In this tutorial we’ll cover using the customizable presentation
templates and also show you how to create a new slide from
scratch.
If you don’t already own one of the Designer titles, you can download
the free trial for Designer Pro X or Web Designer Premium.
An example few pages of a presentation
Xara provides many professionally designed templates that enable
you to create your own presentations quickly and easily. Select File >
New from Content Catalog > Presentations and you will see a list of
the available presentation themes, together with a variety of pages
with differing content. Scroll through the thumbnails to see the
designs.
List of presentation themes showing the ‘Wave’ theme
Click on the ‘Free example’ theme and then click on the first
thumbnail, named ‘Presentation’, to open it. A new presentation
document will open with each page containing different content and
a number of transition steps.
You can either view the pages one at a time in the editor or you can
select Window > Multiple page view to have all pages in the editor
viewable when you scroll up and down.
Select the ‘Preview whole presentation’ icon
to see a preview
in a web browser. Use the directional arrow keys and page up/down
on your keyboard or use the arrows in the top right of the
presentation to move between the slides. When viewing your
presentation each step animates onto the screen. Also try moving
the mouse pointer to the lower left corner of the presentation
preview window to see the pop-up navigation controls. Close the
preview.
Tip: select the Preview current web page icon
to preview a single
page
Tip 2: If you’re viewing a published presentation on an iPhone or iPad,
you can swipe the screen to move to the next or previous step.
The Basics of Presentations
To customize your presentation simply replace the content with your own text, photos and graphics, and add or delete new pages as required. These are the basic principles to creating your presentation: • Each slide is a separate page • To share the presentation you need to publish it online - it’s basically just a website with animations • Each slide has a number of animated steps. When viewing the presentation online, click the right arrow and the next step on that page will animate in. Pressing page up and down will move to the next / previous page • Each step on a slide is basically a new layer animated onto the page. As you go through the steps, each new step slides-in or fades-in on top of the base page, known as the background layer • When you move from one slide to the next there’s an animated transition that you can control • There’s a simple set of controls to do most basic operations (creating new steps, controlling the animation of each step, etc.) but a lot of these can also be controlled using the Page & Layer Gallery.Adding pages
When adding new pages (new slides), it’s common and easy to duplicate an existing one and then change the duplicate. Use the menu Edit > Pages > Duplicate page. You can also use the Page & Layer Gallery buttons to duplicate pages, create new blank pages or delete pages.Deleting pages
To delete a page, right-click on the page and choose ‘Delete Page’, or you can delete multiple pages at once by selecting all the unwanted pages in the Page & Layer Gallery and hitting ‘Delete’.Reordering pages
You can re-order pages using the Page & Layer Gallery, just drag any page up or down.About the layers
I will use the ‘Free Example’ Presentation and show you how to customize page 7, which has both photo and text content. Open the document, select page 7 (just click on it) and preview the page by clicking the Preview icon to see the steps on the slide. You will note that it has 3 steps with a picture and text coming onto the slide at each step. Click on the Page & Layer Gallery to see the detail of the construction of the presentation. The steps that make up the page are arranged bottom to top with the last step - step 3 in this case - at the top. Click the arrow to open up the step and you’ll see that it contains a photo and a text object. The 3 transition steps of page 7 The steps within a presentation document are just different layers on the page. Starting at the bottom there are two background layers - the Pasteboard Background and the Page Background - these usually stay the same throughout the presentation, so you can ignore them. The Mouse Off layer is composed of static items that typically stay visible for this slide. You can ignore the Mouse Over layer - as this is used for things like buttons, navigation bars, 'next page' arrows and so on, that highlight as you move the mouse over them on the final published presentation. When you first view a new slide (a new page) you see everything on the Mouse Off layer. This is basically the background upon which additional layers appear. It’s important to understand that the typical sequence of going through the steps of a presentation, builds up one layer at a time on this background. It’s not possible to remove content on a slide, only to add new content. On this Page 7 example there are the three presentation steps. These are the steps that contain the animations which make up this particular page. In the Page & Layer Gallery open up Step 1 to see that it contains a photo and text that are going to slide onto the page. Each step just animates successive layers on top of the base Mouse Off layer. The Presentation Tool Bar, shown top right of the tool bars You can jump to any step either by using the Page & Layer Gallery and just clicking on the step, or by using the ‘Current step’ drop-down menu on the Presentation controls, shown above. Note: It’s important to understand that you only see the content up to and including the step you are on. For example, if you jump to step 2, then you can see the content of all the steps up to 2, but later steps are not visible (these layers are hidden). So if you are on the final step (when you open a presentation file it always puts you on the last step of the page) then you see all the steps up to that point. You can select (using the Selector Tool) any items on any step – the status line at the bottom of the window tells you what step (layer) the selected object is on.Adding your own content
To change a picture, simply drag one of your own photos from your computer file explorer and drop it over an existing photo on the page. It will fill the existing frame but you can use the controls to rotate or resize the image in the frame. (See the Photo Editing Basics tutorial) The new photo showing the editing handles To replace the text, select the Text Tool, delete the existing text and type or paste your own text. If you are pasting from a word- processor you will be asked about the import format – select ‘unformatted text’ which will result in the text adopting the style of the text it is replacing.Presentation controls
Let’s take a look at the controls on the InfoBar and see what they do: The Presentation Tool Bar • Make a New Step - this adds a new step at the top of the stack • Pin to Background, this moves the selected item/s to the Background Layer for this slide • Duplicate Step - the easiest way of creating a new step • Delete Step - deletes the current step • The drop down menu enables you to jump to a step within the page • Step Transition Effect - this opens the Layer Properties Dialog that allows you to apply and change the animation style (transitions) between the steps.Managing the steps
I am going to show you how to perform common operations on your presentation, such as adding new steps, merging steps, re-ordering the steps and deleting steps. I will add a new line of text above the 3 pictures and then re-order the steps so that the new text is Step 1 and the other steps all move down a level. First, we need to move the 3 photos and corresponding text down on the page to make room for the new text. Using the Selector Tool, marquee select around the 3 photos and their text, and move them all down the page to make room for a new heading. See the finished screen shot below.Adding new steps
We want to add a new step, so using the Selector Tool, select the text object and click on Make new step which will create a new Step 4. New steps are always placed at the end of the sequence - we’ll move it to be Step 1 later. Now anything we draw onto the page will appear on this new Step 4. To add the text heading ‘Our most popular roses’, click on the page and type the heading, resize and make the font the desired size and color. Page 7 after customization. I’ve added a new heading step and adjusted the 3 photo sections. This has been created as Step 4 so, to make this step 1 open the Page & Layer Gallery and drag this Step 4 down in between Step 1 and the Mouse Over layers. The result of this is that Step 4 has now been renamed as Step 1 and all the other steps have moved down a number. To check the new steps are working correctly, preview the current page again. Tip: A quick way to create a new step from an existing step is to use the ‘Duplicate step’ button and then adjust the content. Step 4 has been moved to become Step 1.Moving content from a step
You may not want your presentation steps to be the same as the template so I will now separate Step 2 so that the picture comes in on its own and the text comes in after (currently they both slide in together). Using the Selector Tool, select the text and then select Make new step. This will be created as the next step, i.e. Step 5. Simply drag it into position 3, and Steps 3 and 4 will be renumbered. Step 2 split into two steps and moved into orderMerging Steps
I will now merge the text on Step 1 with the photo on Step 2, so the easiest way is to ‘select’ the photo and perform a ‘cut’ (Ctrl+X), then go to the ‘Jump to’ drop down menu on the Presentation Toolbar and select Step 1 and ‘paste-in-place’ (SHIFT+Ctrl+V). Now they are both on Step 3 and Step 4 is empty. Note: If you leave a layer empty, it will be automatically deleted (and steps re-numbered) when you Preview or Save the document.Step Animation Transitions
When you create a new step it takes the transition style from the last step. But it’s easy to change the animation style of any step. Just select any object on the step you want to change and click the Step Transition icon on the Presentations menu, . This will display the available options with a drop-down list of animation styles and the speed adjustment control. As you see there are many transition styles. The Layer Properties dialog controls how the step (layer) animates onto the slide. And shows the drop down list of transition effects.Presentation components
The Online Content Catalog contains many useful presentation components such as photo transitions, arrows, stars, lists, charts, headings, text panels and transition controls. When you add a bulleted list it is automatically set for the transition of each point. Select File > New from Content Catalog > Presentations > Presentation components to access them. Presentation componentsBullet and Numbered Lists
Bullet and numbered list items can either be made to appear item by item in sequential steps or the whole list can be treated as a single step. You can control this using the right click menu option Presentation > Present by paragraph.Creating a presentation without using
the templates
To create a presentation from the start simply select File > New and you will have the choice of widescreen or 4:3 formats. The 16 x 10 widescreen format is suitable for TVs and wide monitors. You can then bring in all the required elements, text, graphics and photos onto the page and order the content into the presentation steps and pages as you require.Save & Publish
To save your presentation, select the menu File > Save which will save it as a .xar file, which is the working format for Xara. This is the file to use to edit and make further changes in future. To share your Presentation with your audience you can publish it online. Select the menu File > Publish Presentation. You will be asked to enter the details of where you want your website published (FTP details). Alternatively you can save the HTML to your local disc, and from there open the file in your browser to make a local Presentation. To do this select the menu File > Export Presentation. This will create a .htm file and associated folder of content.Xara Online Designer
Xara Online Designer is a great way to edit and share presentations - you don’t even need website hosting. You can use the one-click share to very quickly get a link to your presentation. You can also invite other team members to collaborate on the editing of your presentation. So, for example, you could be working on slide 1, while a colleague is working on slide 6. To open your presentation in Xara Online Designer, first you need to save the .xar file to a cloud drive - which can be either Dropbox, Google Drive or One Drive (the latter is included free with Windows 10). Then go to cloud.ixara.com sign in and select the file to open. You can see an introduction to Xara Online Designer in our earlier tutorial here. Note: At present, using Xara Online Designer you can edit any of your content (and the steps of any page), edit the text, replace and add new pictures and content, etc, but it provides no layer or presentation controls - for now these things have to be controlled using a desktop version of Designer. These features will be enabled in later updates of Xara Online Designer. For more tutorials by Xara and third parties, check out our Resource index, which offers a searchable and browsable list of movies and tutorials created by Xara and third parties.


Copyright © 2017 Xara Group Limited.
Page created with Xara Designer Pro
CREATING PRESENTATIONS WITH XARA
CREATING PRESENTATIONS WITH XARA
CREATING PRESENTATIONS WITH XARA