Xara Cloud is an ultra-simple way to view and edit the content of your Xara document or website, using a web browser on any computer or
tablet (including a Mac, iPad, Android tablet or Chromebook), from anywhere in the world, and to save, print or re-publish it. Ideal for remotely
updating content.
Using Xara Cloud you can work on documents created in Xara Designer Pro, Web Designer and Photo & Graphic Designer but Xara Cloud also
offers a large and growing selection of its own templates that can be edited within Xara Cloud and don’t require the desktop software.
What’s more, Xara Cloud enables one-click sharing of your documents. Share to Web publishes a read-only version, while Share with Others is
perfect for working with colleagues or clients on the same document at the same time, on a collaborative project where edits to text and
images and editors’ comments can be seen live, as-they-happen, by everyone editing the document.
You can subscribe to Xara Cloud as a complement to your existing copy of Designer Pro X, Photo & Graphic Designer or Web Designer or you
can subscribe to Xara Cloud+, a great value bundle of Xara Cloud and Designer Pro+ (Cloud and Cloud+ are subscription options, sold and
supported by Xara).
Note: This tutorial has been updated to reflect the Xara Cloud service in October 2021
The Xara Cloud editor
Getting Started
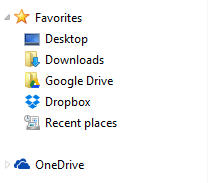
In order to edit any Xara document it must be stored in a cloud drive. Xara works with Dropbox (2GB free), Google Drive (15GB free) and OneDrive (5GB free) so if you are not already signed up with one of these, that is the first thing you need to do. Download the relevant desktop application for one of these, install it and set up your account (Note: OneDrive is pre-installed with Windows 8.1 and 10, but you will need to download it for Windows 7 and 8). Each of these services creates a folder on your local hard disc that is mirrored online ‘in the cloud’, and it is that which Xara Cloud accesses. Screenshot of a section of my Windows File Explorer showing Google Drive, Dropbox and OneDrive Now you can get started with Xara Cloud. Whichever cloud solution you chose, create a folder in which to place your Xara files. If you have an existing Xara document that you wish to edit then drag it into the folder. Note: Dragging the file from another folder into the OneDrive / Dropbox / Google Drive folder on your computer will move it into the new folder, out of the original. If you want to keep the original copy, then it’s better to copy / paste the file from the original folder to the OneDrive folder. Now go to cloud.xara.com to sign up to Xara Cloud. You can Sign Up with the credentials of your Google Drive or OneDrive account, or if you prefer to use a different email address and password simply enter your choice and select Sign Up to set up your new Xara Cloud account. You can then sign in with Google, Microsoft or your chosen email and password in future. If you select Google or Microsoft to sign up, you’ll be asked to give permission to access Xara with these credentials (first time only). Once you have completed sign up, or for any future sign in, you will be taken to the File Picker.The File Picker
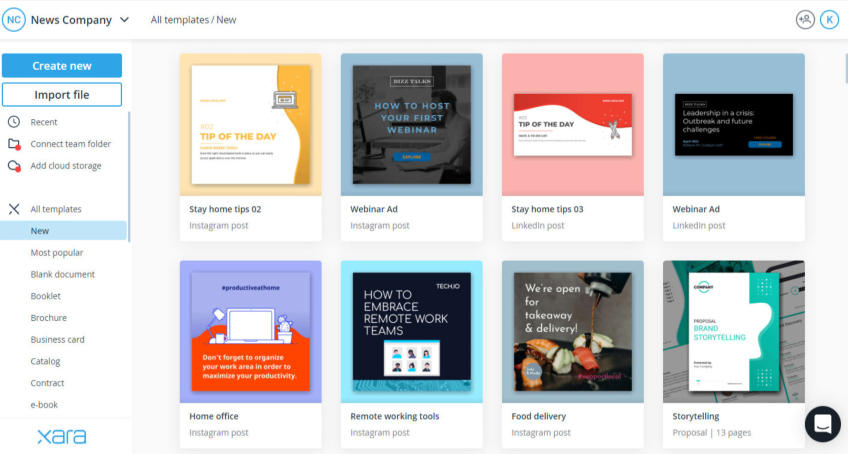
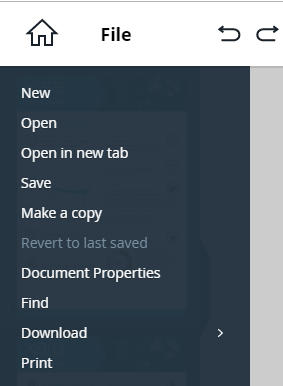
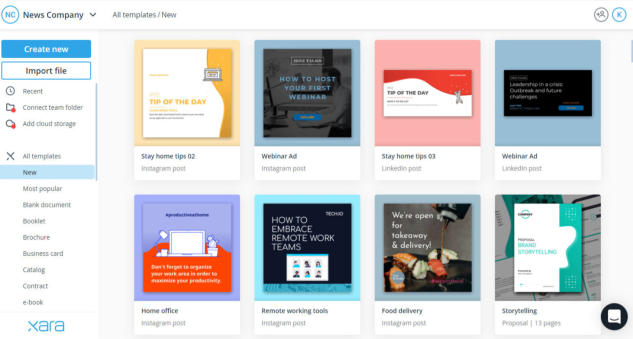
The File Picker is where you can open any Xara document that you have saved in Dropbox, Google Drive or OneDrive, or select one of the Xara Cloud templates. Once you are in the editor you can return to the File Picker at any time with a single click on the Go to Documents icon in the top left, or by selecting Open or Open in new tab in the File menu. Choose from a large selection of Xara Cloud templates or load files from your cloud storage in the File Picker The templates include a wide range of common business documents including presentations, flyers, catalogs, e-books, CVs, proposals, booklets, product sheets and web banners, all of which can be switched into different color schemes and text styles. You can mouseover the template thumbnail to see a preview of all the page layouts in that design. If instead you select Recent you will see any recent files that you’ve been working on in Xara Cloud, or select Add cloud storage to load any Xara documents stored in your cloud drive(s). If you signed up using your cloud drive credentials then you should see your drive already listed here, otherwise click on the type of cloud drive you want to connect. The first time you connect you will be asked to grant permission to access your files, this is because you will be accessing and editing your cloud files. Note: One-click sign-in - Once you have connected a Google Drive or Microsoft OneDrive you can optionally sign-in to Xara Cloud using the Google Drive or OneDrive in future. Once you’ve found the file you want - whether it’s your Xara file in your cloud drive or one of the Xara Cloud templates - simply click to open it in the Xara Cloud editor.Navigating your Document and Understanding the Editor Work Space
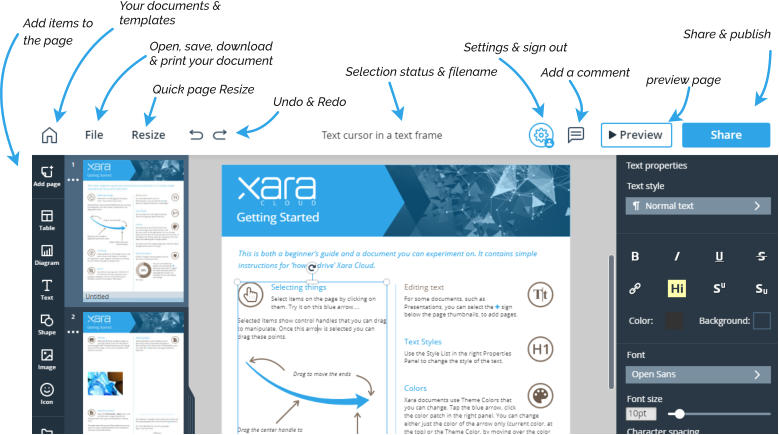
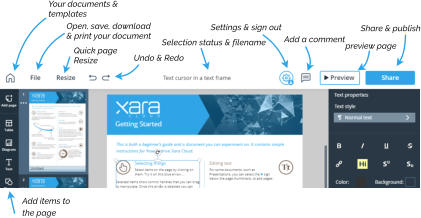
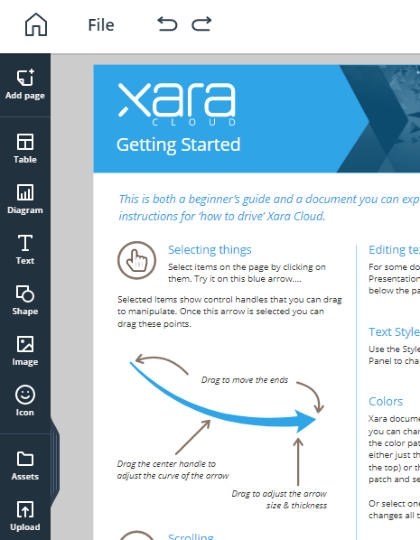
On both touch and mouse systems, you can push pages around (scroll) by simply pressing the mouse center button (the wheel) and dragging. There’s also a handy shortcut of holding the Ctrl key and using the scroll wheel to zoom in and out. Give it a go! If you’re working on a multi-page document you will see the page thumbnails ranged down the left; simply click a page to jump to that page. For longer documents, scroll the page thumbnail area using the mouse wheel or drag on the thumbnails. You can hide and show the page thumbnail panel by sliding left / right on it, or just tapping the projecting ‘drag handle’. Tip: if you have loaded a template with multiple pages only the first page will show, click the Add page option, top of the left toolbar, to see all the possible layouts for the next page ranged down the left. The simple to use key controls are in a bar at the top of the workspace. Xara Cloud editor controlsEditing Your Document
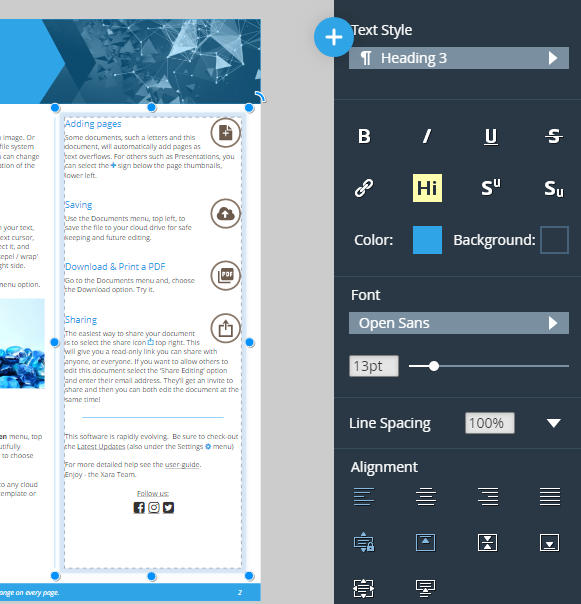
Editing the text and images in your website or document is very easy. Simply click an item to be able to edit it. Press Esc to clear any selection, or click on the background. To edit the text simply click on the text, which places a caret and displays a panel of text controls. You have access to the normal text editing functions like bold, italic, adding links, changing styles, alignment, lists and indents. There’s even a spell checker that works whilst you type (you can change the language in the document Properties menu, tap any blank part of the document to open it). If you want to add new text simply clcik the T - Text icon in the left hand toolbar and select the type of text you want to enter - for example Normal, Heading, Bullet list ,or any of a wide selection of more fancy options - and that will add a new text panel to the document, which can be easily dragged into place.Replacing Images
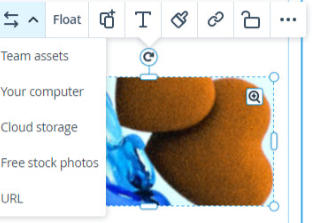
There are several different options for replacing an image: Drag and drop an image file from your File Explorer onto an image, or click the image and select the ‘Replace image’ menu option, where choices include selecting a file from your local disc, an image from your cloud drive, or from the range of nearly a million royalty free stock photos in Xara Cloud. Note - When uploading an image from your local computer the image is resized before upload to be HD resolution (which is usually more than enough for any website). This speeds up the upload process. If your photos are stored in Google Drive, Dropbox or OneDrive, you can select to import it from your cloud drive which will only take a second or two even for full resolution images. When you select a simple image, in addition to the resize and crop handles on the sides, you’ll see a ‘rotate’ handle in the top right corner of the image. Dragging on this will resize and rotate the image within its frame. Drag diagonally outwards to resize or rotate - this clips the image, but while dragging you will see a faint version of the whole image that shows the extent of the full un-cropped image. If the image is clipped you also see a ‘hand’ control in the bottom left, which allows you to re-position the clipped image within the frame. Select an image to see the resize & crop controls around the outside, a resize/rotate in-frame handle in the top right, and a menu of other image options. For further details on editing images check out our tutorial movies: Resizing and cropping photos Aligning photos and textEditing Images
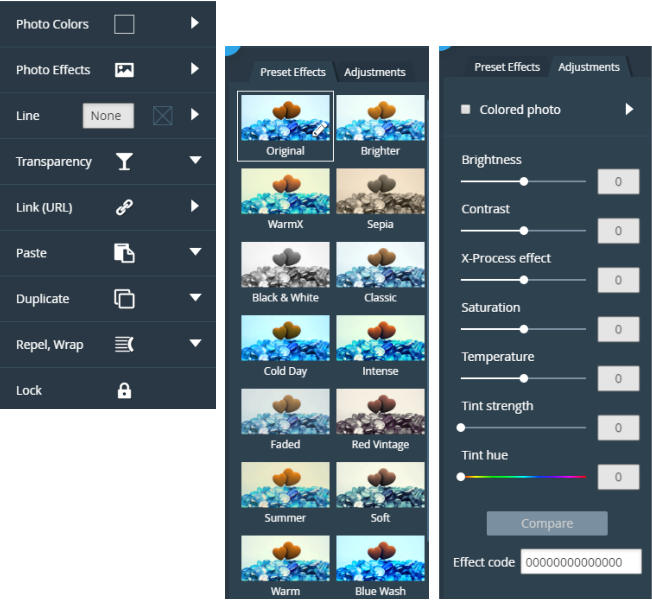
Select a photo and then choose Photo Effects from the Properties panel. To enhance your photo you can either choose from a wide selection of Preset Effects, or click on Adjustments to manually adjust brightness, contrast, saturation, temperature (for warmth or coolness) and X- Process (which you can use to alter the color channels for some dramatic contrast and saturation effects). The Compare option enables you to toggle between the original and current settings. Create a whole variety of moods with photo effectsAdding Objects
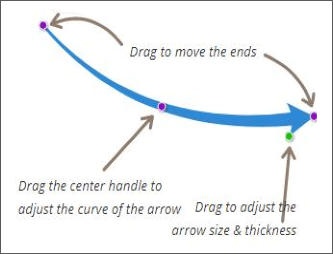
Xara Cloud provides a range of content for you to add to your document. Objects include symbols, photo grids, shapes, buttons, arrows, charts and diagrams. You can find the categories arranged down the left hand side of the, click the category to display all the options. Object categories that can be added are conveniently ranged down the left hand side of the page The objects you can add include a range of customizable SmartShapes, such as rectangles, ellipses, polygons, stars, arrows and flowlines, as well as more complex text panels, photo text panels, speech bubbles and charts. What makes them so easy to use are the editing functions built into the shape. They have a set of control handles that can be dragged to adjust and customize the object.Editing Colors
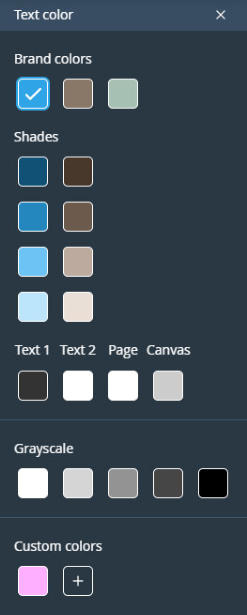
Xara Cloud uses an amazingly powerful system of color control called Theme Colors, which will be familiar to users of the desktop versions of Xara Designer. For example, the heading text in the introduction document uses a blue theme color. To change that color simply select some of the blue heading text, then click the blue color patch in the properties panel on the right, to see and edit the palette of colors in this document. The blue color patch of the selected heading text is shown in the text properties panel on the right - click to edit The selected blue color is highlighted, and you can simply change the color of the heading text by selecting one of the other color patches. To create a completely new color click on the + symbol under Custom Colors. This is the color palette for the intro doc This blue Theme Color 1 has a linked shade seen as the color patch under it. When you change the parent Theme Color 1, all linked shades will also change. Tip: It’s generally regarded as good design to limit your color palette in a document, and to re-use colors or shades of the same color.Saving Your Edits
The document you are editing is on Xara servers in the cloud. When you click Save (File menu, top left) or type Ctrl+S, it saves the document back to your cloud drive, and then automatically syncs back to your cloud drive folder on your Windows computer (providing you have your cloud drive e.g. Dropbox, running on your desktop computer). If you have the file open in the desktop Xara Designer program, it will even be opened in the desktop version as soon as the update is synced. Similarly, if you have the same file open in the desktop version of Web Designer, Photo & Graphic Designer or Designer Pro on your Windows computer, do a Save operation to your cloud drive and it will be synced to the cloud, and from there to the Xara server and into the Xara Cloud editor. So you can edit your document in the cloud or on the desktop, click Save in either and the other will be updated a few seconds later! The File menu showing the Save and ‘Make a copy’ options. To save a copy (like ‘Save As’) first select ‘Make a copy’ from the Documents menu, then select to save it and you can then give it a name. Note: Edit clashes It’s important to realise that this means the same document can be edited in two places at the same time - on your desktop and in Xara Cloud, and that saving from one will overwrite the file open in the other editor. In this case both the desktop Designer and Xara Cloud will detect and alert you that the file has been modified and give you the option of discarding your changes, or keeping them in a new document.Download as PDF
The File menu also has a Download option that allows you to download the document as a high-quality PDF (amongst many other formats).Sharing & Publishing Your Document
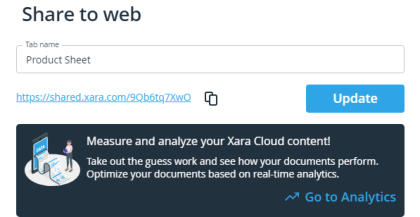
Xara Cloud has revolutionized document sharing. A couple of clicks and a couple of seconds will give you a shareable link that you can give to anyone you want to share the document with. You can share a read-only version of the document, or you can share it for collaborative editing. Select the Share button on the top toolbar to see the Sharing options. The Share to web… option generates a private link you can share with anyone. This is a static read-only version. Select Share to web… you’ll get a confirmation dialog similar to this, showing Publish for the first share and Update for subsequent updates. Share to Web… publishes a read-only version of your document You can copy the URL link to the system clipboard, or you can just click the link to open it in a new browser tab. This is basically like publishing a website - except you don’t need to worry about web space, FTP configuration or hosting, and it’s a lot quicker! If you make further changes to the document, these are not automatically shared until you do another Share to web operation. This allows you to continue working on draft changes, and only update the read-only shared version when you want to. Click Update to re-publish the latest updates. If the document is a website that you want to publish to your own web space and you have saved the web hosting FTP details in the document using Web Designer Premium or Designer Pro, then you will see a Re-publish option in the Share menu. If you have not saved the password in the file, you will be prompted for it.Share Editing
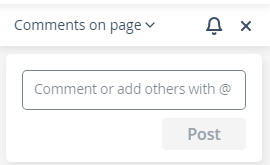
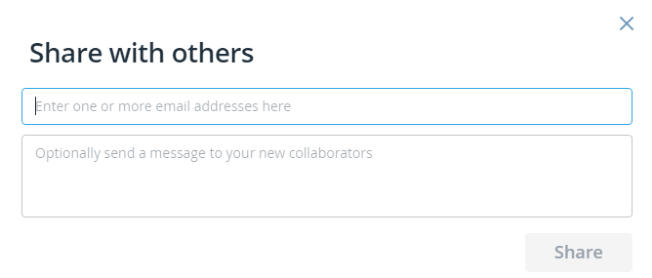
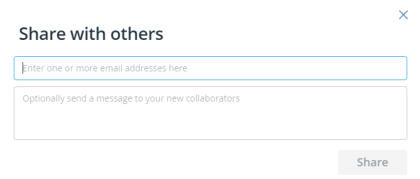
If you select the Share with others option you will be able to enter the email address of anyone you want to share the editing of this document with. You can enter multiple email addresses, comma separated, and each will receive an email inviting them to share editing of your document. When the recipient joins the editing session, the status line shows a round label with the initial of the users editing this document. So for example in the this case there are two people editing the document. You can hover over the label to see the name of each user. Status line of users currently editing the document You see changes they make, as they make them. It’s important to understand that they are not editing a copy of the document - they are editing the exact same document you are. If they click Save, it will save back to your cloud drive (because it’s your document that you let them edit). You - or anyone else you have shared the document with - can also add comments to the document, and mail them to members of your team, to make collaboration quick and easy. Simply click the comment icon on the top toolbar: Xara Cloud offers a very flexible commenting featureBackups
An additional benefit is that Dropbox and Google Drive maintain older versions of your files which provides an easy way of viewing and reverting back to earlier versions, so it’s a safe, easy and storage-saving way of maintaining multiple versions of your website files.Creating New Documents Using Xara Cloud Templates
You can of course edit your Xara documents in Xara Cloud but you can also create a new document using any of the Xara Cloud templates - without even opening your copy of Xara Designer! You can browse thru the Xara Cloud templates here, and simply click Use It to launch Xara Cloud and get started.Find Out More About Xara Cloud
You can find more information on the Xara website. Also don’t miss our tutorials on using the templates included with Xara Cloud to create your own documents: Creating Your Company Documents is an in depth look at producing a document from start to finish - without even using your desktop software - based on one of the flyer templates.Try The Free Trials
If you don’t already own the current version of Web Designer, Photo & Graphic Designer or Designer Pro and you’d like to try the unique offline/online experience offered by Xara then why not download the free trial of Xara Web Designer or Photo & Graphic Designer or Xara Designer Pro+ now! And you can sign up to the free trial of Xara Cloud here.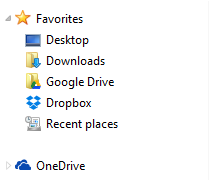


Copyright © 2021 Xara Group Limited.
Page created with Xara Designer Pro+
Xara Cloud is an ultra-simple way to view and edit the content of your Xara document or website, using a
web browser on any computer or tablet (including a Mac, iPad, Android tablet or Chromebook), from
anywhere in the world, and to save, print or re-publish it. Ideal for remotely updating content.
Using Xara Cloud you can work on documents created in Xara Designer Pro, Web Designer and Photo &
Graphic Designer but Xara Cloud also offers a large and growing selection of its own templates that can be
edited within Xara Cloud and don’t require the desktop software.
What’s more, Xara Cloud enables one-click sharing of your documents. Share to Web publishes a read-only
version, while Share with Others is perfect for working with colleagues or clients on the same document at
the same time, on a collaborative project where edits to text and images and editors’ comments can be
seen live, as-they-happen, by everyone editing the document.
You can subscribe to Xara Cloud as a complement to your existing copy of Designer Pro X, Photo &
Graphic Designer or Web Designer or you can subscribe to Xara Cloud+, a great value bundle of Xara Cloud
and Designer Pro+ (Cloud and Cloud+ are subscription options, sold and supported by Xara).
Note: This tutorial has been updated to reflect the Xara Cloud service in October 2021
The Xara Cloud editor
Getting Started
In order to edit any Xara document it must be stored in a cloud drive. Xara works with Dropbox (2GB free), Google Drive (15GB free) and OneDrive (5GB free) so if you are not already signed up with one of these, that is the first thing you need to do. Download the relevant desktop application for one of these, install it and set up your account (Note: OneDrive is pre-installed with Windows 8.1 and 10, but you will need to download it for Windows 7 and 8). Each of these services creates a folder on your local hard disc that is mirrored online ‘in the cloud’, and it is that which Xara Cloud accesses. Screenshot of a section of my Windows File Explorer showing Google Drive, Dropbox and OneDrive Now you can get started with Xara Cloud. Whichever cloud solution you chose, create a folder in which to place your Xara files. If you have an existing Xara document that you wish to edit then drag it into the folder. Note: Dragging the file from another folder into the OneDrive / Dropbox / Google Drive folder on your computer will move it into the new folder, out of the original. If you want to keep the original copy, then it’s better to copy / paste the file from the original folder to the OneDrive folder. Now go to cloud.xara.com to sign up to Xara Cloud. You can Sign Up with the credentials of your Google Drive or OneDrive account, or if you prefer to use a different email address and password simply enter your choice and elect Sign Up to set up your new Xara Cloud account. You can then sign in with Google, Microsoft or your chosen email and password in future. If you select Google or Microsoft to sign up, you’ll be asked to give permission to access Xara with these credentials (first time only). Once you have completed sign up, or for any future sign in, you will be taken to the File Picker..The File Picker
The File Picker is where you can open any Xara document that you have saved in Dropbox, Google Drive or OneDrive, or select one of the Xara Cloud templates. Once you are in the editor you can return to the File Picker at any time with a single click on the Go to Documents icon in the top left, or by selecting Open or Open in new tab in the File menu. Choose from a large selection of Xara Cloud templates or load files from your cloud storage in the File Picker The templates include a wide range of common business documents including presentations, flyers, catalogs, e-books, CVs, proposals, booklets, product sheets and web banners, all of which can be switched into different color schemes and text styles. You can mouseover the template thumbnail to see a preview of all the page layouts in that design. If instead you select Recent you will see any recent files that you’ve been working on in Xara Cloud, or select Add cloud storage to load any Xara documents stored in your cloud drive(s). If you signed up using your cloud drive credentials then you should see your drive already listed here, otherwise click on the type of cloud drive you want to connect. The first time you connect you will be asked to grant permission to access your files, this is because you will be accessing and editing your cloud files. Note: One-click sign-in - Once you have connected a Google Drive or Microsoft OneDrive you can optionally sign-in to Xara Cloud using the Google Drive or OneDrive options in future. Once you’ve found the file you want - whether it’s your Xara file in your cloud drive or one of the Xara Cloud templates - simply click to open it in the Xara Cloud editor.Navigating your Document and Understanding the Editor Work Space
On both touch and mouse systems, you can push pages around (scroll) by simply pressing the mouse center button (the wheel) and dragging. There’s also a handy shortcut of holding the Ctrl key and using the scroll wheel to zoom in and out. Give it a go! If you’re working on a multi-page document you will see the page thumbnails ranged down the left; simply click a page to jump to that page. For longer documents, scroll the page thumbnail area using the mouse wheel or drag on the thumbnails. You can hide and show the page thumbnail panel by sliding left / right on it, or just tapping the projecting ‘drag handle’. Tip: if you have loaded a template with multiple pages only the first page will show, click the Add page option, top of the left toolbar, to see all the possible layouts for the next page ranged down the left. The simple to use key controls are in a bar at the top of the workspace. Xara Cloud editor controlsEditing Your Document
Editing the text and images in your website or document is very easy. Simply click an item to be able to edit it. Press Esc to clear any selection, or click on the background. To edit the text simply click on the text, which places a caret and displays a panel of text controls. You have access to the normal text editing functions like bold, italic, adding links, changing styles, alignment, lists and indents. There’s even a spell checker that works whilst you type (you can change the language in the document Properties menu, tap any blank part of the document to open it). If you want to add new text simply clcik the T - Text icon in the left hand toolbar and select the type of text you want to enter - for example Normal, Heading, Bullet list ,or any of a wide selection of more fancy options - and that will add a new text panel to the document, which can be easily dragged into place.Replacing Images
There are several different options for replacing an image: Drag and drop an image file from your File Explorer onto an image, or click the image and select the ‘Replace image’ menu option, where choices include selecting a file from your local disc, an image from your cloud drive, or from the range of nearly a million royalty free stock photos in Xara Cloud. Note - When uploading an image from your local computer the image is resized before upload to be HD resolution (which is usually more than enough for any website). This speeds up the upload process. If your photos are stored in Google Drive, Dropbox or OneDrive, you can select to import it from your cloud drive which will only take a second or two even for full resolution images. When you select a simple image, in addition to the resize and crop handles on the sides, you’ll see a ‘rotate’ handle in the top right corner of the image. Dragging on this will resize and rotate the image within its frame. Drag diagonally outwards to resize or rotate - this clips the image, but while dragging you will see a faint version of the whole image that shows the extent of the full un-cropped image. If the image is clipped you also see a ‘hand’ control in the bottom left, which allows you to re-position the clipped image within the frame. Select an image to see the resize & crop controls around the outside, a resize/rotate in-frame handle in the top right, and a menu of other image options. For further details on editing images check out our tutorial movies: Resizing and cropping photos Aligning photos and textEditing Images
Select a photo and then choose Photo Effects from the Properties panel. To enhance your photo you can either choose from a wide selection of Preset Effects, or click on Adjustments to manually adjust brightness, contrast, saturation, temperature (for warmth or coolness) and X-Process (which you can use to alter the color channels for some dramatic contrast and saturation effects). The Compare option enables you to toggle between the original and current settings. Create a whole variety of moods with photo effectsAdding Objects
Xara Cloud provides a range of content for you to add to your document. Objects include symbols, photo grids, shapes, buttons, arrows, charts and diagrams. You can find the categories arranged down the left hand side of the, click the category to display all the options. Object categories are conveniently ranged down the left of the page The objects you can add include a range of customizable SmartShapes, such as rectangles, ellipses, polygons, stars, arrows and flowlines, as well as more complex text panels, photo text panels, speech bubbles and charts. What makes them so easy to use are the editing functions built into the shape. They have a set of control handles that can be dragged to adjust and customize the object.Editing Colors
Xara Cloud uses an amazingly powerful system of color control called Theme Colors, which will be familiar to users of the desktop versions of Xara Designer. For example, the heading text in the introduction document uses a blue theme color. To change that color simply select some of the blue heading text, then click the blue color patch in the properties panel on the right, to see and edit the palette of colors in this document. The blue color patch of the selected heading text is shown in the text properties panel on the right - click to edit The selected blue color is highlighted, and you can simply change the color of the heading text by selecting one of the other color patches. To create a completely new color click on the + symbol under Custom Colors. This is the color palette for the intro doc This blue Theme Color 1 has a linked shade seen as the color patch under it. When you change the parent Theme Color 1, all linked shades will also change. Tip: It’s generally regarded as good design to limit your color palette in a document, and to re-use colors or shades of the same color.Saving Your Edits
The document you are editing is on Xara servers in the cloud. When you click Save (File menu, top left) or type Ctrl+S, it saves the document back to your cloud drive, and then automatically syncs back to your cloud drive folder on your Windows computer (providing you have your cloud drive e.g. Dropbox, running on your desktop computer). If you have the file open in the desktop Xara Designer program, it will even be opened in the desktop version as soon as the update is synced. Similarly, if you have the same file open in the desktop version of Web Designer, Photo & Graphic Designer or Designer Pro on your Windows computer, do a Save operation to your cloud drive and it will be synced to the cloud, and from there to the Xara server and into the Xara Cloud editor. So you can edit your document in the cloud or on the desktop, click Save in either and the other will be updated a few seconds later! The File menu showing the Save and ‘Make a copy’ options. To save a copy (like ‘Save As’) first select ‘Make a copy’ from the Documents menu, then select to save it and you can then give it a name. Note: Edit clashes It’s important to realise that this means the same document can be edited in two places at the same time - on your desktop and in Xara Cloud, and that saving from one will overwrite the file open in the other editor. In this case both the desktop Designer and Xara Cloud will detect and alert you that the file has been modified and give you the option of discarding your changes, or keeping them in a new document.Download as PDF
The File menu also has a Download option that allows you to download the document as a high-quality PDF (amongst many other formats).Sharing & Publishing Your Document
Xara Cloud has revolutionized document sharing. A couple of clicks and a couple of seconds will give you a shareable link that you can give to anyone you want to share the document with. You can share a read-only version of the document, or you can share it for collaborative editing. Select the Share button to see the options. The Share to web… option generates a private link you can share with anyone. This is a static read-only version. Select Share to web… you’ll get a confirmation dialog similar to this, showing Publish for the first share and Update for subsequent updates. Share to Web… publishes a read-only version of your document You can copy the URL link to the system clipboard, or you can just click the link to open it in a new browser tab. This is basically like publishing a website - except you don’t need to worry about web space, FTP configuration or hosting, and it’s a lot quicker! If you make further changes to the document, these are not automatically shared until you do another Share to web operation. This allows you to continue working on draft changes, and only update the read- only shared version when you want to. Click Update to re-publish the latest updates. If the document is a website that you want to publish to your own web space and you have saved the web hosting FTP details in the document using Web Designer Premium or Designer Pro, then you will see a Re- publish option in the Share menu. If you have not saved the password in the file, you will be prompted for it.Share Editing
If you select the Share with others option you will be able to enter the email address of anyone you want to share the editing of this document with. You can enter multiple email addresses, comma separated, and each will receive an email inviting them to share editing of your document. When the recipient joins the editing session, the status line shows a round label with the initial of the users editing this document. So for example in the this case there are two people editing the document. You can hover over the label to see the email address of each user. Status line of users currently editing the document You see changes they make, as they make them. It’s important to understand that they are not editing a copy of the document - they are editing the exact same document you are. If they click Save, it will save back to your cloud drive (because it’s your document that you let them edit). You - or anyone else you have shared the document with - can also add comments to the document, and mail them to members of your team, to make collaboration quick and easy. Simply click the comment icon on the top toolbar: Xara Cloud offers a very flexible commenting featureBackups
An additional benefit is that Dropbox and Google Drive maintain older versions of your files which provides an easy way of viewing and reverting back to earlier versions, so it’s a safe, easy and storage-saving way of maintaining multiple versions of your website files.Creating New Documents Using Xara Cloud Templates
You can of course edit your Xara documents in Xara Cloud but you can also create a new document using any of the Xara Cloud templates - without even opening your copy of Xara Designer! You can browse thru the Xara Cloud templates here, and simply click Use It to launch Xara Cloud and get started.Find Out More About Xara Cloud
You can find more information on the Xara website. Also don’t miss our tutorials on using the templates included with Xara Cloud to create your own documents: Creating Your Company Documents is an in depth look at producing a document from start to finish - without even using your desktop software - based on one of the flyer templates.Try The Free Trials
If you don’t already own the current version of Web Designer, Photo & Graphic Designer or Designer Pro and you’d like to try the unique offline/online experience offered by Xara then why not download the free trial of Xara Web Designer or Photo & Graphic Designer or Xara Designer Pro+ now! And you can sign up to the free trial of Xara Cloud here.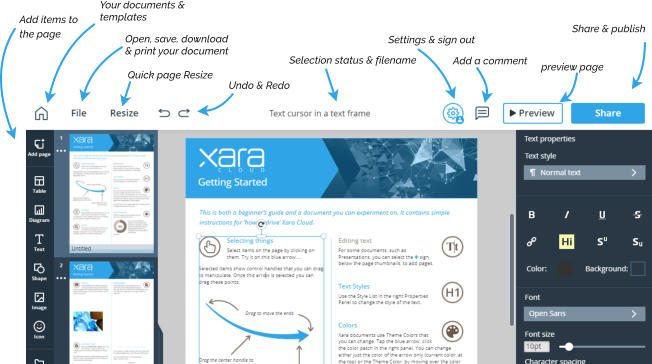


Copyright © 2021 Xara Group Limited.
Page created with Xara Designer Pro+
Xara Cloud is an ultra-simple way to view and edit the
content of your Xara document or website, using a web
browser on any computer or tablet (including a Mac, iPad,
Android tablet or Chromebook), from anywhere in the world,
and to save, print or re-publish it. Ideal for remotely updating
content.
Using Xara Cloud you can work on documents created in
Xara Designer Pro, Web Designer and Photo & Graphic
Designer but Xara Cloud also offers a large and growing
selection of its own templates that can be edited within
Xara Cloud and don’t require the desktop software.
What’s more, Xara Cloud enables one-click sharing of your
documents. Share to Web publishes a read-only version,
while Share with Others is perfect for working with
colleagues or clients on the same document at the same
time, on a collaborative project where edits to text and
images and editors’ comments can be seen live, as-they-
happen, by everyone editing the document.
You can subscribe to Xara Cloud as a complement to your
existing copy of Designer Pro X, Photo & Graphic Designer
or Web Designer or you can subscribe to Xara Cloud+, a
great value bundle of Xara Cloud and Designer Pro+ (Cloud
and Cloud+ are subscription options, sold and supported by
Xara).
Note: This tutorial has been updated to reflect the Xara Cloud
service in October 2021
The Xara Cloud editor
Getting Started
In order to edit any Xara document it must be stored in a cloud drive. Xara works with Dropbox (2GB free), Google Drive (15GB free) and OneDrive (5GB free) so if you are not already signed up with one of these, that is the first thing you need to do. Download the relevant desktop application for one of these, install it and set up your account (Note: OneDrive is pre-installed with Windows 8.1 and 10, but you will need to download it for Windows 7 and 8). Each of these services creates a folder on your local hard disc that is mirrored online ‘in the cloud’, and it is that which Xara Cloud accesses. Screenshot of a section of my Windows File Explorer showing Google Drive, Dropbox and OneDrive Now you can get started with Xara Cloud. Whichever cloud solution you chose, create a folder in which to place your Xara files. If you have an existing Xara document that you wish to edit then drag it into the folder. Note: Dragging the file from another folder into the OneDrive / Dropbox / Google Drive folder on your computer will move it into the new folder, out of the original. If you want to keep the original copy, then it’s better to copy / paste the file from the original folder to the OneDrive folder. Now go to cloud.xara.com to sign up to Xara Cloud. You can Sign Up with the credentials of your Google Drive or OneDrive account, or if you prefer to use a different email address and password simply enter your choice and elect Sign Up to set up your new Xara Cloud account. You can then sign in with Google, Microsoft or your chosen email and password in future. If you select Google or Microsoft to sign up, you’ll be asked to give permission to access Xara with these credentials (first time only). Once you have completed sign up, or for any future sign in, you will be taken to the File Picker.The File Picker
The File Picker is where you can open any Xara document that you have saved in Dropbox, Google Drive or OneDrive, or select one of the Xara Cloud templates. Once you are in the editor you can return to the File Picker at any time with a single click on the Go to Documents icon in the top left, or by selecting Open or Open in new tab in the File menu. Choose from a large selection of Xara Cloud templates or load files from your cloud storage in the File Picker The templates include a wide range of common business documents including presentations, flyers, catalogs, e- books, CVs, proposals, booklets, product sheets and web banners, all of which can be switched into different color schemes and text styles. You can mouseover the template thumbnail to see a preview of all the page layouts in that design. If instead you select Recent you will see any recent files that you’ve been working on in Xara Cloud, or select Add cloud storage to load any Xara documents stored in your cloud drive(s). If you signed up using your cloud drive credentials then you should see your drive already listed here, otherwise click on the type of cloud drive you want to connect. The first time you connect you will be asked to grant permission to access your files, this is because you will be accessing and editing your cloud files. Note: One-click sign-in - Once you have connected a Google Drive or Microsoft OneDrive you can optionally sign-in to Xara Cloud using the Google Drive or OneDrive options in future. Once you’ve found the file you want - whether it’s your Xara file in your cloud drive or one of the Xara Cloud templates - simply click to open it in the Xara Cloud editor.Navigating your Document and Understanding the
Editor Work Space
On both touch and mouse systems, you can push pages around (scroll) by simply pressing the mouse center button (the wheel) and dragging. There’s also a handy shortcut of holding the Ctrl key and using the scroll wheel to zoom in and out. Give it a go! If you’re working on a multi-page document you will see the page thumbnails ranged down the left; simply click a page to jump to that page. For longer documents, scroll the page thumbnail area using the mouse wheel or drag on the thumbnails. You can hide and show the page thumbnail panel by sliding left / right on it, or just tapping the projecting ‘drag handle’. Tip: if you have loaded a template with multiple pages only the first page will show, click the Add page option, top of the left toolbar, to see all the possible layouts for the next page ranged down the left. The simple to use key controls are in a bar at the top of the workspace. Xara Cloud editor controlsEditing Your Document
Editing the text and images in your website or document is very easy. Simply click an item to be able to edit it. Press Esc to clear any selection, or click on the background. To edit the text simply click on the text, which places a caret and displays a panel of text controls. You have access to the normal text editing functions like bold, italic, adding links, changing styles, alignment, lists and indents. There’s even a spell checker that works whilst you type (you can change the language in the document Properties menu, tap any blank part of the document to open it). If you want to add new text simply clcik the T - Text icon in the left hand toolbar and select the type of text you want to enter - for example Normal, Heading, Bullet list ,or any of a wide selection of more fancy options - and that will add a new text panel to the document, which can be easily dragged into place.Replacing Images
There are several different options for replacing an image: Drag and drop an image file from your File Explorer onto an image, or click the image and select the ‘Replace image’ menu option, where choices include selecting a file from your local disc, an image from your cloud drive, or from the range of nearly a million royalty free stock photos in Xara Cloud. Note - When uploading an image from your local computer the image is resized before upload to be HD resolution (which is usually more than enough for any website). This speeds up the upload process. If your photos are stored in Google Drive, Dropbox or OneDrive, you can select to import it from your cloud drive which will only take a second or two even for full resolution images. When you select a simple image, in addition to the resize and crop handles on the sides, you’ll see a ‘rotate’ handle in the top right corner of the image. Dragging on this will resize and rotate the image within its frame. Drag diagonally outwards to resize or rotate - this clips the image, but while dragging you will see a faint version of the whole image that shows the extent of the full un-cropped image. If the image is clipped you also see a ‘hand’ control in the bottom left, which allows you to re-position the clipped image within the frame. Select an image to see the resize & crop controls around the outside, a resize/rotate in-frame handle in the top right, and a menu of other image options. For further details on editing images check out our tutorial movies: Resizing and cropping photos Aligning photos and textEditing Images
Select a photo and then choose Photo Effects from the Properties panel. To enhance your photo you can either choose from a wide selection of Preset Effects, or click on Adjustments to manually adjust brightness, contrast, saturation, temperature (for warmth or coolness) and X-Process (which you can use to alter the color channels for some dramatic contrast and saturation effects). The Compare option enables you to toggle between the original and current settings. Create a whole variety of moods with photo effectsAdding Objects
Xara Cloud provides a range of content for you to add to your document. Objects include symbols, photo grids, shapes, buttons, arrows, charts and diagrams. You can find the categories arranged down the left hand side of the, click the category to display all the options. Object categories are conveniently ranged down the left of the page The objects you can add include a range of customizable SmartShapes, such as rectangles, ellipses, polygons, stars, arrows and flowlines, as well as more complex text panels, photo text panels, speech bubbles and charts. What makes them so easy to use are the editing functions built into the shape. They have a set of control handles that can be dragged to adjust and customize the object.Editing Colors
Xara Cloud uses an amazingly powerful system of color control called Theme Colors, which will be familiar to users of the desktop versions of Xara Designer. For example, the heading text in the introduction document uses a blue theme color. To change that color simply select some of the blue heading text, then click the blue color patch in the properties panel on the right, to see and edit the palette of colors in this document. The blue color patch of the selected heading text is shown in the text properties panel on the right - click to edit The selected blue color is highlighted, and you can simply change the color of the heading text by selecting one of the other color patches. To create a completely new color click on the + symbol under Custom Colors. This is the color palette for the intro doc This blue Theme Color 1 has a linked shade seen as the color patch under it. When you change the parent Theme Color 1, all linked shades will also change. Tip: It’s generally regarded as good design to limit your color palette in a document, and to re-use colors or shades of the same color.Saving Your Edits
The document you are editing is on Xara servers in the cloud. When you click Save (File menu, top left) or type Ctrl+S, it saves the document back to your cloud drive, and then automatically syncs back to your cloud drive folder on your Windows computer (providing you have your cloud drive e.g. Dropbox, running on your desktop computer). If you have the file open in the desktop Xara Designer program, it will even be opened in the desktop version as soon as the update is synced. Similarly, if you have the same file open in the desktop version of Web Designer, Photo & Graphic Designer or Designer Pro on your Windows computer, do a Save operation to your cloud drive and it will be synced to the cloud, and from there to the Xara server and into the Xara Cloud editor. So you can edit your document in the cloud or on the desktop, click Save in either and the other will be updated a few seconds later! The File menu showing the Save and ‘Make a copy’ options. To save a copy (like ‘Save As’) first select ‘Make a copy’ from the Documents menu, then select to save it and you can then give it a name. Note: Edit clashes It’s important to realise that this means the same document can be edited in two places at the same time - on your desktop and in Xara Cloud, and that saving from one will overwrite the file open in the other editor. In this case both the desktop Designer and Xara Cloud will detect and alert you that the file has been modified and give you the option of discarding your changes, or keeping them in a new document.Download as PDF
The File menu also has a Download option that allows you to download the document as a high-quality PDF (amongst many other formats).Sharing & Publishing Your Document
Xara Cloud has revolutionized document sharing. A couple of clicks and a couple of seconds will give you a shareable link that you can give to anyone you want to share the document with. You can share a read-only version of the document, or you can share it for collaborative editing. Select the Share button to see the options. The Share to web… option generates a private link you can share with anyone. This is a static read-only version. Select Share to web… you’ll get a confirmation dialog similar to this, showing Publish for the first share and Update for subsequent updates. Share to Web… publishes a read-only version of your document You can copy the URL link to the system clipboard, or you can just click the link to open it in a new browser tab. This is basically like publishing a website - except you don’t need to worry about web space, FTP configuration or hosting, and it’s a lot quicker! If you make further changes to the document, these are not automatically shared until you do another Share to web operation. This allows you to continue working on draft changes, and only update the read-only shared version when you want to. Click Update to re-publish the latest updates. If the document is a website that you want to publish to your own web space and you have saved the web hosting FTP details in the document using Web Designer Premium or Designer Pro, then you will see a Re-publish option in the Share menu. If you have not saved the password in the file, you will be prompted for it.Share Editing
If you select the Share with others option you will be able to enter the email address of anyone you want to share the editing of this document with. You can enter multiple email addresses, comma separated, and each will receive an email inviting them to share editing of your document. When the recipient joins the editing session, the status line shows a round label with the initial of the users editing this document. So for example in the this case there are two people editing the document. You can hover over the label to see the name of each user. Status line of users currently editing the document You see changes they make, as they make them. It’s important to understand that they are not editing a copy of the document - they are editing the exact same document you are. If they click Save, it will save back to your cloud drive (because it’s your document that you let them edit). You - or anyone else you have shared the document with - can also add comments to the document, and mail them to members of your team, to make collaboration quick and easy. Simply click the comment icon on the top toolbar: Xara Cloud offers a very flexible commenting featureBackups
An additional benefit is that Dropbox and Google Drive maintain older versions of your files which provides an easy way of viewing and reverting back to earlier versions, so it’s a safe, easy and storage-saving way of maintaining multiple versions of your website files.Creating New Documents Using Xara Cloud
Templates
You can of course edit your Xara documents in Xara Cloud but you can also create a new document using any of the Xara Cloud templates - without even opening your copy of Xara Designer! You can browse thru the Xara Cloud templates here, and simply click Use It to launch Xara Cloud and get started.Find Out More About Xara Cloud
You can find more information on the Xara website. Also don’t miss our tutorials on using the templates included with Xara Cloud to create your own documents: Creating Your Company Documents is an in depth look at producing a document from start to finish - without even using your desktop software - based on one of the flyer templates.Try The Free Trials
If you don’t already own the current version of Web Designer, Photo & Graphic Designer or Designer Pro and you’d like to try the unique offline/online experience offered by Xara then why not download the free trial of Xara Web Designer or Photo & Graphic Designer or Xara Designer Pro+ now! And you can sign up to the free trial of Xara Cloud here.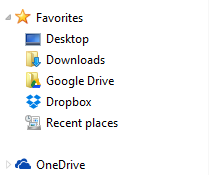


Copyright © 2021 Xara Group Limited.
Page created with Xara Designer Pro+
EASY ONLINE EDITING OF XARA DOCUMENTS
EASY ONLINE EDITING OF XARA DOCUMENTS
EASY ONLINE EDITING OF XARA DOCUMENTS