
Xara Photo and Graphic Designer is a high-powered general purpose photo editing and graphics creation tool, able to create graphic designs of all types, from web graphics to
page layouts such as posters and flyers, cartoons, and the most complex illustrations.
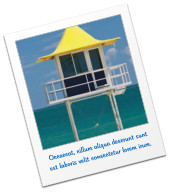
Example graphics and photo frame:
Simple social media icons
Last month in our Introduction Part 1 we gave a general overview of Photo & Graphic Designer, this month in Part 2 we will cover the Text Tool, and next month we take a
closer look at the drawing tools.
Demo Videos
The best way to learn the basics of the tools, selecting and manipulating objects on the page is to view the set of three short introductory demo movies. We highly recommend you view them.Text Tool
There are three types of text object - a single line of text, a column of text or a rectangular text area: Simple Text: Just click on the page and type. This creates an un-bounded line of text - it just grows as you enter more text. Text Column: Click and drag horizontally on the page to create an empty text column. Now type, or paste your text. You can adjust the column width in the Text Tool by dragging the ends of the red column indicator, or using the Selector Tool by dragging the side handles. Text Area: Click and drag diagonally on the empty page to create an empty text box or frame. You can adjust the width and height of a text area by clicking and dragging on it. Tip: To enter some dummy text, type Ctrl+Shift+L to fill your text column with pseudo-Latin. It saves a lot of typing! A column or box of text is an object and using the Selector Tool it can be moved, rotated, enlarged or reduced in size just like any other object. Even if it is rotated you can still go back into the Text Tool to edit the text.Word-processing Functions:
Photo & Graphic Designer has all the normal word processor-style cursor, mouse and selection operations as well as the standard editing functions expected in a word- processor. These can be found in the top Text Tool InfoBar: Text Attributes - There are functions to change the font size, bold, italic, underline, strikethrough, subscript and superscript. Text alignment - Text can be left and right justified, fully justified or centered. It can also be indented or outdented. Line Spacing - This changes the vertical spacing between two lines. Line spacing is measured in percentages (120%) or points (12pt). You can either type the line space value in the text box or click the arrows to nudge the values. Bulleted and numbered lists - Right click on a numbered list and choose List properties… to change the numbering scheme for your list. You can also use any graphic as the bullet or number in your list.Spacing:
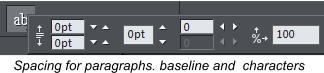
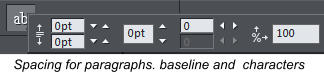
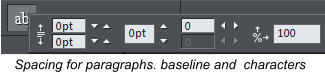
Paragraph spacing - This is particularly useful where you want half line spaces between paragraphs. When you use both spacing above and below paragraphs, the spacing between paragraphs is whichever is the greater value (it's not cumulative). Baseline shift - The baseline is the imaginary line at the bottom of characters. Baseline shift allows you to move part of a line up or down. Positive values move the text upwards, negative downwards. Kerning - Kerning lets you alter the space between two characters thus changing the horizontal spacing. (Most good fonts have auto-kerning, which means they already move appropriate pairs of characters together slightly.) Kerning is measured in "ems" (enter values in 1/1000ths of "ems".) You can either type the kerning value in the text box, or click the arrows to nudge the values. Tracking - Whereas kerning changes the spacing between two characters, tracking changes the spacing equally within a region of text. An EM is the width of the capital letter "M" in the current font and font size. Aspect ratio - The aspect ratio is the ratio between the height and width of the text. Ratios over 100% make the text wider than normal; under 100% make the text narrower. Find and Replace - Select the menu Edit >Find/Replace or Ctrl+Alt+F. Spell checker - The spell checker is on the right end of the top Tool InfoBar. You can select your language and select to check spelling as you type and auto correct as you type including fractions, copyright symbol, etc.Styles:
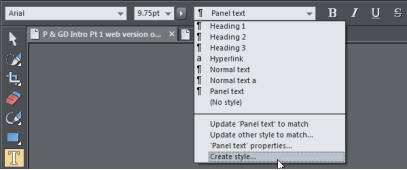
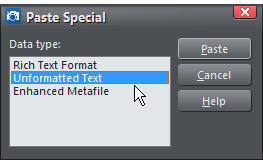
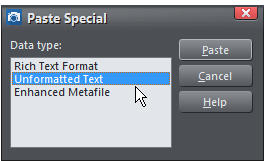
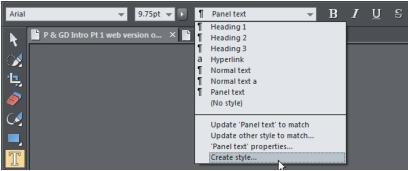
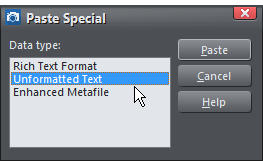
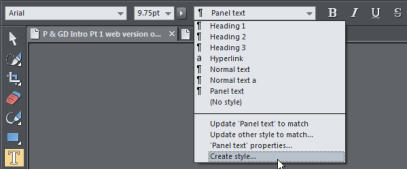
Text Styles are a powerful way to alter the appearance of text throughout a document with a few clicks. A Text Style is a named collection of attributes, such as font, size, color, line spacing and other text attributes. For example, the main heading might have a style called 'Heading 1', the smaller sub-heading might be called 'Heading 2'. By updating the definition of 'Heading 2', say, to be a different font, then every similar heading throughout the document will be updated instantly. Similarly the main text, 'Normal text' (sometimes called the 'body text') of a document is also a particular style. By updating that style to be, say, 12 point Times New Roman, then all 'Normal text' throughout the document can be changed in one go, without having to select and apply the same font change over and over again. To update an existing Text Style: 1. Select some text already in the style you want to update. 2. Apply whatever changes you require, say an alternative font, or font size. 3. Select Update 'style name' to match from the Style drop-down menu on the Text InfoBar. To create a completely new Style, change a selection of text to appear how you want and then select the Create Style menu from the Style list drop-down on the Text Tool InfoBar. If you want to create a new Paragraph Style it's recommended that you select and apply your changes to a whole paragraph, before selecting the Create Style menu option. Tip: When ‘copy and pasting’ text into your document, select ‘Unformatted Text’ and it will adopt the style of the text in your document.Text Fonts
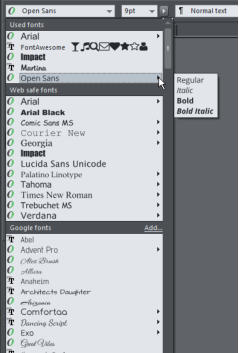
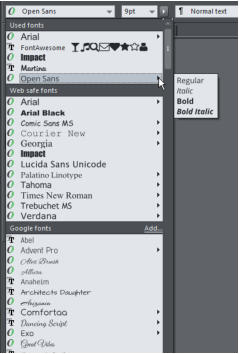
The Font Menu is divided into 4 sections with each font name displayed using its own typeface, making font selection easier: - Fonts used in the current document - Web safe fonts - This section of fonts can be used safely in web pages, because all commonly used web browsers will support these fonts. - Google fonts - You can use one of the hundreds of free, open source Google fonts that have the advantage of being hosted by Google so you don't have to upload font files with your document when it's exported as HTML and the visitor's browser will automatically fetch the fonts from the Google font hosting servers. The fonts are fully integrated within Photo & Graphic Designer so you can browse and search through the font list using the Font Finder to download and install the fonts to your own computer. To start using Google fonts simply click Add… on the font menu to pull up the Font Finder. - All fonts installed Font Awesome Symbols and Icons: Probably the most common type of graphic used in any document is the icon, which may be something as simple as a Facebook icon, or an email icon , or perhaps a thumbs-up . It may be that you need to show that you accept Visa and Mastercard . To insert a Font Awesome symbol just select the menu Insert Font Awesome Symbol… This opens a window with a categorized list of the more than 500 symbols and icons. See the Font Awesome Tutorial.Text Colors
Changing the text color - Simply select the text that you want to change and then click on a color on the color line. If there is a specific color that you want to use, for example from another document, then select your text and click and drag the ‘eye dropper’ over your required color. Highlighting Text - Select the text then right click on the color you want on the bottom color line and choose ‘Set text background’ on the dialog. (To remove a background color select the highlighted text and then right click on the ‘no color’ swatch on the color line and select ‘Clear text background’).Text Wrapping
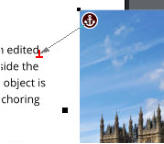
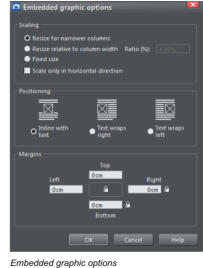
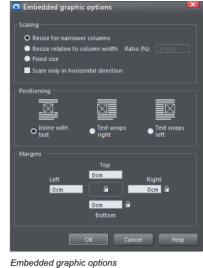
Repelling objects - Text can be wrapped around objects by setting the object to repel text. Simply drag the graphic or photo onto the text, then right click and select ‘Repel text under’. Now when you move or rotate the object, the text will automatically wrap around it. Embedding objects in text - To embed an object copy or cut it (Ctrl+C) to the clipboard, go into the Text Tool and place the text caret at the point in the text where you want to insert it, and then paste (Ctrl+V). If the object you insert is wider than the text area or text column, the object is automatically resized down to the width of the text column. Right-click on the embedded object and choose "Embedded graphic options...’ to see various formatting options such as resizing, wrap right or left and to set the margins. Anchored text You can position any object so it's tied (anchored) to a position in some text, then as the text is moved the object will move to remain at the same relative position. This is normally used for objects that sit outside the margins of the text, eg. a photo sitting to the right or left of a text column. Right click on the object and choose the ‘Anchor to text’ option. The arrow head can be moved to the desired anchoring point. Flowing text - When text overflows the bottom of the text area, a red flow arrow is shown on the bottom of the area. If you drag this over any other text area, the overflow text will flow into the new text area, and the two areas become connected. This is shown with a flow arrow. If the text cursor is in an area with overflowing text, then just click-drag on the page to create a new text area. The new text area is automatically connected and text will flow into the new area. Tip: You can flow text from one area to another on any page, even earlier pages. If you need to flow into an area many pages away, it's probably easier to zoom out to a small page size so you can see both pages and then drag the overflow arrow across the pages. Next month: the Drawing Tools In the meantime, why not Download Xara Photo & Graphic Designer and try it!


Copyright © 2015 Xara Group Limited, a MAGIX company.
Page created with Xara Designer Pro

Introduction to Xara Photo & Graphics Designer Part 2
Xara Photo and Graphic Designer is a high-powered general purpose photo editing and graphics creation tool, able to create graphic designs of all types, from web graphics to page layouts such as posters and flyers, cartoons, and the most complex illustrations. See Introduction Part 1 This Introduction Part 2 will cover the Text Tool Example graphics and photo frame: Simple social media iconsDemo Videos
The best way to learn the basics of the tools, selecting and manipulating objects on the page is to view the set of three short introductory demo movies We highly recommend you view them.Text Tool
There are three types of text object - a single line of text, a column of text or a rectangular text area: Simple Text: Just click on the page and type. This creates an un-bounded line of text - it just grows as you enter more text. Text Column: Click and drag horizontally on the page to create an empty text column. Now type, or paste your text. You can adjust the column width in the Text Tool by dragging the ends of the red column indicator, or using the Selector Tool by dragging the side handles. Text Area: Click and drag diagonally on the empty page to create an empty text box or frame. You can adjust the width and height of a text area by clicking and dragging on it. Tip: To enter some dummy text, type Ctrl+Shift+L to fill your text column with pseudo-Latin. it saves a lot of typing. A column or box of text is an object and using the Selector tool it can be moved, rotated, enlarged or reduced in size just like any other object. Even if it is rotated you can still go back into the Text Tool to edit the text.Word-processing Functions:
Photo & Graphic Designer has all the normal word processor-style cursor, mouse and selection operations as well as the standard editing functions expected in a word-processor. These can be found in the top Text Tool Infobar: Text Attributes - There are functions to change the font size, bold, italic, underline, strikethrough, subscript and superscript. Text alignment - Text can be left and right justified, fully justified or centred. It can also be indented or outdented. Line Spacing - This changes the vertical spacing between two lines. Line spacing is measured in percentages (120%) or points (12pt). You can either type the line space value in the text box or click the arrows to nudge the values. Bulleted and numbered lists - Right click on a numbered list and choose List properties… to change the numbering scheme for your list. You can also use any graphic as the bullet or number in your list.Spacing:
Paragraph spacing- This is particularly useful where you want half line spaces between paragraphs. When you use both spacing above and below paragraphs, the spacing between paragraphs is whichever is the greater value (it's not cumulative). Baseline shift - The baseline is the imaginary line at the bottom of characters. Baseline shift allows you to move part of a line up or down. Positive values move the text upwards, negative downwards. Kerning - Kerning lets you alter the space between two characters thus changing the horizontal spacing. (Most good fonts have auto-kerning which means they already move appropriate pairs of characters together slightly.) Kerning is measured in "ems" (enter values in 1/1000ths of "ems".) You can either type the kerning value in the text box, or click the arrows to nudge the values. Tracking - Whereas kerning changes the spacing between two characters, tracking changes the spacing equally within a region of text. An EM is the width of the capital letter "M" in the current font and font size. Aspect ratio - The aspect ratio is the ratio between the height and width of the text. Ratios over 100% make the text wider than normal; under 100% make the text narrower. Find and Replace - Select the menu Edit >Find/Replace or Ctrl+Alt+F Spell checker - The spell checker is on the right end of the top Tool Info bar. You can select your language and select to check spelling as you type and auto correct as you type including fractions, copyright symbol, etc.Styles:
Text Styles are a powerful way to alter the appearance of text throughout a document with a few clicks. A Text Style is a named collection of attributes, such as font, size, color, line spacing and other text attributes. For example, the main heading might have a style called 'Heading 1', the smaller sub-heading, might be called 'Heading 2'. By updating the definition of 'Heading 2', say, to be a different font, then every similar heading throughout the document will be updated instantly. Similarly the main text, 'Normal text' (sometimes called the 'body text') of a document is also a particular style. By updating that style to be, say, 12 point Times New Roman, then all 'Normal text' throughout the document can be changed in one go, without having to select and apply the same font change over and over again. To update an existing Text Style: 1. Select some text already in the style you want to update. 2. Apply whatever changes you require, say an alternative font, or font size. 3. Select Update 'style name' to match from the Style drop-down menu on the Text InfoBar. To create a completely new Style, change a selection of text to appear how you want and then select the Create Style menu from the Style list drop-down on the Text Tool InfoBar. If you want to create a new Paragraph Style it's recommended that you select and apply your changes to a whole paragraph, before selecting the Create Style menu option. Tip: When ‘copy and pasting’ text into your document, select ‘Unformatted Text’ and it will adopt the style of the text in your document.Text Fonts
The Font menu is divided into 4 sections with each font name displayed using its own typeface, making font selection easier: - Fonts used in the current document - Web safe fonts - This section of fonts can be used safely in web pages, because all commonly used web browsers will support these fonts. - Google fonts - You can use one of the hundreds of free, open source Google fonts that have the advantage of being hosted by Google so you don't have to upload font files with your document when it's exported as HTML and the visitor's browser will automatically fetch the fonts from the Google font hosting servers. The fonts are fully integrated within Photo & Graphic Designer so you can browse and search through the font list using the Font Finder to download and install the fonts to your own computer. To start using Google fonts simply click Add on the font menu to pull up the Font Finder. - All fonts installed Font Awesome Symbols and Icons: Probably the most common type of graphic used in any document is the icon, which may be something as simple as a Facebook icon, or an email icon , or perhaps a thumbs-up . It may be that you need to show that you accept Visa and Mastercard . To insert a Font Awesome symbol just select the menu Insert Font Awesome Symbol… This opens a window with a categorized list of the more than 500 symbols and icons. See the Font Awesome TutorialText Colors
Changing the text color - Simply select the text that you want to change and then click on a color on the color line. If there is a specific color that you want to use, for example, from another document - with you text selected, click and drag the ‘eye dropper’ over your required color. Highlighting Text - Select the text then right click on the color you want on the bottom color line and choose Set text background on the dialogue. (To remove a background color select the highlighted text and then right click on the ‘no color’ swatch on the color line. and select Clear text backgroiund)Text Wrapping
Repelling objects - Text can be wrapped around objects by setting the object to repel text. Simply drag the graphic or photo onto the text, then right click and select ‘Repel text under’. Now when you move or rotate the object, the text will automatically wrap around it. Embedding objects in text - To embed an object - ‘copy’ or ‘cut’ it (Ctrl+C) to the clipboard, go into the Text Tool and place the text caret at the point in the text where you want to insert it, and then ‘paste’ (Ctrl+V). If the object you insert is wider than the text area or text column, the object is automatically resized down to the width of the text column. Right-click on the embedded object and choose "Embedded graphic options... to see various formatting options such as resizing, wrap right or left and setting the margins. Anchored text You can position any object so it's tied (anchored) to a position in some text, then as the text is moved the object will move to remain at the same relative position. This is normally used for objects that sit outside the margins of the text, eg. a photo sitting to the right or left of a text column. Right click on the object and choose the ‘Anchor to text’ option. The arrow head can be moved to the desired anchoring point Flowing text - When text overflows the bottom of the text area, a red flow arrow is shown on the bottom of the area. If you drag this over any other text area, the overflow text will flow into the new text area, and the two areas become connected. This is shown with a flow arrow. If the text cursor is in an area with overflowing text, then just click-drag on the page to create a new text area. The new text area is automatically connected and text will flow into the new area. Tip: You can flow text from one area to another on any page, even earlier pages. If you need to flow into an area many pages away, it's probably easier to zoom out to a small page size so you can see both pages and then drag the overflow arrow across the pages. Next month: the Drawing Tools and Color Editor In the meantime, Download Xara Photo & Graphic Designer and try it!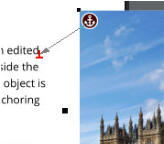


Copyright © 2015 Xara Group Limited, a MAGIX company.
Page created with Xara Designer Pro

Introduction to Xara Photo & Graphics
Designer Part 2
Xara Photo and Graphic Designer is a high-powered general purpose photo editing and graphics creation tool, able to create graphic designs of all types, from web graphics to page layouts such as posters and flyers, cartoons, and the most complex illustrations. See Introduction Part 1 This Introduction Part 2 will cover the Text Tool Example graphics and photo frame: Simple social media iconsDemo Videos
The best way to learn the basics of the tools, selecting and manipulating objects on the page is to view the set of three short introductory demo movies We highly recommend you view them.Text Tool
There are three types of text object - a single line of text, a column of text or a rectangular text area: Simple Text: Just click on the page and type. This creates an un- bounded line of text - it just grows as you enter more text. Text Column: Click and drag horizontally on the page to create an empty text column. Now type, or paste your text. You can adjust the column width in the Text Tool by dragging the ends of the red column indicator, or using the Selector Tool by dragging the side handles. Text Area: Click and drag diagonally on the empty page to create an empty text box or frame. You can adjust the width and height of a text area by clicking and dragging on it. Tip: To enter some dummy text, type Ctrl+Shift+L to fill your text column with pseudo-Latin. it saves a lot of typing. A column or box of text is an object and using the Selector tool it can be moved, rotated, enlarged or reduced in size just like any other object. Even if it is rotated you can still go back into the Text Tool to edit the text.Word-processing Functions:
Photo & Graphic Designer has all the normal word processor-style cursor, mouse and selection operations as well as the standard editing functions expected in a word-processor. These can be found in the top Text Tool Infobar: Text Attributes - There are functions to change the font size, bold, italic, underline, strikethrough, subscript and superscript. Text alignment - Text can be left and right justified, fully justified or centred. It can also be indented or outdented. Line Spacing - This changes the vertical spacing between two lines. Line spacing is measured in percentages (120%) or points (12pt). You can either type the line space value in the text box or click the arrows to nudge the values. Bulleted and numbered lists - Right click on a numbered list and choose List properties… to change the numbering scheme for your list. You can also use any graphic as the bullet or number in your list.Spacing:
Paragraph spacing- This is particularly useful where you want half line spaces between paragraphs. When you use both spacing above and below paragraphs, the spacing between paragraphs is whichever is the greater value (it's not cumulative). Baseline shift - The baseline is the imaginary line at the bottom of characters. Baseline shift allows you to move part of a line up or down. Positive values move the text upwards, negative downwards. Kerning - Kerning lets you alter the space between two characters thus changing the horizontal spacing. (Most good fonts have auto-kerning which means they already move appropriate pairs of characters together slightly.) Kerning is measured in "ems" (enter values in 1/1000ths of "ems".) You can either type the kerning value in the text box, or click the arrows to nudge the values. Tracking - Whereas kerning changes the spacing between two characters, tracking changes the spacing equally within a region of text. An EM is the width of the capital letter "M" in the current font and font size. Aspect ratio - The aspect ratio is the ratio between the height and width of the text. Ratios over 100% make the text wider than normal; under 100% make the text narrower. Find and Replace - Select the menu Edit >Find/Replace or Ctrl+Alt+F Spell checker - The spell checker is on the right end of the top Tool Info bar. You can select your language and select to check spelling as you type and auto correct as you type including fractions, copyright symbol, etc.Styles:
Text Styles are a powerful way to alter the appearance of text throughout a document with a few clicks. A Text Style is a named collection of attributes, such as font, size, color, line spacing and other text attributes. For example, the main heading might have a style called 'Heading 1', the smaller sub-heading, might be called 'Heading 2'. By updating the definition of 'Heading 2', say, to be a different font, then every similar heading throughout the document will be updated instantly. Similarly the main text, 'Normal text' (sometimes called the 'body text') of a document is also a particular style. By updating that style to be, say, 12 point Times New Roman, then all 'Normal text' throughout the document can be changed in one go, without having to select and apply the same font change over and over again. To update an existing Text Style: 1. Select some text already in the style you want to update. 2. Apply whatever changes you require, say an alternative font, or font size. 3. Select Update 'style name' to match from the Style drop-down menu on the Text InfoBar. To create a completely new Style, change a selection of text to appear how you want and then select the Create Style menu from the Style list drop-down on the Text Tool InfoBar. If you want to create a new Paragraph Style it's recommended that you select and apply your changes to a whole paragraph, before selecting the Create Style menu option. Tip: When ‘copy and pasting’ text into your document, select ‘Unformatted Text’ and it will adopt the style of the text in your document.Text Fonts
The Font menu is divided into 4 sections with each font name displayed using its own typeface, making font selection easier: - Fonts used in the current document - Web safe fonts - This section of fonts can be used safely in web pages, because all commonly used web browsers will support these fonts. - Google fonts - You can use one of the hundreds of free, open source Google fonts that have the advantage of being hosted by Google so you don't have to upload font files with your document when it's exported as HTML and the visitor's browser will automatically fetch the fonts from the Google font hosting servers. The fonts are fully integrated within Photo & Graphic Designer so you can browse and search through the font list using the Font Finder to download and install the fonts to your own computer. To start using Google fonts simply click Add on the font menu to pull up the Font Finder. - All fonts installed Font Awesome Symbols and Icons: Probably the most common type of graphic used in any document is the icon, which may be something as simple as a Facebook icon, or an email icon , or perhaps a thumbs-up . It may be that you need to show that you accept Visa and Mastercard . To insert a Font Awesome symbol just select the menu Insert Font Awesome Symbol… This opens a window with a categorized list of the more than 500 symbols and icons. See the Font Awesome TutorialText Colors
Changing the text color - Simply select the text that you want to change and then click on a color on the color line. If there is a specific color that you want to use, for example, from another document - with you text selected, click and drag the ‘eye dropper’ over your required color. Highlighting Text - Select the text then right click on the color you want on the bottom color line and choose Set text background on the dialogue. (To remove a background color select the highlighted text and then right click on the ‘no color’ swatch on the color line. and select Clear text backgroiund)Text Wrapping
Repelling objects - Text can be wrapped around objects by setting the object to repel text. Simply drag the graphic or photo onto the text, then right click and select ‘Repel text under’. Now when you move or rotate the object, the text will automatically wrap around it. Embedding objects in text - To embed an object - ‘copy’ or ‘cut’ it (Ctrl+C) to the clipboard, go into the Text Tool and place the text caret at the point in the text where you want to insert it, and then ‘paste’ (Ctrl+V). If the object you insert is wider than the text area or text column, the object is automatically resized down to the width of the text column. Right-click on the embedded object and choose "Embedded graphic options... to see various formatting options such as resizing, wrap right or left and setting the margins. Anchored text You can position any object so it's tied (anchored) to a position in some text, then as the text is moved the object will move to remain at the same relative position. This is normally used for objects that sit outside the margins of the text, eg. a photo sitting to the right or left of a text column. Right click on the object and choose the ‘Anchor to text’ option. The arrow head can be moved to the desired anchoring point Flowing text - When text overflows the bottom of the text area, a red flow arrow is shown on the bottom of the area. If you drag this over any other text area, the overflow text will flow into the new text area, and the two areas become connected. This is shown with a flow arrow. If the text cursor is in an area with overflowing text, then just click-drag on the page to create a new text area. The new text area is automatically connected and text will flow into the new area. Tip: You can flow text from one area to another on any page, even earlier pages. If you need to flow into an area many pages away, it's probably easier to zoom out to a small page size so you can see both pages and then drag the overflow arrow across the pages. Next month: the Drawing Tools and Color Editor In the meantime, Download Xara Photo & Graphic Designer and try it!


Copyright © 2015 Xara Group Limited, a MAGIX company.
Page created with Xara Designer Pro
INTRODUCTION TO PHOTO & GRAPHIC DESIGNER PART 2
INTRODUCTION TO PHOTO & GRAPHIC DESIGNER PART 2
INTRODUCTION TO PHOTO &
GRAPHIC DESIGNER PART 2
INTRODUCTION TO PHOTO &
GRAPHIC DESIGNER PART 2