One of the most common exposure problems with cameras is that foreground subjects become underexposed when taken against a bright
background such as the sky.
Photo & Graphic Designer and Designer Pro X have two controls for brightening dark areas or shadows in photos and for reducing over-bright
highlights.
Note: This tutorial has been updated to cover changes to the photo tools in Photo & Graphic Designer and Designer Pro in 2016.
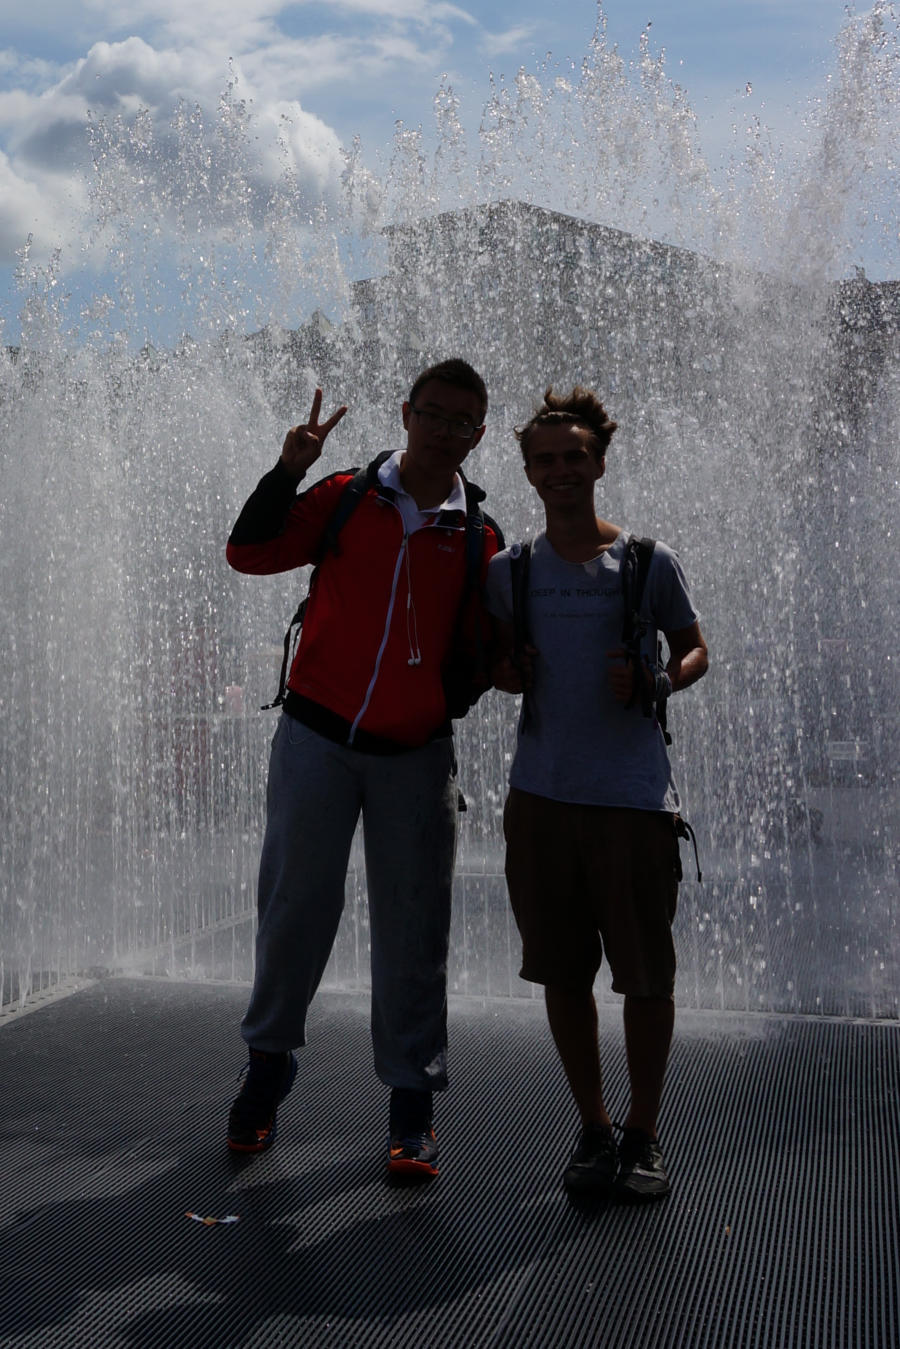
I recently processed a batch of photos taken with quite an expensive camera and almost every image could be improved with the use of the
Shadow Enhance feature. Here’s an example.
Click to enlarge any photo
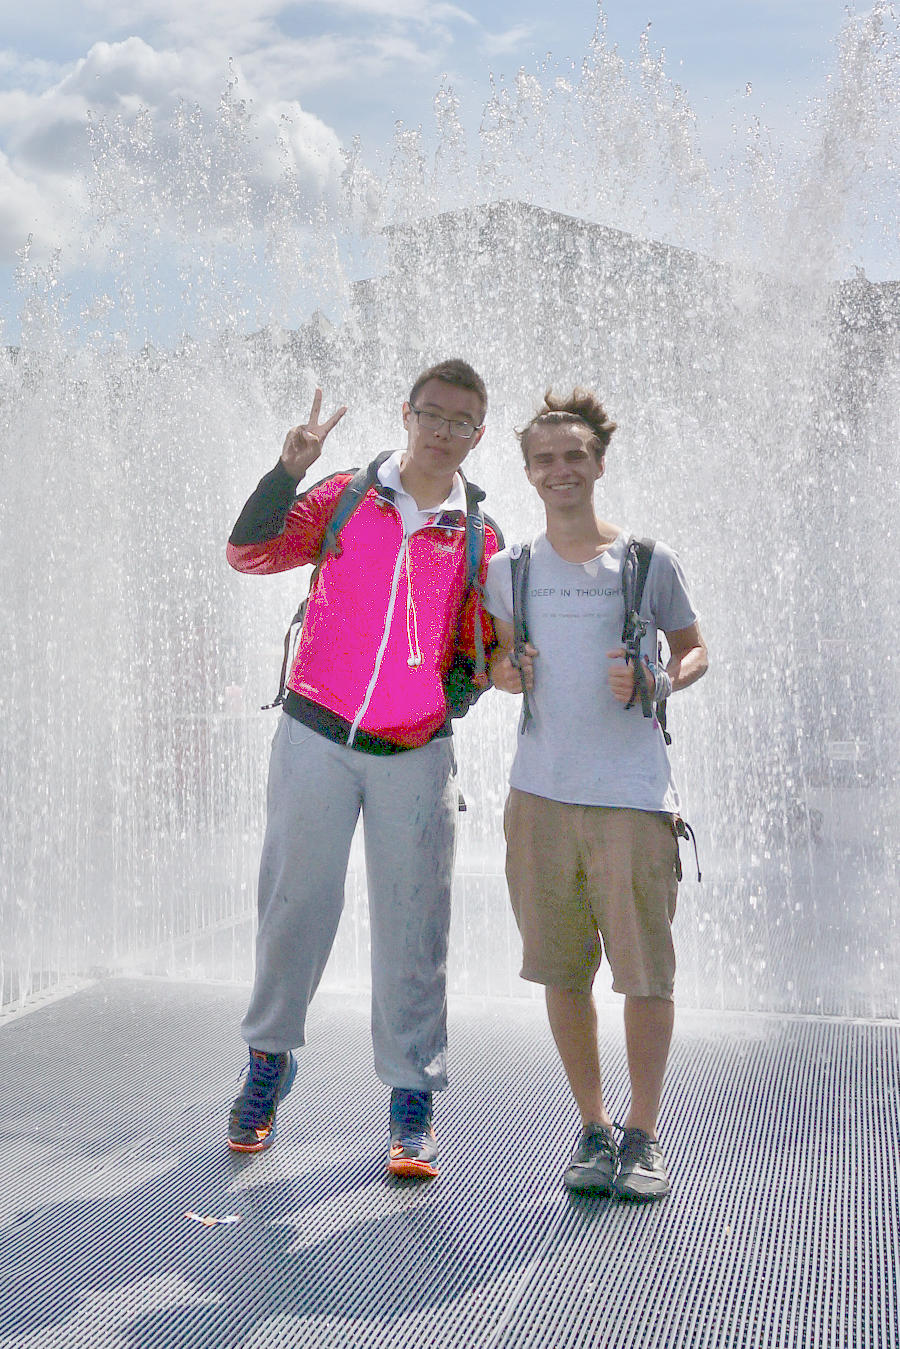
A combination of photographing in bright sunlight, a bright sky and reflections from the water has produced a poor image, that you might think
is un-recoverable. But using the Shadow enhance tool, along with some slight brightness adjustment, I was able to recover much of the details
lost in the dark shadow areas.
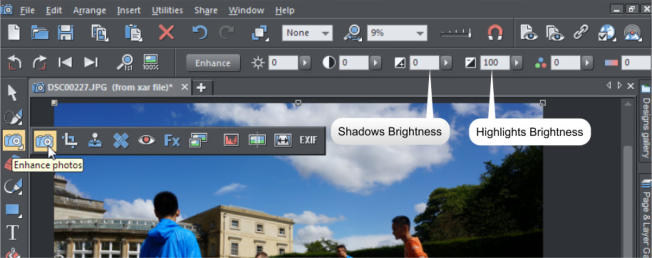
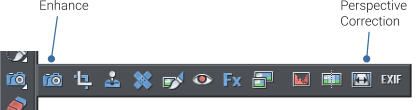
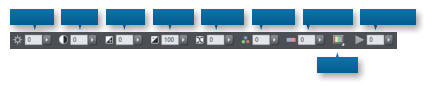
Here’s a reminder of the set of photo enhance controls available in from the Photo Tool
Step-by-step
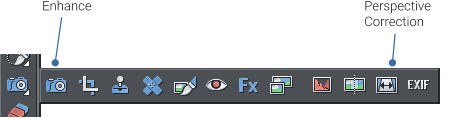
Here are step-by-step instructions on how to enhance your photo in a similar way. First open the photo. You can do this using the File > Open… menu, but it’s often quicker to just drag the JPG file onto the title bar of Xara Designer. Both these techniques open the photo as the full size and resolution stand-alone photo. (If, instead, you dragged the photo onto the page of an existing document, this will import it often at a lower resolution.) With the photo selected, click on the Photo Tool icon On the top InfoBar you will see the Enhance options, shown above, which include the Shadows brightness and Highlights brightness controls we’re going to cover in this tutorial. Simply click on the small down arrow and adjust the slider as required.Brightness or Shadow enhance?
The difference between the Shadows brightness control and the traditional Brightness control is that the former only lightens the darker shadows, whereas the brightness will lighten all parts of the image. Usually when you have photos that already have brighter parts, the last thing you want is to make those any brighter. Below you can see that the brightness control enhances not only the shadows but the whole image. The sky in particular becomes too washed out. Whereas in the third image, where I am using the Shadows enhance control, just the darker shades are enhanced to get the result we need. Click to enlarge any photo on this page. Original Brightness only Shadow enhance The following examples have been greatly improved with the use of the Shadow brightness feature showing that a pretty dull image can be made much brighter with a lot more detail.Highlights
The Highlights brightness control works at the other end of the brightness spectrum, in that it adjusts the brightest highlights only. Unfortunately many cameras, especially those at the cheaper end, tend to overexpose really bright areas to appear as pure white, and it's not always possible to extract detail from those parts of the image. Therefore, in practice the highlights control tends to be less effective than the shadows control. In the example below, as well as lifting the shadows a bit, I’ve reduced the highlights (more than you usually would). The effect is subtle but the you can see the clouds are darker, showing more detail. Original Highlights reduced, shadows lifted Even in this studio photo, the white quilt is slightly over exposed, but we can get more detail back by reducing the highlights. Original Highlights reduced Here are some more examples using the Shadows brightness feature: This is a woefully under exposed image in dark conditions. Using a combination of Brightness control, Shadow brightness and the Warmth control (to move all the colors away from blue towards warmer colors) I have been able to recover a great deal of detail.Examples
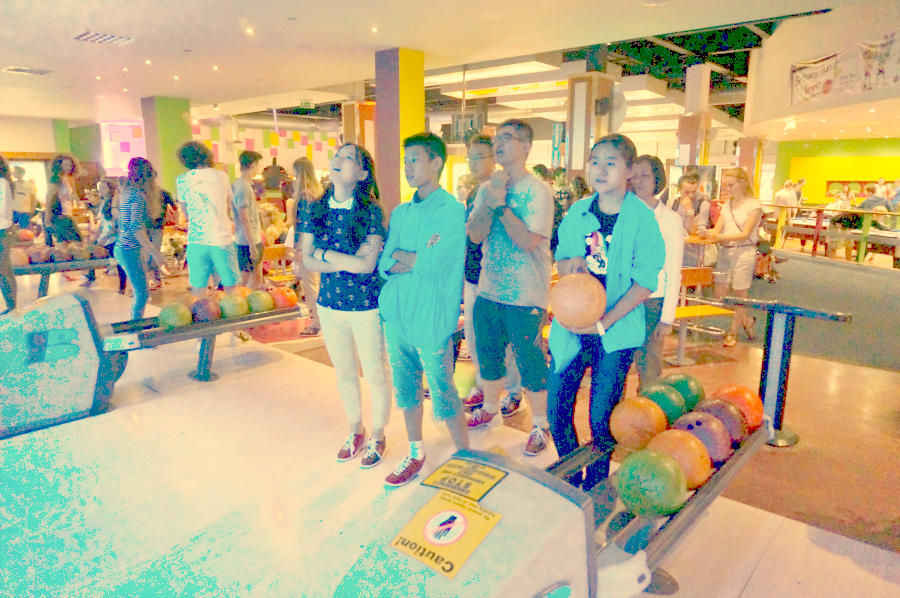
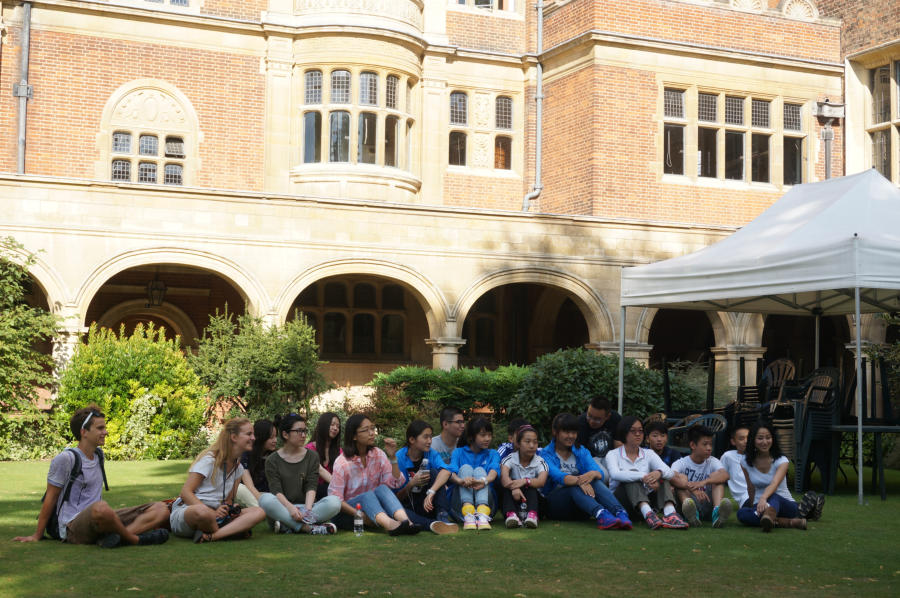
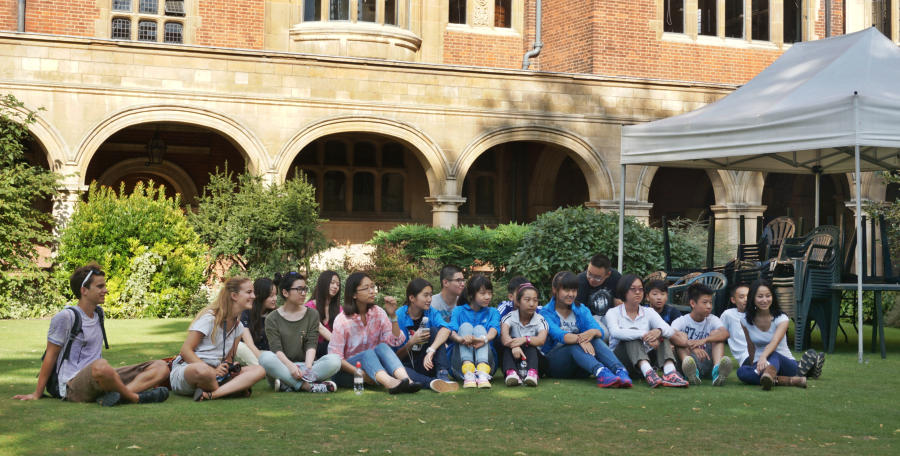
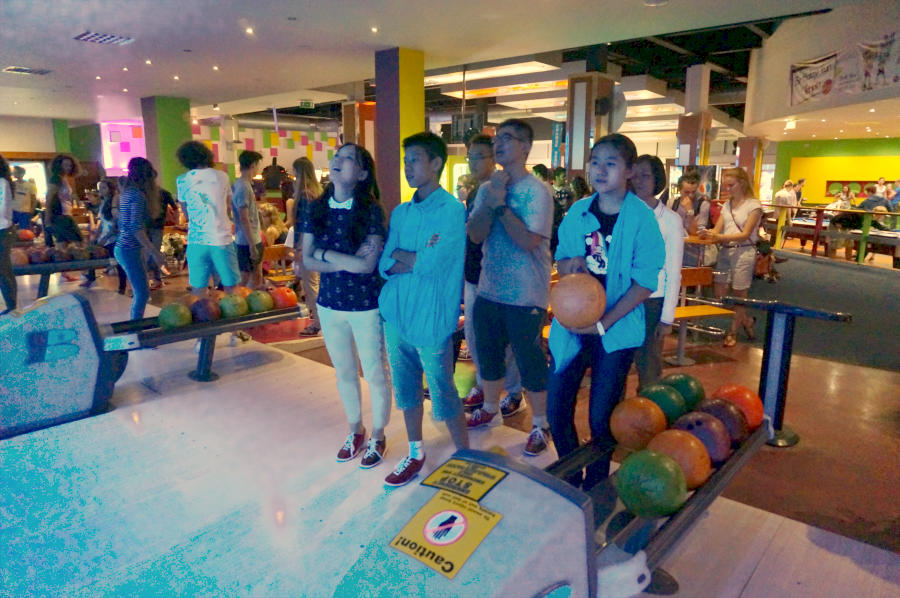
In the following photo, the students are unfortunately in shadow, as the bright building has caused them to be too dark. So I’ve used the Shadow brightness control to brighten the darker area, plus the Highlights brightness control to reduce the over-exposed bright building. As a final edit I cropped most of the building away to focus more on the students. Here’s another example. It’s not clear why this image was so badly exposed, perhaps the bright lights in the background. But using a combination of Brightness control and Shadow brightness has brought back a lot of hidden detail (I suspect any more brightening will cause too much noise to appear in the darker areas - but this is certainly a big improvement). There are two major issues with the next image. Firstly the right side of the building is in shadow - this was a single fix setting of the new Shadow brightness enhance to a value of 90. The second issue is that this wide angle shot shows a typical perspective problem – the building leans away from the observer. This was fixed using the automatic perspective correction tool: These two simple changes made a huge improvement. This final example demonstrates the wider power of Photo & Graphic Designer or Designer Pro. The bright sky has caused the whole image to be under exposed, which was fixed by the new Shadow brightness control. The ‘leaning back’ effect, common when photographing tall buildings with wide angle lenses, was fixed with the perspective correction feature. Finally, using Magic Erase and the Clone tool I’ve removed some of the cars and people.Whole Photo or Region
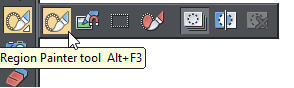
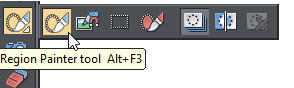
As with all photo enhance effects you can apply the effect to the whole photo - as I’ve done on the above examples. Or you can apply the effect to any part of the image by using the mask and region tools: This set of tools allow you to paint a region (or a mask) on the photo. After this if you switch to the Enhance tool and apply any enhance effect it will be applied to that region only. Or, if you using a mask, it will be applied to the whole image excluding the masked area. You can use the Feather control to blend the edges.Effect Strength
Even more powerfully, with an active region, you can switch to the Transparency tool to adjust the mix of the effect with the original image. You can even have a graduated blend of the effect by simply dragging across the region in the Transparency Tool.Try it!
If you don’t already own Xara Photo & Graphic Designer or Designer Pro X, you can download the free trial version of Xara Photo & Graphic Designer or Xara Designer Pro X to try it with your photos. More guides to editing photos in Xara. 1. Beginner’s Guide to Photo Editing in Xara The basics of opening photos, zooming, sizing photos, and saving. 2. Summary of the Photo Tools A summary of the tools on the Photo Tool fly-out menu. 3. Photo Enhance options An overview of the ‘work-horse’ range of Enhance options. 4. Changing colors in photos How to select and enhance or adjust specific colors. 5. A real-world example Combining many of the techniques described above, to transform a poor photo. In addition there are more detailed guides covering other photo tools: Intelligent Photo Rescaling and Zooming Erasing Backgrounds and Combining Photos Brightness Levels and Color Balance Panoramic Photos For more tutorials by Xara and third parties, check out our Resource index, which offers a searchable and browsable list of movies and tutorials created by Xara and third parties.

Copyright © 2016 Xara Group Limited.
Page created with Xara Designer Pro


Brightness
Contrast
Shadows
Highlights
Saturation
Warm / Cold
Sharpen / Blur
Color Tint
X-Process


One of the most common exposure problems with cameras is that foreground subjects become
underexposed when taken against a bright background such as the sky.
Photo & Graphic Designer and Designer Pro X have two controls for brightening dark areas or shadows in
photos and for reducing over-bright highlights.
Note: This tutorial has been updated to cover changes to the photo tools in Photo & Graphic Designer
and Designer Pro in 2016.
I recently processed a batch of photos taken with quite an expensive camera and almost every image
could be improved with the use of the Shadow Enhance feature. Here’s an example.
Click to enlarge any photo
A combination of photographing in bright sunlight, a bright sky and reflections from the water has
produced a poor image, that you might think is un-recoverable. But using the Shadow enhance tool, along
with some slight brightness adjustment, I was able to recover much of the details lost in the dark shadow
areas.
Here’s a reminder of the set of photo enhance controls available in from the Photo Tool
Step-by-step
Here are step-by-step instructions on how to enhance your photo in a similar way. First open the photo. You can do this using the File > Open… menu, but it’s often quicker to just drag the JPG file onto the title bar of Xara Designer. Both these techniques open the photo as the full size and resolution stand-alone photo. (If, instead, you dragged the photo onto the page of an existing document, this will import it often at a lower resolution.) With the photo selected, click on the Photo Tool icon On the top InfoBar you will see the Enhance options, shown above, which include the Shadows brightness and Highlights brightness controls we’re going to cover in this tutorial. Simply click on the small down arrow and adjust the slider as required.Brightness or Shadow enhance?
The difference between the Shadows brightness control and the traditional Brightness control is that the former only lightens the darker shadows, whereas the brightness will lighten all parts of the image. Usually when you have photos that already have brighter parts, the last thing you want is to make those any brighter. Below you can see that the brightness control enhances not only the shadows but the whole image. The sky in particular becomes too washed out. Whereas in the third image, where I am using the Shadows enhance control, just the darker shades are enhanced to get the result we need. Click to enlarge any photo on this page. Original Brightness only Shadow enhance The following examples have been greatly improved with the use of the Shadow brightness feature showing that a pretty dull image can be made much brighter with a lot more detail.Highlights
The Highlights brightness control works at the other end of the brightness spectrum, in that it adjusts the brightest highlights only. Unfortunately many cameras, especially those at the cheaper end, tend to overexpose really bright areas to appear as pure white, and it's not always possible to extract detail from those parts of the image. Therefore, in practice the highlights control tends to be less effective than the shadows control. In the example below, as well as lifting the shadows a bit, I’ve reduced the highlights (more than you usually would). The effect is subtle but the you can see the clouds are darker, showing more detail. Original Highlights reduced, shadows lifted Even in this studio photo, the white quilt is slightly over exposed, but we can get more detail back by reducing the highlights. Original Highlights reduced Here are some more examples using the Shadows brightness feature: This is a woefully under exposed image in dark conditions. Using a combination of Brightness control, Shadow brightness and the Warmth control (to move all the colors away from blue towards warmer colors) I have been able to recover a great deal of detail.Examples
In the following photo, the students are unfortunately in shadow, as the bright building has caused them to be too dark. So I’ve used the Shadow brightness control to brighten the darker area, plus the Highlights brightness control to reduce the over-exposed bright building. As a final edit I cropped most of the building away to focus more on the students. Here’s another example. It’s not clear why this image was so badly exposed, perhaps the bright lights in the background. But using a combination of Brightness control and Shadow brightness has brought back a lot of hidden detail (I suspect any more brightening will cause too much noise to appear in the darker areas - but this is certainly a big improvement). There are two major issues with the next image. Firstly the right side of the building is in shadow - this was a single fix setting of the new Shadow brightness enhance to a value of 90. The second issue is that this wide angle shot shows a typical perspective problem – the building leans away from the observer. This was fixed using the automatic perspective correction tool: These two simple changes made a huge improvement. This final example demonstrates the wider power of Photo & Graphic Designer or Designer Pro. The bright sky has caused the whole image to be under exposed, which was fixed by the new Shadow brightness control. The ‘leaning back’ effect, common when photographing tall buildings with wide angle lenses, was fixed with the perspective correction feature. Finally, using Magic Erase and the Clone tool I’ve removed some of the cars and people.Whole Photo or Region
As with all photo enhance effects you can apply the effect to the whole photo - as I’ve done on the above examples. Or you can apply the effect to any part of the image by using the mask and region tools: This set of tools allow you to paint a region (or a mask) on the photo. After this if you switch to the Enhance tool and apply any enhance effect it will be applied to that region only. Or, if you using a mask, it will be applied to the whole image excluding the masked area. You can use the Feather control to blend the edges.Effect Strength
Even more powerfully, with an active region, you can switch to the Transparency tool to adjust the mix of the effect with the original image. You can even have a graduated blend of the effect by simply dragging across the region in the Transparency Tool.Try it!
If you don’t already own Xara Photo & Graphic Designer or Designer Pro X, you can download the free trial version of Xara Photo & Graphic Designer or Xara Designer Pro X to try it with your photos. More guides to editing photos in Xara. 1. Beginner’s Guide to Photo Editing in Xara The basics of opening photos, zooming, sizing photos, and saving. 2. Summary of the Photo Tools A summary of the tools on the Photo Tool fly-out menu. 3. Photo Enhance options An overview of the ‘work-horse’ range of Enhance options. 4. Changing colors in photos How to select and enhance or adjust specific colors. 5. A real-world example Combining many of the techniques described above, to transform a poor photo. In addition there are more detailed guides covering other photo tools: Intelligent Photo Rescaling and Zooming Erasing Backgrounds and Combining Photos Brightness Levels and Color Balance Panoramic Photos For more tutorials by Xara and third parties, check out our Resource index, which offers a searchable and browsable list of movies and tutorials created by Xara and third parties.


Brightnes
s
Contra
st
Shadow
s
Highligh
ts
Saturatio
n
Warm /
Cold
Sharpen /
Blur
Color
Tint
X-
Process

Copyright © 2016 Xara Group Limited.
Page created with Xara Designer Pro
One of the most common exposure problems with cameras is that
foreground subjects become underexposed when taken against a
bright background such as the sky.
Photo & Graphic Designer and Designer Pro X have two controls for
brightening dark areas or shadows in photos and for reducing over-
bright highlights.
Note: This tutorial has been updated to cover changes to the
photo tools in Photo & Graphic Designer and Designer Pro in 2016.
I recently processed a batch of photos taken with quite an expensive
camera and almost every image could be improved with the use of
the Shadow Enhance feature. Here’s an example.
Click to enlarge any photo
A combination of photographing in bright sunlight, a bright sky and
reflections from the water has produced a poor image, that you
might think is un-recoverable. But using the Shadow enhance tool,
along with some slight brightness adjustment, I was able to recover
much of the details lost in the dark shadow areas.
Here’s a reminder of the set of photo enhance controls available in
from the Photo Tool
Step-by-step
Here are step-by-step instructions on how to enhance your photo in a similar way. First open the photo. You can do this using the File > Open… menu, but it’s often quicker to just drag the JPG file onto the title bar of Xara Designer. Both these techniques open the photo as the full size and resolution stand-alone photo. (If, instead, you dragged the photo onto the page of an existing document, this will import it often at a lower resolution.) With the photo selected, click on the Photo Tool icon On the top InfoBar you will see the Enhance options, shown above, which include the Shadows brightness and Highlights brightness controls we’re going to cover in this tutorial. Simply click on the small down arrow and adjust the slider as required.Brightness or Shadow enhance?
The difference between the Shadows brightness control and the traditional Brightness control is that the former only lightens the darker shadows, whereas the brightness will lighten all parts of the image. Usually when you have photos that already have brighter parts, the last thing you want is to make those any brighter. Below you can see that the brightness control enhances not only the shadows but the whole image. The sky in particular becomes too washed out. Whereas in the third image, where I am using the Shadows enhance control, just the darker shades are enhanced to get the result we need. Click to enlarge any photo on this page. Original Brightness only Shadow enhance The following examples have been greatly improved with the use of the Shadow brightness feature showing that a pretty dull image can be made much brighter with a lot more detail.Highlights
The Highlights brightness control works at the other end of the brightness spectrum, in that it adjusts the brightest highlights only. Unfortunately many cameras, especially those at the cheaper end, tend to overexpose really bright areas to appear as pure white, and it's not always possible to extract detail from those parts of the image. Therefore, in practice the highlights control tends to be less effective than the shadows control. In the example below, as well as lifting the shadows a bit, I’ve reduced the highlights (more than you usually would). The effect is subtle but the you can see the clouds are darker, showing more detail. Original Highlights reduced, shadows lifted Even in this studio photo, the white quilt is slightly over exposed, but we can get more detail back by reducing the highlights. Original Highlights reduced Here are some more examples using the Shadows brightness feature: This is a woefully under exposed image in dark conditions. Using a combination of Brightness control, Shadow brightness and the Warmth control (to move all the colors away from blue towards warmer colors) I have been able to recover a great deal of detail.Examples
In the following photo, the students are unfortunately in shadow, as the bright building has caused them to be too dark. So I’ve used the Shadow brightness control to brighten the darker area, plus the Highlights brightness control to reduce the over-exposed bright building. As a final edit I cropped most of the building away to focus more on the students. Here’s another example. It’s not clear why this image was so badly exposed, perhaps the bright lights in the background. But using a combination of Brightness control and Shadow brightness has brought back a lot of hidden detail (I suspect any more brightening will cause too much noise to appear in the darker areas - but this is certainly a big improvement). There are two major issues with the next image. Firstly the right side of the building is in shadow - this was a single fix setting of the new Shadow brightness enhance to a value of 90. The second issue is that this wide angle shot shows a typical perspective problem – the building leans away from the observer. This was fixed using the automatic perspective correction tool: These two simple changes made a huge improvement. This final example demonstrates the wider power of Photo & Graphic Designer or Designer Pro. The bright sky has caused the whole image to be under exposed, which was fixed by the new Shadow brightness control. The ‘leaning back’ effect, common when photographing tall buildings with wide angle lenses, was fixed with the perspective correction feature. Finally, using Magic Erase and the Clone tool I’ve removed some of the cars and people.Whole Photo or Region
As with all photo enhance effects you can apply the effect to the whole photo - as I’ve done on the above examples. Or you can apply the effect to any part of the image by using the mask and region tools: This set of tools allow you to paint a region (or a mask) on the photo. After this if you switch to the Enhance tool and apply any enhance effect it will be applied to that region only. Or, if you using a mask, it will be applied to the whole image excluding the masked area. You can use the Feather control to blend the edges.Effect Strength
Even more powerfully, with an active region, you can switch to the Transparency tool to adjust the mix of the effect with the original image. You can even have a graduated blend of the effect by simply dragging across the region in the Transparency Tool.Try it!
If you don’t already own Xara Photo & Graphic Designer or Designer Pro X, you can download the free trial version of Xara Photo & Graphic Designer or Xara Designer Pro X to try it with your photos. More guides to editing photos in Xara. 1. Beginner’s Guide to Photo Editing in Xara The basics of opening photos, zooming, sizing photos, and saving. 2. Summary of the Photo Tools A summary of the tools on the Photo Tool fly-out menu. 3. Photo Enhance options An overview of the ‘work-horse’ range of Enhance options. 4. Changing colors in photos How to select and enhance or adjust specific colors. 5. A real-world example Combining many of the techniques described above, to transform a poor photo. In addition there are more detailed guides covering other photo tools: Intelligent Photo Rescaling and Zooming Erasing Backgrounds and Combining Photos Brightness Levels and Color Balance Panoramic Photos For more tutorials by Xara and third parties, check out our Resource index, which offers a searchable and browsable list of movies and tutorials created by Xara and third parties.


Bright
ness
Cont
rast
Shad
ows
Highl
ights
Satur
ation
Warm /
Cold
Sharpe
n / Blur
Color
Tint
X-
Proce
ss

Copyright © 2016 Xara Group Limited.
Page created with Xara Designer Pro
BRIGHTEN UP YOUR DAY!
BRIGHTEN UP YOUR DAY!
BRIGHTEN UP YOUR DAY!