PC Pro Magazine called Photo & Graphic Designer “Powerful and fast, and a fantastically good-value Photoshop alternative” so if you’re not
already using it why not download the trial and give it a try. For new and existing owners, here’s a quick summary of what you need to know to
start editing photos using Xara.
Note: This tutorial has been updated to cover changes to Photo & Graphic Designer and Designer Pro photo tools in 2016.
To open a photo for editing do one of the following:
1. Select the menu File > Open and select a JPG or any other image file you want to edit or 2. Select the menu File > New > Blank Photo and then drag a file from your file manager onto the blank Xara window. or... 3. Simply drag a photo file onto the title bar of Xara Designer. In each case this will open the photo as a Photo Document. Photo Documents (as opposed to a normal print document or web document) will show images at their full size, so when viewing at 100% zoom, you’re seeing all the pixels in the image. Also the dimension units are set to pixels, and there is no white page background - the image is placed on a dark pasteboard area. You can have multiple documents open at once. The icon on the tab for photo documents shows a camera like this. The other major benefit of the Photo Document type is that if you load a JPG photo this way, a Save operation will default to re-saving the file as a JPG. So this means the normal work-flow - open a photo, edit it, save it - will work as you expect, and will result in an edited JPG file being saved back. In Xara you can place a photo on other types of document such as print, web pages or presentations, just by dragging it on the page. And you can perform all the same image operations. But for these other document types very high-resolution photo will sometimes have their resolution reduced. Also doing a Save of these other document types results in a .xar file being saved.The Photo Tools
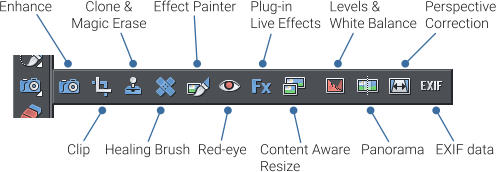
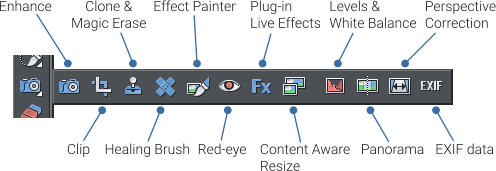
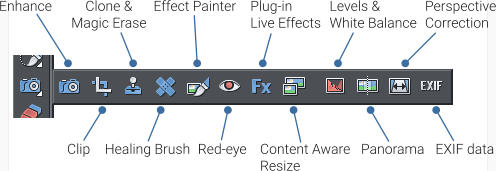
The main tools for manipulating photos are under the Camera icon. Mouseover this and it shows a fly-out set of tools: We’ll cover each of these tools in future tutorials (see the bottom of this article for more details) but for now we’ll focus on the basics, and the left most tool - the camera icon, known as the Photo Enhance Tool. Note: Initially the Camera icon is shown in the main, left-side, toolbar. But when you select any of the tools on this fly-out menu, the Camera icon changes to the last selected tool. So if you can’t find the camera any more, remember the third tool down on the main toolbar is always the photo tool collection, and you can re-select the camera (which represents Photo Enhance options).The InfoBar
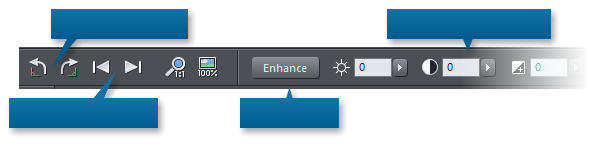
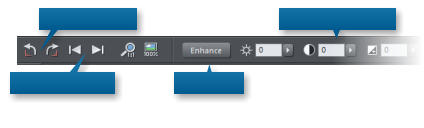
The most important area of the user-interface is below the top set of icons, and shows the controls for the selected tool. This is called the InfoBar. When you select the main Camera tool (the Enhance options), this is the InfoBar:Zoom
Perhaps the most used function when editing a photo is simply adjusting the zoom, zooming into detail to edit, zooming out to get an overview of the whole image. By far the quickest way to zoom and move around your photo is to use the mouse wheel. Your productivity will be dramatically increased if you learn and practice these three short-cuts: Ctrl key + mouse wheel to zoom in and out. Press the mouse wheel to push the page (it’s a button as well as a wheel!) this is a short cut to the Push tool. Press ‘1’ (not on the numeric keypad) to zoom to 100% - At 100% you’re viewing the image at 1:1 actual size - so each pixel of the image is one pixel on screen.Select
Your photo should be selected when you’ve opened it, but if you have multiple photos, it may be necessary to select it before you make changes to it. Just click on it in the Selector tool (the arrow) to do this. Short-cut: If you’re in the Selector tool and want to go to the Enhance Tool, which is the most used photo tool, just double-click the photo.Photo crop / straighten / scale
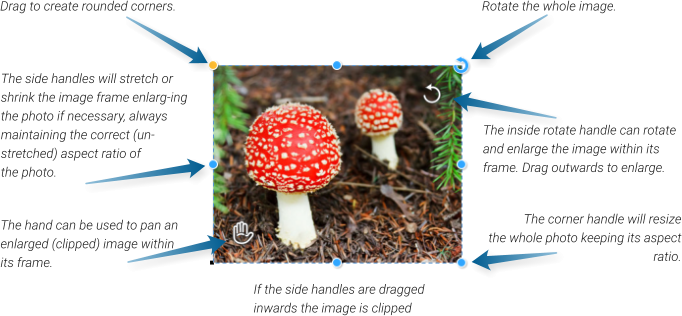
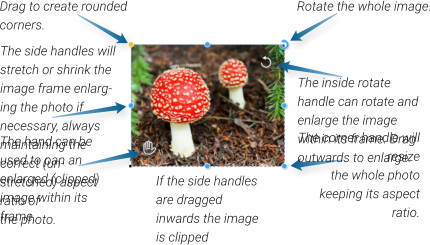
When using the Enhance Tool any selected photo will show a number of control handles on and around the image (see below). These allow you to adjust the width & height of the photo, clip or enlarge the image to fit within the desired size, rotate the rectangle frame or just the contents within the rectangular frame (e.g. horizon straighten), even to give rounded corner to your photo. It’s an all-in-one way of performing the most common clip / resize (contents of photo or the whole photo) and horizon straighten operations. In the Enhance Tool just click on a photo to show the control handles. Here’s what each of the controls does: Hold the mouse pointer over any handle to reveal a pop-up tip for that handle. Crop or Clip There are several ways you can crop or clip an image: 1. Using the side handles shown above, just drag inwards to clip the image, or 2. Drag across the image. This will create a a crop rectangle and also show you the ‘rule of thirds’ lines to help composition, or 3. Use the dedicate Crop tool which is the second tool on the photo tools fly-out. The crop tool provides more advanced options such as restricting the aspect ratio of your crop, or cropping to a specific dimension, and also a way of ‘un-cropping’ an image. All of these methods perform a non-destructive clipping operation. That means it doesn’t really remove the cropped parts, they are just hidden and you can un-crop to see the earlier removed parts. Wider or taller If you drag the side handles outwards the image is enlarged to fill the rectangle (the height is kept the same). Since it’s really bad practice to stretch images (the human eye is very sensitive to ‘wrongly stretched’ images with an unnatural aspect ratio), this means the top and bottom parts of the image will be clipped. Similarly if you make the image taller, by dragging the top or bottom edges, the photo width is not changed, so this makes the image larger, and some parts will now be clipped on the left and right side. Try it to see how this works. Pan the image within the frame If you reduce the edges of the frame inwards, or use the rotate/scale handle in the top right to enlarge the image, then the the image is clipped or masked - so some of the image is outside the visible frame. In this case the ‘hand’ control can be used to re-position the image within the frame. Horizon Straighten Select the image and use the inner rotate handle, top right, of the photo. You can drag outwards also to enlarge the image within the frame at the same time. You’ll see a tool-tip showing you the rotation angle as you drag. Reset size and position. To reset a photo back to its ‘best fit’ state, double click on the rotate/scale handle. To center the image in its frame, double click on the ‘hand’ icon. To un-clip an image double-click on one of the side handles. These photo operations also work with photos of any shape, not just rectangular photos and with photos within groups and Soft Groups.Size and Re-size
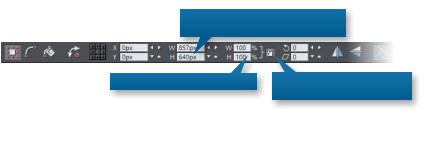
While you’re in the Selector Tool the InfoBar provides size information, and a way to resize your image either by entering the required dimension, or as a % size change. This is the Selector InfoBar when you have a photo selected. So if you want your image to be, say, exactly 500 pixels wide, just type 500 into the width field and press Enter. The height will change in proportion so the image is not squashed. The other way to change the size, is to simply drag the bottom right corner control handle using the Selector Tool. As you do this you’ll see the pixel width and height values change. So the whole sequence to save a resized version of a photo is this: • Open the JPG as described above. • In the Selector Tool type a new width or height dimensions in the W or H field shown above • Select File > Save or Save As...The Photo Enhance Controls
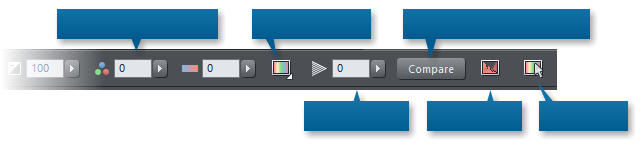
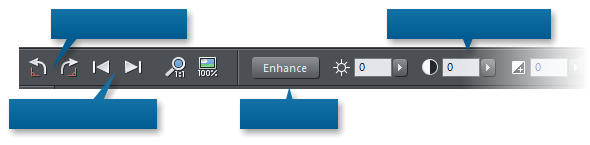
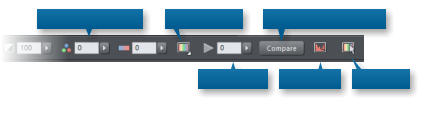
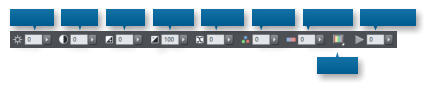
When you select this Camera tool, it provides access to the main photo enhance controls - these adjust things like brightness and contrast levels, color controls such as saturation, color tinting, sharpen and blur and others. Here are the main controls on the Photo Enhance Tool (in three sections): The left end of the InfoBar: The right end of the InfoBar: The center part of the InfoBar is a set of manual enhance controls: To adjust any of the values, click the right arrow and drag the slider control. Or just enter a numeric value into the field. Most of these controls should be self-explanatory, but we will cover them in more detail in future tutorials (see the bottom of this article for more details). For now, just experiment if you’re not sure what they do. Remember you have infinite undo in Xara so you can always get back to an earlier state.Before / After comparison
Click the Compare button to revert the image back to its original un-enhanced value. Click again to restore your settings.Auto-enhance
The Enhance button does an automatic adjustment of some of the values to try and improve the levels, in particular the brightness. This is great as an instant enhance, but very often you can do a better job yourself by making manual adjustments after the auto enhance.Next & Previous
It’s a common requirement to go through a folder full of images, one after another, opening, perhaps adjusting and then saving. This is where the Next and Previous controls are used. If you’ve opened a photo into a Photo Document (see top) rather than added it to the page of another document, these controls move to the next or previous image in the folder, prompting you to save the current one if you’ve made any edits.Saving Your Edited Photo
You can just select File > Save or Save As... to save the photo back over the original. It will be saved at the same pixel size as you see at 100% zoom - which, if you’ve not adjusted the size, will be the same pixel dimensions of the original.Non-Destructive Saves
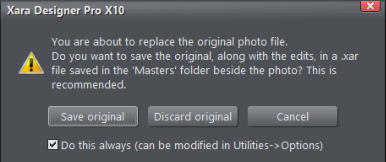
Suppose you edit a photo, as described here, perhaps adjusting the crop, brightness values, etc, then save this back - this replaces the original JPG. This is a destructive operation. Besides losing your original photo it is not good for another reason - each time you save a JPG it gets distorted slightly - this is because JPGs use ‘lossy’ compression - the image loses a bit of fidelity every time you save. So if you open a saved JPG you’re starting with a slightly worse quality image. Each open-edit-save cycle makes it worse. But in Xara it doesn’t have to be this way. When you save a JPG you are prompted to save the original file. This is like keeping the original negative (in old film speak). With the negative you could always start from the original and re-do any changes you want. You can elect to save the original alongside your edited JPG, then the next time you wish to edit that JPG, we recover the original master instead, with all the edits you’ve done to the image. This means no lossy cumulative distortion, no matter how many times you open and save that JPG. It means you can change your mind and undo or adjust any of the edits you’ve done previously. Try this: Open a JPG. In the Photo Enhance tool drag across the image to crop it. Now save this JPG back to disc and select ‘Save original’ when prompted, and close the tab after this. Your JPG has been cropped, as you can tell by opening it in Windows preview. If you did this with other software it would be final and you could not recover the missing parts. Now open this cropped JPG in Xara again - you can now un-crop. You’ve got back all the missing parts of the image. This is just one of the many ways in which Xara photo editing excels. This is the first part of a series of guides to editing photos in Xara. 1. Beginner’s Guide to Photo Editing in Xara The basics of opening photos, zooming, sizing photos, and saving. 2. Summary of the Photo Tools A summary of the tools on the Photo Tool fly-out menu. 3. Photo Enhance options An overview of the ‘work-horse’ range of Enhance options. 4. Changing colors in photos How to select and enhance or adjust specific colors. 5. A real-world example Combining many of the techniques described above, to transform a poor photo. In addition there are more detailed guides covering other photo tools: The Shadow and Highlight controls Intelligent Photo Rescaling and Zooming Erasing Backgrounds and Combining Photos Brightness Levels and Color Balance Panoramic Photos For more tutorials by Xara and third parties, check out our Resource index, which offers a searchable and browsable list of movies and tutorials created by Xara and third parties.Advanced Users
There’s one slightly complex aspect to image resizing. Xara provides what is called non-destructive editing, which means all the original pixels of your photo are preserved when editing. So when you resize an image down to, say, half its initial size, you are not actually shrinking the original image. You’re just fitting all the original pixels into a smaller area - in effect, just making everything twice the resolution. And you can see this on the status line (bottom of window). Images are shown at 96dpi when first opened (which is the same resolution as your screen). When you resize it, you can see the dpi figure change. Resize an image down to half its initial size and you’ll see the dpi figure show 192dpi. The smaller you make the image, the higher the pixel resolution goes. This is different to Photoshop - which has destructive image resizing. If you resize an image down to 10% of its original size, and then resize it back up again in Photoshop you get a blurred image as it has removed 90% of the pixels in doing this. In Xara you get back the full original image - no pixels are destroyed. In Xara, start with an image 1000 pixels across. Resize it to be 500 pixels across - what we’re doing is squeezing all 1000 pixels into 500 pixel screen image (doubling the dpi resolution). If you zoom in you’ll see all the detail is there. Resize the image back to 1000 pixels and all the detail is there. But the important thing is that when saving the JPG it saves at the pixel size shown on the InfoBar. So in the above case if you now save the image it will save a 500 pixel wide JPG. This would be a destructive save operation were it not for the non-destructive save option described above.
Copyright © 2016 Xara Group Limited.
Page created with Xara Designer Pro
The InfoBar at the top of the window shows the
controls for the selected tool. In this case it’s
showing the main photo enhance controls


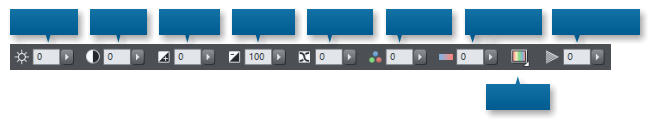
Brightness
Contrast
Shadows
Highlights
Saturation
Warm / Cold
Sharpen / Blur
Color Tint
X-Process


Rotate the image 90°
Next or Previous photo
Auto-enhance
Manual enhance controls
Color Tint Control
Color Select
Sharpen & Blur
Manual enhance controls
Compare before / after toggle
Levels dialog
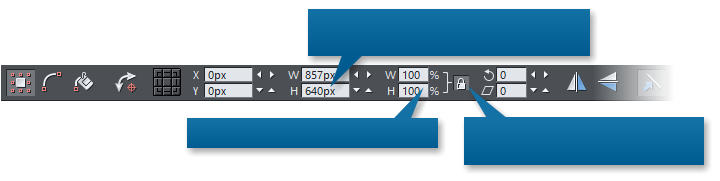
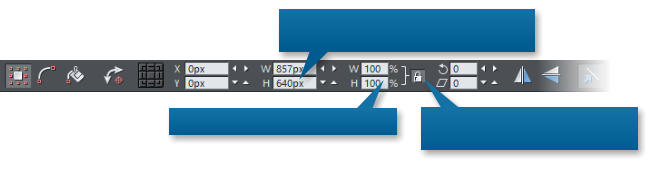
The Width and Height of your photo in pixels.
Enter new values to change the size.
Enter a new % value to adjust the size.
Make sure this lock-aspect is always on
to prevent images being squashed.

PC Pro Magazine called Photo & Graphic Designer “Powerful and fast, and a fantastically good-value
Photoshop alternative” so if you’re not already using it why not download the trial and give it a try. For new
and existing owners, here’s a quick summary of what you need to know to start editing photos using Xara.
Note: This tutorial has been updated to cover changes to Photo & Graphic Designer and Designer Pro photo
tools in 2016.
To open a photo for editing do one of the following:
1. Select the menu File > Open and select a JPG or any other image file you want to edit or 2. Select the menu File > New > Blank Photo and then drag a file from your file manager onto the blank Xara window. or... 3. Simply drag a photo file onto the title bar of Xara Designer. In each case this will open the photo as a Photo Document. Photo Documents (as opposed to a normal print document or web document) will show images at their full size, so when viewing at 100% zoom, you’re seeing all the pixels in the image. Also the dimension units are set to pixels, and there is no white page background - the image is placed on a dark pasteboard area. You can have multiple documents open at once. The icon on the tab for photo documents shows a camera like this. The other major benefit of the Photo Document type is that if you load a JPG photo this way, a Save operation will default to re-saving the file as a JPG. So this means the normal work-flow - open a photo, edit it, save it - will work as you expect, and will result in an edited JPG file being saved back. In Xara you can place a photo on other types of document such as print, web pages or presentations, just by dragging it on the page. And you can perform all the same image operations. But for these other document types very high-resolution photo will sometimes have their resolution reduced. Also doing a Save of these other document types results in a .xar file being saved.The Photo Tools
The main tools for manipulating photos are under the Camera icon. Mouseover this and it shows a fly-out set of tools: We’ll cover each of these tools in future tutorials (see the bottom of this article for more details) but for now we’ll focus on the basics, and the left most tool - the camera icon, known as the Photo Enhance Tool. Note: Initially the Camera icon is shown in the main, left-side, toolbar. But when you select any of the tools on this fly-out menu, the Camera icon changes to the last selected tool. So if you can’t find the camera any more, remember the third tool down on the main toolbar is always the photo tool collection, and you can re-select the camera (which represents Photo Enhance options).The InfoBar
The most important area of the user-interface is below the top set of icons, and shows the controls for the selected tool. This is called the InfoBar. When you select the main Camera tool (the Enhance options), this is the InfoBar:Zoom
Perhaps the most used function when editing a photo is simply adjusting the zoom, zooming into detail to edit, zooming out to get an overview of the whole image. By far the quickest way to zoom and move around your photo is to use the mouse wheel. Your productivity will be dramatically increased if you learn and practice these three short-cuts: Ctrl key + mouse wheel to zoom in and out. Press the mouse wheel to push the page (it’s a button as well as a wheel!) this is a short cut to the Push tool. Press ‘1’ (not on the numeric keypad) to zoom to 100% - At 100% you’re viewing the image at 1:1 actual size - so each pixel of the image is one pixel on screen.Select
Your photo should be selected when you’ve opened it, but if you have multiple photos, it may be necessary to select it before you make changes to it. Just click on it in the Selector tool (the arrow) to do this. Short-cut: If you’re in the Selector tool and want to go to the Enhance Tool, which is the most used photo tool, just double-click the photo.Photo crop / straighten / scale
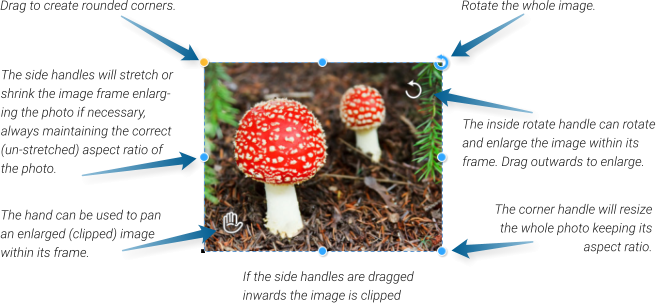
When using the Enhance Tool any selected photo will show a number of control handles on and around the image (see below). These allow you to adjust the width & height of the photo, clip or enlarge the image to fit within the desired size, rotate the rectangle frame or just the contents within the rectangular frame (e.g. horizon straighten), even to give rounded corner to your photo. It’s an all-in-one way of performing the most common clip / resize (contents of photo or the whole photo) and horizon straighten operations. In the Enhance Tool just click on a photo to show the control handles. Here’s what each of the controls does: Hold the mouse pointer over any handle to reveal a pop-up tip for that handle. Crop or Clip There are several ways you can crop or clip an image: 1. Using the side handles shown above, just drag inwards to clip the image, or 2. Drag across the image. This will create a a crop rectangle and also show you the ‘rule of thirds’ lines to help composition, or 3. Use the dedicate Crop tool which is the second tool on the photo tools fly-out. The crop tool provides more advanced options such as restricting the aspect ratio of your crop, or cropping to a specific dimension, and also a way of ‘un-cropping’ an image. All of these methods perform a non-destructive clipping operation. That means it doesn’t really remove the cropped parts, they are just hidden and you can un-crop to see the earlier removed parts. Wider or taller If you drag the side handles outwards the image is enlarged to fill the rectangle (the height is kept the same). Since it’s really bad practice to stretch images (the human eye is very sensitive to ‘wrongly stretched’ images with an unnatural aspect ratio), this means the top and bottom parts of the image will be clipped. Similarly if you make the image taller, by dragging the top or bottom edges, the photo width is not changed, so this makes the image larger, and some parts will now be clipped on the left and right side. Try it to see how this works. Pan the image within the frame If you reduce the edges of the frame inwards, or use the rotate/scale handle in the top right to enlarge the image, then the the image is clipped or masked - so some of the image is outside the visible frame. In this case the ‘hand’ control can be used to re-position the image within the frame. Horizon Straighten Select the image and use the inner rotate handle, top right, of the photo. You can drag outwards also to enlarge the image within the frame at the same time. You’ll see a tool-tip showing you the rotation angle as you drag. Reset size and position. To reset a photo back to its ‘best fit’ state, double click on the rotate/scale handle. To center the image in its frame, double click on the ‘hand’ icon. To un-clip an image double-click on one of the side handles. These photo operations also work with photos of any shape, not just rectangular photos and with photos within groups and Soft Groups.Size and Re-size
While you’re in the Selector Tool the InfoBar provides size information, and a way to resize your image either by entering the required dimension, or as a % size change. This is the Selector InfoBar when you have a photo selected. So if you want your image to be, say, exactly 500 pixels wide, just type 500 into the width field and press Enter. The height will change in proportion so the image is not squashed. The other way to change the size, is to simply drag the bottom right corner control handle using the Selector Tool. As you do this you’ll see the pixel width and height values change. So the whole sequence to save a resized version of a photo is this: • Open the JPG as described above. • In the Selector Tool type a new width or height dimensions in the W or H field shown above • Select File > Save or Save As...The Photo Enhance Controls
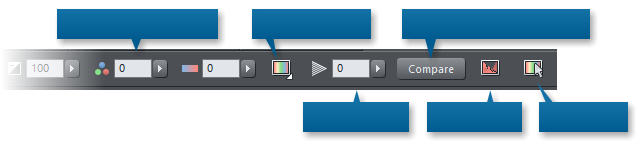
When you select this Camera tool, it provides access to the main photo enhance controls - these adjust things like brightness and contrast levels, color controls such as saturation, color tinting, sharpen and blur and others. Here are the main controls on the Photo Enhance Tool (in three sections): The left end of the InfoBar: The right end of the InfoBar: The center part of the InfoBar is a set of manual enhance controls: To adjust any of the values, click the right arrow and drag the slider control. Or just enter a numeric value into the field. Most of these controls should be self-explanatory, but we will cover them in more detail in future tutorials (see the bottom of this article for more details). For now, just experiment if you’re not sure what they do. Remember you have infinite undo in Xara so you can always get back to an earlier state.Before / After comparison
Click the Compare button to revert the image back to its original un-enhanced value. Click again to restore your settings.Auto-enhance
The Enhance button does an automatic adjustment of some of the values to try and improve the levels, in particular the brightness. This is great as an instant enhance, but very often you can do a better job yourself by making manual adjustments after the auto enhance.Next & Previous
It’s a common requirement to go through a folder full of images, one after another, opening, perhaps adjusting and then saving. This is where the Next and Previous controls are used. If you’ve opened a photo into a Photo Document (see top) rather than added it to the page of another document, these controls move to the next or previous image in the folder, prompting you to save the current one if you’ve made any edits.Saving Your Edited Photo
You can just select File > Save or Save As... to save the photo back over the original. It will be saved at the same pixel size as you see at 100% zoom - which, if you’ve not adjusted the size, will be the same pixel dimensions of the original.Non-Destructive Saves
Suppose you edit a photo, as described here, perhaps adjusting the crop, brightness values, etc, then save this back - this replaces the original JPG. This is a destructive operation. Besides losing your original photo it is not good for another reason - each time you save a JPG it gets distorted slightly - this is because JPGs use ‘lossy’ compression - the image loses a bit of fidelity every time you save. So if you open a saved JPG you’re starting with a slightly worse quality image. Each open-edit-save cycle makes it worse. But in Xara it doesn’t have to be this way. When you save a JPG you are prompted to save the original file. This is like keeping the original negative (in old film speak). With the negative you could always start from the original and re-do any changes you want. You can elect to save the original alongside your edited JPG, then the next time you wish to edit that JPG, we recover the original master instead, with all the edits you’ve done to the image. This means no lossy cumulative distortion, no matter how many times you open and save that JPG. It means you can change your mind and undo or adjust any of the edits you’ve done previously. Try this: Open a JPG. In the Photo Enhance tool drag across the image to crop it. Now save this JPG back to disc and select ‘Save original’ when prompted, and close the tab after this. Your JPG has been cropped, as you can tell by opening it in Windows preview. If you did this with other software it would be final and you could not recover the missing parts. Now open this cropped JPG in Xara again - you can now un-crop. You’ve got back all the missing parts of the image. This is just one of the many ways in which Xara photo editing excels. This is the first part of a series of guides to editing photos in Xara. 1. Beginner’s Guide to Photo Editing in Xara The basics of opening photos, zooming, sizing photos, and saving. 2. Summary of the Photo Tools A summary of the tools on the Photo Tool fly-out menu. 3. Photo Enhance options An overview of the ‘work-horse’ range of Enhance options. 4. Changing colors in photos How to select and enhance or adjust specific colors. 5. A real-world example Combining many of the techniques described above, to transform a poor photo. In addition there are more detailed guides covering other photo tools: The Shadow and Highlight controls Intelligent Photo Rescaling and Zooming Erasing Backgrounds and Combining Photos Brightness Levels and Color Balance Panoramic Photos For more tutorials by Xara and third parties, check out our Resource index, which offers a searchable and browsable list of movies and tutorials created by Xara and third parties.Advanced Users
There’s one slightly complex aspect to image resizing. Xara provides what is called non-destructive editing, which means all the original pixels of your photo are preserved when editing. So when you resize an image down to, say, half its initial size, you are not actually shrinking the original image. You’re just fitting all the original pixels into a smaller area - in effect, just making everything twice the resolution. And you can see this on the status line (bottom of window). Images are shown at 96dpi when first opened (which is the same resolution as your screen). When you resize it, you can see the dpi figure change. Resize an image down to half its initial size and you’ll see the dpi figure show 192dpi. The smaller you make the image, the higher the pixel resolution goes. This is different to Photoshop - which has destructive image resizing. If you resize an image down to 10% of its original size, and then resize it back up again in Photoshop you get a blurred image as it has removed 90% of the pixels in doing this. In Xara you get back the full original image - no pixels are destroyed. In Xara, start with an image 1000 pixels across. Resize it to be 500 pixels across - what we’re doing is squeezing all 1000 pixels into 500 pixel screen image (doubling the dpi resolution). If you zoom in you’ll see all the detail is there. Resize the image back to 1000 pixels and all the detail is there. But the important thing is that when saving the JPG it saves at the pixel size shown on the InfoBar. So in the above case if you now save the image it will save a 500 pixel wide JPG. This would be a destructive save operation were it not for the non-destructive save option described above.

Brightnes
s
Contras
t
Shadow
s
Highlight
s
Saturatio
n
Warm /
Cold
Sharpen /
Blur
Color
Tint
X-Process
Color Tint Control
Color Select
Sharpen & Blur
Manual enhance controls
Compare before / after toggle
Levels dialog
Rotate the image 90°
Next or Previous photo
Auto-enhance
Manual enhance controls
The Width and Height of your photo in
pixels.
Enter new values to change the size.
Enter a new % value to adjust the
size.
Make sure this lock-aspect is always
on to prevent images being
squashed.
The InfoBar at the top of the window
shows the controls for the selected
tool. In this case it’s showing the main
photo enhance controls
Copyright © 2016 Xara Group Limited.
Page created with Xara Designer Pro
PC Pro Magazine called Photo & Graphic Designer “Powerful and
fast, and a fantastically good-value Photoshop alternative” so if you’re
not already using it why not download the trial and give it a try. For
new and existing owners, here’s a quick summary of what you need
to know to start editing photos using Xara.
Note: This tutorial has been updated to cover changes to Photo &
Graphic Designer and Designer Pro photo tools in 2016.
To open a photo for editing do one of the following:
1. Select the menu File > Open and select a JPG or any other image file you want to edit or 2. Select the menu File > New > Blank Photo and then drag a file from your file manager onto the blank Xara window. or... 3. Simply drag a photo file onto the title bar of Xara Designer. In each case this will open the photo as a Photo Document. Photo Documents (as opposed to a normal print document or web document) will show images at their full size, so when viewing at 100% zoom, you’re seeing all the pixels in the image. Also the dimension units are set to pixels, and there is no white page background - the image is placed on a dark pasteboard area. You can have multiple documents open at once. The icon on the tab for photo documents shows a camera like this. The other major benefit of the Photo Document type is that if you load a JPG photo this way, a Save operation will default to re-saving the file as a JPG. So this means the normal work-flow - open a photo, edit it, save it - will work as you expect, and will result in an edited JPG file being saved back. In Xara you can place a photo on other types of document such as print, web pages or presentations, just by dragging it on the page. And you can perform all the same image operations. But for these other document types very high-resolution photo will sometimes have their resolution reduced. Also doing a Save of these other document types results in a .xar file being saved.The Photo Tools
The main tools for manipulating photos are under the Camera icon. Mouseover this and it shows a fly-out set of tools: We’ll cover each of these tools in future tutorials (see the bottom of this article for more details) but for now we’ll focus on the basics, and the left most tool - the camera icon, known as the Photo Enhance Tool. Note: Initially the Camera icon is shown in the main, left-side, toolbar. But when you select any of the tools on this fly-out menu, the Camera icon changes to the last selected tool. So if you can’t find the camera any more, remember the third tool down on the main toolbar is always the photo tool collection, and you can re-select the camera (which represents Photo Enhance options).The InfoBar
The most important area of the user-interface is below the top set of icons, and shows the controls for the selected tool. This is called the InfoBar. When you select the main Camera tool (the Enhance options), this is the InfoBar:Zoom
Perhaps the most used function when editing a photo is simply adjusting the zoom, zooming into detail to edit, zooming out to get an overview of the whole image. By far the quickest way to zoom and move around your photo is to use the mouse wheel. Your productivity will be dramatically increased if you learn and practice these three short-cuts: Ctrl key + mouse wheel to zoom in and out. Press the mouse wheel to push the page (it’s a button as well as a wheel!) this is a short cut to the Push tool. Press ‘1’ (not on the numeric keypad) to zoom to 100% - At 100% you’re viewing the image at 1:1 actual size - so each pixel of the image is one pixel on screen.Select
Your photo should be selected when you’ve opened it, but if you have multiple photos, it may be necessary to select it before you make changes to it. Just click on it in the Selector tool (the arrow) to do this. Short-cut: If you’re in the Selector tool and want to go to the Enhance Tool, which is the most used photo tool, just double-click the photo.Photo crop / straighten / scale
When using the Enhance Tool any selected photo will show a number of control handles on and around the image (see below). These allow you to adjust the width & height of the photo, clip or enlarge the image to fit within the desired size, rotate the rectangle frame or just the contents within the rectangular frame (e.g. horizon straighten), even to give rounded corner to your photo. It’s an all-in- one way of performing the most common clip / resize (contents of photo or the whole photo) and horizon straighten operations. In the Enhance Tool just click on a photo to show the control handles. Here’s what each of the controls does: Hold the mouse pointer over any handle to reveal a pop-up tip for that handle. Crop or Clip There are several ways you can crop or clip an image: 1. Using the side handles shown above, just drag inwards to clip the image, or 2. Drag across the image. This will create a a crop rectangle and also show you the ‘rule of thirds’ lines to help composition, or 3. Use the dedicate Crop tool which is the second tool on the photo tools fly-out. The crop tool provides more advanced options such as restricting the aspect ratio of your crop, or cropping to a specific dimension, and also a way of ‘un- cropping’ an image. All of these methods perform a non-destructive clipping operation. That means it doesn’t really remove the cropped parts, they are just hidden and you can un-crop to see the earlier removed parts. Wider or taller If you drag the side handles outwards the image is enlarged to fill the rectangle (the height is kept the same). Since it’s really bad practice to stretch images (the human eye is very sensitive to ‘wrongly stretched’ images with an unnatural aspect ratio), this means the top and bottom parts of the image will be clipped. Similarly if you make the image taller, by dragging the top or bottom edges, the photo width is not changed, so this makes the image larger, and some parts will now be clipped on the left and right side. Try it to see how this works. Pan the image within the frame If you reduce the edges of the frame inwards, or use the rotate/scale handle in the top right to enlarge the image, then the the image is clipped or masked - so some of the image is outside the visible frame. In this case the ‘hand’ control can be used to re-position the image within the frame. Horizon Straighten Select the image and use the inner rotate handle, top right, of the photo. You can drag outwards also to enlarge the image within the frame at the same time. You’ll see a tool-tip showing you the rotation angle as you drag. Reset size and position. To reset a photo back to its ‘best fit’ state, double click on the rotate/scale handle. To center the image in its frame, double click on the ‘hand’ icon. To un-clip an image double-click on one of the side handles. These photo operations also work with photos of any shape, not just rectangular photos and with photos within groups and Soft Groups.Size and Re-size
While you’re in the Selector Tool the InfoBar provides size information, and a way to resize your image either by entering the required dimension, or as a % size change. This is the Selector InfoBar when you have a photo selected. So if you want your image to be, say, exactly 500 pixels wide, just type 500 into the width field and press Enter. The height will change in proportion so the image is not squashed. The other way to change the size, is to simply drag the bottom right corner control handle using the Selector Tool. As you do this you’ll see the pixel width and height values change. So the whole sequence to save a resized version of a photo is this: • Open the JPG as described above. • In the Selector Tool type a new width or height dimensions in the W or H field shown above • Select File > Save or Save As...The Photo Enhance Controls
When you select this Camera tool, it provides access to the main photo enhance controls - these adjust things like brightness and contrast levels, color controls such as saturation, color tinting, sharpen and blur and others. Here are the main controls on the Photo Enhance Tool (in three sections): The left end of the InfoBar: The right end of the InfoBar: The center part of the InfoBar is a set of manual enhance controls: To adjust any of the values, click the right arrow and drag the slider control. Or just enter a numeric value into the field. Most of these controls should be self-explanatory, but we will cover them in more detail in future tutorials (see the bottom of this article for more details). For now, just experiment if you’re not sure what they do. Remember you have infinite undo in Xara so you can always get back to an earlier state.Before / After comparison
Click the Compare button to revert the image back to its original un- enhanced value. Click again to restore your settings.Auto-enhance
The Enhance button does an automatic adjustment of some of the values to try and improve the levels, in particular the brightness. This is great as an instant enhance, but very often you can do a better job yourself by making manual adjustments after the auto enhance.Next & Previous
It’s a common requirement to go through a folder full of images, one after another, opening, perhaps adjusting and then saving. This is where the Next and Previous controls are used. If you’ve opened a photo into a Photo Document (see top) rather than added it to the page of another document, these controls move to the next or previous image in the folder, prompting you to save the current one if you’ve made any edits.Saving Your Edited Photo
You can just select File > Save or Save As... to save the photo back over the original. It will be saved at the same pixel size as you see at 100% zoom - which, if you’ve not adjusted the size, will be the same pixel dimensions of the original.Non-Destructive Saves
Suppose you edit a photo, as described here, perhaps adjusting the crop, brightness values, etc, then save this back - this replaces the original JPG. This is a destructive operation. Besides losing your original photo it is not good for another reason - each time you save a JPG it gets distorted slightly - this is because JPGs use ‘lossy’ compression - the image loses a bit of fidelity every time you save. So if you open a saved JPG you’re starting with a slightly worse quality image. Each open-edit-save cycle makes it worse. But in Xara it doesn’t have to be this way. When you save a JPG you are prompted to save the original file. This is like keeping the original negative (in old film speak). With the negative you could always start from the original and re-do any changes you want. You can elect to save the original alongside your edited JPG, then the next time you wish to edit that JPG, we recover the original master instead, with all the edits you’ve done to the image. This means no lossy cumulative distortion, no matter how many times you open and save that JPG. It means you can change your mind and undo or adjust any of the edits you’ve done previously. Try this: Open a JPG. In the Photo Enhance tool drag across the image to crop it. Now save this JPG back to disc and select ‘Save original’ when prompted, and close the tab after this. Your JPG has been cropped, as you can tell by opening it in Windows preview. If you did this with other software it would be final and you could not recover the missing parts. Now open this cropped JPG in Xara again - you can now un-crop. You’ve got back all the missing parts of the image. This is just one of the many ways in which Xara photo editing excels. This is the first part of a series of guides to editing photos in Xara. 1. Beginner’s Guide to Photo Editing in Xara The basics of opening photos, zooming, sizing photos, and saving. 2. Summary of the Photo Tools A summary of the tools on the Photo Tool fly-out menu. 3. Photo Enhance options An overview of the ‘work-horse’ range of Enhance options. 4. Changing colors in photos How to select and enhance or adjust specific colors. 5. A real-world example Combining many of the techniques described above, to transform a poor photo. In addition there are more detailed guides covering other photo tools: The Shadow and Highlight controls Intelligent Photo Rescaling and Zooming Erasing Backgrounds and Combining Photos Brightness Levels and Color Balance Panoramic Photos For more tutorials by Xara and third parties, check out our Resource index, which offers a searchable and browsable list of movies and tutorials created by Xara and third parties.Advanced Users
There’s one slightly complex aspect to image resizing. Xara provides what is called non-destructive editing, which means all the original pixels of your photo are preserved when editing. So when you resize an image down to, say, half its initial size, you are not actually shrinking the original image. You’re just fitting all the original pixels into a smaller area - in effect, just making everything twice the resolution. And you can see this on the status line (bottom of window). Images are shown at 96dpi when first opened (which is the same resolution as your screen). When you resize it, you can see the dpi figure change. Resize an image down to half its initial size and you’ll see the dpi figure show 192dpi. The smaller you make the image, the higher the pixel resolution goes. This is different to Photoshop - which has destructive image resizing. If you resize an image down to 10% of its original size, and then resize it back up again in Photoshop you get a blurred image as it has removed 90% of the pixels in doing this. In Xara you get back the full original image - no pixels are destroyed. In Xara, start with an image 1000 pixels across. Resize it to be 500 pixels across - what we’re doing is squeezing all 1000 pixels into 500 pixel screen image (doubling the dpi resolution). If you zoom in you’ll see all the detail is there. Resize the image back to 1000 pixels and all the detail is there. But the important thing is that when saving the JPG it saves at the pixel size shown on the InfoBar. So in the above case if you now save the image it will save a 500 pixel wide JPG. This would be a destructive save operation were it not for the non-destructive save option described above.

Bright
ness
Cont
rast
Shad
ows
Highli
ghts
Satur
ation
Warm /
Cold
Sharpen
/ Blur
Color
Tint
X-
Proce
ss
Color Tint
Control
Color
Select
Sharpen &
Blur
Manual enhance
controls
Compare before /
after toggle
Levels
dialog
Rotate the
image 90°
Next or Previous
photo
Auto-
enhance
Manual enhance
controls
The Width and Height of
your photo in pixels.
Enter new values to change
the size.
Enter a new % value to
adjust the size.
Make sure this lock-
aspect is always on to
prevent images being
squashed.
The InfoBar at the top
of the window shows
the controls for the
selected tool. In this
case it’s showing the
main photo enhance
controls
Copyright © 2016 Xara Group Limited.
Page created with Xara Designer Pro
PHOTO EDITING GUIDE, Pt 1 - THE BASICS
PHOTO EDITING GUIDE, PT 1 - THE BASICS
PHOTO EDITING GUIDE, PT 1 - THE BASICS