


 © Xara Group 2010
Welcome to our beginner's guide to Flash animations. This tutorial works with Xtreme 5, Xtreme Pro 5, Xara Photo & Graphic Designer 6 and 7, Designer
Pro 6 and 7, and Web Designer 5 and 6 and Web Designer Premium 7.
Step one
Start a new animation document. Set the page size to be the size you want your animation. Click on Utilities > Options, Page size tab and enter the
width and height of the animation.
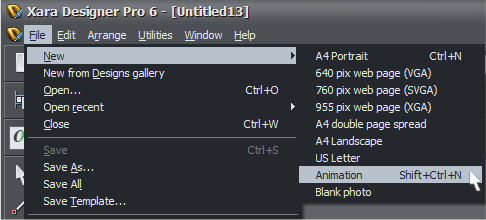
Select File > New > Animation (Ctrl+Shift+N).
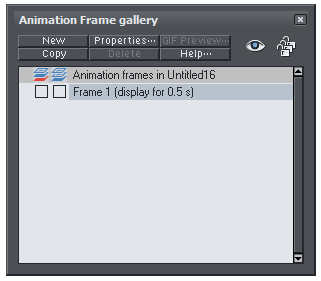
The Animation Frame gallery window will appear.
Step two
Draw your first frame. Let's say a simple star shape.
With the object (Star) selected, click on the Apply, remove or inspect names of objects button on the Selector Tool InfoBar. Give it a name like 'star',
and click on Add.
You can also create a rectangle if you wish your animation to have a border. In this example it's a simple rectangle made with the Rectangle tool.
Remove the fill color by left clicking the ‘No Color’ square.
As the rectangle won't be animated, it doesn't need a name.
Step three
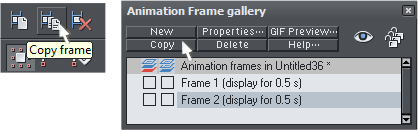
Create a new key frame. While you could create a blank frame, it is easier to copy your existing frame. That way your named object is on the new
frame, and you can alter it without naming it again.
To copy the current frame, click the Copy Frame button on the Animation button bar . Or in the Animation Frame Gallery click the Copy button.
Step four
Move and transform the objects as required. In this example we'll rotate the star, change its color and add a transparency.
Step five
Repeat steps three and four, building up your animation.
In our example, we want the star to grow larger but not go beyond the border.
© Xara Group 2010
Welcome to our beginner's guide to Flash animations. This tutorial works with Xtreme 5, Xtreme Pro 5, Xara Photo & Graphic Designer 6 and 7, Designer
Pro 6 and 7, and Web Designer 5 and 6 and Web Designer Premium 7.
Step one
Start a new animation document. Set the page size to be the size you want your animation. Click on Utilities > Options, Page size tab and enter the
width and height of the animation.
Select File > New > Animation (Ctrl+Shift+N).
The Animation Frame gallery window will appear.
Step two
Draw your first frame. Let's say a simple star shape.
With the object (Star) selected, click on the Apply, remove or inspect names of objects button on the Selector Tool InfoBar. Give it a name like 'star',
and click on Add.
You can also create a rectangle if you wish your animation to have a border. In this example it's a simple rectangle made with the Rectangle tool.
Remove the fill color by left clicking the ‘No Color’ square.
As the rectangle won't be animated, it doesn't need a name.
Step three
Create a new key frame. While you could create a blank frame, it is easier to copy your existing frame. That way your named object is on the new
frame, and you can alter it without naming it again.
To copy the current frame, click the Copy Frame button on the Animation button bar . Or in the Animation Frame Gallery click the Copy button.
Step four
Move and transform the objects as required. In this example we'll rotate the star, change its color and add a transparency.
Step five
Repeat steps three and four, building up your animation.
In our example, we want the star to grow larger but not go beyond the border.