


 Flash Seasons Greetings
In this short tutorial I’m going to show you how to create this effective seasonal Flash animation - with only 3 key-frames! If you don’t have time to
follow this tutorial and create your own animation, no worries - you can download the xar files for ‘my first animation’ and snowflake designs (to
change the company name to your own, simply edit the text in Frame 2 and 3, see below).
Or you can follow these steps to recreate the animation:
Choose File > New > Animation to open a new animation document. Set the page size to the size of the animation, in this case 240 x 400 pixels: File >
Page Options...
Frame 1:
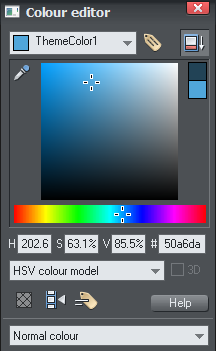
My animation starts with a blue background. So to start, create a rectangle with the Rectangle tool that is the exact page size. By default it
will be black so open the Color Editor (right click on the black rectangle and select Color Editor) and then edit the colors until you find the
shade you’re looking for. To make things easier for me later on I gave my color a name: click the Apply, remove or inspect names of objects
icon on the top of the Color Editor, enter a name (I chose ‘Theme Color 1’). Now you should see your new Named Color as a square on the
left hand side of the Color Line.
Note: It isn’t necessary to use Named Colors for Flash but, as with any image, using Named Colors makes it a lot easier to experiment with the colors
later (see below).
Apply a graduated transparency to the background rectangle (go to the Transparency tool and drag from the top to the bottom of the rectangle).
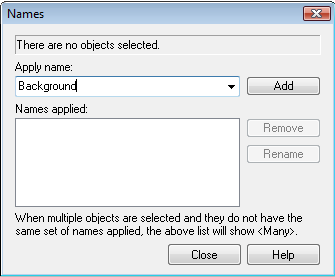
Name the rectangle ‘Background’. This is an important point to remember for Flash animations - all objects that are going to change must be
given names when you first create them. Click on the Apply, remove or inspect names of objects icon on the Selector Tool InfoBar, enter the
name ‘Background’, click Create.
Next, draw your snowflakes. I created 6 different flake designs. (You can download them here)
© Xara Group 2010
The final 3 frame Flash animation
Flash Seasons Greetings
In this short tutorial I’m going to show you how to create this effective seasonal Flash animation - with only 3 key-frames! If you don’t have time to
follow this tutorial and create your own animation, no worries - you can download the xar files for ‘my first animation’ and snowflake designs (to
change the company name to your own, simply edit the text in Frame 2 and 3, see below).
Or you can follow these steps to recreate the animation:
Choose File > New > Animation to open a new animation document. Set the page size to the size of the animation, in this case 240 x 400 pixels: File >
Page Options...
Frame 1:
My animation starts with a blue background. So to start, create a rectangle with the Rectangle tool that is the exact page size. By default it
will be black so open the Color Editor (right click on the black rectangle and select Color Editor) and then edit the colors until you find the
shade you’re looking for. To make things easier for me later on I gave my color a name: click the Apply, remove or inspect names of objects
icon on the top of the Color Editor, enter a name (I chose ‘Theme Color 1’). Now you should see your new Named Color as a square on the
left hand side of the Color Line.
Note: It isn’t necessary to use Named Colors for Flash but, as with any image, using Named Colors makes it a lot easier to experiment with the colors
later (see below).
Apply a graduated transparency to the background rectangle (go to the Transparency tool and drag from the top to the bottom of the rectangle).
Name the rectangle ‘Background’. This is an important point to remember for Flash animations - all objects that are going to change must be
given names when you first create them. Click on the Apply, remove or inspect names of objects icon on the Selector Tool InfoBar, enter the
name ‘Background’, click Create.
Next, draw your snowflakes. I created 6 different flake designs. (You can download them here)
© Xara Group 2010
The final 3 frame Flash animation