


Bitmap Feather
This type of feathering is very similar to vector feathering, but has subtle differences discussed below. Applying a bitmap feather is done through the use of the Live Effect (LE) tool; that is, bitmap feathering is a Xara-developed Live Effect.
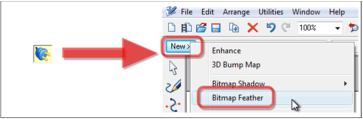
To apply a bitmap feather, simply select the object to be feathered, select the Live Effect tool, click on the New button on the infobar, and select
Bitmap Feather from the drop-down list of LEs available as shown in Figure 2.3. This applies the bitmap feather to the object, and the same slider used
for vector feathering can be used to alter the feathering amount.
Figure 2.3. To apply a bitmap feather, select the object, click on the Live Effect (LE) tool, click on the New button on the infobar, and select Bitmap Feather from the
dropdown list
Uses of Bitmap Feathering
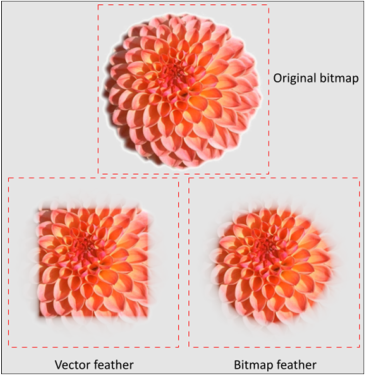
Bitmap feathering can be used for several reasons. Its primary use is to allow the feathering of bitmaps (or bitmap filled shapes) while ignoring the alpha channel (the transparent sections). Normal vector feathering would not feather the bitmap in this way—the edges of bitmap would be feathered as a whole (rectangular) object, whether or not they were visible. This is highlighted in Figure 2.4.
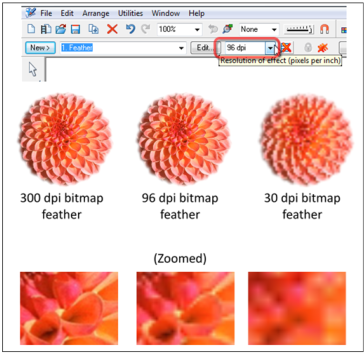
As can be gathered from the name, a bitmap feather applies a bitmap effect to an object (whether it be a vector initially or not). Unlike vector
feathering, this therefore means it is limited to a fixed resolution. To highlight what this means, Figure 2.5 shows what happens when the bitmap
feather resolution is changed. Notice how the object on which a bitmap feather is applied is forced to the resolution set on the LE infobar. This can be
the default 96 dpi (screen resolution), or a higher or lower value depending on the resolution of the bitmap that the bitmap feather is being applied to.
If a bitmap feather is applied to a bitmap, there is no need to increase the bitmap feather resolution any higher than the native bitmap resolution, as it
will produce no significant visual difference; for example, use a 96 dpi bitmap feather for a 96 dpi bitmap. Higher resolutions of bitmap feathers take
greater processing power, and can slow down rendering.
Figure 2.4. An example of the principal distinction between vector and bitmap feathering. Vector feathering feathers the edges of the whole (rectangular)
bitmap, whereas bitmap feathering feathers the edges of the non-transparent part of the bitmap (that is, ignoring the alpha-channel of the bitmap).
Note that the profile of the feather has been purposefully altered to exaggerate the effect.
Figure 2.5. A 300 dpi bitmap with alpha channel is given a bitmap feather. The resolution of the bitmap feather can be set in the Live Effect tool infobar.
The image is re-rendered at whatever resolution is set for the bitmap feather. Lowering the resolution of the bitmap feather below the native resolution
of the bitmap causes the bitmap to be rendered at that lower resolution. There is no significant visual difference in applying a bitmap feather at a resolution
higher than the resolution of the bitmap it is being applied to, and in fact there would be a performance impact.
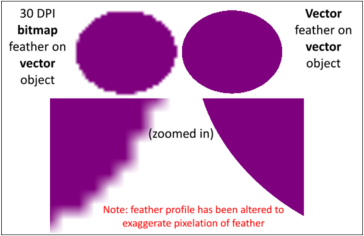
In contrast, a vector feather is truly resolution independent. To understand this, it is necessary to understand what ‘vector graphics’ are. All images displayed on screen in Xara are bitmaps—including the ‘vectors’. This is because a monitor (in particular an LCD screen) is not an oscilloscope, which could literally draw ‘physical’ lines, or at least does not display like one. Specifically, ‘resolution independence’ means that no matter what zoom value chosen to observe a (feathered/vector) object at, it is always re-rendered at screen resolution (i.e. no visible pixilation) for display. This means that as an object is zoomed into, the object must be re-rendered at screen resolution again, which at higher zooms means a larger, higher effective resolution of displayed bitmap. Thus the vector feather is being applied to an even bigger bitmap at these higher zooms. This is why as a vector feathered object is zoomed into, the redraw time becomes longer; zooming in by twice as much effectively increases the size of a 50 pixel feather to a 100 pixel feather on a bitmap twice as large and detailed. It is also similar to the reason why larger feathers of say 50 pixels take longer to draw than 25 pixel feathers. A bitmap feather set to 96 dpi remains 96 dpi regardless of how far the image is zoomed into. While resolution independent vector feathers thus strictly have no advantage over bitmap feathers for bitmapped objects, they are essential for vector objects—such objects always need to be redrawn at higher effective resolutions as they are zoomed into to maintain ‘resolution independence’ (i.e. always be displayed at 96 dpi). To highlight this, Figure 2.6 shows how a vector object is displayed with each type of feathering.
Some other drawing applications only support bitmap feathering, and this is clear when a vector object with bitmap feathering applied is zoomed into, and the pixels become visible (unblurred in some cases)—which totally defeats the purpose of using vector graphics. Only rarely would a bitmap feather be used on a vector object; conversely a vector feather would be frequently used on a bitmap unless the alpha channel was to be ignored, in which case a bitmap feather would be used.
Figure 2.6. Applying a bitmap and vector feather on a vector object shows the distinction between the two feathering types. Here, the profile of the feather in both cases has been purposefully altered to highlight the pixel edges (essentially turning the smooth feathering gradient off to emphasise the difference). The 30 dpi bitmap feather remains 30 dpi at all zoom factors; the ‘resolution independent’ vector feather is recalculated and displayed at 96 dpi at any zoom factor.