In the last few months our tutorials have covered the basics of photo editing and the various photo tools available in Xara Photo & Graphic
Designer and Xara Designer Pro. Now we are going to show you an example of how to use a combination of these tools to transform a poor
photo into great one!
Note: This tutorial has been updated to cover new features in Photo & Graphic Designer and Designer Pro in 2016.
Here’s our example...
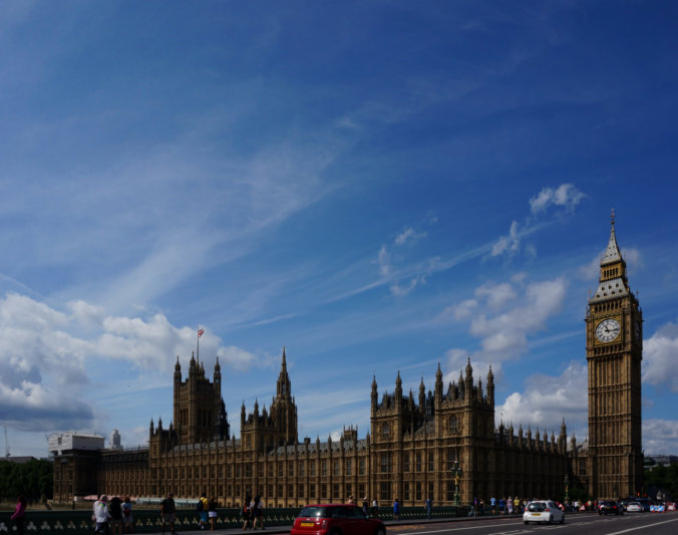
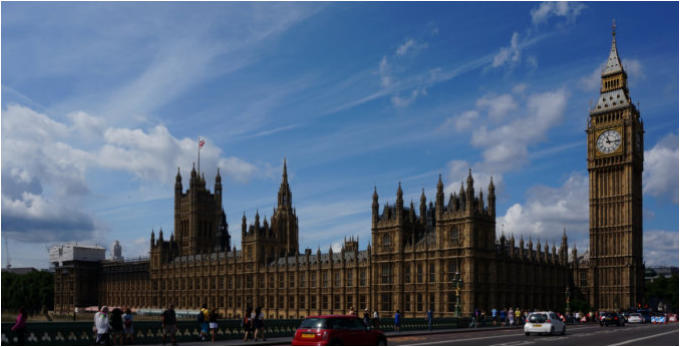
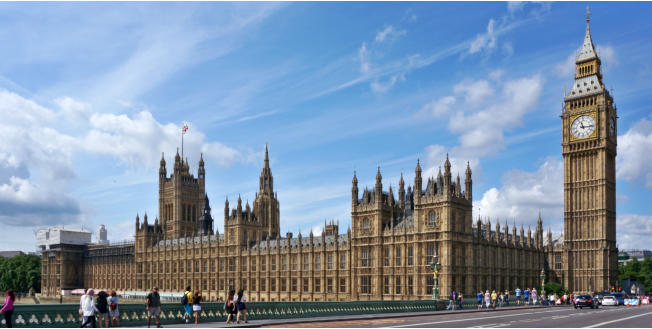
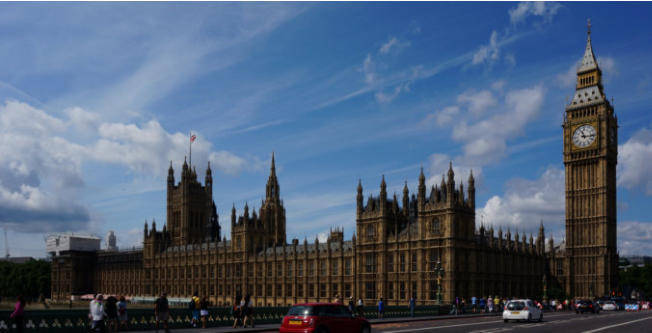
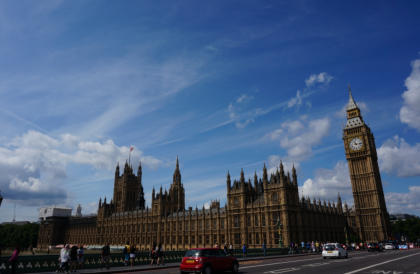
This photo was taken with a decent camera, but it’s badly under-exposed, the wide-angle ‘leaning building’ effect is extreme, the cropping is poor and there are foreground objects that would be better removed from the photo. It doesn’t take too long to turn the photo into this result. And I’ll show you how.Perspective Correction
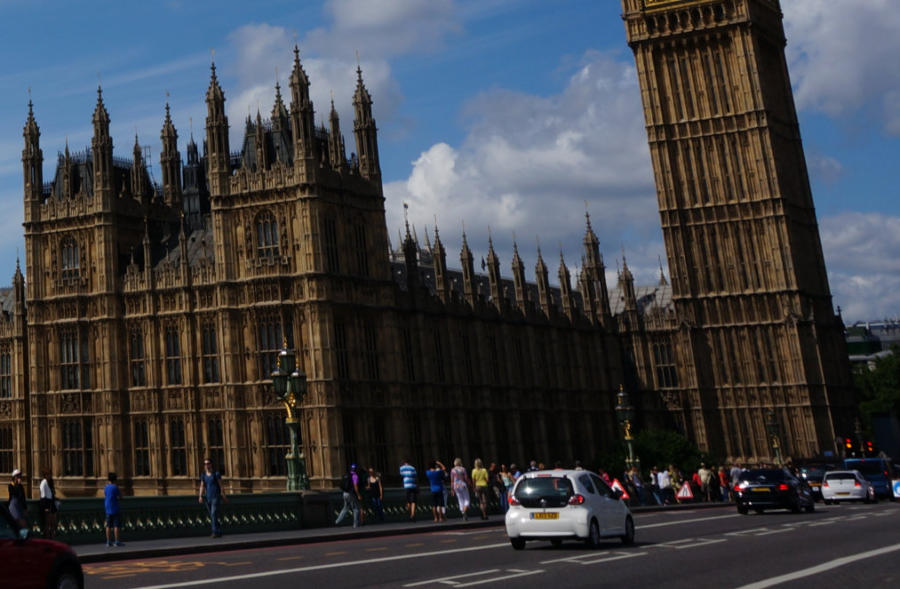
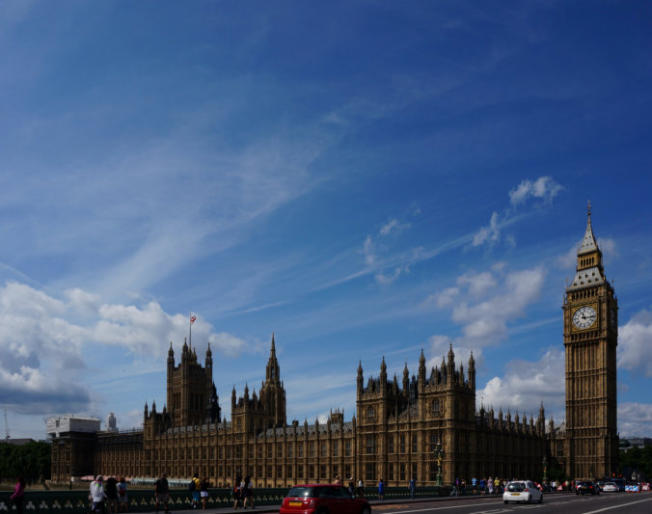
The first step is to fix the perspective problem. Xara has a totally automatic ‘perspective correction’ facility that can fix the leaning building syndrome that you get with wide angle shots. Just select the photo then select the perspective correction tool from the fly-out menu of the Photo tool: After a few seconds you get back the corrected version: This process will often change the size of the image slightly, but you can resize it as required using the Selector tool. Tip: This operation creates a new image which is a ‘raw bitmap’ and not a JPG, and so it will take a lot more memory and slow down save operations. You can optimize this image to be a JPG. Just select the image, and then the menu Utilities > Optimize Photo… Now that the building is upright, the most obvious problem is that it’s badly composed with far too much sky. In fact, this is the most likely reason that it’s so badly under-exposed as most of the photo is sky containing some bright clouds.Crop
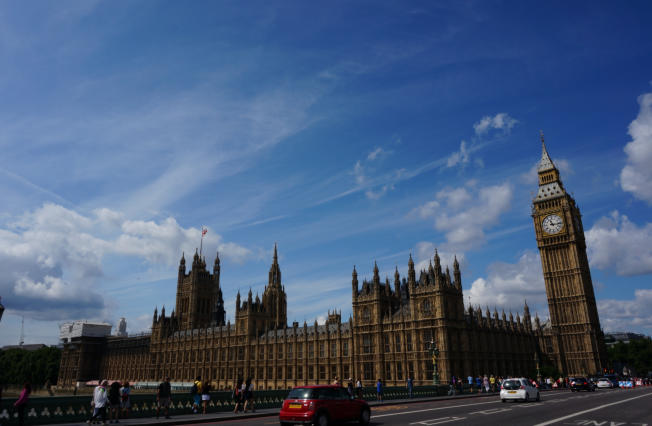
So I want to crop some of the sky out of the picture. The easiest way to crop when in the Photo Enhance tool is to just drag the top-edge round handle down. This is a better composition with less sky and more of the building. But it’s too dull as a result of underexposure.Exposure
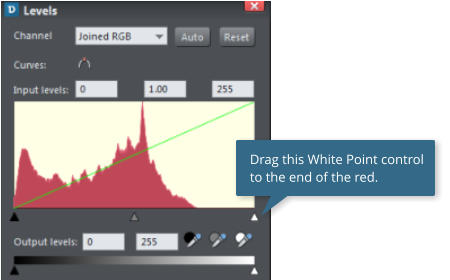
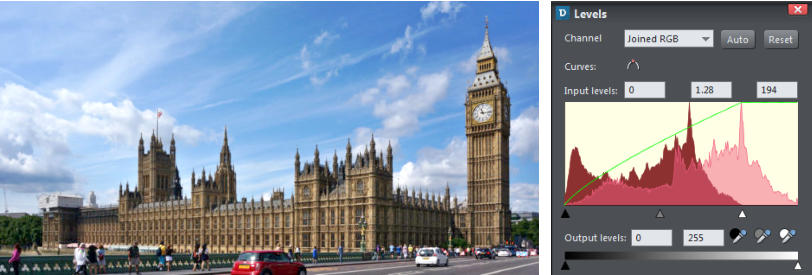
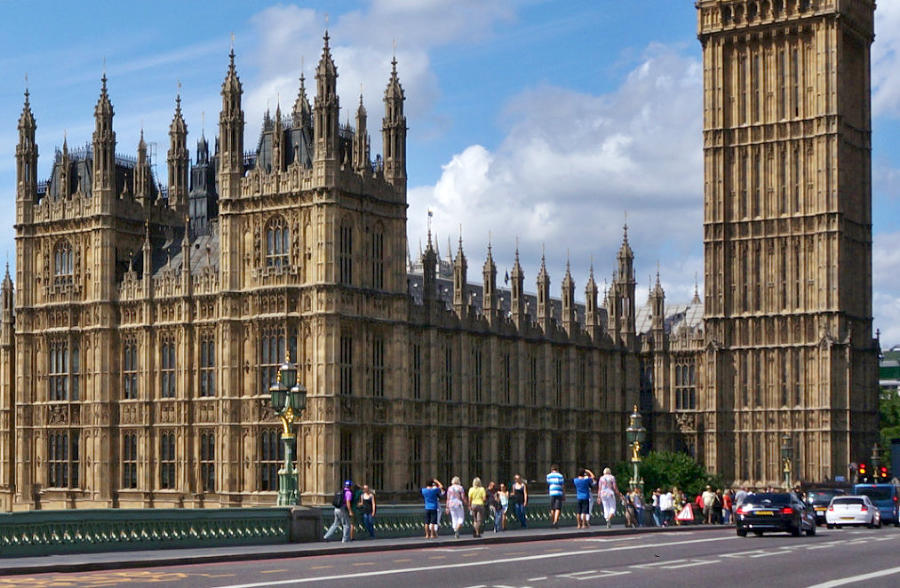
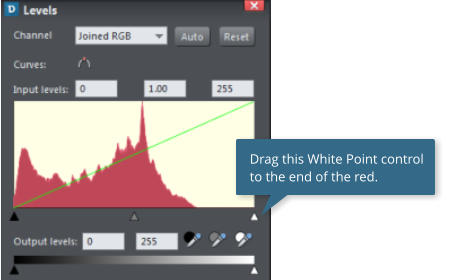
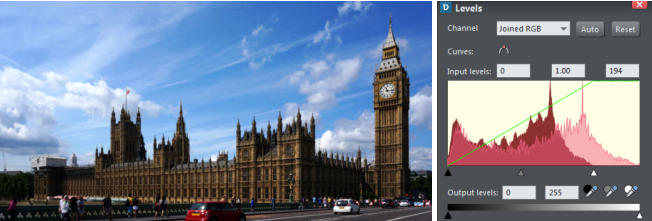
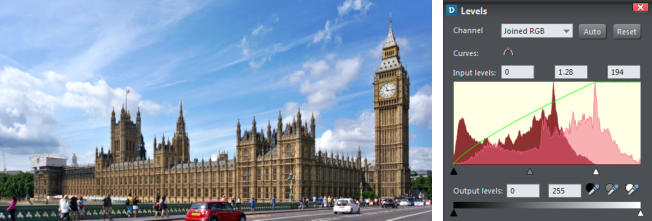
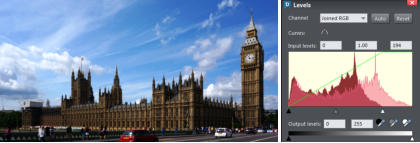
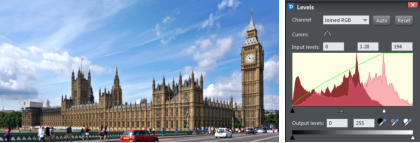
We can correct the exposure and lighten the building using a variety of the Enhance tool options. The Histogram tool in the Brightness Levels Dialog is the best way to get an overview of the brightness levels of an image. See our tutorial about the Histogram tool. The histogram of this image shows why it’s so dull. The image is composed of mostly dark to medium brightness. There’s almost no light pixels in the image - as shown by the absence of anything at the right end (the light shades) of the above histogram. So instead of an even spread of shades, dark-to-light, most of the light end is missing. To correct cases like this drag the White Point control (shown above) to the end of the red. This will now re-distribute the shades over the whole range. With the adjusted White Point, the histogram now shows the range of shades spread more evenly over the whole range (the pale red chart is the adjusted histogram, the dark red is the original), and you can see the image is now brighter, particularly the sky. But the parliament building is still too dark. So we can use the various brightness controls to adjust this. The best way to do this is by eye. Select the ‘Enhance photos’ tool again. I could use just the Brightness control, and although this does put more emphasis on brightening mid to dark shades, it still makes the image look a bit too washed out if I use this alone. Using the Shadows Brightness control is better as this only affects the mid-to-dark shades, without touching the brighter shades at all. The following version has a small brightness change of +7 and a Shadows Brightness value of +59. The building is much brighter. The Histogram shows the change - if you compare it with the previous, the pale red chart is the same at the bright (right) end, but the darker shades have been moved to the right. The overall brightness balance visually looks better, and the histogram now shows a much better balance across the chart then before. Here’s a before and after of an enlarged part of the image showing the image is straighter and brighter. Click to enlarge You might notice one other difference - some of the people and cars are missing from the ‘after’ version so next I will show you how I removed them.Removing unwanted items
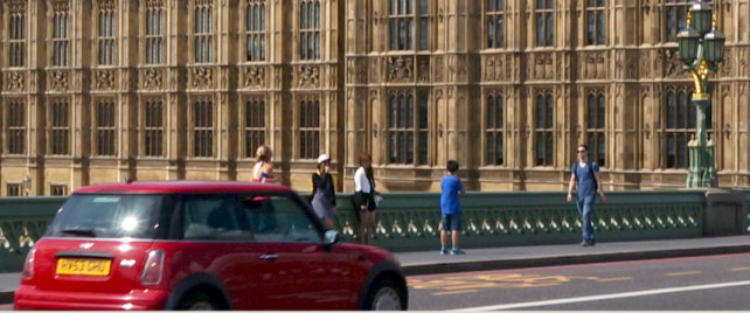
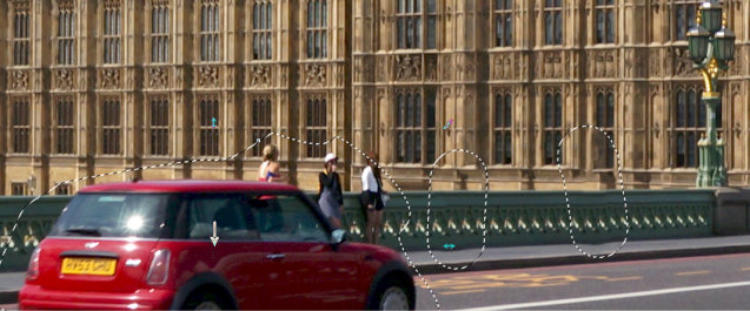
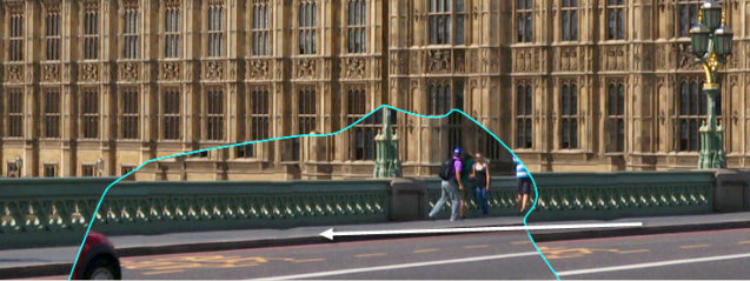
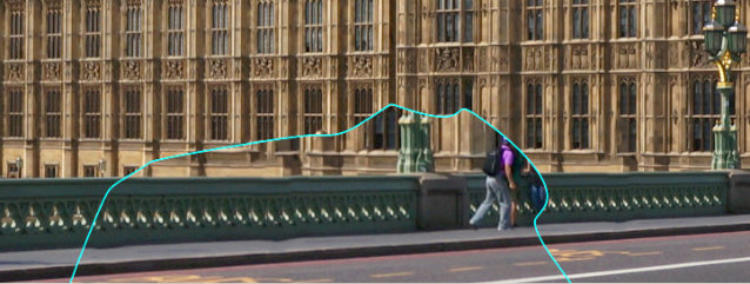
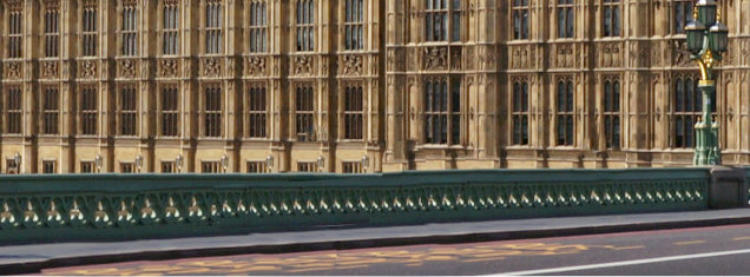
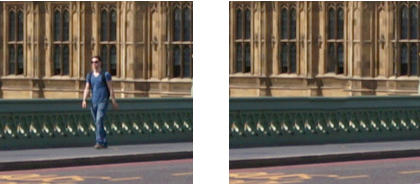
There are two main ways to remove unwanted items from your picture, the Clone Tool and the Photo Heal Tool. For the simpler cases, such as removing an isolated person from the image, the automatic Heal Tool can work very well, as in this example. Using the automatic Healing Tool, just paint over the man, the program calculates what it thinks should be the right background. In this case with near perfect results. Just select the Heal Tool and paint over the area you want to erase. The program automatically fills a background calculated from the surrounding background of the erased area. For larger areas, or more complex subject matter, it’s probably better to use the Clone Tool to manually copy parts of the image over other parts to remove unwanted items, and that’s what I’ve done to remove the cars and some of the people. See below. The two isolated people to the right of the car were removed using the Heal Tool, just painting over them, as described above, to automatically remove them. The program does a very good job as you can see in the next image. Switching into the Clone Tool I’ve drawn around the red car and the people that I want to remove. The Clone Tool shows the dotted outlines of all cloned areas and also the areas where the Heal brush has been used, so you can see where the two people were erased previously. The Clone Tool will copy (clone) any part of the image into the drawn area. To set the source point you just drag to any part of the image. Here I show a white arrow that indicates the source point. The cyan outline shows the area being replaced. Although this has basically worked, it’s still not perfect, and there are alignment problems with the pavement edge caused by the fact that the source area is further away and thus smaller. But Clone and Heal patches are just overlaid patches, (basically just cloned pieces of the photo overlaid inside a group) and so you Can select and edit them. If you hold the Ctrl key and click on a patch it becomes selected ‘inside’ the photo, and you can now manipulate it using the usual tools, such as the Selector and Fill Tools. So I have enlarged and re- positioned the cloned part so that it’s the right scale and it fits better, as you can see here. All that remains is to tidy up various bits which I’ve done using the same techniques, with the Heal Tool and Clone Tool to touch up all the remaining parts. Xara’s unique non-destructive nature maintains the high quality of your original photo regardless of how many times you open-edit-save it- which explains why many people use Xara Photo and Graphic Designer or Designer Pro as their primary, general purpose image editor. If you are not already one of them, download Xara Photo & Graphic Designer or Xara Designer Pro and try it now! This is the fifth in a series of guides to photo editing in Xara. 1. Beginner’s Guide to Photo Editing in Xara The basics of opening photos, zooming, sizing photos, and saving. 2. Summary of the Photo Tools A summary of the tools on the Photo Tool fly-out menu. 3. Photo Enhance options An overview of the ‘work-horse’ range of Enhance options. 4. Changing colors in photos How to select and enhance or adjust specific colors. 5. A real-world example This tutorial. In addition there are more detailed guides covering other photo tools: The Shadow and Highlight controls Intelligent Photo Rescaling and Zooming Erasing Backgrounds and Combining Photos Brightness Levels and Color Balance Panoramic Photos For more tutorials by Xara and third parties, check out our Resource index, which offers a searchable and browsable list of movies and tutorials created by Xara and third parties.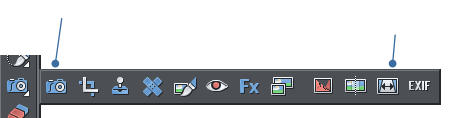


Copyright © 2015 Xara Group Limited.
Page created with Xara Designer Pro


Enhance
Perspective
Correction


In the last few months our tutorials have covered the basics of photo editing and the various photo tools
available in Xara Photo & Graphic Designer and Xara Designer Pro. Now we are going to show you an
example of how to use a combination of these tools to transform a poor photo into great one!
Note: This tutorial has been updated to cover new features in Photo & Graphic Designer and Designer Pro in
2016.
Here’s our example...
This photo was taken with a decent camera, but it’s badly under-exposed, the wide-angle ‘leaning building’ effect is extreme, the cropping is poor and there are foreground objects that would be better removed from the photo. It doesn’t take too long to turn the photo into this result. And I’ll show you how.Perspective Correction
The first step is to fix the perspective problem. Xara has a totally automatic ‘perspective correction’ facility that can fix the leaning building syndrome that you get with wide angle shots. Just select the photo then select the perspective correction tool from the fly-out menu of the Photo tool: After a few seconds you get back the corrected version: This process will often change the size of the image slightly, but you can resize it as required using the Selector tool. Tip: This operation creates a new image which is a ‘raw bitmap’ and not a JPG, and so it will take a lot more memory and slow down save operations. You can optimize this image to be a JPG. Just select the image, and then the menu Utilities > Optimize Photo… Now that the building is upright, the most obvious problem is that it’s badly composed with far too much sky. In fact, this is the most likely reason that it’s so badly under-exposed as most of the photo is sky containing some bright clouds.Crop
So I want to crop some of the sky out of the picture. The easiest way to crop when in the Photo Enhance tool is to just drag the top-edge round handle down. This is a better composition with less sky and more of the building. But it’s too dull as a result of underexposure.Exposure
We can correct the exposure and lighten the building using a variety of the Enhance tool options. The Histogram tool in the Brightness Levels Dialog is the best way to get an overview of the brightness levels of an image. See our tutorial about the Histogram tool. The histogram of this image shows why it’s so dull. The image is composed of mostly dark to medium brightness. There’s almost no light pixels in the image - as shown by the absence of anything at the right end (the light shades) of the above histogram. So instead of an even spread of shades, dark-to-light, most of the light end is missing. To correct cases like this drag the White Point control (shown above) to the end of the red. This will now re-distribute the shades over the whole range. With the adjusted White Point, the histogram now shows the range of shades spread more evenly over the whole range (the pale red chart is the adjusted histogram, the dark red is the original), and you can see the image is now brighter, particularly the sky. But the parliament building is still too dark. So we can use the various brightness controls to adjust this. The best way to do this is by eye. Select the ‘Enhance photos’ tool again. I could use just the Brightness control, and although this does put more emphasis on brightening mid to dark shades, it still makes the image look a bit too washed out if I use this alone. Using the Shadows Brightness control is better as this only affects the mid-to-dark shades, without touching the brighter shades at all. The following version has a small brightness change of +7 and a Shadows Brightness value of +59. The building is much brighter. The Histogram shows the change - if you compare it with the previous, the pale red chart is the same at the bright (right) end, but the darker shades have been moved to the right. The overall brightness balance visually looks better, and the histogram now shows a much better balance across the chart then before. Here’s a before and after of an enlarged part of the image showing the image is straighter and brighter. Click to enlarge You might notice one other difference - some of the people and cars are missing from the ‘after’ version so next I will show you how I removed them.Removing unwanted items
There are two main ways to remove unwanted items from your picture, the Clone Tool and the Photo Heal Tool. For the simpler cases, such as removing an isolated person from the image, the automatic Heal Tool can work very well, as in this example. Using the automatic Healing Tool, just paint over the man, the program calculates what it thinks should be the right background. In this case with near perfect results. Just select the Heal Tool and paint over the area you want to erase. The program automatically fills a background calculated from the surrounding background of the erased area. For larger areas, or more complex subject matter, it’s probably better to use the Clone Tool to manually copy parts of the image over other parts to remove unwanted items, and that’s what I’ve done to remove the cars and some of the people. See below. The two isolated people to the right of the car were removed using the Heal Tool, just painting over them, as described above, to automatically remove them. The program does a very good job as you can see in the next image. Switching into the Clone Tool I’ve drawn around the red car and the people that I want to remove. The Clone Tool shows the dotted outlines of all cloned areas and also the areas where the Heal brush has been used, so you can see where the two people were erased previously. The Clone Tool will copy (clone) any part of the image into the drawn area. To set the source point you just drag to any part of the image. Here I show a white arrow that indicates the source point. The cyan outline shows the area being replaced. Although this has basically worked, it’s still not perfect, and there are alignment problems with the pavement edge caused by the fact that the source area is further away and thus smaller. But Clone and Heal patches are just overlaid patches, (basically just cloned pieces of the photo overlaid inside a group) and so you Can select and edit them. If you hold the Ctrl key and click on a patch it becomes selected ‘inside’ the photo, and you can now manipulate it using the usual tools, such as the Selector and Fill Tools. So I have enlarged and re-positioned the cloned part so that it’s the right scale and it fits better, as you can see here. All that remains is to tidy up various bits which I’ve done using the same techniques, with the Heal Tool and Clone Tool to touch up all the remaining parts. Xara’s unique non-destructive nature maintains the high quality of your original photo regardless of how many times you open-edit-save it- which explains why many people use Xara Photo and Graphic Designer or Designer Pro as their primary, general purpose image editor. If you are not already one of them, download Xara Photo & Graphic Designer or Xara Designer Pro and try it now! This is the fifth in a series of guides to photo editing in Xara. 1. Beginner’s Guide to Photo Editing in Xara The basics of opening photos, zooming, sizing photos, and saving. 2. Summary of the Photo Tools A summary of the tools on the Photo Tool fly-out menu. 3. Photo Enhance options An overview of the ‘work-horse’ range of Enhance options. 4. Changing colors in photos How to select and enhance or adjust specific colors. 5. A real-world example This tutorial. In addition there are more detailed guides covering other photo tools: The Shadow and Highlight controls Intelligent Photo Rescaling and Zooming Erasing Backgrounds and Combining Photos Brightness Levels and Color Balance Panoramic Photos For more tutorials by Xara and third parties, check out our Resource index, which offers a searchable and browsable list of movies and tutorials created by Xara and third parties.


Enhance
Perspective
Correction
Copyright © 2015 Xara Group Limited.
Page created with Xara Designer Pro
In the last few months our tutorials have covered the basics of photo
editing and the various photo tools available in Xara Photo & Graphic
Designer and Xara Designer Pro. Now we are going to show you an
example of how to use a combination of these tools to transform a
poor photo into great one!
Note: This tutorial has been updated to cover new features in Photo &
Graphic Designer and Designer Pro in 2016.
Here’s our example...
This photo was taken with a decent camera, but it’s badly under- exposed, the wide-angle ‘leaning building’ effect is extreme, the cropping is poor and there are foreground objects that would be better removed from the photo. It doesn’t take too long to turn the photo into this result. And I’ll show you how.Perspective Correction
The first step is to fix the perspective problem. Xara has a totally automatic ‘perspective correction’ facility that can fix the leaning building syndrome that you get with wide angle shots. Just select the photo then select the perspective correction tool from the fly-out menu of the Photo tool: After a few seconds you get back the corrected version: This process will often change the size of the image slightly, but you can resize it as required using the Selector tool. Tip: This operation creates a new image which is a ‘raw bitmap’ and not a JPG, and so it will take a lot more memory and slow down save operations. You can optimize this image to be a JPG. Just select the image, and then the menu Utilities > Optimize Photo… Now that the building is upright, the most obvious problem is that it’s badly composed with far too much sky. In fact, this is the most likely reason that it’s so badly under-exposed as most of the photo is sky containing some bright clouds.Crop
So I want to crop some of the sky out of the picture. The easiest way to crop when in the Photo Enhance tool is to just drag the top- edge round handle down. This is a better composition with less sky and more of the building. But it’s too dull as a result of underexposure.Exposure
We can correct the exposure and lighten the building using a variety of the Enhance tool options. The Histogram tool in the Brightness Levels Dialog is the best way to get an overview of the brightness levels of an image. See our tutorial about the Histogram tool. The histogram of this image shows why it’s so dull. The image is composed of mostly dark to medium brightness. There’s almost no light pixels in the image - as shown by the absence of anything at the right end (the light shades) of the above histogram. So instead of an even spread of shades, dark-to-light, most of the light end is missing. To correct cases like this drag the White Point control (shown above) to the end of the red. This will now re-distribute the shades over the whole range. With the adjusted White Point, the histogram now shows the range of shades spread more evenly over the whole range (the pale red chart is the adjusted histogram, the dark red is the original), and you can see the image is now brighter, particularly the sky. But the parliament building is still too dark. So we can use the various brightness controls to adjust this. The best way to do this is by eye. Select the ‘Enhance photos’ tool again. I could use just the Brightness control, and although this does put more emphasis on brightening mid to dark shades, it still makes the image look a bit too washed out if I use this alone. Using the Shadows Brightness control is better as this only affects the mid-to-dark shades, without touching the brighter shades at all. The following version has a small brightness change of +7 and a Shadows Brightness value of +59. The building is much brighter. The Histogram shows the change - if you compare it with the previous, the pale red chart is the same at the bright (right) end, but the darker shades have been moved to the right. The overall brightness balance visually looks better, and the histogram now shows a much better balance across the chart then before. Here’s a before and after of an enlarged part of the image showing the image is straighter and brighter. Click to enlarge You might notice one other difference - some of the people and cars are missing from the ‘after’ version so next I will show you how I removed them.Removing unwanted items
There are two main ways to remove unwanted items from your picture, the Clone Tool and the Photo Heal Tool. For the simpler cases, such as removing an isolated person from the image, the automatic Heal Tool can work very well, as in this example. Using the automatic Healing Tool, just paint over the man, the program calculates what it thinks should be the right background. In this case with near perfect results. Just select the Heal Tool and paint over the area you want to erase. The program automatically fills a background calculated from the surrounding background of the erased area. For larger areas, or more complex subject matter, it’s probably better to use the Clone Tool to manually copy parts of the image over other parts to remove unwanted items, and that’s what I’ve done to remove the cars and some of the people. See below. The two isolated people to the right of the car were removed using the Heal Tool, just painting over them, as described above, to automatically remove them. The program does a very good job as you can see in the next image. Switching into the Clone Tool I’ve drawn around the red car and the people that I want to remove. The Clone Tool shows the dotted outlines of all cloned areas and also the areas where the Heal brush has been used, so you can see where the two people were erased previously. The Clone Tool will copy (clone) any part of the image into the drawn area. To set the source point you just drag to any part of the image. Here I show a white arrow that indicates the source point. The cyan outline shows the area being replaced. Although this has basically worked, it’s still not perfect, and there are alignment problems with the pavement edge caused by the fact that the source area is further away and thus smaller. But Clone and Heal patches are just overlaid patches, (basically just cloned pieces of the photo overlaid inside a group) and so you Can select and edit them. If you hold the Ctrl key and click on a patch it becomes selected ‘inside’ the photo, and you can now manipulate it using the usual tools, such as the Selector and Fill Tools. So I have enlarged and re-positioned the cloned part so that it’s the right scale and it fits better, as you can see here. All that remains is to tidy up various bits which I’ve done using the same techniques, with the Heal Tool and Clone Tool to touch up all the remaining parts. Xara’s unique non-destructive nature maintains the high quality of your original photo regardless of how many times you open-edit- save it- which explains why many people use Xara Photo and Graphic Designer or Designer Pro as their primary, general purpose image editor. If you are not already one of them, download Xara Photo & Graphic Designer or Xara Designer Pro and try it now! This is the fifth in a series of guides to photo editing in Xara. 1. Beginner’s Guide to Photo Editing in Xara The basics of opening photos, zooming, sizing photos, and saving. 2. Summary of the Photo Tools A summary of the tools on the Photo Tool fly-out menu. 3. Photo Enhance options An overview of the ‘work-horse’ range of Enhance options. 4. Changing colors in photos How to select and enhance or adjust specific colors. 5. A real-world example This tutorial. In addition there are more detailed guides covering other photo tools: The Shadow and Highlight controls Intelligent Photo Rescaling and Zooming Erasing Backgrounds and Combining Photos Brightness Levels and Color Balance Panoramic Photos For more tutorials by Xara and third parties, check out our Resource index, which offers a searchable and browsable list of movies and tutorials created by Xara and third parties.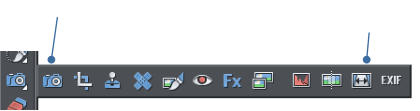


Enhance
Perspective
Correction
Copyright © 2015 Xara Group Limited.
Page created with Xara Designer Pro
PHOTO EDITING: A ‘REAL WORLD’ EXAMPLE
PHOTO EDITING: A ‘REAL WORLD’ EXAMPLE
PHOTO EDITING: A ‘REAL WORLD’ EXAMPLE