


 Button 5
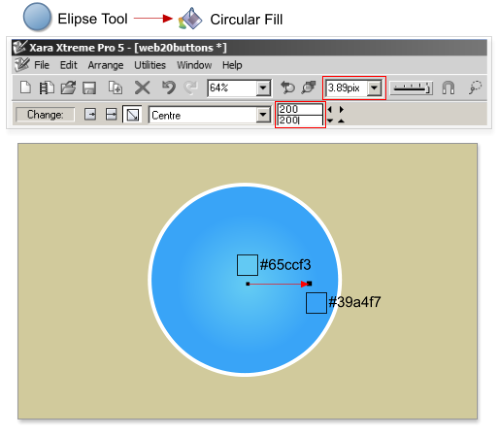
Step 1: Using the Ellipse tool, create a 200 X 200 circle and set the line width to 3.89 pixels. Fill it with a radial color fill from #65CCF3 to #39A4F7, set
the line color to white.
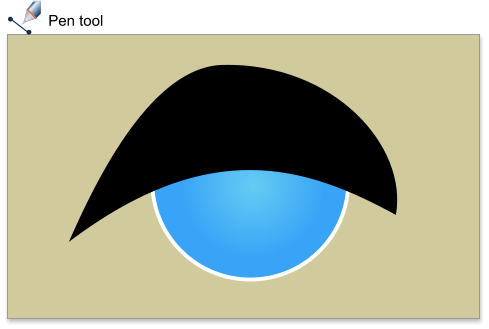
Step 2: Draw a new curved shape over the circle using the Pen tool - as you will know from previous examples this will be needed to create the glossy
effect.
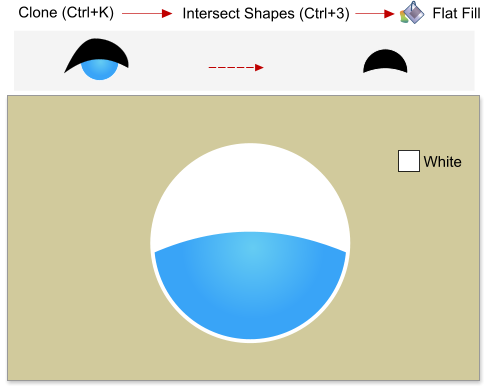
Step 3: Clone the circle using the shortcut Ctrl+K, intersect the cloned circle and the curved shape using the shortcut Ctrl+3. Make the resulting shape
white.
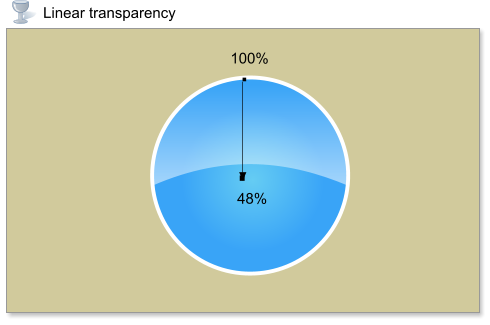
Step 4: Apply a linear transparency to the curved shape from 100% to 48.8%.
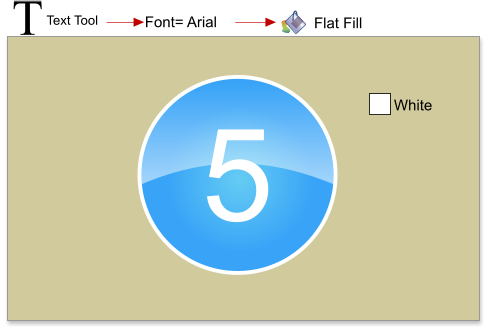
Step 5: Enter the text, in this button we will make it a number.
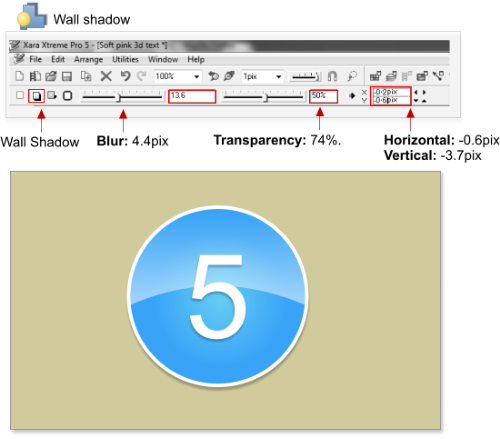
Step 6: To finish, add a wall shadow to the circle and the number. Shadow blur=4.4 pixels, transparency=74%, horizontal and vertical positions -0.6 & -
3.7 pixels respectively.
The Web 2.0 buttons all use a simple linear or radial fill, and as you notice the gradients are blue to a lighter blue or red to a lighter red etc, in order
to make a smooth gradient, and the glossy effect can be achieved with a simple shape filled with white and a linear or flat transparency. So practice a
little more, try some star or other shapes to create more Web 2.0 buttons.
This tutorial was created by José Campoy of Blueberry Design
Button 5
Step 1: Using the Ellipse tool, create a 200 X 200 circle and set the line width to 3.89 pixels. Fill it with a radial color fill from #65CCF3 to #39A4F7, set
the line color to white.
Step 2: Draw a new curved shape over the circle using the Pen tool - as you will know from previous examples this will be needed to create the glossy
effect.
Step 3: Clone the circle using the shortcut Ctrl+K, intersect the cloned circle and the curved shape using the shortcut Ctrl+3. Make the resulting shape
white.
Step 4: Apply a linear transparency to the curved shape from 100% to 48.8%.
Step 5: Enter the text, in this button we will make it a number.
Step 6: To finish, add a wall shadow to the circle and the number. Shadow blur=4.4 pixels, transparency=74%, horizontal and vertical positions -0.6 & -
3.7 pixels respectively.
The Web 2.0 buttons all use a simple linear or radial fill, and as you notice the gradients are blue to a lighter blue or red to a lighter red etc, in order
to make a smooth gradient, and the glossy effect can be achieved with a simple shape filled with white and a linear or flat transparency. So practice a
little more, try some star or other shapes to create more Web 2.0 buttons.
This tutorial was created by José Campoy of Blueberry Design


 © José Campoy