
We all take photos of our family or friends and often we would like to share or view them in our homes, rather than sharing in a fleeting moment online with social media. A
perfect way to share a special photo is to print it out and frame it or use it in a greetings card. Very often the photos we take have other people in the background or they may
have other objects that you would wish to remove.
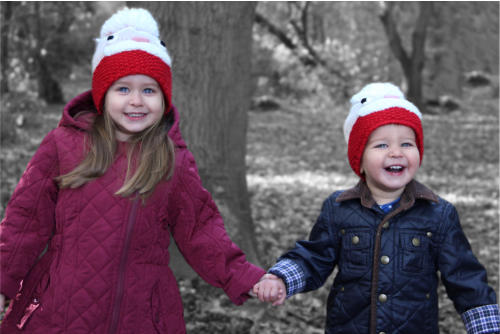
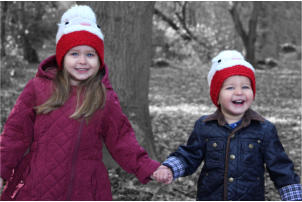
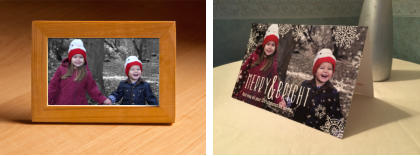
I’m going to show you how to be creative with your photos for use as an attractive photo in a frame or as a greetings card, by making the background only be black and white
and blurred like this:
Black & white, blurred background
I’m using Xara Photo & Graphic Designer which is a high-powered general purpose photo editing and graphics creation tool. You can follow this tutorial to create your own
unique, personalised photos easily with Xara Photo & Graphic Designer. Download a free trial version and give it a try.
Opening a photo for editing
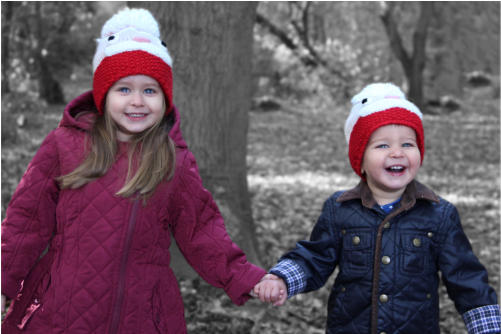
You can open a photo for editing in one of the following ways: 1. Select the menu File > Open and select a JPG or any other image file you want to edit or 2. Select the menu File > New > Blank Photo and then drag a file from your file manager onto the blank Xara window. or... 3. Simply drag a photo file onto the title bar of Xara Designer. In each case this will open the photo as a Photo Document. Photo Documents (as opposed to a normal print document or web document) will show images at their full size, so when viewing at 100% zoom, you’re seeing all the pixels in the image. Also the dimension units are set to pixels, and there is no white page background - the image is placed on a dark pasteboard area. The other major benefit of a Photo Document type is that if you load a JPG photo this way, a Save operation will default to saving the file back as a JPG. (along with a Master files in a Masters folder, so you can make further edits or even undo edits later). Left - The original photo. Right - I will remove the background people and change the background colors.Removing unwanted objects or people
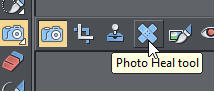
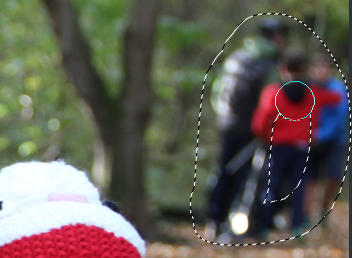
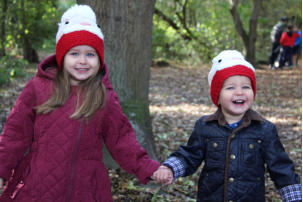
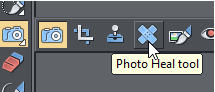
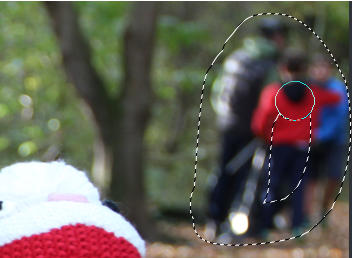
The first thing I want to do with my photo is to remove the people in the top right as they are a distraction. I want the photo to focus purely on the children. There are two ways to do this. The quickest way is to use the Photo Heal Tool as it’s a single step operation. Select the Photo Heal tool and then hold down your mouse button and brush over the area that you wish to remove. When you have finished, release the mouse button and Xara Designer will automatically erase the ‘brushed’ area. If you are not happy with the result, select the Magic erase button on the InfoBar, for the program to make another attempt. You can make as many attempts as you wish and simply press the undo or redo button to decide on your final choice. Using the photo heal tool to paint over the area I want erased. With the Photo Heal tool still selected, move the feather slider control (top right on the InfoBar) to blend the new area in with the original photo - I set mine to 13px. The alternative way to remove unwanted objects is to use the Clone Tool on the Photo Tool flyout. Select the Clone tool, draw an outline around the objects that you wish to remove, then select the ‘magic erase’ button on the top InfoBar. Use the feather slide control to blend the edge of the new area with the original photo. With the Clone tool you can also drag the new area so that it copies an existing area of the photo. Instead of selecting the Magic Erase button, click on the pointer in the area that you wish to eliminate and keep it selected whilst dragging the section around until you find a suitable area to make your photo look right. See Magic Erase tutorial Tip - You don’t have to be too exact when drawing around the object that you wish to eliminate; it’s better to leave a gap around it as this gives Xara Designer a clue as to the background that should be filled in. People in the background ‘erased’ with the Photo Heal toolChanging the background
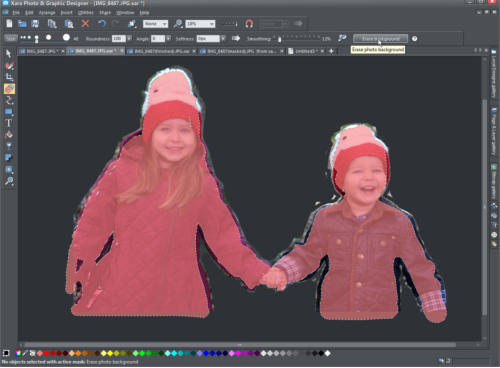
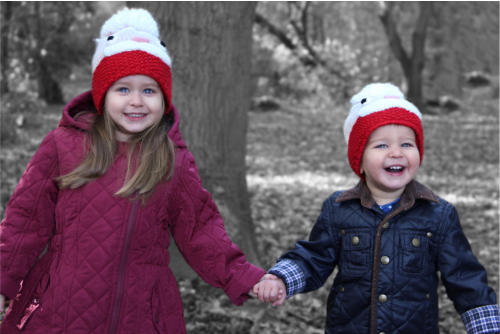
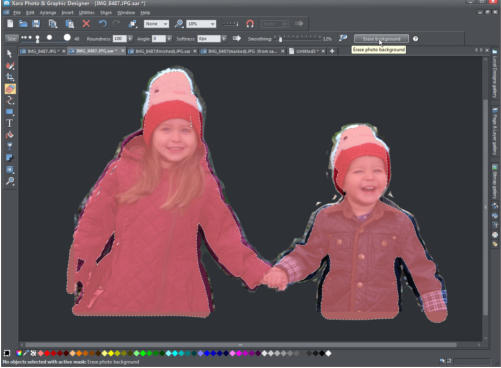
I now wish to de-emphasise the background by making it black and white, and blur it a little more, leaving the children in color. To do this I’m going to cut the children out of the background, set the whole image to be black and white, with some blur, and then paste the cut-out children back on top. I could use the new Magnetic Lasso method to select the children but I will show you another method, which is more appropriate when your subject has colors in areas that blend with the background colors or the subject has complex shapes such as fur, hair, trees etc, that would be tedious, or impossible to mask manually. So I’m going to use the Background Erase method to cut the children out of the background. Here’s how to do it step by step.Copy the photo
Firstly, use Ctrl+C to copy the photo to the clipboard - there is no need to paste it anywhere at the moment as we shall use it later when we paste it behind the cut-out children.Background Erase
Xara Photo & Graphic Designer can do an automatic background erase, but it needs some hints as to what is the foreground and what is the background. So it’s necessary to mask an approximate area of the forground, erase some of the background, and then ask the program to do the rest, using those hints.Masking your subject
Select the Mask Painter Tool and paint over the parts of the foreground you want to keep. Ensure that you do not mask over any background area, although it’s OK to go off the edge of the photo. You can cover larger areas quickly whilst zoomed out as the mask brush will appear larger (relative to the smaller image). It is always advisable to zoom in on the image to paint over the more intricate areas as the brush will appear smaller (relative to the image) and will be easier to cover closer to the required edge. It’s only necessary to more carefully mask areas that have little contrast with the background. If you make a mistake hold Shift and move the brush to erase the erroneous mask. Tip: Be sure to cover the various different shades of color in the subject you wish to keep. However, if the subject is all a similar colour then you only need to cover part of it with the mask. Zoom in to mask the smaller, more intricate areas of your photo. (It’s not normally necessary to mask with this much accuracy, but in areas of low contrast between foregound & background it helps.)Erasing the background
The next step is to erase the bits of the photo that you do not want. Select the Eraser tool and again zoom out to cover the larger areas and zoom in to cover the more intricate sections. When you are happy with it select the ‘Erase background’ button on Erase Tool Infobar top right. Having masked the foreground and erased most of the of the background, select the ‘Erase Background’ button After the program has done its magic, sometimes there are stubborn bits that still need to be erased or adjusted so you may need to do a ‘Post erase touch-up’. With the Eraser tool still selected simply brush over those unwanted bits of background. Or you can Undo the background erase, to show the mask again, then make further adjustsments to the mask or erased parts before selecting ‘Erase background’ again. Tip: If you adjust the Softness slider to be non-zero, this tool now becomes a soft eraser with softer, feathered edges.Combine the two photos and adjust the background
Select the current photo and select Ctrl+Shft+V to ‘paste in place’ (i.e. it’s original position) the previously copied photo on top of the cut-out photo. Now select the Photo Tool to customise the photo that is on the top. I wanted a black and white photo so I set the saturation to be -100. I also wanted to blur the background so that the children would be sharp against a blurred background. The blur/sharpness slider only goes down to -100 but you can manually enter large (negative) values, so I typed in the number -200. Now go into the Selector tool and with the photo selected, go to Arrange>Put to back or use Ctrl+B. The colored cut-out of the children is now at the front, on top of the black and white, blurred photo. If necessary you can just drag the foregound children image around to position it accurately. The finished photoSaving your photo
You can now save your photo and print it to be put in a frame or share it in many other ways. Just select Save or Save As... to save the photo. It will be saved at the same pixel size as you see at 100% zoom - which, if you’ve not adjusted the size, will be the same pixel dimensions of the original. The file was opened as a photo jpg type so it will automatically combine the background and cut-out and save it as a jpg, without the need to ‘group’ the two photo.Non-destructive saves
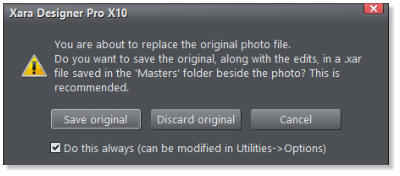
After editing a photo and then saving it back, it replaces the original JPG so your photo will be replaced. This is a destructive operation. Besides losing your original photo it is not good for another reason - each time you save a JPG it gets distorted slightly - this is because JPGs use ‘lossy’ compression - the image loses a bit of fidelity every time you save. So if you open a saved JPG you’re starting with a slightly worse quality image. Each open-edit-save cycle makes it worse. Using Xara it doesn’t have to be this way. When you save a JPG you are prompted to save the original file. This is like keeping the original negative (in old film speak). With the negative you could always start from the original and re-do any changes you want. You can elect to save the original alongside your edited JPG, then the next time you wish to edit that JPG, Xara recovers the original master instead, with all the edits you’ve done to the image. This means no lossy cumulative distortion, no matter how many times you open and save that JPG. It also means you can change your mind and undo or adjust any of the edits you’ve done previously. The really smart thing is that if you open the edited JPG into Xara, it finds and restores this original edited file to work on, which in this case will have the two layers, so you can now continue editing, with no loss of quality.Creating your Greetings Card
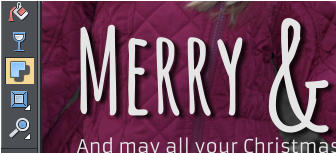
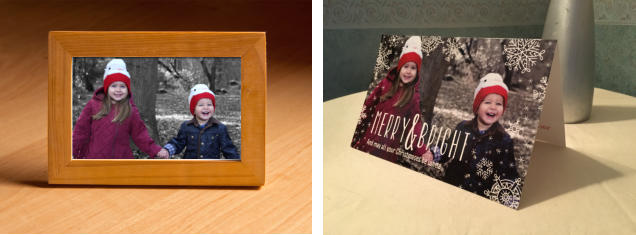
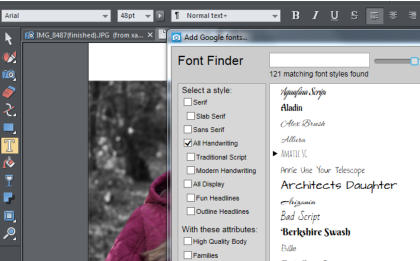
I will now add some text and snowflakes to the photo to create a seasonal card, like this: The finished card Select File>New>A4 portrait (blank) or select Ctrl-N to open a new document. (Or you can select whichever size document you want or change the size in File>page options.) Drag your saved photo onto the page and position it on the bottom half. With the Text tool selected, position your cursor and type your text. It will usually come out far too small on a hi-res photo, so just use the Selector tool and drag to make it approximately the correct size. I also changed the text color to white by clicking on the white ‘diamond’ on the color line. I want a hand writing style font, so I will search for an appropriate font from the 700 or more Google fonts that are available to be downloaded and installed. With the Text tool still selected, go to the drop down list of fonts and choose ‘Add’ link at the top of the Google Fonts section of the font list. Finding and adding a Google font I selected the ‘All handwriting’ check box, to view all the handwriting styles, and chose a font called ‘Amatic SC’ and clicked to ‘install’ which then downloaded and was added to my list of available fonts in Xara Designer.Add a shadow
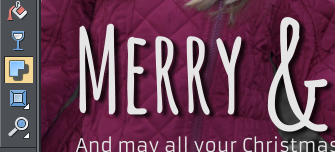
I added a shadow to the text to lift it off the page - using the Selector tool, select the text and then click on the Shadow tool . Just drag on the text to create a drop shadow Use the transparency slider to adjust the transparency of the shadow. I set mine on 25%. I then added a strapline in another font. Text with a shadow addedSnowflakes
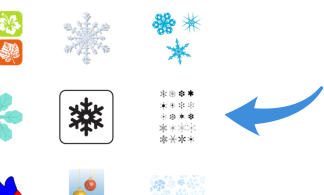
The recently added free stock illustration library is a great source of clipart, such as snowflakes. Go to File > New from Content Catalogue. Select Stock Illustrations and then search for ‘snowflakes’. One of the illustrations is a sheet of 20 difference shape snowflakes. Some snowflake clipart Select ‘Import’. With the sheet of stars selected, click on the white color on the color line to change their color then click Ctrl+U to ungroup the snowflakes so that they can be moved individually. Simply drag and drop the snowflakes onto the picture - resize as necessary. Tip: A quick way to make a copy of a snowflake is to right-click-hold on the mouse button and drag on it. That’s it! Now the document can be printed out and folded in half to make a greetings card. The finished Greetings card, alongside are some of the unused stars from the sheet in the Content Catalogue Xara Photo & Graphic Designer is a flexible and time-saving all-in-one creative tool that provides a wide range of photo editing and enhancement, illustration and graphic design features. At an unbeatable value for money price, it’s ideal for private and professional use: at home, in clubs, in academic institutions, and at work. For more features you. Download a free trial version and give it a try.
Copyright © 2016 Xara Group Limited.
Page created with Xara Designer Pro


We all take photos of our family or friends and often we would like to share or view them in our homes, rather than sharing in a fleeting
moment online with social media. A perfect way to share a special photo is to print it out and frame it or use it in a greetings card. Very often
the photos we take have other people in the background or they may have other objects that you would wish to remove.
I’m going to show you how to be creative with your photos for use as an attractive photo in a frame or as a greetings card, by making the
background only be black and white and blurred like this:
Black & white, blurred background
I’m using Xara Photo & Graphic Designer which is a high-powered general purpose photo editing and graphics creation tool. You can follow this
tutorial to create your own unique, personalised photos easily with Xara Photo & Graphic Designer. Download a free trial version and give it a
try.
Opening a photo for editing
You can open a photo for editing in one of the following ways: 1. Select the menu File > Open and select a JPG or any other image file you want to edit or 2. Select the menu File > New > Blank Photo and then drag a file from your file manager onto the blank Xara window. or... 3. Simply drag a photo file onto the title bar of Xara Designer. In each case this will open the photo as a Photo Document. Photo Documents (as opposed to a normal print document or web document) will show images at their full size, so when viewing at 100% zoom, you’re seeing all the pixels in the image. Also the dimension units are set to pixels, and there is no white page background - the image is placed on a dark pasteboard area. The other major benefit of a Photo Document type is that if you load a JPG photo this way, a Save operation will default to saving the file back as a JPG. (along with a Master files in a Masters folder, so you can make further edits or even undo edits later). Left - The original photo. Right - I will remove the background people and change the background colors.Removing unwanted objects or people
The first thing I want to do with my photo is to remove the people in the top right as they are a distraction. I want the photo to focus purely on the children. There are two ways to do this. The quickest way is to use the Photo Heal Tool as it’s a single step operation. Select the Photo Heal tool and then hold down your mouse button and brush over the area that you wish to remove. When you have finished, release the mouse button and Xara Designer will automatically erase the ‘brushed’ area. If you are not happy with the result, select the Magic erase button on the InfoBar, for the program to make another attempt. You can make as many attempts as you wish and simply press the undo or redo button to decide on your final choice. Using the photo heal tool to paint over the area I want erased. With the Photo Heal tool still selected, move the feather slider control (top right on the InfoBar) to blend the new area in with the original photo - I set mine to 13px. The alternative way to remove unwanted objects is to use the Clone Tool on the Photo Tool flyout. Select the Clone tool, draw an outline around the objects that you wish to remove, then select the ‘magic erase’ button on the top InfoBar. Use the feather slide control to blend the edge of the new area with the original photo. With the Clone tool you can also drag the new area so that it copies an existing area of the photo. Instead of selecting the Magic Erase button, click on the pointer in the area that you wish to eliminate and keep it selected whilst dragging the section around until you find a suitable area to make your photo look right. See Magic Erase tutorial Tip - You don’t have to be too exact when drawing around the object that you wish to eliminate; it’s better to leave a gap around it as this gives Xara Designer a clue as to the background that should be filled in. People in the background ‘erased’ with the Photo Heal toolChanging the background
I now wish to de-emphasise the background by making it black and white, and blur it a little more, leaving the children in color. To do this I’m going to cut the children out of the background, set the whole image to be black and white, with some blur, and then paste the cut-out children back on top. I could use the new Magnetic Lasso method to select the children but I will show you another method, which is more appropriate when your subject has colors in areas that blend with the background colors or the subject has complex shapes such as fur, hair, trees etc, that would be tedious, or impossible to mask manually. So I’m going to use the Background Erase method to cut the children out of the background. Here’s how to do it step by step.Copy the photo
Firstly, use Ctrl+C to copy the photo to the clipboard - there is no need to paste it anywhere at the moment as we shall use it later when we paste it behind the cut-out children.Background Erase
Xara Photo & Graphic Designer can do an automatic background erase, but it needs some hints as to what is the foreground and what is the background. So it’s necessary to mask an approximate area of the forground, erase some of the background, and then ask the program to do the rest, using those hints.Masking your subject
Select the Mask Painter Tool and paint over the parts of the foreground you want to keep. Ensure that you do not mask over any background area, although it’s OK to go off the edge of the photo. You can cover larger areas quickly whilst zoomed out as the mask brush will appear larger (relative to the smaller image). It is always advisable to zoom in on the image to paint over the more intricate areas as the brush will appear smaller (relative to the image) and will be easier to cover closer to the required edge. It’s only necessary to more carefully mask areas that have little contrast with the background. If you make a mistake hold Shift and move the brush to erase the erroneous mask. Tip: Be sure to cover the various different shades of color in the subject you wish to keep. However, if the subject is all a similar colour then you only need to cover part of it with the mask. Zoom in to mask the smaller, more intricate areas of your photo. (It’s not normally necessary to mask with this much accuracy, but in areas of low contrast between foregound & background it helps.)Erasing the background
The next step is to erase the bits of the photo that you do not want. Select the Eraser tool and again zoom out to cover the larger areas and zoom in to cover the more intricate sections. When you are happy with it select the ‘Erase background’ button on Erase Tool Infobar top right. Having masked the foreground and erased most of the of the background, select the ‘Erase Background’ button After the program has done its magic, sometimes there are stubborn bits that still need to be erased or adjusted so you may need to do a ‘Post erase touch-up’. With the Eraser tool still selected simply brush over those unwanted bits of background. Or you can Undo the background erase, to show the mask again, then make further adjustsments to the mask or erased parts before selecting ‘Erase background’ again. Tip: If you adjust the Softness slider to be non-zero, this tool now becomes a soft eraser with softer, feathered edges.Combine the two photos and adjust the background
Select the current photo and select Ctrl+Shft+V to ‘paste in place’ (i.e. it’s original position) the previously copied photo on top of the cut-out photo. Now select the Photo Tool to customise the photo that is on the top. I wanted a black and white photo so I set the saturation to be - 100. I also wanted to blur the background so that the children would be sharp against a blurred background. The blur/sharpness slider only goes down to -100 but you can manually enter large (negative) values, so I typed in the number -200. Now go into the Selector tool and with the photo selected, go to Arrange>Put to back or use Ctrl+B. The colored cut-out of the children is now at the front, on top of the black and white, blurred photo. If necessary you can just drag the foregound children image around to position it accurately. The finished photoSaving your photo
You can now save your photo and print it to be put in a frame or share it in many other ways. Just select Save or Save As... to save the photo. It will be saved at the same pixel size as you see at 100% zoom - which, if you’ve not adjusted the size, will be the same pixel dimensions of the original. The file was opened as a photo jpg type so it will automatically combine the background and cut-out and save it as a jpg, without the need to ‘group’ the two photo.Non-destructive saves
After editing a photo and then saving it back, it replaces the original JPG so your photo will be replaced. This is a destructive operation. Besides losing your original photo it is not good for another reason - each time you save a JPG it gets distorted slightly - this is because JPGs use ‘lossy’ compression - the image loses a bit of fidelity every time you save. So if you open a saved JPG you’re starting with a slightly worse quality image. Each open-edit-save cycle makes it worse. Using Xara it doesn’t have to be this way. When you save a JPG you are prompted to save the original file. This is like keeping the original negative (in old film speak). With the negative you could always start from the original and re-do any changes you want. You can elect to save the original alongside your edited JPG, then the next time you wish to edit that JPG, Xara recovers the original master instead, with all the edits you’ve done to the image. This means no lossy cumulative distortion, no matter how many times you open and save that JPG. It also means you can change your mind and undo or adjust any of the edits you’ve done previously. The really smart thing is that if you open the edited JPG into Xara, it finds and restores this original edited file to work on, which in this case will have the two layers, so you can now continue editing, with no loss of quality.Creating your Greetings Card
I will now add some text and snowflakes to the photo to create a seasonal card, like this: The finished card Select File>New>A4 portrait (blank) or select Ctrl-N to open a new document. (Or you can select whichever size document you want or change the size in File>page options.) Drag your saved photo onto the page and position it on the bottom half. With the Text tool selected, position your cursor and type your text. It will usually come out far too small on a hi-res photo, so just use the Selector tool and drag to make it approximately the correct size. I also changed the text color to white by clicking on the white ‘diamond’ on the color line. I want a hand writing style font, so I will search for an appropriate font from the 700 or more Google fonts that are available to be downloaded and installed. With the Text tool still selected, go to the drop down list of fonts and choose ‘Add’ link at the top of the Google Fonts section of the font list. Finding and adding a Google font I selected the ‘All handwriting’ check box, to view all the handwriting styles, and chose a font called ‘Amatic SC’ and clicked to ‘install’ which then downloaded and was added to my list of available fonts in Xara Designer.Add a shadow
I added a shadow to the text to lift it off the page - using the Selector tool, select the text and then click on the Shadow tool . Just drag on the text to create a drop shadow Use the transparency slider to adjust the transparency of the shadow. I set mine on 25%. I then added a strapline in another font. Text with a shadow addedSnowflakes
The recently added free stock illustration library is a great source of clipart, such as snowflakes. Go to File > New from Content Catalogue. Select Stock Illustrations and then search for ‘snowflakes’. One of the illustrations is a sheet of 20 difference shape snowflakes. Some snowflake clipart Select ‘Import’. With the sheet of stars selected, click on the white color on the color line to change their color then click Ctrl+U to ungroup the snowflakes so that they can be moved individually. Simply drag and drop the snowflakes onto the picture - resize as necessary. Tip: A quick way to make a copy of a snowflake is to right-click-hold on the mouse button and drag on it. That’s it! Now the document can be printed out and folded in half to make a greetings card. The finished Greetings card, alongside are some of the unused stars from the sheet in the Content Catalogue Xara Photo & Graphic Designer is a flexible and time-saving all-in-one creative tool that provides a wide range of photo editing and enhancement, illustration and graphic design features. At an unbeatable value for money price, it’s ideal for private and professional use: at home, in clubs, in academic institutions, and at work. For more features you. Download a free trial version and give it a try.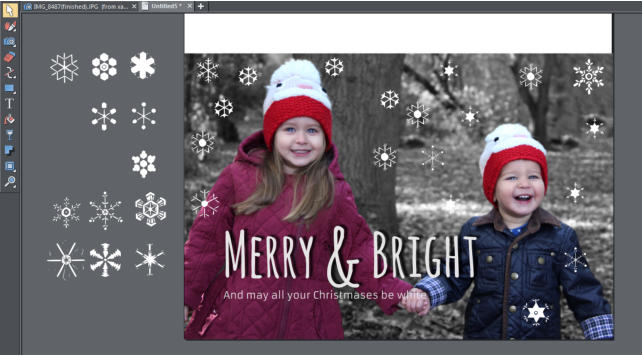


Copyright © 2015 Xara Group Limited.
Page created with Xara Designer Pro

We all take photos of our family or friends and often we would like to share or view them in our homes,
rather than sharing in a fleeting moment online with social media. A perfect way to share a special photo is
to print it out and frame it or use it in a greetings card. Very often the photos we take have other people in
the background or they may have other objects that you would wish to remove.
I’m going to show you how to be creative with your photos for use as an attractive photo in a frame or as a
greetings card, by making the background only be black and white and blurred like this:
Black & white, blurred background
I’m using Xara Photo & Graphic Designer which is a high-powered general purpose photo editing and
graphics creation tool. You can follow this tutorial to create your own unique, personalised photos easily
with Xara Photo & Graphic Designer. Download a free trial version and give it a try.
Opening a photo for editing
You can open a photo for editing in one of the following ways: 1. Select the menu File > Open and select a JPG or any other image file you want to edit or 2. Select the menu File > New > Blank Photo and then drag a file from your file manager onto the blank Xara window. or... 3. Simply drag a photo file onto the title bar of Xara Designer. In each case this will open the photo as a Photo Document. Photo Documents (as opposed to a normal print document or web document) will show images at their full size, so when viewing at 100% zoom, you’re seeing all the pixels in the image. Also the dimension units are set to pixels, and there is no white page background - the image is placed on a dark pasteboard area. The other major benefit of a Photo Document type is that if you load a JPG photo this way, a Save operation will default to saving the file back as a JPG. (along with a Master files in a Masters folder, so you can make further edits or even undo edits later). Left - The original photo. Right - I will remove the background people and change the background colors.Removing unwanted objects or people
The first thing I want to do with my photo is to remove the people in the top right as they are a distraction. I want the photo to focus purely on the children. There are two ways to do this. The quickest way is to use the Photo Heal Tool as it’s a single step operation. Select the Photo Heal tool and then hold down your mouse button and brush over the area that you wish to remove. When you have finished, release the mouse button and Xara Designer will automatically erase the ‘brushed’ area. If you are not happy with the result, select the Magic erase button on the InfoBar, for the program to make another attempt. You can make as many attempts as you wish and simply press the undo or redo button to decide on your final choice. Using the photo heal tool to paint over the area I want erased. With the Photo Heal tool still selected, move the feather slider control (top right on the InfoBar) to blend the new area in with the original photo - I set mine to 13px. The alternative way to remove unwanted objects is to use the Clone Tool on the Photo Tool flyout. Select the Clone tool, draw an outline around the objects that you wish to remove, then select the ‘magic erase’ button on the top InfoBar. Use the feather slide control to blend the edge of the new area with the original photo. With the Clone tool you can also drag the new area so that it copies an existing area of the photo. Instead of selecting the Magic Erase button, click on the pointer in the area that you wish to eliminate and keep it selected whilst dragging the section around until you find a suitable area to make your photo look right. See Magic Erase tutorial Tip - You don’t have to be too exact when drawing around the object that you wish to eliminate; it’s better to leave a gap around it as this gives Xara Designer a clue as to the background that should be filled in. People in the background ‘erased’ with the Photo Heal toolChanging the background
I now wish to de-emphasise the background by making it black and white, and blur it a little more, leaving the children in color. To do this I’m going to cut the children out of the background, set the whole image to be black and white, with some blur, and then paste the cut-out children back on top. I could use the new Magnetic Lasso method to select the children but I will show you another method, which is more appropriate when your subject has colors in areas that blend with the background colors or the subject has complex shapes such as fur, hair, trees etc, that would be tedious, or impossible to mask manually. So I’m going to use the Background Erase method to cut the children out of the background. Here’s how to do it step by step.Copy the photo
Firstly, use Ctrl+C to copy the photo to the clipboard - there is no need to paste it anywhere at the moment as we shall use it later when we paste it behind the cut-out children.Background Erase
Xara Photo & Graphic Designer can do an automatic background erase, but it needs some hints as to what is the foreground and what is the background. So it’s necessary to mask an approximate area of the forground, erase some of the background, and then ask the program to do the rest, using those hints.Masking your subject
Select the Mask Painter Tool and paint over the parts of the foreground you want to keep. Ensure that you do not mask over any background area, although it’s OK to go off the edge of the photo. You can cover larger areas quickly whilst zoomed out as the mask brush will appear larger (relative to the smaller image). It is always advisable to zoom in on the image to paint over the more intricate areas as the brush will appear smaller (relative to the image) and will be easier to cover closer to the required edge. It’s only necessary to more carefully mask areas that have little contrast with the background. If you make a mistake hold Shift and move the brush to erase the erroneous mask. Tip: Be sure to cover the various different shades of color in the subject you wish to keep. However, if the subject is all a similar colour then you only need to cover part of it with the mask. Zoom in to mask the smaller, more intricate areas of your photo. (It’s not normally necessary to mask with this much accuracy, but in areas of low contrast between foregound & background it helps.)Erasing the background
The next step is to erase the bits of the photo that you do not want. Select the Eraser tool and again zoom out to cover the larger areas and zoom in to cover the more intricate sections. When you are happy with it select the ‘Erase background’ button on Erase Tool Infobar top right. Having masked the foreground and erased most of the of the background, select the ‘Erase Background’ button After the program has done its magic, sometimes there are stubborn bits that still need to be erased or adjusted so you may need to do a ‘Post erase touch-up’. With the Eraser tool still selected simply brush over those unwanted bits of background. Or you can Undo the background erase, to show the mask again, then make further adjustsments to the mask or erased parts before selecting ‘Erase background’ again. Tip: If you adjust the Softness slider to be non-zero, this tool now becomes a soft eraser with softer, feathered edges.Combine the two photos and adjust the background
Select the current photo and select Ctrl+Shft+V to ‘paste in place’ (i.e. it’s original position) the previously copied photo on top of the cut-out photo. Now select the Photo Tool to customise the photo that is on the top. I wanted a black and white photo so I set the saturation to be -100. I also wanted to blur the background so that the children would be sharp against a blurred background. The blur/sharpness slider only goes down to -100 but you can manually enter large (negative) values, so I typed in the number -200. Now go into the Selector tool and with the photo selected, go to Arrange>Put to back or use Ctrl+B. The colored cut-out of the children is now at the front, on top of the black and white, blurred photo. If necessary you can just drag the foregound children image around to position it accurately. The finished photoSaving your photo
You can now save your photo and print it to be put in a frame or share it in many other ways. Just select Save or Save As... to save the photo. It will be saved at the same pixel size as you see at 100% zoom - which, if you’ve not adjusted the size, will be the same pixel dimensions of the original. The file was opened as a photo jpg type so it will automatically combine the background and cut-out and save it as a jpg, without the need to ‘group’ the two photo.Non-destructive saves
After editing a photo and then saving it back, it replaces the original JPG so your photo will be replaced. This is a destructive operation. Besides losing your original photo it is not good for another reason - each time you save a JPG it gets distorted slightly - this is because JPGs use ‘lossy’ compression - the image loses a bit of fidelity every time you save. So if you open a saved JPG you’re starting with a slightly worse quality image. Each open-edit-save cycle makes it worse. Using Xara it doesn’t have to be this way. When you save a JPG you are prompted to save the original file. This is like keeping the original negative (in old film speak). With the negative you could always start from the original and re-do any changes you want. You can elect to save the original alongside your edited JPG, then the next time you wish to edit that JPG, Xara recovers the original master instead, with all the edits you’ve done to the image. This means no lossy cumulative distortion, no matter how many times you open and save that JPG. It also means you can change your mind and undo or adjust any of the edits you’ve done previously. The really smart thing is that if you open the edited JPG into Xara, it finds and restores this original edited file to work on, which in this case will have the two layers, so you can now continue editing, with no loss of quality.Creating your Greetings Card
I will now add some text and snowflakes to the photo to create a seasonal card, like this: The finished card Select File>New>A4 portrait (blank) or select Ctrl-N to open a new document. (Or you can select whichever size document you want or change the size in File>page options.) Drag your saved photo onto the page and position it on the bottom half. With the Text tool selected, position your cursor and type your text. It will usually come out far too small on a hi-res photo, so just use the Selector tool and drag to make it approximately the correct size. I also changed the text color to white by clicking on the white ‘diamond’ on the color line. I want a hand writing style font, so I will search for an appropriate font from the 700 or more Google fonts that are available to be downloaded and installed. With the Text tool still selected, go to the drop down list of fonts and choose ‘Add’ link at the top of the Google Fonts section of the font list. Finding and adding a Google font I selected the ‘All handwriting’ check box, to view all the handwriting styles, and chose a font called ‘Amatic SC’ and clicked to ‘install’ which then downloaded and was added to my list of available fonts in Xara Designer.Add a shadow
I added a shadow to the text to lift it off the page - using the Selector tool, select the text and then click on the Shadow tool . Just drag on the text to create a drop shadow Use the transparency slider to adjust the transparency of the shadow. I set mine on 25%. I then added a strapline in another font. Text with a shadow addedSnowflakes
The recently added free stock illustration library is a great source of clipart, such as snowflakes. Go to File > New from Content Catalogue. Select Stock Illustrations and then search for ‘snowflakes’. One of the illustrations is a sheet of 20 difference shape snowflakes. Some snowflake clipart Select ‘Import’. With the sheet of stars selected, click on the white color on the color line to change their color then click Ctrl+U to ungroup the snowflakes so that they can be moved individually. Simply drag and drop the snowflakes onto the picture - resize as necessary. Tip: A quick way to make a copy of a snowflake is to right-click-hold on the mouse button and drag on it. That’s it! Now the document can be printed out and folded in half to make a greetings card. The finished Greetings card, alongside are some of the unused stars from the sheet in the Content Catalogue Xara Photo & Graphic Designer is a flexible and time-saving all-in-one creative tool that provides a wide range of photo editing and enhancement, illustration and graphic design features. At an unbeatable value for money price, it’s ideal for private and professional use: at home, in clubs, in academic institutions, and at work. For more features you. Download a free trial version and give it a try.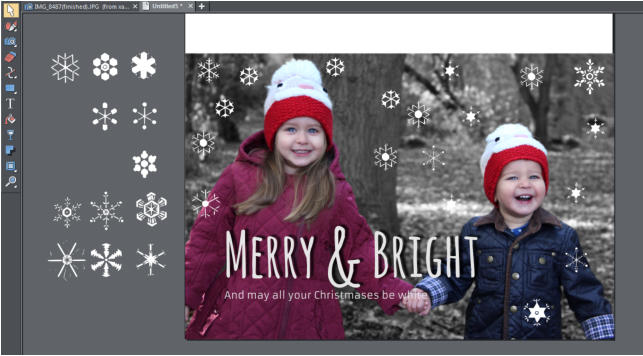


Copyright © 2015 Xara Group Limited.
Page created with Xara Designer Pro

We all take photos of our family or friends and often we would like to
share or view them in our homes, rather than sharing in a fleeting
moment online with social media. A perfect way to share a special
photo is to print it out and frame it or use it in a greetings card. Very
often the photos we take have other people in the background or
they may have other objects that you would wish to remove.
I’m going to show you how to be creative with your photos for use as
an attractive photo in a frame or as a greetings card, by making the
background only be black and white and blurred like this:
Black & white, blurred background
I’m using Xara Photo & Graphic Designer which is a high-powered
general purpose photo editing and graphics creation tool. You can
follow this tutorial to create your own unique, personalised photos
easily with Xara Photo & Graphic Designer. Download a free trial
version and give it a try.
Opening a photo for editing
You can open a photo for editing in one of the following ways: 1. Select the menu File > Open and select a JPG or any other image file you want to edit or 2. Select the menu File > New > Blank Photo and then drag a file from your file manager onto the blank Xara window. or... 3. Simply drag a photo file onto the title bar of Xara Designer. In each case this will open the photo as a Photo Document. Photo Documents (as opposed to a normal print document or web document) will show images at their full size, so when viewing at 100% zoom, you’re seeing all the pixels in the image. Also the dimension units are set to pixels, and there is no white page background - the image is placed on a dark pasteboard area. The other major benefit of a Photo Document type is that if you load a JPG photo this way, a Save operation will default to saving the file back as a JPG. (along with a Master files in a Masters folder, so you can make further edits or even undo edits later). Left - The original photo. Right - I will remove the background people and change the background colors.Removing unwanted objects or people
The first thing I want to do with my photo is to remove the people in the top right as they are a distraction. I want the photo to focus purely on the children. There are two ways to do this. The quickest way is to use the Photo Heal Tool as it’s a single step operation. Select the Photo Heal tool and then hold down your mouse button and brush over the area that you wish to remove. When you have finished, release the mouse button and Xara Designer will automatically erase the ‘brushed’ area. If you are not happy with the result, select the Magic erase button on the InfoBar, for the program to make another attempt. You can make as many attempts as you wish and simply press the undo or redo button to decide on your final choice. Using the photo heal tool to paint over the area I want erased. With the Photo Heal tool still selected, move the feather slider control (top right on the InfoBar) to blend the new area in with the original photo - I set mine to 13px. The alternative way to remove unwanted objects is to use the Clone Tool on the Photo Tool flyout. Select the Clone tool, draw an outline around the objects that you wish to remove, then select the ‘magic erase’ button on the top InfoBar. Use the feather slide control to blend the edge of the new area with the original photo. With the Clone tool you can also drag the new area so that it copies an existing area of the photo. Instead of selecting the Magic Erase button, click on the pointer in the area that you wish to eliminate and keep it selected whilst dragging the section around until you find a suitable area to make your photo look right. See Magic Erase tutorial Tip - You don’t have to be too exact when drawing around the object that you wish to eliminate; it’s better to leave a gap around it as this gives Xara Designer a clue as to the background that should be filled in. People in the background ‘erased’ with the Photo Heal toolChanging the background
I now wish to de-emphasise the background by making it black and white, and blur it a little more, leaving the children in color. To do this I’m going to cut the children out of the background, set the whole image to be black and white, with some blur, and then paste the cut- out children back on top. I could use the new Magnetic Lasso method to select the children but I will show you another method, which is more appropriate when your subject has colors in areas that blend with the background colors or the subject has complex shapes such as fur, hair, trees etc, that would be tedious, or impossible to mask manually. So I’m going to use the Background Erase method to cut the children out of the background. Here’s how to do it step by step.Copy the photo
Firstly, use Ctrl+C to copy the photo to the clipboard - there is no need to paste it anywhere at the moment as we shall use it later when we paste it behind the cut-out children.Background Erase
Xara Photo & Graphic Designer can do an automatic background erase, but it needs some hints as to what is the foreground and what is the background. So it’s necessary to mask an approximate area of the forground, erase some of the background, and then ask the program to do the rest, using those hints.Masking your subject
Select the Mask Painter Tool and paint over the parts of the foreground you want to keep. Ensure that you do not mask over any background area, although it’s OK to go off the edge of the photo. You can cover larger areas quickly whilst zoomed out as the mask brush will appear larger (relative to the smaller image). It is always advisable to zoom in on the image to paint over the more intricate areas as the brush will appear smaller (relative to the image) and will be easier to cover closer to the required edge. It’s only necessary to more carefully mask areas that have little contrast with the background. If you make a mistake hold Shift and move the brush to erase the erroneous mask. Tip: Be sure to cover the various different shades of color in the subject you wish to keep. However, if the subject is all a similar colour then you only need to cover part of it with the mask. Zoom in to mask the smaller, more intricate areas of your photo. (It’s not normally necessary to mask with this much accuracy, but in areas of low contrast between foregound & background it helps.)Erasing the background
The next step is to erase the bits of the photo that you do not want. Select the Eraser tool and again zoom out to cover the larger areas and zoom in to cover the more intricate sections. When you are happy with it select the ‘Erase background’ button on Erase Tool Infobar top right. Having masked the foreground and erased most of the of the background, select the ‘Erase Background’ button After the program has done its magic, sometimes there are stubborn bits that still need to be erased or adjusted so you may need to do a ‘Post erase touch-up’. With the Eraser tool still selected simply brush over those unwanted bits of background. Or you can Undo the background erase, to show the mask again, then make further adjustsments to the mask or erased parts before selecting ‘Erase background’ again. Tip: If you adjust the Softness slider to be non-zero, this tool now becomes a soft eraser with softer, feathered edges.Combine the two photos and adjust the background
Select the current photo and select Ctrl+Shft+V to ‘paste in place’ (i.e. it’s original position) the previously copied photo on top of the cut- out photo. Now select the Photo Tool to customise the photo that is on the top. I wanted a black and white photo so I set the saturation to be -100. I also wanted to blur the background so that the children would be sharp against a blurred background. The blur/sharpness slider only goes down to -100 but you can manually enter large (negative) values, so I typed in the number -200. Now go into the Selector tool and with the photo selected, go to Arrange>Put to back or use Ctrl+B. The colored cut-out of the children is now at the front, on top of the black and white, blurred photo. If necessary you can just drag the foregound children image around to position it accurately. The finished photoSaving your photo
You can now save your photo and print it to be put in a frame or share it in many other ways. Just select Save or Save As... to save the photo. It will be saved at the same pixel size as you see at 100% zoom - which, if you’ve not adjusted the size, will be the same pixel dimensions of the original. The file was opened as a photo jpg type so it will automatically combine the background and cut-out and save it as a jpg, without the need to ‘group’ the two photo.Non-destructive saves
After editing a photo and then saving it back, it replaces the original JPG so your photo will be replaced. This is a destructive operation. Besides losing your original photo it is not good for another reason - each time you save a JPG it gets distorted slightly - this is because JPGs use ‘lossy’ compression - the image loses a bit of fidelity every time you save. So if you open a saved JPG you’re starting with a slightly worse quality image. Each open-edit-save cycle makes it worse. Using Xara it doesn’t have to be this way. When you save a JPG you are prompted to save the original file. This is like keeping the original negative (in old film speak). With the negative you could always start from the original and re-do any changes you want. You can elect to save the original alongside your edited JPG, then the next time you wish to edit that JPG, Xara recovers the original master instead, with all the edits you’ve done to the image. This means no lossy cumulative distortion, no matter how many times you open and save that JPG. It also means you can change your mind and undo or adjust any of the edits you’ve done previously. The really smart thing is that if you open the edited JPG into Xara, it finds and restores this original edited file to work on, which in this case will have the two layers, so you can now continue editing, with no loss of quality.Creating your Greetings Card
I will now add some text and snowflakes to the photo to create a seasonal card, like this: The finished card Select File>New>A4 portrait (blank) or select Ctrl-N to open a new document. (Or you can select whichever size document you want or change the size in File>page options.) Drag your saved photo onto the page and position it on the bottom half. With the Text tool selected, position your cursor and type your text. It will usually come out far too small on a hi-res photo, so just use the Selector tool and drag to make it approximately the correct size. I also changed the text color to white by clicking on the white ‘diamond’ on the color line. I want a hand writing style font, so I will search for an appropriate font from the 700 or more Google fonts that are available to be downloaded and installed. With the Text tool still selected, go to the drop down list of fonts and choose ‘Add’ link at the top of the Google Fonts section of the font list. Finding and adding a Google font I selected the ‘All handwriting’ check box, to view all the handwriting styles, and chose a font called ‘Amatic SC’ and clicked to ‘install’ which then downloaded and was added to my list of available fonts in Xara Designer.Add a shadow
I added a shadow to the text to lift it off the page - using the Selector tool, select the text and then click on the Shadow tool . Just drag on the text to create a drop shadow Use the transparency slider to adjust the transparency of the shadow. I set mine on 25%. I then added a strapline in another font. Text with a shadow addedSnowflakes
The recently added free stock illustration library is a great source of clipart, such as snowflakes. Go to File > New from Content Catalogue. Select Stock Illustrations and then search for ‘snowflakes’. One of the illustrations is a sheet of 20 difference shape snowflakes. Some snowflake clipart Select ‘Import’. With the sheet of stars selected, click on the white color on the color line to change their color then click Ctrl+U to ungroup the snowflakes so that they can be moved individually. Simply drag and drop the snowflakes onto the picture - resize as necessary. Tip: A quick way to make a copy of a snowflake is to right-click- hold on the mouse button and drag on it. That’s it! Now the document can be printed out and folded in half to make a greetings card. The finished Greetings card, alongside are some of the unused stars from the sheet in the Content Catalogue Xara Photo & Graphic Designer is a flexible and time-saving all-in-one creative tool that provides a wide range of photo editing and enhancement, illustration and graphic design features. At an unbeatable value for money price, it’s ideal for private and professional use: at home, in clubs, in academic institutions, and at work. For more features you. Download a free trial version and give it a try.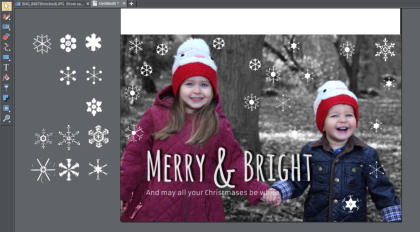


Copyright © 2015 Xara Group Limited.
Page created with Xara Designer Pro
CREATIVE PHOTOS & GREETINGS CARDS
CREATIVE PHOTOS & GREETINGS CARDS
CREATIVE PHOTOS & GREETINGS CARDS
CREATIVE PHOTOS & GREETINGS CARDS