


 © Xara Group 2010
Creating a photo collage
© Xara Group 2010
Creating a photo collage In this tutorial I’m going to show you how to create a photo collage. It’s really quite easy.
1) Select the Rectangle tool, create a rectangle that is the background of the 'Polaroid' style image. Give this a pale gray fill (e.g. 10% black from
the color bar) and no outline color.
2) Add a second white rectangle on top of this. Make sure the margins are exactly even around the left, top and right side. Fill color white, no
outline color. This will contain the photo.
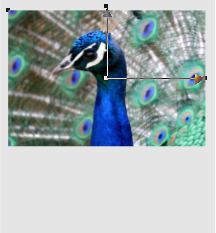
3) Next we’re going to add a photo, just drag in the photo, hold down the Shift key and drop it on the white rectangle. You can resize and rotate
the photo within the rectangle by dragging the fill handles. To re-position your new photo, simply drag anywhere on the photo (in the Fill tool
which will be selected after you've dropped the photo).
Tip: Holding down just the Ctrl key on its own constrains the rotation to 45 degree increments from its starting position, which makes resizing
the image within the fill easier because it doesn’t rotate easily when expanding and shortening the fill arrows.
In this tutorial I’m going to show you how to create a photo collage. It’s really quite easy.
1) Select the Rectangle tool, create a rectangle that is the background of the 'Polaroid' style image. Give this a pale gray fill (e.g. 10% black from
the color bar) and no outline color.
2) Add a second white rectangle on top of this. Make sure the margins are exactly even around the left, top and right side. Fill color white, no
outline color. This will contain the photo.
3) Next we’re going to add a photo, just drag in the photo, hold down the Shift key and drop it on the white rectangle. You can resize and rotate
the photo within the rectangle by dragging the fill handles. To re-position your new photo, simply drag anywhere on the photo (in the Fill tool
which will be selected after you've dropped the photo).
Tip: Holding down just the Ctrl key on its own constrains the rotation to 45 degree increments from its starting position, which makes resizing
the image within the fill easier because it doesn’t rotate easily when expanding and shortening the fill arrows.

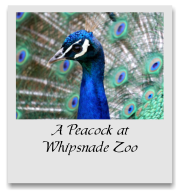


 Photo Collage Tutorial


 Fill arrows


