


 © Xara Group 2010
Make text appear to flow along a curve or around a circle
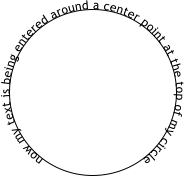
In this tutorial I’m going to show you how to make text appear to flow along a curve or around a circle. In fact, it’s really quite easy.
© Xara Group 2010
Make text appear to flow along a curve or around a circle
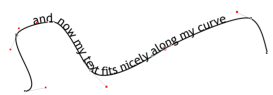
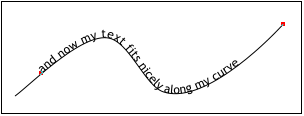
In this tutorial I’m going to show you how to make text appear to flow along a curve or around a circle. In fact, it’s really quite easy. Text flow along a curve
So these are the steps you would take to create this heading from scratch.
1. Select the Freehand tool, draw your line.
2. Select the line and click on the Text tool, click directly on the line where you want the text to start - a small red square should appear
indicating the start point - and type your sentence.
3. You can still edit both the line and the text - try changing the curve using the Shape editor tool either by nudging the line or moving the red
handles as shown below. You’ll see the text flows along the new curve automatically.
Equally, if you go into the Text tool, you can still add or delete words and the text adjusts along the line. Also if you grab the red square at the
start of the text you can drag the whole sentence along the curve. And you can left/right/center align text within the start and end red squares.
Text flow along a curve
So these are the steps you would take to create this heading from scratch.
1. Select the Freehand tool, draw your line.
2. Select the line and click on the Text tool, click directly on the line where you want the text to start - a small red square should appear
indicating the start point - and type your sentence.
3. You can still edit both the line and the text - try changing the curve using the Shape editor tool either by nudging the line or moving the red
handles as shown below. You’ll see the text flows along the new curve automatically.
Equally, if you go into the Text tool, you can still add or delete words and the text adjusts along the line. Also if you grab the red square at the
start of the text you can drag the whole sentence along the curve. And you can left/right/center align text within the start and end red squares.

 It’s easy to make text appear to flow along the curve or around a circle


 A small red square indicating the start point of the sentence


 Edit the line by moving the red handles
 Use the red square to drag the whole sentence along the curve.