


 © Xara Group 2010
Text flow around a circle
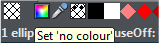
1. Draw a circle (tip, hold down the Ctrl key to keep it perfectly rounded) and set the fill to no color (with the circle selected left click on ‘No
© Xara Group 2010
Text flow around a circle
1. Draw a circle (tip, hold down the Ctrl key to keep it perfectly rounded) and set the fill to no color (with the circle selected left click on ‘No Color’ on the color line).
Tip: if you don’t now see a circle then maybe you have line width set to 0. Change it to 1pix and the circle will appear.
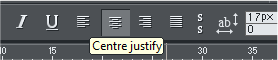
2. Next, type the text on a separate single line, above the circle and apply center justification.
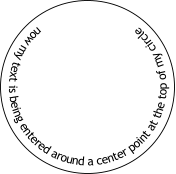
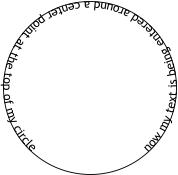
3. Select both the text and the circle using the Selector tool. Select Arrange > Fit Text to Curve. The text will appear wrapped around the
bottom of the circle.
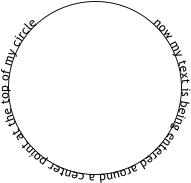
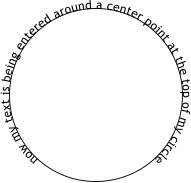
4. Now, to make the text appear at the top of the circle, use the Selector tool and rotate the circle until the text appears at the top.
5. If you want to make the text go on the inside of the circle, right click on it and select Reverse Text on Curve (or use the Shape editor 'reverse
path icon’).
So by rotating the circle and applying the reverse commands you can get all sorts of combination of text, centered on the top or bottom, inside
or outside the circle.
6. As above, you can use baseline shift to move the text above or below the line, and tracking to adjust the letter spacing.
7. And again you can make the line invisible by selecting 'clear line color' from the color line (you can still see the line using the view quality
slider if necessary).
Color’ on the color line).
Tip: if you don’t now see a circle then maybe you have line width set to 0. Change it to 1pix and the circle will appear.
2. Next, type the text on a separate single line, above the circle and apply center justification.
3. Select both the text and the circle using the Selector tool. Select Arrange > Fit Text to Curve. The text will appear wrapped around the
bottom of the circle.
4. Now, to make the text appear at the top of the circle, use the Selector tool and rotate the circle until the text appears at the top.
5. If you want to make the text go on the inside of the circle, right click on it and select Reverse Text on Curve (or use the Shape editor 'reverse
path icon’).
So by rotating the circle and applying the reverse commands you can get all sorts of combination of text, centered on the top or bottom, inside
or outside the circle.
6. As above, you can use baseline shift to move the text above or below the line, and tracking to adjust the letter spacing.
7. And again you can make the line invisible by selecting 'clear line color' from the color line (you can still see the line using the view quality
slider if necessary).

 left click on ‘No Color’ on the Color Line


 Text initially appears on the wrong side of the circle
 Rotate the circle for the text to appear at the top

 Text on the inside of the circle

 Adjust baseline shift and tracking
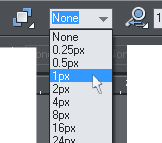
 Set the line width from the drop down menu