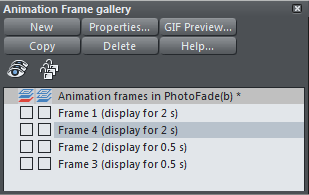
 17. With Frame 1 highlighted, click the Copy button. This creates a new Frame 4 at the top. Now carefully drag this Frame 4 down the Animation Frame
Gallery and drop it below the Frame 1. It should look like this now.
Now preview your animation again. And you'll see the first image stays static for 1 second, and then takes 1 second to spin away. It doesn't matter
that Frame 4 appears before Frame 1 - the names are irrelevant when playing. You can rename the Frame in the Properties dialog and click, say to
Frame 0 and click Apply. The reason this causes a pause is that there is no difference between Frame 0 and Frame 1, so no animation occurs. It just
displays the static image for 1 second before it moves onto Frame 1 and start spinning.
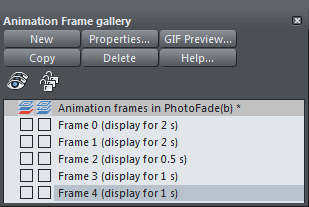
18. Do the same to Frame 3. First change the display period to 1 second. Now Copy this frame as before to make a new Frame 4. Your Animation Frame
Gallery should look like this now
Preview your animation and you'll see the last frame now also stays around for 1 second. As an exercise change the static periods to keep the photos on
screen for longer. Also you might note the second photo spins back rather faster. Why should be obvious. See if you can fix this.
So we now have a nice animation, but when it transitions from the end to the start it's not a smooth transition. So to complete the cycle we need to
fade from the second photo back to the first.
19. With frame 4 selected, copy this to create Frame 5. And now adjust the transparency of the second photo so it's 90% transparent. Resize and rotate
so it's a small almost invisible image. Remember to hold Shift down when resizing to ensure it resizes around the center point.
20. Select Frame 0 and copy the first bitmap to the clipboard. Select the last frame, 5, and Paste in Place (Ctrl+Shift+V).
21. Now also resize, rotate and adjust the transparency. So now both images are small and almost invisible.
22. Copy frame again, to create Frame 6.
23. Delete both objects, so the page is blank. And now Paste in Place (Ctrl+Shift+V) again. This should put the full size first photo back exactly where it
is in Frame 0 (because you copied in step 21)
24. Your animation is now complete. Preview it.
As a last small point, you might notice that the first photo stays on screen for twice as long. Can you work out why?
Answer: Because it's displayed on the last frame for 1 second, before cycling around to the first frame, which is also up for one second. To solve this
you could either just delete frame 0 (select it and click the Delete button in the Animation Frame Gallery), or you could adjust the display time of the
last frame to be 0.
Tip: As with Photos in the .xar file it doesn't matter how many times you use a photo in the Flash animation, the file gets hardly any larger.
Tip: You can add numbers or text onto your key frames to help you understand where you are in your sequence. The text will appear at the start of the
key-frame and vanish at the start of the next.
17. With Frame 1 highlighted, click the Copy button. This creates a new Frame 4 at the top. Now carefully drag this Frame 4 down the Animation Frame
Gallery and drop it below the Frame 1. It should look like this now.
Now preview your animation again. And you'll see the first image stays static for 1 second, and then takes 1 second to spin away. It doesn't matter
that Frame 4 appears before Frame 1 - the names are irrelevant when playing. You can rename the Frame in the Properties dialog and click, say to
Frame 0 and click Apply. The reason this causes a pause is that there is no difference between Frame 0 and Frame 1, so no animation occurs. It just
displays the static image for 1 second before it moves onto Frame 1 and start spinning.
18. Do the same to Frame 3. First change the display period to 1 second. Now Copy this frame as before to make a new Frame 4. Your Animation Frame
Gallery should look like this now
Preview your animation and you'll see the last frame now also stays around for 1 second. As an exercise change the static periods to keep the photos on
screen for longer. Also you might note the second photo spins back rather faster. Why should be obvious. See if you can fix this.
So we now have a nice animation, but when it transitions from the end to the start it's not a smooth transition. So to complete the cycle we need to
fade from the second photo back to the first.
19. With frame 4 selected, copy this to create Frame 5. And now adjust the transparency of the second photo so it's 90% transparent. Resize and rotate
so it's a small almost invisible image. Remember to hold Shift down when resizing to ensure it resizes around the center point.
20. Select Frame 0 and copy the first bitmap to the clipboard. Select the last frame, 5, and Paste in Place (Ctrl+Shift+V).
21. Now also resize, rotate and adjust the transparency. So now both images are small and almost invisible.
22. Copy frame again, to create Frame 6.
23. Delete both objects, so the page is blank. And now Paste in Place (Ctrl+Shift+V) again. This should put the full size first photo back exactly where it
is in Frame 0 (because you copied in step 21)
24. Your animation is now complete. Preview it.
As a last small point, you might notice that the first photo stays on screen for twice as long. Can you work out why?
Answer: Because it's displayed on the last frame for 1 second, before cycling around to the first frame, which is also up for one second. To solve this
you could either just delete frame 0 (select it and click the Delete button in the Animation Frame Gallery), or you could adjust the display time of the
last frame to be 0.
Tip: As with Photos in the .xar file it doesn't matter how many times you use a photo in the Flash animation, the file gets hardly any larger.
Tip: You can add numbers or text onto your key frames to help you understand where you are in your sequence. The text will appear at the start of the
key-frame and vanish at the start of the next.


 © Xara Group 2011