


 1. Create a new blank animation document (File >New >Animation).
2. Drag and drop the first photo onto the blank page.
3. Select the photo and give it a name. Click the 'Names' icon.
4. Create the second key frame by clicking the Copy frame button.
5. Rotate and resize the photo (tip: hold Shift while doing this to resize it around the center).
6. Adjust the transparency. In Transparency tool just drag the slider to be 90% transparent.
7. Click the preview button to
see the first stage of your animation. That's the first photo spinning away and fading. Now we'll spin the new
photo in.
8. Drag and drop your second photo onto the page.
9. Click on 'Names' icon and give it a new name.
10. Copy it to the clipboard (you'll need this later).
11. Rotate, resize and fade the photo as you did the first. Place it on top of the, just visible, first photo.
12. Create a third key-frame by clicking the 'copy frame' button again.
13. Delete both of the small photos and Paste the second photo you copied at step 10. The reason for this is that we no longer need the original photo
1, and we need to replace the second small photo with the original full size version, so the animation sequence from Frame 2 to 3 goes from the small
rotated Photo 2 back to the full size version.
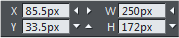
14. Position the full sized photo so it's in exactly the same position as the original one on frame 1.
You can do this by clicking on Frame 1 in the Animation Frame Gallery, taking a note of the XY coordinates, and then click back onto frame 3 and
entering those same coordinates. This ensures that when the second photo spins back it ends up at the exact same position as the original.
15. Preview your flash animation by clicking so now photo 2 spins back to full size. Neither photo stays around for any time and it repeats the
whole animation. So let's now slow things down and put pauses in.
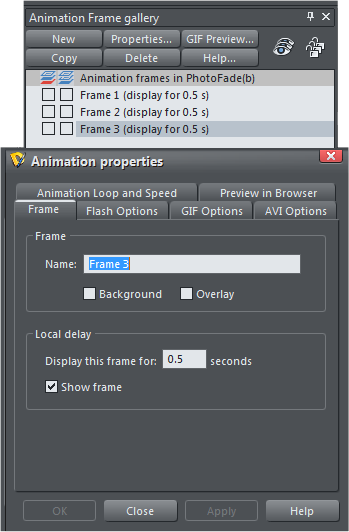
16. You can see that each frame has a [display for 50cs] which means it takes half a second for each animation sequence between key-frames. To slow
down the animation of the first stage click on "Frame 1 title" and then the Properties button to display the Animation Properties dialog.
On the Frame tab, change the display period to be 100cs. Click "Apply" and then preview your animation.
By clicking the Apply button the dialog remains on screen, which saves a lot of time if wanting to change the time or other parameters on lots of
frames.
Now lets hold the first image static for 2 second before it spins away.
1. Create a new blank animation document (File >New >Animation).
2. Drag and drop the first photo onto the blank page.
3. Select the photo and give it a name. Click the 'Names' icon.
4. Create the second key frame by clicking the Copy frame button.
5. Rotate and resize the photo (tip: hold Shift while doing this to resize it around the center).
6. Adjust the transparency. In Transparency tool just drag the slider to be 90% transparent.
7. Click the preview button to
see the first stage of your animation. That's the first photo spinning away and fading. Now we'll spin the new
photo in.
8. Drag and drop your second photo onto the page.
9. Click on 'Names' icon and give it a new name.
10. Copy it to the clipboard (you'll need this later).
11. Rotate, resize and fade the photo as you did the first. Place it on top of the, just visible, first photo.
12. Create a third key-frame by clicking the 'copy frame' button again.
13. Delete both of the small photos and Paste the second photo you copied at step 10. The reason for this is that we no longer need the original photo
1, and we need to replace the second small photo with the original full size version, so the animation sequence from Frame 2 to 3 goes from the small
rotated Photo 2 back to the full size version.
14. Position the full sized photo so it's in exactly the same position as the original one on frame 1.
You can do this by clicking on Frame 1 in the Animation Frame Gallery, taking a note of the XY coordinates, and then click back onto frame 3 and
entering those same coordinates. This ensures that when the second photo spins back it ends up at the exact same position as the original.
15. Preview your flash animation by clicking so now photo 2 spins back to full size. Neither photo stays around for any time and it repeats the
whole animation. So let's now slow things down and put pauses in.
16. You can see that each frame has a [display for 50cs] which means it takes half a second for each animation sequence between key-frames. To slow
down the animation of the first stage click on "Frame 1 title" and then the Properties button to display the Animation Properties dialog.
On the Frame tab, change the display period to be 100cs. Click "Apply" and then preview your animation.
By clicking the Apply button the dialog remains on screen, which saves a lot of time if wanting to change the time or other parameters on lots of
frames.
Now lets hold the first image static for 2 second before it spins away.


 © Xara Group 2011