


© Xara Group Limited


Adding a Laurel Wreath with a Graduated Fill and Embossed Effect.
Drag in the wreath graphic from the medal folder in your Design Gallery onto a new area of your page. It is best to work on the wreath separately from
the medal and then we will position it later.
We will add a three point linear fill as before. Select the Fill tool and drag a line vertically from the top to the bottom of the wreath. Double-click just
below the centre of the fill arrow to add a color change marker. Select the start of the fill arrow line then click on the 'Gold link 4', click on the newly
added middle marker and then select 'Gold link 1', and click on the end of the fill arrow and apply the color 'Gold'.
Tip 4: In the Fill tool when you have selected a color marker on the fill arrow, you can use the Tab key to cycle around the fill stops
Now we will add a small drop shadow to the wreath. With the wreath selected still (status line will show '1 group') select the Shadow tool and
then using the tool's Infobar, the second 'wall shadow' button and then use the slider controls to set it to 50% transparency, with a blur of 1.4px
and a 0.7px X and Y offset.
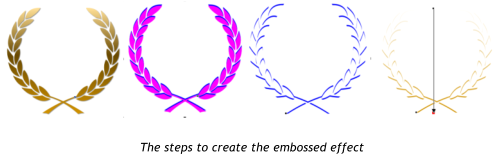
Select the wreath and create a clone copy with Ctrl+K. Drag the copy clear of the original to an empty area of the page.
We're going to create top edge highlight the same way as we did before. First remove the shadow from this version: select the Shadow tool and click
the 'no shadow' icon on the tool's Infobar at the top (1st icon on the bar). Now color the whole thing blue by simply clicking the blue color on the color
line (the only reason to make them a bright color is that it's easier to see what's what).
Clone it again (Ctrl+k) and make the new copy a magenta color. Now nudge the magenta version down 2 pixels with the down arrow key.
You can see the magenta copy shift down a couple of pixels to reveal the blue copy under.
Use the same technique as before to select both groups (zoom in and Shift+click on the blue. You want the status line to show '2 groups. Now Subtract
the top magenta one from the lower blue one using Arrange -> Combine Shapes -> Subtract, (or simply Ctrl+2.) You should be left with this.
In the Fill tool, drag a vertical fill arrow top to bottom, and set the start color to be white (should be already), and the end color (click the end of the
arrow) to be 'Gold' by clicking the 'Gold' from the color line.
We're now going to move this highlight back on top of the original wreath. This template has the 'snap' switched on (see
on top infobar) so when
you drag the new outlines over the original, it will snap in place. Now zoom in (Ctrl+wheel, to about 500% or more) and use the arrow keys to adjust the
position of the highlight to it's exactly on the top edge of the wreath leaves. It will probably require just a single pixel nudge upwards). This is the final
zoomed in view you want.
Zoom out and select the whole object. If you have the correct things selected the status line
will show '3 objects. Now we'll group these to create a single group (press Ctrl+G).
Tip 5: Whilst you could use the Shift+click technique, probably the easiest way to select all
objects within a given area is to use Lasso-select. In the Selector tool just drag from outside
the top left to below the bottom right of the objects. As you drag you'll see a red border
rectangle.
For a final touch, we'll add an outer glow shadow. With the wreath group selected select the Shadow tool and click on the 'glow' icon (4th on the
Infobar), (it will give it a red glow), set a 56% transparency and a 3.2 pixel blur using the controls.
To change the color of the outer glow, zoom in closely to any section of the wreath, and in the Shows
tool still, just click on the outer red glow area. The status line will change to show '1 shadow' selected.
Now just click the color required, in this case 'Gold link 5'.
The laurel wreath graphic is now complete so, zoom back out and drag it into position over the gold
medal. If you have 'Snap' on still you'll see that as you drag it over the vertical line will mark it as being
exactly over the centre.
The final wreath moved onto the medal.
Adding some Numbers (or text).
As before, we will create the text as an individual element and then drag it onto our gold medal. Select the Text tool and somewhere on the page
background type in '20'. Adjust the font and size as required. I used Palatino Linotype, bold, size118 pixels but you can experiment with different fonts
and different sizes.
Using the Fill tool, add a 3 point linear fill as we have previously done and select 'Gold link 4' for the top, 'Gold link 1' for the middle point and
'Gold' for the bottom end of the fill arrow. Add a wall shadow with a transparency of 50%, a blur of 4 pixels and an X and Y offset of 0.7 pixel.
Tip 6: In the Fill tool when dragging out a fill arrow, if you hold the Ctrl key it will constrain the fill direction to be exactly horizontal or vertical
Start with simple black text and then give it a graduated fill and a subtle shadow.
Emboss the Numbers
For the final touch we will create the relief for the numerals using exactly the same technique as we did for the wreath - clone the number, drag the
copy to a blank area, remove the shadow, color it blue, clone it again, color it magenta, and offset it by 2 pixels down, select both shapes, subtract the
top shape, add a linear fill of white to gold.
Adding the embossed effect with outer glow
Drag the highlight back on top of the original number, zoom in and nudge the new edge highlight up a bit.
There's a subtle improvement that can be made using the Feather control. With the highlight selected still, using the Feather
control on the top bar, give it a 1px feather. This softens the edges of the highlight.
Give the new numbers a glow shadow, the same as before:
(Select both the original number and the new edge, (zoom in and Shift-Click on the edge), group them (Ctrl+G), apply 'glow' shadow type, zoom in and
select the shadow only and apply give it a darker gold color 'Gold link 5' and adjust the blur and transparency of the shadow.
Finally, group all of the objects (lasso select around the whole medal), group it, and apply a wall shadow, in this case 6px blur, 60% transparency, 4px X
and Y offset.
Well done. Award yourself a gold medal!
But don't forget to save your good work. To use the graphic on your printed certificates or web page select File and Export PNG.
And also remember Xara Photo & Graphic Designer is the most flexible and time-saving all-in-one solution for impressive graphics: powerful image
editing, astounding illustration capabilities, professional design templates & extensive desktop publishing (DTP), all in a single intuitive program! It's
ideal for private and professional use: at home, in clubs, in academic institutions, and at work. We hope that you have enjoyed using it and will
continue to do so.