


© Xara Group Limited


Open Xara Photo & Graphic Designer and then double click on the 'work_file.xar' which is one of the files that you have just unzipped. It will open with a pre-defined color palette and a 231 pixel diameter gold circle.
Creating the Medal Reflective Gold Effect
Click Ctrl+K which will create an exact copy of the circle on top of the original circle. Change the number setting in the 'W' (width) on the top Infobar
which will automatically change the height too. (It's not easy to see this copy because it's the exact same color as the one underneath)
We will create a three point graduated color fill on this smaller circle. Firstly, familiarise yourself with the pre-set gold colors that we have provided -
you can see them on the left of the color line at the bottom - you can see their names as you mouse-over them or right click on your mouse to see the
name (this also enables you to edit it the color).
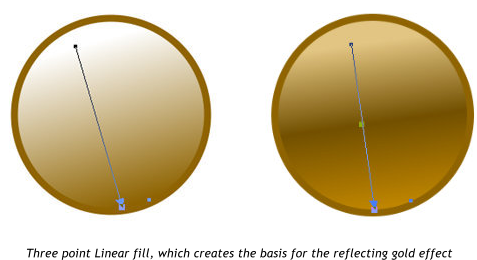
The centre circle should still be selected, (status line will say 1 ellipse) so now select the Fill tool from the left tool bar and then
drag a line down across the circle from a point between 11 and 12 o'clock to 6 o'clock. This creates a simple graduated fill from one
color to another, with a fill arrow showing the direction and extent of the fill. It will look like the left hand circle.
While in the Fill tool still, double click near the centre of the fill arrow line to put a new color stop marker square as a place for a color change.
We'll now change the colors of the graduated fill. Select the square marker at the start of the fill arrow then click on the 'Gold link 4' color on the color
line, click on the centre square marker and then select the 'Gold link 1' color, and finally select the end of the fill arrow and click the 'Gold' color, which
will give you a medal as the right-hand image above.
Creating a Highlight on the Top Edge
Using the Selector tool, carefully click on the large original (outer) circle to select it.
Tip1: You can zoom in, while in any tool, by holding Ctrl and using the mouse wheel. It will help when doing detailed work.
Tip 2: If you're not sure which object is selected then just use the arrow keys to nudge it a bit and then Undo this change with the Undo option (Ctrl+Z)
Now select Ctrl+K to clone the outer shape. (This will place a copy on top of everything, covering the work you've just done. Click on the 'Gold Link 4'
color to fill the circle with this color.
Select the new circle and use Ctrl+K to clone it then fill this with a Black color (click the Black color swatch at the right end of the color line). Using
the cursor keys on your keyboard, press the down arrow twice and then the right arrow twice to nudge the black circle 2 pixels down and 2 pixels to the
right.
Now a slightly tricky part is that we have to select both circles, the black one on top (already selected), and the pale one underneath. There are two
ways to do this:
a) With the top black circle selected, hold the Alt key (mouse pointer turns upside down) and click. This selects the object underneath the selected
object (in this case the pale circle). Then holding Shift click on the black circle to add this to the selection
b) Use Ctrl+mouse wheel to zoom into the top left area, so you can easily see and click on the small pale circle. Then hold Shift and click on the pale
circle underneath
In both cases what you want is for the status line to indicate '2 ellipses' selected
Tip 3: Remember to click on the background to clear the select. Shift+click will add to the select. Alt+click will select the object under the currently
selected object.
We'll now do a shape combining operation to 'subtract' the top black circle from the lower pale one, leaving just a sliver of pale around the top left of
our medal.
From the Arrange Menu, choose Combine Shapes > Subtract Shapes (the keyboard shortcut is Ctrl+2)
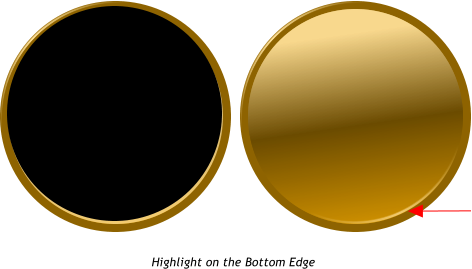
Creating the Bottom Edge Highlight
Use the same technique as the previous step - clone the inner circle with Ctrl+K - the clone is a copy of the graduated circle so, if you drag the color on
it the graduated color will change, however, if you click on the color 'Gold link 4' on the color line then it will become a 'Gold link 4' solid color.
Select to clone again (so there are now 2 copies on top of each other) and select the 'Black' on the color line. Nudge the black one it using your cursor
keys by 3 pixels up and 1 pixel to the left. Again, select both shapes as described above and use the shortcut Ctrl+2 to subtract the black shape, leaving
only a highlight sliver on the lower right of our medal.
a pre-defined color palette and a 231 pixel diameter gold circle.
Creating the Medal Reflective Gold Effect
Click Ctrl+K which will create an exact copy of the circle on top of the original circle. Change the number setting in the 'W' (width) on the top Infobar
which will automatically change the height too. (It's not easy to see this copy because it's the exact same color as the one underneath)
We will create a three point graduated color fill on this smaller circle. Firstly, familiarise yourself with the pre-set gold colors that we have provided -
you can see them on the left of the color line at the bottom - you can see their names as you mouse-over them or right click on your mouse to see the
name (this also enables you to edit it the color).
The centre circle should still be selected, (status line will say 1 ellipse) so now select the Fill tool from the left tool bar and then
drag a line down across the circle from a point between 11 and 12 o'clock to 6 o'clock. This creates a simple graduated fill from one
color to another, with a fill arrow showing the direction and extent of the fill. It will look like the left hand circle.
While in the Fill tool still, double click near the centre of the fill arrow line to put a new color stop marker square as a place for a color change.
We'll now change the colors of the graduated fill. Select the square marker at the start of the fill arrow then click on the 'Gold link 4' color on the color
line, click on the centre square marker and then select the 'Gold link 1' color, and finally select the end of the fill arrow and click the 'Gold' color, which
will give you a medal as the right-hand image above.
Creating a Highlight on the Top Edge
Using the Selector tool, carefully click on the large original (outer) circle to select it.
Tip1: You can zoom in, while in any tool, by holding Ctrl and using the mouse wheel. It will help when doing detailed work.
Tip 2: If you're not sure which object is selected then just use the arrow keys to nudge it a bit and then Undo this change with the Undo option (Ctrl+Z)
Now select Ctrl+K to clone the outer shape. (This will place a copy on top of everything, covering the work you've just done. Click on the 'Gold Link 4'
color to fill the circle with this color.
Select the new circle and use Ctrl+K to clone it then fill this with a Black color (click the Black color swatch at the right end of the color line). Using
the cursor keys on your keyboard, press the down arrow twice and then the right arrow twice to nudge the black circle 2 pixels down and 2 pixels to the
right.
Now a slightly tricky part is that we have to select both circles, the black one on top (already selected), and the pale one underneath. There are two
ways to do this:
a) With the top black circle selected, hold the Alt key (mouse pointer turns upside down) and click. This selects the object underneath the selected
object (in this case the pale circle). Then holding Shift click on the black circle to add this to the selection
b) Use Ctrl+mouse wheel to zoom into the top left area, so you can easily see and click on the small pale circle. Then hold Shift and click on the pale
circle underneath
In both cases what you want is for the status line to indicate '2 ellipses' selected
Tip 3: Remember to click on the background to clear the select. Shift+click will add to the select. Alt+click will select the object under the currently
selected object.
We'll now do a shape combining operation to 'subtract' the top black circle from the lower pale one, leaving just a sliver of pale around the top left of
our medal.
From the Arrange Menu, choose Combine Shapes > Subtract Shapes (the keyboard shortcut is Ctrl+2)
Creating the Bottom Edge Highlight
Use the same technique as the previous step - clone the inner circle with Ctrl+K - the clone is a copy of the graduated circle so, if you drag the color on
it the graduated color will change, however, if you click on the color 'Gold link 4' on the color line then it will become a 'Gold link 4' solid color.
Select to clone again (so there are now 2 copies on top of each other) and select the 'Black' on the color line. Nudge the black one it using your cursor
keys by 3 pixels up and 1 pixel to the left. Again, select both shapes as described above and use the shortcut Ctrl+2 to subtract the black shape, leaving
only a highlight sliver on the lower right of our medal.

The pale colored circle is just showing underneath the black one
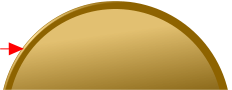
Highlight on the Top Edge