


 Upon opening Xara Designer Pro, it will open a blank A4 page, but it's better to have a postcard as A5 so go to File > Page Options and within the
Page Size tab select A5 from the drop down list and click OK. We also recommend you engage 'magnetic snap' by pressing the red/white
horseshoe icon on the top toolbar as this will be very useful in helping to accurately align all the photos on the postcard.
So to start we’ll create the heading. Select the Text tool and the center alignment option on the editor bar. Click drag with your mouse
from the left edge to the right edge of the page in a straight line to create your 'column' for text. Now enter your text which will
automatically center itself across the page, select 'return' then enter the next line. The default is 10pt arial which you can change.
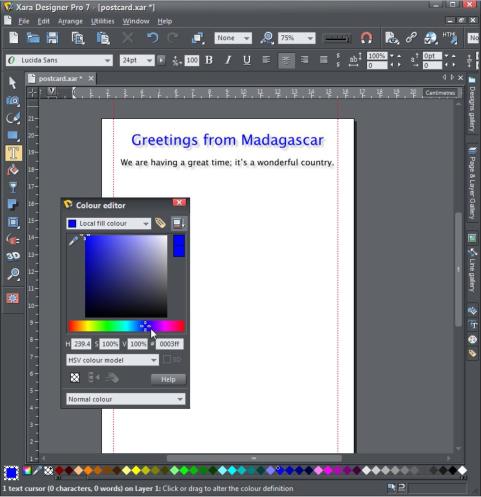
Click, hold and Drag (or triple click) to select the first line of text and then select your font from the drop down list of font styles and sizes. I
chose 24pt Lucinda Sans and 14pt for my second line of text. To give the heading text a color, highlight it and click on one of the squares on the
color line at the bottom of the page or click on the color editor to open it and then select your color. To give it an effect, select the Shadow
tool and on the InfoBar click the button for a wall drop shadow. You can adjust the position under the text by dragging it.
Now for the layout of the photos. Select Ctrl+Shift+R to turn the rulers on. Click on the left ruler, hold down and drag a guideline off the ruler
onto the page to provide a left hand margin and then repeat to create a right hand margin of equivalent width.
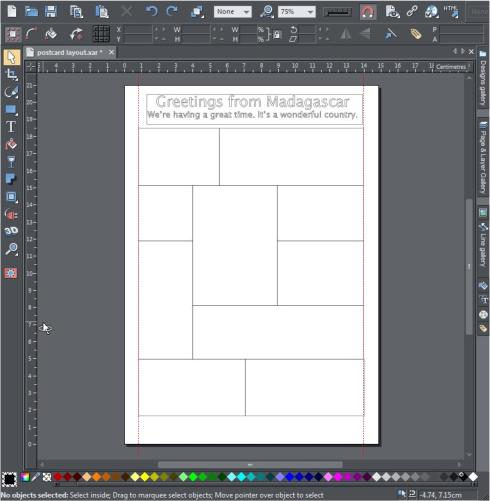
Select the Rectangle tool then set the view quality to outline mode by moving the View quality slider leftwards. This will
show your heading in outline too but don't worry about that as we will change it back later. Draw a rectangle in the upper left side
of the page, to be the position and size of your first photo. You can adjust the size by dragging on one of the corner handles. To add another
rectangle de-select the current one by clicking somewhere off it and then add the next.
Draw all the other rectangles, with a mix of different shapes - some landscape, some portrait and some square. It is visually attractive to have
aligned rows or columns.
There are two ways to adjust your rectangles so the edges align perfectly with the adjoining rectangles and guidelines. With the
Rectangle tool, select the rectangle outline then drag on the corners, or use the Selector tool and drag the center handles in any of the
sides to resize it vertically or horizontally.
To ensure that they are all snapped tightly to their neighbouring rectangle, zoom in to the edges and see that the edges are exactly on
top of each other. Now zoom back out to your working size. (Selecting the magnifying glass on the top toolbar will return you quickly to
your previous size).
At this point you can switch off the ruler by selecting Ctrl+Shift+R and the guidelines by selecting Window > Show guides. Slide the View quality
slider back to the right to return to the full quality view where you will see a page of black rectangles.
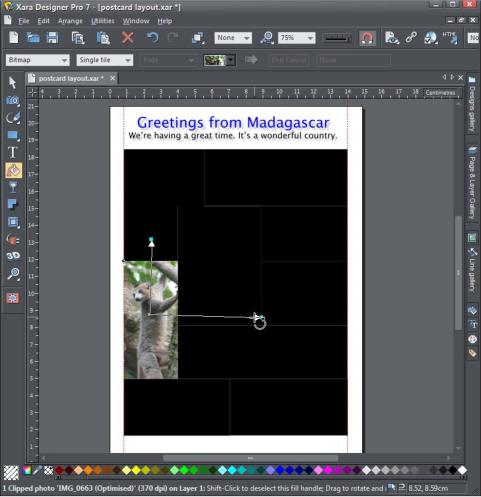
Now you need to populate the rectangles with your photos - ensure you have a selection ready in landscape and portrait format.
If you drag a photo onto the page from your File Explorer it imports it as a new photo on top of the rectangles, which is not what we want so
you need to hold down the Shift key when you drop the photo so that it will fill the rectangle instead. When you release the photo it will
prompt you whether you want to import a reduced version or the original size. It makes sense to select the reduced size since it saves memory
and keeps the file size down.
After dropping a photo, you will be in the Fill tool and you can see 2 little directional arrows that indicate the center point and extent
of the photo fill in the rectangle. You can now adjust the photo size and rotation inside the rectangle by dragging on the ends of the
arrows. Repeat this for all of your photos.
Upon opening Xara Designer Pro, it will open a blank A4 page, but it's better to have a postcard as A5 so go to File > Page Options and within the
Page Size tab select A5 from the drop down list and click OK. We also recommend you engage 'magnetic snap' by pressing the red/white
horseshoe icon on the top toolbar as this will be very useful in helping to accurately align all the photos on the postcard.
So to start we’ll create the heading. Select the Text tool and the center alignment option on the editor bar. Click drag with your mouse
from the left edge to the right edge of the page in a straight line to create your 'column' for text. Now enter your text which will
automatically center itself across the page, select 'return' then enter the next line. The default is 10pt arial which you can change.
Click, hold and Drag (or triple click) to select the first line of text and then select your font from the drop down list of font styles and sizes. I
chose 24pt Lucinda Sans and 14pt for my second line of text. To give the heading text a color, highlight it and click on one of the squares on the
color line at the bottom of the page or click on the color editor to open it and then select your color. To give it an effect, select the Shadow
tool and on the InfoBar click the button for a wall drop shadow. You can adjust the position under the text by dragging it.
Now for the layout of the photos. Select Ctrl+Shift+R to turn the rulers on. Click on the left ruler, hold down and drag a guideline off the ruler
onto the page to provide a left hand margin and then repeat to create a right hand margin of equivalent width.
Select the Rectangle tool then set the view quality to outline mode by moving the View quality slider leftwards. This will
show your heading in outline too but don't worry about that as we will change it back later. Draw a rectangle in the upper left side
of the page, to be the position and size of your first photo. You can adjust the size by dragging on one of the corner handles. To add another
rectangle de-select the current one by clicking somewhere off it and then add the next.
Draw all the other rectangles, with a mix of different shapes - some landscape, some portrait and some square. It is visually attractive to have
aligned rows or columns.
There are two ways to adjust your rectangles so the edges align perfectly with the adjoining rectangles and guidelines. With the
Rectangle tool, select the rectangle outline then drag on the corners, or use the Selector tool and drag the center handles in any of the
sides to resize it vertically or horizontally.
To ensure that they are all snapped tightly to their neighbouring rectangle, zoom in to the edges and see that the edges are exactly on
top of each other. Now zoom back out to your working size. (Selecting the magnifying glass on the top toolbar will return you quickly to
your previous size).
At this point you can switch off the ruler by selecting Ctrl+Shift+R and the guidelines by selecting Window > Show guides. Slide the View quality
slider back to the right to return to the full quality view where you will see a page of black rectangles.
Now you need to populate the rectangles with your photos - ensure you have a selection ready in landscape and portrait format.
If you drag a photo onto the page from your File Explorer it imports it as a new photo on top of the rectangles, which is not what we want so
you need to hold down the Shift key when you drop the photo so that it will fill the rectangle instead. When you release the photo it will
prompt you whether you want to import a reduced version or the original size. It makes sense to select the reduced size since it saves memory
and keeps the file size down.
After dropping a photo, you will be in the Fill tool and you can see 2 little directional arrows that indicate the center point and extent
of the photo fill in the rectangle. You can now adjust the photo size and rotation inside the rectangle by dragging on the ends of the
arrows. Repeat this for all of your photos.

 © Xara Group Limited


 Wall, floor and glow shadows


 Adjust the size and rotation of your photos using the arrow ends in the Fill tool


