
Companies generate lots of documents for internal and external purposes. Xara Cloud is an excellent tool to create these because it offers two
great options; either your in-house designer creates a set of master documents for your teams to edit (using Xara Cloud or our desktop
software Xara Designer Pro), or you can use Xara Cloud’s professionally designed ready-made templates to customize with your own branding
and content.
What’s more Xara Cloud also supports collaborative editing so colleagues can work together on the same document at the same time, with
edits being seen live, as-they-happen, by everyone editing the document.
This two-part tutorial shows you how to create a double sided flyer by customizing a Xara template to match your company branding, with your
own text and photos and other content. In the first part, I showed you how to create the front page of a flyer in your company branding,
changing the theme colors, text and header photo and social media symbols. See Creating your company documents Part 1
In this second part, I will show you how to share the editing with a colleague so you can both work on the flyer together, and I’ll show you how
to customize the content of the document, save the document as a PDF and share it with others.
If you need to create good looking documents and maybe share editing, then why not sign up to the free Xara Cloud trial and give it a go!
The front and back of the flyer
If you followed Creating your company documents Part 1, you will have saved your document to your cloud drive, Dropbox, Google Drive or
OneDrive.
Opening your document
To open any Xara file that you have saved in Dropbox, Google Drive or OneDrive click on the File menu in the top left, and select Open or Open in new tab. (In your cloud drive you can also store and open .web or .xar files that you created offline in Xara’s desktop products).The File Picker
When you select Open you’re presented with the File Picker screen, where you can choose between the Xara Cloud templates and your own files. If you followed part 1 of this tutorial you should find your Flyer file under Your Files. File Picker showing the template categories down the left and previews on the right (Presentations templates selected) Once you’ve found the document you want to edit, simply click to open it in the Xara Cloud editor.Share Editing
Share Editing is a great collaboration feature and I’m going to show you how to use it for editing the second side of our flyer. The first thing to do is share the editing of this flyer document, so that you can work on page 2 with a colleague. Select the Share button at the top right corner of the editor and then the Share editing… option, where you will be able to enter the email address of anyone you want to share the editing of this document with, together with a message. You can enter multiple email addresses, comma separated, and each will receive an email inviting them to share editing of your document. When the recipient joins the editing session, the status line shows a label with the initial of the users editing this document. In my case, there are just the two of us editing the document (C and K). You can hover over the label to see the name of each user. Showing 2 people editing the document (C and K) You will now see changes that they make to the document, as they make them. Note: They are not editing a copy of the document - they are editing the same document as you. If they click Save, it will save back to your cloud drive (because it’s your document that you let them edit).Editing the text
Firstly, replace the text on the template with your own text. Editing text is easy - just click or tap in your text to place a text cursor, then you can either type your text in or ‘cut and paste’ it. A Text Properties panel will show on the right of your document whenever you are editing text (see screenshot below) and it offers the usual range of text controls such as bold, italic, etc. (or use the normal keyboard shortcuts like Ctrl-B for bold. A list of key shortcuts can be found in the Settings menu).Changing font sizes
Although it’s recommended to use the text styles provided, there are times when you need to adjust the font size, which you can easily do using the slider under the font name.Changing text styles and fonts
The templates provide a range of pre-defined text styles, such as Heading 1, Heading 2, ‘Normal text’ and others. For design consistency it’s recommended that you stick with styles provided. To change a text style, click on the text style in the Text properties panel that you’ll see on the right hand side whenever you have text selected (in the example below click on Normal text > ) and this will open up the menu offering you a choice of text styles such as headings, sub- headings, body text, etc. Or you can change all the fonts in the whole of your document by choosing one of the ready-made Text Style schemes at the bottom of the style list. The Text Properties panel shows on the right side of your document when text is selected.Adding and editing photos
Inline photos
Next I’m going to show you how to add a photo ‘inline’, so that it flows with the text as you edit the text. Place the cursor in the text where you want the photo to go and then drag and drop a photo file from your computer onto the browser window, or you can add one from the stock photos by clicking the Image icon on the left hand side of your document (then cut and paste it to the text cursor position if you want it inline). The photo will be resized to fit the column width and will be embedded as an inline image.Editing photos
The photo will also appear with adjustment handles (small circles on the outer edges) that allow you to resize, crop and rotate the photo. The inner controls (hand and rotate arrow) enable you to rotate, scale and reposition it within the frame. If you mouse-over the handles the tool tips or status line at the top of the Xara Cloud window will give you a brief description of each handle’s function. As you drag the handles to adjust an image, a faint copy of the full uncropped image is shown behind. This makes it easier to make adjustments because you can see parts of the image that fall outside the crop area as you drag the handles. Photo inline showing the editing handles and other optionsFloating photos
An alternative to an embedded, inline photo is a floating one. You can make an inline photo float by selecting the photo and clicking the float option in the context menu (shown in the screenshot above). Or with nothing selected drag a photo onto the page or add one of the stock photos. I have imported an oval shaped image for the Our Team section of my flyer. Normally a floating image will cover any text underneath it but you can make the text repel around it. To do that select the image, then select the Repel option, then Repel text on the Photo Properties panel that you’ll see on the right side of the document when you have an image selected. A floating image selected showing the Repel option in the right-side Properties Panel The floating image after selecting to repel textAdjusting the text columns and moving objects
As I mentioned before, your text will probably not fit perfectly so you will probably need to make some adjustments to the text columns. When you select text, it’s shown with a dotted blue outline. You can adjust the width and height using the handles on each side or in the bottom right corner. If you wish to move the whole text object, drag on its outer edge. (If you click on the outer edge, this selects the whole text object so you can copy, duplicate or delete it). To move other objects such as photos or shapes, simply click or tap to select it and then drag to move it. When moving objects on the page there are alignment indicators so it’s really easy to ensure that things are aligned. The page before and after adjusting the text columns, changing the house photo and repositioning the floating oval imageSmartShapes
Xara provides a range of ready-made shapes that you can add to your document. What makes them so smart and easy is that the editing functions are built into the shape. There are text panels, rectangles, ovals, stars, pie charts, arrows, charts and many more. A common design element in many documents is a block of text placed on a colored rectangle. Of course it would be relatively easy to create this using the normal graphics tools - just draw a rectangle and place a text column or text frame on top of the rectangle, and then group them. But the problem with that is that each time you change the text you would need to adjust the background rectangle. The Text Panel SmartShape solves this problem because the background rectangle automatically expands or contracts as you edit the text. You can directly adjust the panel width and height, rounded corners and the margin space between the text and outer rectangle. You can edit the text as normal including setting text styles, fonts and links to web or email addresses. To add a Text Panel select the Text option from the choices down the left hand side of the document, then select from the Fancy Text or Fancy Image designs. It will be placed on your document and automatically adjusted to use your theme color. It’s already selected so click on the outer edge to move it into position. Then click on the text to change the text. Notice how the text panel adjusts as you add your text.Add and respond to comments
Anyone working on the document can easily add comments. These are shown as small text boxes outside the page, attached to the relevant text in the document. Comments are often messages to others working on the document, or just notes to yourself. The great thing about comments is that your colleagues can edit and add text to your comments - you can have a little thread of a conversation. To add a comment, highlight the text that you wish to comment on, and select the Add comment option on the pop-up menu. A comment box appears to the right of the workspace, where you can just add your comment text. Click or tap the blue strip on the top edge of the comment box to bring up a context menu with a Reply or Delete option. The comment remains locked to the text (so it moves as you move the text) but you can drag the comment box anywhere on the page. You can resize it (drag the green right-side handle), as well as changing text color and all the usual text attributes using the text controls. A typical comment is shown right. The ‘Comment subject’ is editable. Click on the comment to see the context menu. When any user selects Reply their name and date is added. When you select the comment the corresponding text in the main document is highlighted in blue to indicate the text this comment applies to.Collapse or expand the comment
You can click or tap the symbol at the top of the comment to collapse it down to a small comment symbol as shown above. Just click again to expand the comment. You can also add a comment box as a stand alone item, unconnected to any text. Simply tap the comment icon on the top bar above your document, next to the Share button: The flyer showing 2 comment boxesDownload as PDF
The File menu has a Download option that allows you to download the document as a high-quality PDF. Select the File menu, then Download, then Download PDF. Select the format and then select Download.Sharing & publishing your document
Although creating a PDF is easy and a great way to distribute a printable version of your document, there’s an even easier way of sharing your finished document. Select the Share button then Share to web… option. This produces a private link to a static read-only version that you can share with anyone. After a few seconds you’ll get a confirmation dialog as shown below: The Copy option places the URL link on the system clipboard. Or you can just click the link to open it in a new browser tab. This is basically like publishing a website - except you don’t need to worry about web space, FTP configuration or hosting, and it’s a lot quicker! Note: If you make further changes to the document, these are not automatically shared until you do another Share to web... operation. This allows you to continue working on draft changes, and only update the read-only shared version when you want to. If a document is already shared, you’ll get a simple ‘update’ option to re-publish. The shared private link to a static read-only version That’s it! You and your colleagues can now create your own company documents in your own branding and share it by circulating either the PDF or the link to the online version.Windows tip:
If you’re a Windows 10 user here’s a great time-saving way to incorporate screen grabs into any document. Windows 10 has a short cut to grab any part of the screen. Just press ‘Shift + Windows key + S’, the screen fades, and you now have cross hairs that you can drag across any part of the screen. At the end this places that piece of screen on the system clipboard. Now you can just paste this directly into your document - just press Ctrl+V. This works with Xara Cloud as well as our desktop software products.The Xara Cloud templates
The Xara Cloud templates include an ever growing selection of all the most common business documents, including social media headings, presentations, CVs, flyers, catalogs, booklets, product sheets, e-books and web banners. You can browse the templates, pick your design and start editing immediately by selecting Use It here.Try the free trials
Or maybe you’d like to try the unique offline/online experience offered by Xara, whereby you can edit your documents either online or offline - download the free trial of Xara Designer Pro X and sign up for the free trial of Xara Cloud now!


Copyright © 2019 Xara Group Limited.
Page created with Xara Designer Pro


Companies generate lots of documents for internal and external purposes. Xara Cloud is an excellent tool
to create these because it offers two great options; either your in-house designer creates a set of master
documents for your teams to edit (using Xara Cloud or our desktop software Xara Designer Pro), or you
can use Xara Cloud’s professionally designed ready-made templates to customize with your own branding
and content.
What’s more Xara Cloud also supports collaborative editing so colleagues can work together on the same
document at the same time, with edits being seen live, as-they-happen, by everyone editing the document.
This two-part tutorial shows you how to create a double sided flyer by customizing a Xara template to
match your company branding, with your own text and photos and other content. In the first part, I showed
you how to create the front page of a flyer in your company branding, changing the theme colors, text and
header photo and social media symbols. See Creating your company documents Part 1
In this second part, I will show you how to share the editing with a colleague so you can both work on the
flyer together, and I’ll show you how to customize the content of the document, save the document as a
PDF and share it with others.
If you need to create good looking documents and maybe share editing, then why not sign up to the free
Xara Cloud trial and give it a go!
The front and back of the flyer
If you followed Creating your company documents Part 1, you will have saved your document to your cloud
drive, Dropbox, Google Drive or OneDrive.
Opening your document
To open any Xara file that you have saved in Dropbox, Google Drive or OneDrive click on the File menu in the top left, and select Open or Open in new tab. (In your cloud drive you can also store and open .web or .xar files that you created offline in Xara’s desktop products).The File Picker
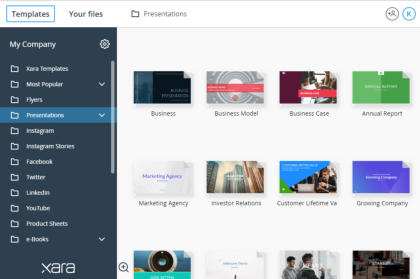
When you select Open you’re presented with the File Picker screen, where you can choose between the Xara Cloud templates and your own files. If you followed part 1 of this tutorial you should find your Flyer file under Your Files. File Picker showing the template categories down the left and previews on the right (Presentations templates selected) Once you’ve found the document you want to edit, simply click to open it in the Xara Cloud editor.Share Editing
Share Editing is a great collaboration feature and I’m going to show you how to use it for editing the second side of our flyer. The first thing to do is share the editing of this flyer document, so that you can work on page 2 with a colleague. Select the Share button at the top right corner of the editor and then the Share editing… option, where you will be able to enter the email address of anyone you want to share the editing of this document with, together with a message. You can enter multiple email addresses, comma separated, and each will receive an email inviting them to share editing of your document. When the recipient joins the editing session, the status line shows a label with the initial of the users editing this document. In my case, there are just the two of us editing the document (C and K). You can hover over the label to see the name of each user. Showing 2 people editing the document (C and K) You will now see changes that they make to the document, as they make them. Note: They are not editing a copy of the document - they are editing the same document as you. If they click Save, it will save back to your cloud drive (because it’s your document that you let them edit).Editing the text
Firstly, replace the text on the template with your own text. Editing text is easy - just click or tap in your text to place a text cursor, then you can either type your text in or ‘cut and paste’ it. A Text Properties panel will show on the right of your document whenever you are editing text (see screenshot below) and it offers the usual range of text controls such as bold, italic, etc. (or use the normal keyboard shortcuts like Ctrl-B for bold. A list of key shortcuts can be found in the Settings menu).Changing font sizes
Although it’s recommended to use the text styles provided, there are times when you need to adjust the font size, which you can easily do using the slider under the font name.Changing text styles and fonts
The templates provide a range of pre-defined text styles, such as Heading 1, Heading 2, ‘Normal text’ and others. For design consistency it’s recommended that you stick with styles provided. To change a text style, click on the text style in the Text properties panel that you’ll see on the right hand side whenever you have text selected (in the example below click on Normal text > ) and this will open up the menu offering you a choice of text styles such as headings, sub-headings, body text, etc. Or you can change all the fonts in the whole of your document by choosing one of the ready-made Text Style schemes at the bottom of the style list. The Text Properties panel shows on the right side of your document when text is selected.Adding and editing photos
Inline photos
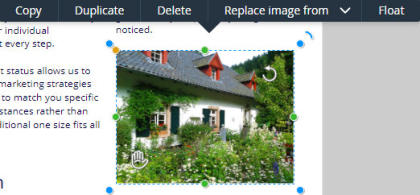
Next I’m going to show you how to add a photo ‘inline’, so that it flows with the text as you edit the text. Place the cursor in the text where you want the photo to go and then drag and drop a photo file from your computer onto the browser window, or you can add one from the stock photos by clicking the Image icon on the left hand side of your document (then cut and paste it to the text cursor position if you want it inline). The photo will be resized to fit the column width and will be embedded as an inline image.Editing photos
The photo will also appear with adjustment handles (small circles on the outer edges) that allow you to resize, crop and rotate the photo. The inner controls (hand and rotate arrow) enable you to rotate, scale and reposition it within the frame. If you mouse-over the handles the tool tips or status line at the top of the Xara Cloud window will give you a brief description of each handle’s function. As you drag the handles to adjust an image, a faint copy of the full uncropped image is shown behind. This makes it easier to make adjustments because you can see parts of the image that fall outside the crop area as you drag the handles. Photo inline showing the editing handles and other optionsFloating photos
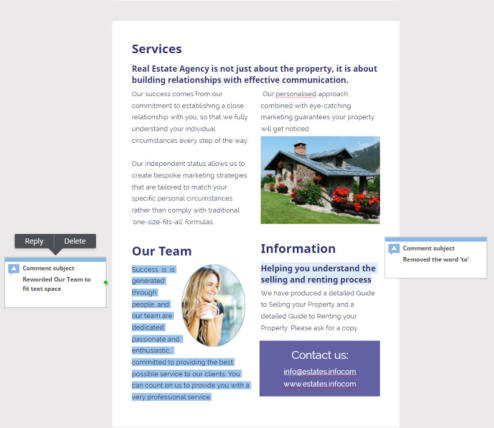
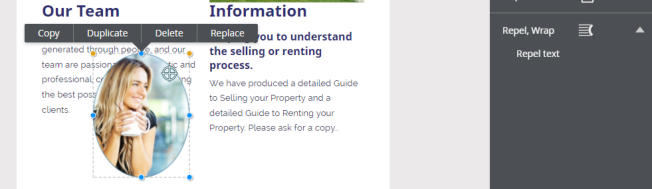
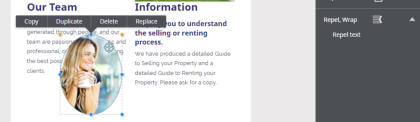
An alternative to an embedded, inline photo is a floating one. You can make an inline photo float by selecting the photo and clicking the float option in the context menu (shown in the screenshot above). Or with nothing selected drag a photo onto the page or add one of the stock photos. I have imported an oval shaped image for the Our Team section of my flyer. Normally a floating image will cover any text underneath it but you can make the text repel around it. To do that select the image, then select the Repel option, then Repel text on the Photo Properties panel that you’ll see on the right side of the document when you have an image selected. A floating image selected showing the Repel option in the right-side Properties Panel The floating image after selecting to repel textAdjusting the text columns and moving objects
As I mentioned before, your text will probably not fit perfectly so you will probably need to make some adjustments to the text columns. When you select text, it’s shown with a dotted blue outline. You can adjust the width and height using the handles on each side or in the bottom right corner. If you wish to move the whole text object, drag on its outer edge. (If you click on the outer edge, this selects the whole text object so you can copy, duplicate or delete it). To move other objects such as photos or shapes, simply click or tap to select it and then drag to move it. When moving objects on the page there are alignment indicators so it’s really easy to ensure that things are aligned. The page before and after adjusting the text columns, changing the house photo and repositioning the floating oval imageSmartShapes
Xara provides a range of ready-made shapes that you can add to your document. What makes them so smart and easy is that the editing functions are built into the shape. There are text panels, rectangles, ovals, stars, pie charts, arrows, charts and many more. A common design element in many documents is a block of text placed on a colored rectangle. Of course it would be relatively easy to create this using the normal graphics tools - just draw a rectangle and place a text column or text frame on top of the rectangle, and then group them. But the problem with that is that each time you change the text you would need to adjust the background rectangle. The Text Panel SmartShape solves this problem because the background rectangle automatically expands or contracts as you edit the text. You can directly adjust the panel width and height, rounded corners and the margin space between the text and outer rectangle. You can edit the text as normal including setting text styles, fonts and links to web or email addresses. To add a Text Panel select the Text option from the choices down the left hand side of the document, then select from the Fancy Text or Fancy Image designs. It will be placed on your document and automatically adjusted to use your theme color. It’s already selected so click on the outer edge to move it into position. Then click on the text to change the text. Notice how the text panel adjusts as you add your text.Add and respond to comments
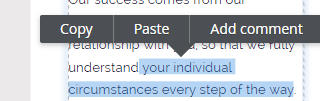
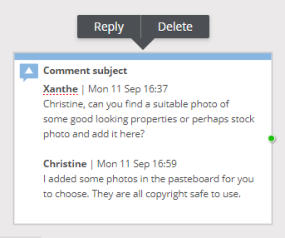
Anyone working on the document can easily add comments. These are shown as small text boxes outside the page, attached to the relevant text in the document. Comments are often messages to others working on the document, or just notes to yourself. The great thing about comments is that your colleagues can edit and add text to your comments - you can have a little thread of a conversation. To add a comment, highlight the text that you wish to comment on, and select the Add comment option on the pop-up menu. A comment box appears to the right of the workspace, where you can just add your comment text. Click or tap the blue strip on the top edge of the comment box to bring up a context menu with a Reply or Delete option. The comment remains locked to the text (so it moves as you move the text) but you can drag the comment box anywhere on the page. You can resize it (drag the green right-side handle), as well as changing text color and all the usual text attributes using the text controls. A typical comment is shown right. The ‘Comment subject’ is editable. Click on the comment to see the context menu. When any user selects Reply their name and date is added. When you select the comment the corresponding text in the main document is highlighted in blue to indicate the text this comment applies to.Collapse or expand the comment
You can click or tap the symbol at the top of the comment to collapse it down to a small comment symbol as shown above. Just click again to expand the comment. You can also add a comment box as a stand alone item, unconnected to any text. Simply tap the comment icon on the top bar above your document, next to the Share button: The flyer showing 2 comment boxesDownload as PDF
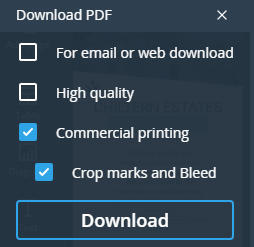
The File menu has a Download option that allows you to download the document as a high-quality PDF. Select the File menu, then Download, then Download PDF. Select the format and then select Download.Sharing & publishing your document
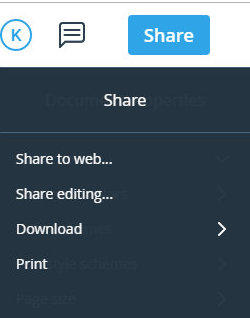
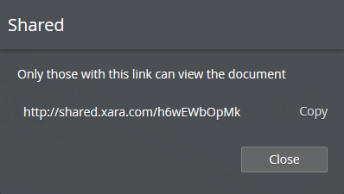
Although creating a PDF is easy and a great way to distribute a printable version of your document, there’s an even easier way of sharing your finished document. Select the Share button then Share to web… option. This produces a private link to a static read-only version that you can share with anyone. After a few seconds you’ll get a confirmation dialog as shown below: The Copy option places the URL link on the system clipboard. Or you can just click the link to open it in a new browser tab. This is basically like publishing a website - except you don’t need to worry about web space, FTP configuration or hosting, and it’s a lot quicker! Note: If you make further changes to the document, these are not automatically shared until you do another Share to web... operation. This allows you to continue working on draft changes, and only update the read-only shared version when you want to. If a document is already shared, you’ll get a simple ‘update’ option to re-publish. The shared private link to a static read-only version That’s it! You and your colleagues can now create your own company documents in your own branding and share it by circulating either the PDF or the link to the online version.Windows tip:
If you’re a Windows 10 user here’s a great time-saving way to incorporate screen grabs into any document. Windows 10 has a short cut to grab any part of the screen. Just press ‘Shift + Windows key + S’, the screen fades, and you now have cross hairs that you can drag across any part of the screen. At the end this places that piece of screen on the system clipboard. Now you can just paste this directly into your document - just press Ctrl+V. This works with Xara Cloud as well as our desktop software products.The Xara Cloud templates
The Xara Cloud templates include an ever growing selection of all the most common business documents, including social media headings, presentations, CVs, flyers, catalogs, booklets, product sheets, e-books and web banners. You can browse the templates, pick your design and start editing immediately by selecting Use It here.Try the free trials
Or maybe you’d like to try the unique offline/online experience offered by Xara, whereby you can edit your documents either online or offline - download the free trial of Xara Designer Pro X and sign up for the free trial of Xara Cloud now!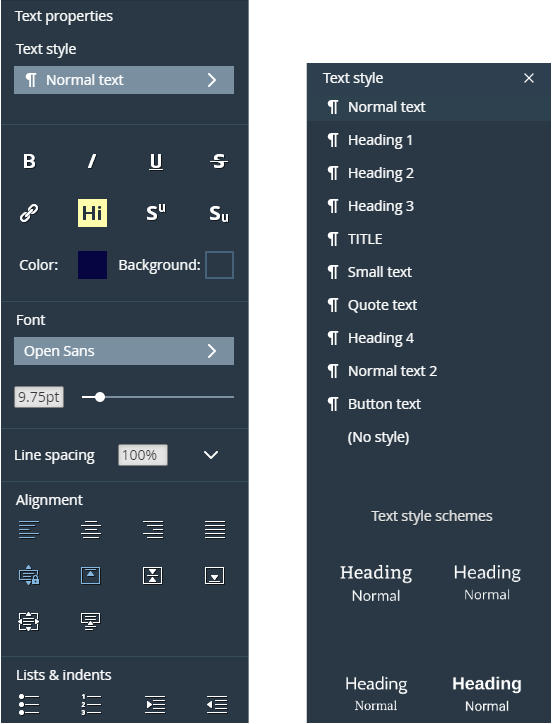

Copyright © 2019 Xara Group Limited.
Page created with Xara Designer Pro

Companies generate lots of documents for internal and external
purposes. Xara Cloud is an excellent tool to create these because it
offers two great options; either your in-house designer creates a set
of master documents for your teams to edit (using Xara Cloud or our
desktop software Xara Designer Pro), or you can use Xara Cloud’s
professionally designed ready-made templates to customize with
your own branding and content.
What’s more Xara Cloud also supports collaborative editing so
colleagues can work together on the same document at the same
time, with edits being seen live, as-they-happen, by everyone editing
the document.
This two-part tutorial shows you how to create a double sided flyer
by customizing a Xara template to match your company branding,
with your own text and photos and other content. In the first part, I
showed you how to create the front page of a flyer in your company
branding, changing the theme colors, text and header photo and
social media symbols. See Creating your company documents Part
1
In this second part, I will show you how to share the editing with a
colleague so you can both work on the flyer together, and I’ll show
you how to customize the content of the document, save the
document as a PDF and share it with others.
If you need to create good looking documents and maybe share
editing, then why not sign up to the free Xara Cloud trial and give it a
go!
The front and back of the flyer
If you followed Creating your company documents Part 1, you will
have saved your document to your cloud drive, Dropbox, Google
Drive or OneDrive.
PDF
The File menu has a Download option that allows you to download the document as a high-quality PDF. Select the File menu, then Download, then Download PDF. Select the format and then select Download.
Opening your document
To open any Xara file that you have saved in Dropbox, Google Drive or OneDrive click on the File menu in the top left, and select Open or Open in new tab. (In your cloud drive you can also store and open .web or .xar files that you created offline in Xara’s desktop products).The File Picker
When you select Open you’re presented with the File Picker screen, where you can choose between the Xara Cloud templates and your own files. If you followed part 1 of this tutorial you should find your Flyer file under Your Files. File Picker showing the template categories down the left and previews on the right (Presentations templates selected) Once you’ve found the document you want to edit, simply click to open it in the Xara Cloud editor.Share Editing
Share Editing is a great collaboration feature and I’m going to show you how to use it for editing the second side of our flyer. The first thing to do is share the editing of this flyer document, so that you can work on page 2 with a colleague. Select the Share button at the top right corner of the editor and then the Share editing… option, where you will be able to enter the email address of anyone you want to share the editing of this document with, together with a message. You can enter multiple email addresses, comma separated, and each will receive an email inviting them to share editing of your document. When the recipient joins the editing session, the status line shows a label with the initial of the users editing this document. In my case, there are just the two of us editing the document (C and K). You can hover over the label to see the name of each user. Showing 2 people editing the document (C and K) You will now see changes that they make to the document, as they make them. Note: They are not editing a copy of the document - they are editing the same document as you. If they click Save, it will save back to your cloud drive (because it’s your document that you let them edit).Editing the text
Firstly, replace the text on the template with your own text. Editing text is easy - just click or tap in your text to place a text cursor, then you can either type your text in or ‘cut and paste’ it. A Text Properties panel will show on the right of your document whenever you are editing text (see screenshot below) and it offers the usual range of text controls such as bold, italic, etc. (or use the normal keyboard shortcuts like Ctrl-B for bold. A list of key shortcuts can be found in the Settings menu).Changing font sizes
Although it’s recommended to use the text styles provided, there are times when you need to adjust the font size, which you can easily do using the slider under the font name.Changing text styles and fonts
The templates provide a range of pre-defined text styles, such as Heading 1, Heading 2, ‘Normal text’ and others. For design consistency it’s recommended that you stick with styles provided. To change a text style, click on the text style in the Text properties panel that you’ll see on the right hand side whenever you have text selected (in the example below click on Normal text > ) and this will open up the menu offering you a choice of text styles such as headings, sub-headings, body text, etc. Or you can change all the fonts in the whole of your document by choosing one of the ready-made Text Style schemes at the bottom of the style list. The Text Properties panel shows on the right side of your document when text is selected.Adding and editing photos
Inline photos
Next I’m going to show you how to add a photo ‘inline’, so that it flows with the text as you edit the text. Place the cursor in the text where you want the photo to go and then drag and drop a photo file from your computer onto the browser window, or you can add one from the stock photos by clicking the Image icon on the left hand side of your document (then cut and paste it to the text cursor position if you want it inline). The photo will be resized to fit the column width and will be embedded as an inline image.Editing photos
The photo will also appear with adjustment handles (small circles on the outer edges) that allow you to resize, crop and rotate the photo. The inner controls (hand and rotate arrow) enable you to rotate, scale and reposition it within the frame. If you mouse-over the handles the tool tips or status line at the top of the Xara Cloud window will give you a brief description of each handle’s function. As you drag the handles to adjust an image, a faint copy of the full uncropped image is shown behind. This makes it easier to make adjustments because you can see parts of the image that fall outside the crop area as you drag the handles. Photo inline showing the editing handles and other optionsFloating photos
An alternative to an embedded, inline photo is a floating one. You can make an inline photo float by selecting the photo and clicking the float option in the context menu (shown in the screenshot above). Or with nothing selected drag a photo onto the page or add one of the stock photos. I have imported an oval shaped image for the Our Team section of my flyer. Normally a floating image will cover any text underneath it but you can make the text repel around it. To do that select the image, then select the Repel option, then Repel text on the Photo Properties panel that you’ll see on the right side of the document when you have an image selected. A floating image selected showing the Repel option in the right-side Properties Panel The floating image after selecting to repel textAdjusting the text columns and moving
objects
As I mentioned before, your text will probably not fit perfectly so you will probably need to make some adjustments to the text columns. When you select text, it’s shown with a dotted blue outline. You can adjust the width and height using the handles on each side or in the bottom right corner. If you wish to move the whole text object, drag on its outer edge. (If you click on the outer edge, this selects the whole text object so you can copy, duplicate or delete it). To move other objects such as photos or shapes, simply click or tap to select it and then drag to move it. When moving objects on the page there are alignment indicators so it’s really easy to ensure that things are aligned. The page before and after adjusting the text columns, changing the house photo and repositioning the floating oval imageSmartShapes
Xara provides a range of ready-made shapes that you can add to your document. What makes them so smart and easy is that the editing functions are built into the shape. There are text panels, rectangles, ovals, stars, pie charts, arrows, charts and many more. A common design element in many documents is a block of text placed on a colored rectangle. Of course it would be relatively easy to create this using the normal graphics tools - just draw a rectangle and place a text column or text frame on top of the rectangle, and then group them. But the problem with that is that each time you change the text you would need to adjust the background rectangle. The Text Panel SmartShape solves this problem because the background rectangle automatically expands or contracts as you edit the text. You can directly adjust the panel width and height, rounded corners and the margin space between the text and outer rectangle. You can edit the text as normal including setting text styles, fonts and links to web or email addresses. To add a Text Panel select the Text option from the choices down the left hand side of the document, then select from the Fancy Text or Fancy Image designs. It will be placed on your document and automatically adjusted to use your theme color. It’s already selected so click on the outer edge to move it into position. Then click on the text to change the text. Notice how the text panel adjusts as you add your text.Add and respond to comments
Anyone working on the document can easily add comments. These are shown as small text boxes outside the page, attached to the relevant text in the document. Comments are often messages to others working on the document, or just notes to yourself. The great thing about comments is that your colleagues can edit and add text to your comments - you can have a little thread of a conversation. To add a comment, highlight the text that you wish to comment on, and select the Add comment option on the pop-up menu. A comment box appears to the right of the workspace, where you can just add your comment text. Click or tap the blue strip on the top edge of the comment box to bring up a context menu with a Reply or Delete option. The comment remains locked to the text (so it moves as you move the text) but you can drag the comment box anywhere on the page. You can resize it (drag the green right-side handle), as well as changing text color and all the usual text attributes using the text controls. A typical comment is shown right. The ‘Comment subject’ is editable. Click on the comment to see the context menu. When any user selects Reply their name and date is added. When you select the comment the corresponding text in the main document is highlighted in blue to indicate the text this comment applies to.Collapse or expand the comment
You can click or tap the symbol at the top of the comment to collapse it down to a small comment symbol as shown above. Just click again to expand the comment. You can also add a comment box as a stand alone item, unconnected to any text. Simply tap the comment icon on the top bar above your document, next to the Share button: The flyer showing 2 comment boxesDownload as
Sharing & publishing your document
Although creating a PDF is easy and a great way to distribute a printable version of your document, there’s an even easier way of sharing your finished document. Select the Share button then Share to web… option. This produces a private link to a static read-only version that you can share with anyone. After a few seconds you’ll get a confirmation dialog as shown below: The Copy option places the URL link on the system clipboard. Or you can just click the link to open it in a new browser tab. This is basically like publishing a website - except you don’t need to worry about web space, FTP configuration or hosting, and it’s a lot quicker! Note: If you make further changes to the document, these are not automatically shared until you do another Share to web... operation. This allows you to continue working on draft changes, and only update the read-only shared version when you want to. If a document is already shared, you’ll get a simple ‘update’ option to re-publish. The shared private link to a static read-only version That’s it! You and your colleagues can now create your own company documents in your own branding and share it by circulating either the PDF or the link to the online version.Windows tip:
If you’re a Windows 10 user here’s a great time-saving way to incorporate screen grabs into any document. Windows 10 has a short cut to grab any part of the screen. Just press ‘Shift + Windows key + S’, the screen fades, and you now have cross hairs that you can drag across any part of the screen. At the end this places that piece of screen on the system clipboard. Now you can just paste this directly into your document - just press Ctrl+V. This works with Xara Cloud as well as our desktop software products.The Xara Cloud templates
The Xara Cloud templates include an ever growing selection of all the most common business documents, including social media headings, presentations, CVs, flyers, catalogs, booklets, product sheets, e-books and web banners. You can browse the templates, pick your design and start editing immediately by selecting Use It here.Try the free trials
Or maybe you’d like to try the unique offline/online experience offered by Xara, whereby you can edit your documents either online or offline - download the free trial of Xara Designer Pro X and sign up for the free trial of Xara Cloud now!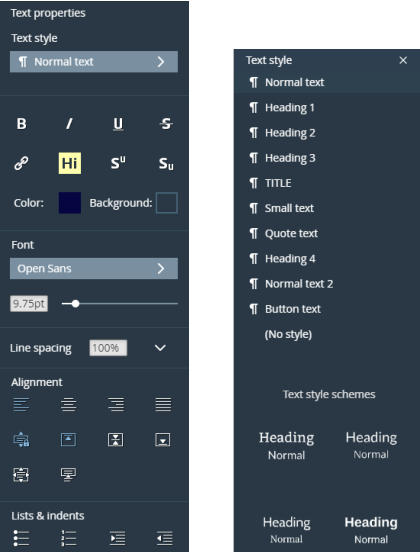


Copyright © 2019 Xara Group Limited.
Page created with Xara Designer Pro
CREATING YOUR COMPANY DOCUMENTS - PART 2
CREATING YOUR COMPANY DOCUMENTS - PART 2
CREATING YOUR COMPANY DOCUMENTS
PART 2