
Probably the most common type of graphic used in any document is the icon, which may be something as simple as a Facebook icon, or an email icon , or perhaps a
thumbs-up . It may be that you need to show that you accept Visa and Mastercard .
Symbols such are these are becoming particularly common in Infographic type of documents.
All versions of Xara Designer include a huge library of icons and symbols courtesy of a special font called Font Awesome. As the name implies this is basically just a font, but
what’s so great is that Xara has special support so you can use the symbols in your text (as I have above) or as plain simple vector graphic objects anywhere on the page.
If you don’t already own one of the Designer titles then you can download the free trial of Xara Web Designer 11, Xara Photo & Graphic Designer 11, Xara Page & Layout
Designer 11 or Xara Designer Pro X11 and follow this tutorial.
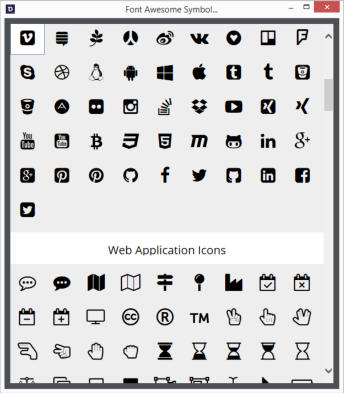
To insert a Font Awesome symbol just select the menu Insert Font Awesome Symbol… This opens a window with a categorized list of more than 500 symbols and icons.
Use as a font or a graphic
There are two ways of adding a Font Awesome symbol to your page. In both cases the symbol is vector, resolution independent - which means it scales to any size with no pixelation or loss of quality. 1. If you have the Text tool selected and the caret placed in the text, then picking an icon will insert it into the text at the caret, using the current font size, such as this example: ‘twitter icon in the text’. 2. If you have other tools selected such as the Selector tool , without a text caret, then selecting an icon will place a vector graphic version in the center of the window - you can now move it and manipulate it as you do with any simple vector shape. The Font Awesome symbol picker. It’s a re-sizable window.To use as a vector shape
If you insert the symbol on the page as a graphic, then you can do all sorts of fancy things with it, because it’s just a simple vector shape. You can edit the vector outlines with the Shape Editor tool, combine it with other shapes, change the fill and outline style. A popular way to present an infographic symbol is inside a circle, like the examples at the start of this tutorial but you can present it in different ways. Let’s experiment with the Twitter symbol… First give it a graduated fill or any fill style you like. Here’s the same shape presented in different ways on a circular background: For this version - Use the Circle Tool to draw a simple white circle and give it a black outline. Drag the Twitter symbol onto the circle. If you have the Snap to Object option on then as you drag the symbol over the circle it will snap to be centered. Group the two objects for ease of manipulation afterwards. This is very similar - use the Circle Tool to draw a circle and color it blue. Drag the Twitter symbol onto the circle and color it white. Group the pair so they can now be treated as a single object. In this version, I placed the Twitter icon on a circle as above, then cut out the top shape from the circle leaving a hole, and then gave a soft shadow to the result - which helps emphasize the hole effect. To cut out one shape from another, select them both and select the menu Arrange Combine Shapes Subtract shapes, which will cut the top shape out of the lower one, leaving a hole. To add a soft shadow, select the object, choose the Shadow Tool and then drag the shadow away from the object. You can adjust the transparency and add a blur for more effect. Finally, using the first Twitter in a circle symbol above, ungroup it. I have given the Twitter symbol a 3pt outline (drop down menu on the top Tool bar) and changed its fill color to ‘No color’ so it’s the outline of the bird only, and then added a very slight soft shadow to the bird only which has the effect of slightly lifting it off the surface of the circle.To use as a font
When you have the text caret in some text (using the Text tool) and select the Insert Font Awesome Symbol option and pick a symbol, then it’s inserted into the text as a normal ‘character’ but using the font called FontAwesome. If you select this symbol in the Text tool you’ll see the font menu shows this font. The symbol adopts the same size as the surrounding text. To change the size of the inline symbol, just select it as you do for normal text (drag select or Shift+arrow) and change the font size. You can also set the color, or background color of the character using the usual color controls. Here’s an example: An enlarged icon in some text If you have the character inline like this because it’s just one character in the line with a different font, there are some ‘gotchas’ you need to be aware of. If you place the text caret next to the symbol and start typing - you’ll see nothing because your text will be coming out using the Font Awesome font - which has no symbols for the normal alphabetic range. This also means that if you apply a text style to the paragraph, e.g. ‘Normal text’, then the symbol will vanish and probably be replaced with a ‘missing’ rectangle like this which is sometimes shown when the font has no symbol - this is because the FontAwesome font has been replaced with the ‘Normal style’ font for all the characters in the paragraph. Websites: There’s no need to worry about using the font on website documents, as Xara automatically creates the correct web font (WOFF font) subsetting it to only the used symbols, to keep the file size down. This is compatible with all modern browsers, and because it’s a vector font outline, it means it’s always pin-sharp no matter what size and what device (e.g. on Retina or similar hi-res screens). Some more examples of the available symbols: You can use Font Awesome symbols and icons on your web pages and documents with Xara Web Designer 11, Xara Photo & Graphic Designer 11, Xara Page & Layout Designer 11 and Xara Designer Pro X11 – Try it Now for free!
Copyright © 2015 Xara Group Limited, a MAGIX company.
Page created with Xara Designer Pro


Probably the most common type of graphic used in any document is the icon, which may be something as simple as a Facebook icon, or
an email icon , or perhaps a thumbs-up . It may be that you need to show that you accept Visa and Mastercard .
Symbols such are these are becoming particularly common in Infographic type of documents.
All versions of Xara Designer include a huge library of icons and symbols courtesy of a special font called Font Awesome. As the name implies
this is basically just a font, but what’s so great is that Xara has special support so you can use the symbols in your text (as I have above) or as
plain simple vector graphic objects anywhere on the page.
If you don’t already own one of the Designer titles then you can download the free trial of Xara Web Designer 11, Xara Photo & Graphic
Designer 11, Xara Page & Layout Designer 11 or Xara Designer Pro X11 and follow this tutorial.
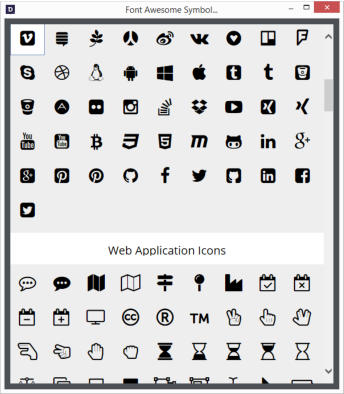
To insert a Font Awesome symbol just select the menu Insert Font Awesome Symbol… This opens a window with a categorized list of more
than 500 symbols and icons.
Use as a font or a graphic
There are two ways of adding a Font Awesome symbol to your page. In both cases the symbol is vector, resolution independent - which means it scales to any size with no pixelation or loss of quality. 1. If you have the Text tool selected and the caret placed in the text, then picking an icon will insert it into the text at the caret, using the current font size, such as this example: ‘twitter icon in the text’. 2. If you have other tools selected such as the Selector tool , without a text caret, then selecting an icon will place a vector graphic version in the center of the window - you can now move it and manipulate it as you do with any simple vector shape. The Font Awesome symbol picker. It’s a re-sizable window.To use as a vector shape
If you insert the symbol on the page as a graphic, then you can do all sorts of fancy things with it, because it’s just a simple vector shape. You can edit the vector outlines with the Shape Editor tool, combine it with other shapes, change the fill and outline style. A popular way to present an infographic symbol is inside a circle, like the examples at the start of this tutorial but you can present it in different ways. Let’s experiment with the Twitter symbol… First give it a graduated fill or any fill style you like. Here’s the same shape presented in different ways on a circular background: For this version - Use the Circle Tool to draw a simple white circle and give it a black outline. Drag the Twitter symbol onto the circle. If you have the Snap to Object option on then as you drag the symbol over the circle it will snap to be centered. Group the two objects for ease of manipulation afterwards. This is very similar - use the Circle Tool to draw a circle and color it blue. Drag the Twitter symbol onto the circle and color it white. Group the pair so they can now be treated as a single object. In this version, I placed the Twitter icon on a circle as above, then cut out the top shape from the circle leaving a hole, and then gave a soft shadow to the result - which helps emphasize the hole effect. To cut out one shape from another, select them both and select the menu Arrange Combine Shapes Subtract shapes, which will cut the top shape out of the lower one, leaving a hole. To add a soft shadow, select the object, choose the Shadow Tool and then drag the shadow away from the object. You can adjust the transparency and add a blur for more effect. Finally, using the first Twitter in a circle symbol above, ungroup it. I have given the Twitter symbol a 3pt outline (drop down menu on the top Tool bar) and changed its fill color to ‘No color’ so it’s the outline of the bird only, and then added a very slight soft shadow to the bird only which has the effect of slightly lifting it off the surface of the circle.To use as a font
When you have the text caret in some text (using the Text tool) and select the Insert Font Awesome Symbol option and pick a symbol, then it’s inserted into the text as a normal ‘character’ but using the font called FontAwesome. If you select this symbol in the Text tool you’ll see the font menu shows this font. The symbol adopts the same size as the surrounding text. To change the size of the inline symbol, just select it as you do for normal text (drag select or Shift+arrow) and change the font size. You can also set the color, or background color of the character using the usual color controls. Here’s an example: An enlarged icon in some text If you have the character inline like this because it’s just one character in the line with a different font, there are some ‘gotchas’ you need to be aware of. If you place the text caret next to the symbol and start typing - you’ll see nothing because your text will be coming out using the Font Awesome font - which has no symbols for the normal alphabetic range. This also means that if you apply a text style to the paragraph, e.g. ‘Normal text’, then the symbol will vanish and probably be replaced with a ‘missing’ rectangle like this which is sometimes shown when the font has no symbol - this is because the FontAwesome font has been replaced with the ‘Normal style’ font for all the characters in the paragraph. Websites: There’s no need to worry about using the font on website documents, as Xara automatically creates the correct web font (WOFF font) subsetting it to only the used symbols, to keep the file size down. This is compatible with all modern browsers, and because it’s a vector font outline, it means it’s always pin-sharp no matter what size and what device (e.g. on Retina or similar hi-res screens). Some more examples of the available symbols: You can use Font Awesome symbols and icons on your web pages and documents with Xara Web Designer 11, Xara Photo & Graphic Designer 11, Xara Page & Layout Designer 11 and Xara Designer Pro X11 – Try it Now for free!


Copyright © 2015 Xara Group Limited, a MAGIX company.
Page created with Xara Designer Pro

Probably the most common type of graphic used in any document is the icon, which may be something as
simple as a Facebook icon, or an email icon , or perhaps a thumbs-up . It may be that you need
to show that you accept Visa and Mastercard .
Symbols such are these are becoming particularly common in Infographic type of documents.
All versions of Xara Designer include a huge library of icons and symbols courtesy of a special font called
Font Awesome. As the name implies this is basically just a font, but what’s so great is that Xara has
special support so you can use the symbols in your text (as I have above) or as plain simple vector graphic
objects anywhere on the page.
If you don’t already own one of the Designer titles then you can download the free trial of Xara Web
Designer 11, Xara Photo & Graphic Designer 11, Xara Page & Layout Designer 11 or Xara Designer Pro X11
and follow this tutorial.
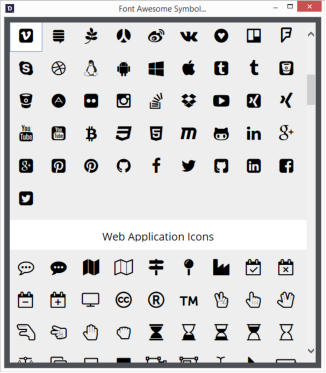
To insert a Font Awesome symbol just select the menu Insert Font Awesome Symbol… This opens a
window with a categorized list of more than 500 symbols and icons.
Use as a font or a graphic
There are two ways of adding a Font Awesome symbol to your page. In both cases the symbol is vector, resolution independent - which means it scales to any size with no pixelation or loss of quality. 1. If you have the Text tool selected and the caret placed in the text, then picking an icon will insert it into the text at the caret, using the current font size, such as this example: ‘twitter icon in the text’. 2. If you have other tools selected such as the Selector tool , without a text caret, then selecting an icon will place a vector graphic version in the center of the window - you can now move it and manipulate it as you do with any simple vector shape. The Font Awesome symbol picker. It’s a re-sizable window.To use as a vector shape
If you insert the symbol on the page as a graphic, then you can do all sorts of fancy things with it, because it’s just a simple vector shape. You can edit the vector outlines with the Shape Editor tool, combine it with other shapes, change the fill and outline style. A popular way to present an infographic symbol is inside a circle, like the examples at the start of this tutorial but you can present it in different ways. Let’s experiment with the Twitter symbol… First give it a graduated fill or any fill style you like. Here’s the same shape presented in different ways on a circular background: For this version - Use the Circle Tool to draw a simple white circle and give it a black outline. Drag the Twitter symbol onto the circle. If you have the Snap to Object option on then as you drag the symbol over the circle it will snap to be centered. Group the two objects for ease of manipulation afterwards. This is very similar - use the Circle Tool to draw a circle and color it blue. Drag the Twitter symbol onto the circle and color it white. Group the pair so they can now be treated as a single object. In this version, I placed the Twitter icon on a circle as above, then cut out the top shape from the circle leaving a hole, and then gave a soft shadow to the result - which helps emphasize the hole effect. To cut out one shape from another, select them both and select the menu Arrange Combine Shapes Subtract shapes, which will cut the top shape out of the lower one, leaving a hole. To add a soft shadow, select the object, choose the Shadow Tool and then drag the shadow away from the object. You can adjust the transparency and add a blur for more effect. Finally, using the first Twitter in a circle symbol above, ungroup it. I have given the Twitter symbol a 3pt outline (drop down menu on the top Tool bar) and changed its fill color to ‘No color’ so it’s the outline of the bird only, and then added a very slight soft shadow to the bird only which has the effect of slightly lifting it off the surface of the circle.To use as a font
When you have the text caret in some text (using the Text tool) and select the Insert Font Awesome Symbol option and pick a symbol, then it’s inserted into the text as a normal ‘character’ but using the font called FontAwesome. If you select this symbol in the Text tool you’ll see the font menu shows this font. The symbol adopts the same size as the surrounding text. To change the size of the inline symbol, just select it as you do for normal text (drag select or Shift+arrow) and change the font size. You can also set the color, or background color of the character using the usual color controls. Here’s an example: An enlarged icon in some text If you have the character inline like this because it’s just one character in the line with a different font, there are some ‘gotchas’ you need to be aware of. If you place the text caret next to the symbol and start typing - you’ll see nothing because your text will be coming out using the Font Awesome font - which has no symbols for the normal alphabetic range. This also means that if you apply a text style to the paragraph, e.g. ‘Normal text’, then the symbol will vanish and probably be replaced with a ‘missing’ rectangle like this which is sometimes shown when the font has no symbol - this is because the FontAwesome font has been replaced with the ‘Normal style’ font for all the characters in the paragraph. Websites: There’s no need to worry about using the font on website documents, as Xara automatically creates the correct web font (WOFF font) subsetting it to only the used symbols, to keep the file size down. This is compatible with all modern browsers, and because it’s a vector font outline, it means it’s always pin- sharp no matter what size and what device (e.g. on Retina or similar hi-res screens). Some more examples of the available symbols: You can use Font Awesome symbols and icons on your web pages and documents with Xara Web Designer 11, Xara Photo & Graphic Designer 11, Xara Page & Layout Designer 11 and Xara Designer Pro X11 – Try it Now for free! 


Copyright © 2015 Xara Group Limited, a MAGIX company.
Page created with Xara Designer Pro

Probably the most common type of graphic used in any document is
the icon, which may be something as simple as a Facebook icon,
or an email icon , or perhaps a thumbs-up . It may be that you
need to show that you accept Visa and Mastercard .
Symbols such are these are becoming particularly common in
Infographic type of documents.
All versions of Xara Designer include a huge library of icons and
symbols courtesy of a special font called Font Awesome. As the
name implies this is basically just a font, but what’s so great is that
Xara has special support so you can use the symbols in your text (as
I have above) or as plain simple vector graphic objects anywhere on
the page.
If you don’t already own one of the Designer titles then you can
download the free trial of Xara Web Designer 11, Xara Photo &
Graphic Designer 11, Xara Page & Layout Designer 11 or Xara
Designer Pro X11 and follow this tutorial.
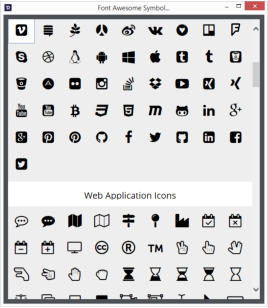
To insert a Font Awesome symbol just select the menu Insert Font
Awesome Symbol… This opens a window with a categorized list of
more than 500 symbols and icons.
Use as a
font or a
graphic
There are two ways of adding a Font Awesome symbol to your page. In both cases the symbol is vector, resolution independent - which means it scales to any size with no pixelation or loss of quality. 1. If you have the Text tool selected and the caret placed in the text, then picking an icon will insert it into the text at the caret, using the current font size, such as this example: ‘twitter icon in the text’. 2. If you have other tools selected such as the Selector tool , without a text caret, then selecting an icon will place a vector graphic version in the center of the window - you can now move it and manipulate it as you do with any simple vector shape. The Font Awesome symbol picker. It’s a re-sizable window.To use as a vector shape
If you insert the symbol on the page as a graphic, then you can do all sorts of fancy things with it, because it’s just a simple vector shape. You can edit the vector outlines with the Shape Editor tool, combine it with other shapes, change the fill and outline style. A popular way to present an infographic symbol is inside a circle, like the examples at the start of this tutorial but you can present it in different ways. Let’s experiment with the Twitter symbol… First give it a graduated fill or any fill style you like. Here’s the same shape presented in different ways on a circular background: For this version - Use the Circle Tool to draw a simple white circle and give it a black outline. Drag the Twitter symbol onto the circle. If you have the Snap to Object option on then as you drag the symbol over the circle it will snap to be centered. Group the two objects for ease of manipulation afterwards. This is very similar - use the Circle Tool to draw a circle and color it blue. Drag the Twitter symbol onto the circle and color it white. Group the pair so they can now be treated as a single object. In this version, I placed the Twitter icon on a circle as above, then cut out the top shape from the circle leaving a hole, and then gave a soft shadow to the result - which helps emphasize the hole effect. To cut out one shape from another, select them both and select the menu Arrange Combine Shapes Subtract shapes, which will cut the top shape out of the lower one, leaving a hole. To add a soft shadow, select the object, choose the Shadow Tool and then drag the shadow away from the object. You can adjust the transparency and add a blur for more effect. Finally, using the first Twitter in a circle symbol above, ungroup it. I have given the Twitter symbol a 3pt outline (drop down menu on the top Tool bar) and changed its fill color to ‘No color’ so it’s the outline of the bird only, and then added a very slight soft shadow to the bird only which has the effect of slightly lifting it off the surface of the circle.To use as a font
When you have the text caret in some text (using the Text tool) and select the Insert Font Awesome Symbol option and pick a symbol, then it’s inserted into the text as a normal ‘character’ but using the font called FontAwesome. If you select this symbol in the Text tool you’ll see the font menu shows this font. The symbol adopts the same size as the surrounding text. To change the size of the inline symbol, just select it as you do for normal text (drag select or Shift+arrow) and change the font size. You can also set the color, or background color of the character using the usual color controls. Here’s an example: An enlarged icon in some text If you have the character inline like this because it’s just one character in the line with a different font, there are some ‘gotchas’ you need to be aware of. If you place the text caret next to the symbol and start typing - you’ll see nothing because your text will be coming out using the Font Awesome font - which has no symbols for the normal alphabetic range. This also means that if you apply a text style to the paragraph, e.g. ‘Normal text’, then the symbol will vanish and probably be replaced with a ‘missing’ rectangle like this which is sometimes shown when the font has no symbol - this is because the FontAwesome font has been replaced with the ‘Normal style’ font for all the characters in the paragraph. Websites: There’s no need to worry about using the font on website documents, as Xara automatically creates the correct web font (WOFF font) subsetting it to only the used symbols, to keep the file size down. This is compatible with all modern browsers, and because it’s a vector font outline, it means it’s always pin-sharp no matter what size and what device (e.g. on Retina or similar hi-res screens). Some more examples of the available symbols: You can use Font Awesome symbols and icons on your web pages and documents with Xara Web Designer 11, Xara Photo & Graphic Designer 11, Xara Page & Layout Designer 11 and Xara Designer Pro X11 – Try it Now for free! 


Copyright © 2015 Xara Group Limited, a MAGIX company.
Page created with Xara Designer Pro
FONT AWESOME SYMBOLS AND ICONS
FONT AWESOME SYMBOLS AND ICONS
FONT AWESOME SYMBOLS AND ICONS
FONT AWESOME SYMBOLS AND ICONS