


 I could simply add the ribbons as 2 thin rectangles but I want to give them a sheen effect for a touch of quality. Firstly, add the ribbons by
selecting the Rectangle tool and dragging the mouse to create a thin rectangle approximately 10mm high/wide and slightly longer than the
paper.
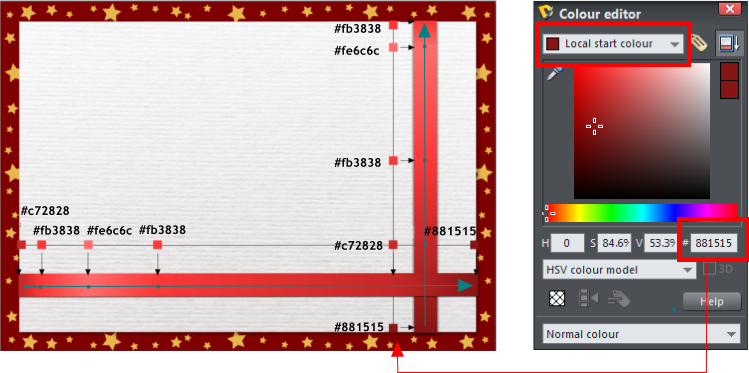
To achieve the sheen effect a multi-point linear fill is needed. With the vertical ribbon selected, choose the Fill tool and drag the fill arrow to go from
the bottom to the top of the ribbon. Click on the start of the fill arrow and, in the color editor, enter the color of #881515 as the Local start color. Now
click on the top end of the fill arrow and enter #fb3838 as the Local end color. To enter the color changes throughout the ribbon - double-click on the
line of the fill arrow and enter the color number. I used #c72828 near the crossover, #fb3838 midway and #fe6c6c near the end. The multiple points and
colors that I used on both the vertical and horizontal ribbons are shown in the following illustration.
You might notice that for a bit of final polish I have added a tight, dark wall shadow to the ribbon rectangles by selecting the Shadow tool, wall
shadow and moving the blur to about 0.25cm.
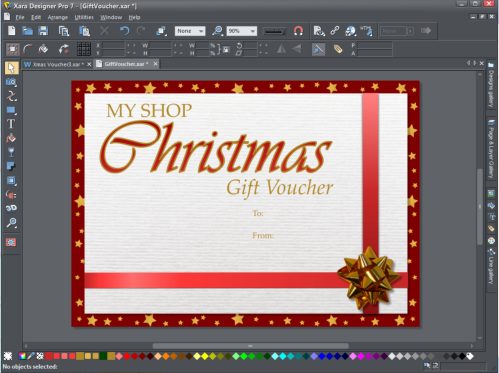
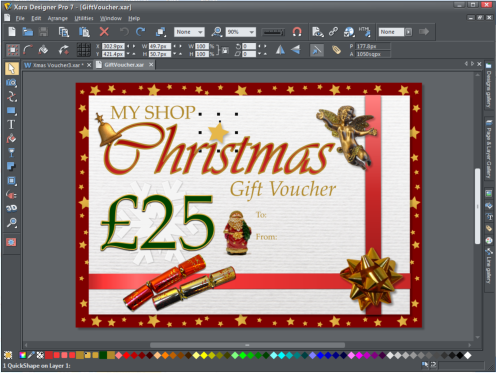
Now for the voucher content. Drag the xar file called Bow from the Designs Gallery and resize it, then add a drop shadow. We've even provided
the 'Christmas' heading as a graphic for you, so drag that onto the page too. It's looking great already so time to add the rest of the text. Select
the Text tool, choose the font - I used Palatino Linotype 36pt for 'My Shop' and for 'Gift Voucher' and 14pt for the 'To' and 'From' (of course you
can still resize the text and change the font after you have type it if you don't like the result). It's easy to change the color of the text - with the Text
tool selected, drag the cursor over the text to highlight it and then click on the color you're looking for on the color line, in this case gold.
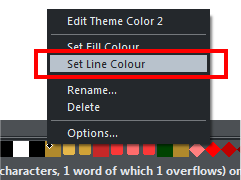
For the '£25' text I wanted to have a different effect, with a dark outline around the outside of the characters, so I selected Palatino Linotype 135pt and
set the line width from the drop-down list in the top bar to be 2pt. After typing my text, I highlighted it with my cursor and then selected the dark
green color from the color line, which made the text fill color green. With the text still highlighted I right clicked on the gold color on the color line,
then selected 'Set line color' in the menu, which made the outer line gold. I then used the Shadow tool to add a tight, dark wall shadow with 4px blur.
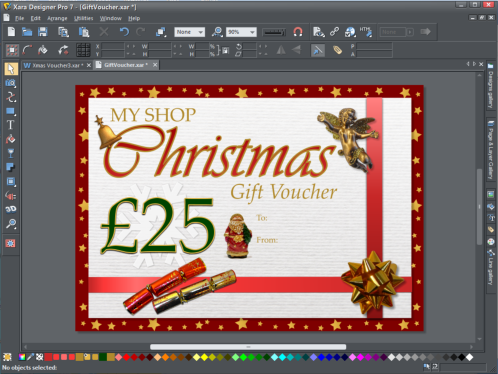
The final touches! All of these elements can be found in the free clipart in the Designs Gallery: Drag in the files called cherub, bell, crackers and
Father Christmas. Select each in turn and drag the corner handles to resize it, then add a drop shadow to make them less flat by lifting them off the
page. Add the snow flake and resize it. To put it behind the text, go to Arrange menu > Move backwards.
The final step is to add the star over the 'Christmas'. Add a QuickShape star, and select the Gold color from the color bar. Add a wall shadow and place it
over the dot in 'Christmas'. And that's it! An impressive gift voucher in no time at all!
I could simply add the ribbons as 2 thin rectangles but I want to give them a sheen effect for a touch of quality. Firstly, add the ribbons by
selecting the Rectangle tool and dragging the mouse to create a thin rectangle approximately 10mm high/wide and slightly longer than the
paper.
To achieve the sheen effect a multi-point linear fill is needed. With the vertical ribbon selected, choose the Fill tool and drag the fill arrow to go from
the bottom to the top of the ribbon. Click on the start of the fill arrow and, in the color editor, enter the color of #881515 as the Local start color. Now
click on the top end of the fill arrow and enter #fb3838 as the Local end color. To enter the color changes throughout the ribbon - double-click on the
line of the fill arrow and enter the color number. I used #c72828 near the crossover, #fb3838 midway and #fe6c6c near the end. The multiple points and
colors that I used on both the vertical and horizontal ribbons are shown in the following illustration.
You might notice that for a bit of final polish I have added a tight, dark wall shadow to the ribbon rectangles by selecting the Shadow tool, wall
shadow and moving the blur to about 0.25cm.
Now for the voucher content. Drag the xar file called Bow from the Designs Gallery and resize it, then add a drop shadow. We've even provided
the 'Christmas' heading as a graphic for you, so drag that onto the page too. It's looking great already so time to add the rest of the text. Select
the Text tool, choose the font - I used Palatino Linotype 36pt for 'My Shop' and for 'Gift Voucher' and 14pt for the 'To' and 'From' (of course you
can still resize the text and change the font after you have type it if you don't like the result). It's easy to change the color of the text - with the Text
tool selected, drag the cursor over the text to highlight it and then click on the color you're looking for on the color line, in this case gold.
For the '£25' text I wanted to have a different effect, with a dark outline around the outside of the characters, so I selected Palatino Linotype 135pt and
set the line width from the drop-down list in the top bar to be 2pt. After typing my text, I highlighted it with my cursor and then selected the dark
green color from the color line, which made the text fill color green. With the text still highlighted I right clicked on the gold color on the color line,
then selected 'Set line color' in the menu, which made the outer line gold. I then used the Shadow tool to add a tight, dark wall shadow with 4px blur.
The final touches! All of these elements can be found in the free clipart in the Designs Gallery: Drag in the files called cherub, bell, crackers and
Father Christmas. Select each in turn and drag the corner handles to resize it, then add a drop shadow to make them less flat by lifting them off the
page. Add the snow flake and resize it. To put it behind the text, go to Arrange menu > Move backwards.
The final step is to add the star over the 'Christmas'. Add a QuickShape star, and select the Gold color from the color bar. Add a wall shadow and place it
over the dot in 'Christmas'. And that's it! An impressive gift voucher in no time at all!


 © Xara Group 2011