
Lists are an important element of many documents. They are used in articles, company reports, literature, websites and especially,
presentations. Xara Designer has always been good at lists and each release improves on the previous. With the latest Update Service release
we have revamped the user interface and made the entire process more user friendly and easier to use.
To follow this tutorial and experiment with lists you’ll need a current version of Photo & Graphic Designer or Web Designer Premium or
Designer Pro X - if you don’t already own one then download the trial version of Designer Pro X, Photo & Graphic Designer or Xara Web
Designer Premium and give it a try!
The basics
With the Text Tool selected, on the InfoBar you will see the four buttons that are relevant to making lists – bulleted list, numbered list, outdent and indent. These controls work in the same way as most text editors. The first two buttons control the two types of lists: Bulleted list – this can be a simple bullet point or more decorative using any graphic you design or any symbol from the symbol library. Numbered list – these can be alphabetical, numerical or using roman numerals. You can turn any text into a list by selecting the text and then selecting one of the list buttons. Each paragraph of text will become a separate bullet. If you press Return to finish a line at the end of one bullet point, the next line starts with a bullet point too. Indent - All lists have the capability of supporting a hierarchy of lists within lists, known as sublists. To make a list become a sublist, select the list and then select the ‘indent’ button. • This is a bulleted list • This is a bulleted list o This is a second level sublist o This is a second level sublist • This is a third level sublist • This is a third level sublist Similarly numbered lists have indented sub lists with different numbering styles to indicate that it is a sublist. 1. This is a numbered list 2. This is a numbered list a. This is a second level sublist b. This is a second level sublist i. This is a third level sublist ii. This is a third level sublist Outdent - To return a sublist to a higher level select the ‘outdent’ button. Tip: Key short cuts - With the caret at the beginning of the line – indent = Tab / outdent = Shift+TabTo make a new list
Press the bullet or the number button and it goes into list mode, so now every time you press Return it starts a new bullet point. To exit press the button again to turn the list mode off, or use the short cut by pressing your Return key twice. This removes the last empty bulleted line and enables you to start entering normal text again.To create a sub list
With the caret at the start of the line of text, press the indent button or your ‘tab’ key. This indents the current bulleted line and changes the bullet character to a different style, to distinguish it from the parent bullet. If you are in a numbered list, the first sub level defaults to be alphabetical and the second sub level will be roman numbers. Pressing Return will keep you at the current sub level.Going back a level:
To move a bullet point from a sub list into its parent bulleted list simply place the carot at the beginning of the line of text and then select the outdent button, or press Shift + Tab. To move several bullet points from a sub list into its parent bulleted list select the bulleted text and then select the outdent button, or press Shift + Tab. Tip - Tab and Shift+Tab have to be done whilst at the beginning of the list item, whereas you can use the indent or outdent button with the caret anywhere within the list.Making an entry with no bullet or number
Every time you press the Return key it starts a new list item, however it’s common that you may want a normal paragraph within your list that has no bullet or number at the front. There are 2 ways to do this: • If you’re at the start of a new list item you can just press the backspace key once and now your paragraph will be bullet-less and at the right indent level (ie. the same indent as the bullet list). • Secondly, you can enter a soft return - press Shift + Return. A soft return is the same as a normal return, ie. it starts a new line but it’s actually part of the same paragraph, hence it has no new bullet/number. It can be used when you want to insert a blank line between paragraphs. 1. This is a numbered list 2. This is a numbered list a. This is a second level sublist b. This is a second level sublist This is a paragraph with no number or bullet at the start. Simply press the backspace key once when you are at the start of the text. To create a blank line use a ‘soft return’ by pressing Shift and Return. i. This is a third level sublist ii. This is a third level sublistExiting a list
To end the list, simply press the bullet or number button again. Or press Return on the start of a new line - each press of the Return key takes you back out one level and when you are the first level pressing Return will take you out of the list completely.Adjusting your indented list
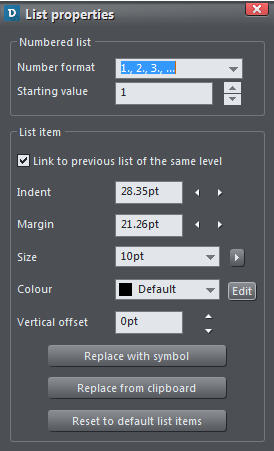
You can make various adjustments easily, such as the number format, font size and color, indent positions and margins. Place the caret within the text of your list and right click on your mouse. From the drop down menu that will be displayed, select ‘List properties’. The List properties dialog is modal, which means it will stay open as you make edits to your list items and you can instantly see your changes as you make them.Formatting your numbered lists
Using the options at the top of the List properties, you can choose the numbering scheme to be used for each of your lists from a variety of numbering schemes. You can also enter the value that should be used for the very first entry in the list. Then the number is automatically incremented for the second and subsequent entries in the list. Click on the text in your list that you wish to adjust and then choose your number format and the starting value. You can also link separate numbered lists so that the numbering of the second list carries on from the last number used in the previous list. This allows you to insert gaps, graphics, paragraphs etc. in the middle of lists. Place the caret in the text of the second list and then check the ‘Link to previous list’ checkbox. 1. This is a numbered list 2. This is a numbered list a. This is a second level sublist b. This is a second level sublist This is a paragraph with no bullet at the start. Simply press the backspace key once when you are at the start of the text. 3. The is a second list 4. I have linked it to the first listBullet / number font size and color
With the List Properties open, click on some text within the list that you wish to adjust. The adjustment will be made to the bullet or number; it will not change the font size or color of your text. • To change the font size of the bullet or number, select a size from the drop down list or select the arrow on the right which will display a slider control. • To change the color of the bullet or number click the Edit button to display the color picker. Once you have opened the color editor in this way you can select your color from the picker or click on any of the colors on the color line. 1. This is a numbered list with the number set to 12pt and colored red. 2. This is a numbered list a. This is a second level sublist with the ‘numbered’ bullet set to 8pt and colored blue b. This is a second level sublistPosition on the page
Occasionally, you may wish to adjust the position of your list. Click within the list that you wish to adjust and open the List properties, if it is not already open.Indent
Select this option to adjust the space between the numbers or bullets and the start of the list text. • This is a bulleted list with a small indent • This is a bulleted list 1. This is a numbered list with a large indent 2. This is a numbered listMargin
Select this option to adjust the space to the left of the bullet or number. This is normally used to adjust the horizontal offsets of sub-lists. 1. This is a numbered list 2. This is a numbered list a. This is a second level sublist with an increased margin b. This is a second level sublistVertical Offset
Depending upon which symbols you choose for your bullets (see below) you may find that the vertical position varies to that of the text or you may simply choose to have your numbered bullets offset. To realign the bullet select the Vertical offset option and use the up and down arrows to move the bullets or numbers up or down relative to the text.Using symbols and graphics as bullet points
You can change the bullets in your list to be any symbol or graphic. Numbered lists can be changed to use any graphic but not symbols.Symbol bullets
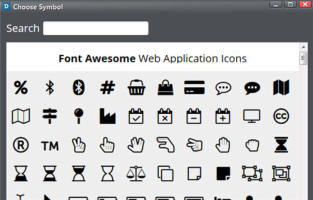
Select the Replace with symbol option in the List properties which will open the symbol picker. The symbols are displayed in several sections. If you choose any of the Material Icon symbols, you will probably need to adjust the vertical position of the symbol - see above. Font Awesome symbols don’t generally need an offset. Xara offers symbols from Font Awesome and a collection of Google Material Design Icons making more than 1500 symbols for you to choose from.Graphical bullets
Using graphics for your bullets in lists can be very attractive. You can select from the many bullet designs in the Online Content Catalog. Or you can design your own bullet using any of the normal drawing or text tools in Xara Designer (I used the Shape Tool to create a simple star and then I added a transparency fill and changed the color). Select your graphic and copy it to the clipboard (Ctrl+C or Edit>Copy) and then highlight the list you want to apply the style to using the Text Tool. Right click on the list and open the List properties then choose Replace from clipboard. The design will now appear as a bullet for each of the list items. This list has a graphic bullet This list has a graphic bulletGraphical bullets in numbered lists
Firstly, create your graphic using any of the normal drawing or text tools and then add some text, for example: Next group your graphic and text and then copy it to the clipboard (Ctrl+C or Edit>Copy). Now, in the Text Tool right click on the list to open the List properties and then select Replace from clipboard. This is a numbered list This is a numbered list As you see, lists are a very useful way to format text and the Xara titles offer lots of flexibility. If you don’t already own one, download the free trial of Designer Pro X, Photo & Graphic Designer or Xara Web Designer Premium – and give it a try!
Copyright © 2017 Xara Group Limited.
Page created with Xara Designer Pro


Lists are an important element of many documents. They are used in articles, company reports, literature,
websites and especially, presentations. Xara Designer has always been good at lists and each release
improves on the previous. With the latest Update Service release we have revamped the user interface and
made the entire process more user friendly and easier to use.
To follow this tutorial and experiment with lists you’ll need a current version of Photo & Graphic Designer or
Web Designer Premium or Designer Pro X - if you don’t already own one then download the trial version of
Designer Pro X, Photo & Graphic Designer or Xara Web Designer Premium and give it a try!
The basics
With the Text Tool selected, on the InfoBar you will see the four buttons that are relevant to making lists – bulleted list, numbered list, outdent and indent. These controls work in the same way as most text editors. The first two buttons control the two types of lists: Bulleted list – this can be a simple bullet point or more decorative using any graphic you design or any symbol from the symbol library. Numbered list – these can be alphabetical, numerical or using roman numerals. You can turn any text into a list by selecting the text and then selecting one of the list buttons. Each paragraph of text will become a separate bullet. If you press Return to finish a line at the end of one bullet point, the next line starts with a bullet point too. Indent - All lists have the capability of supporting a hierarchy of lists within lists, known as sublists. To make a list become a sublist, select the list and then select the ‘indent’ button. • This is a bulleted list • This is a bulleted list o This is a second level sublist o This is a second level sublist • This is a third level sublist • This is a third level sublist Similarly numbered lists have indented sub lists with different numbering styles to indicate that it is a sublist. 1. This is a numbered list 2. This is a numbered list a. This is a second level sublist b. This is a second level sublist i. This is a third level sublist ii. This is a third level sublist Outdent - To return a sublist to a higher level select the ‘outdent’ button. Tip: Key short cuts - With the caret at the beginning of the line – indent = Tab / outdent = Shift+TabTo make a new list
Press the bullet or the number button and it goes into list mode, so now every time you press Return it starts a new bullet point. To exit press the button again to turn the list mode off, or use the short cut by pressing your Return key twice. This removes the last empty bulleted line and enables you to start entering normal text again.To create a sub list
With the caret at the start of the line of text, press the indent button or your ‘tab’ key. This indents the current bulleted line and changes the bullet character to a different style, to distinguish it from the parent bullet. If you are in a numbered list, the first sub level defaults to be alphabetical and the second sub level will be roman numbers. Pressing Return will keep you at the current sub level.Going back a level:
To move a bullet point from a sub list into its parent bulleted list simply place the carot at the beginning of the line of text and then select the outdent button, or press Shift + Tab. To move several bullet points from a sub list into its parent bulleted list select the bulleted text and then select the outdent button, or press Shift + Tab. Tip - Tab and Shift+Tab have to be done whilst at the beginning of the list item, whereas you can use the indent or outdent button with the caret anywhere within the list.Making an entry with no bullet or number
Every time you press the Return key it starts a new list item, however it’s common that you may want a normal paragraph within your list that has no bullet or number at the front. There are 2 ways to do this: • If you’re at the start of a new list item you can just press the backspace key once and now your paragraph will be bullet-less and at the right indent level (ie. the same indent as the bullet list). • Secondly, you can enter a soft return - press Shift + Return. A soft return is the same as a normal return, ie. it starts a new line but it’s actually part of the same paragraph, hence it has no new bullet/number. It can be used when you want to insert a blank line between paragraphs. 1. This is a numbered list 2. This is a numbered list a. This is a second level sublist b. This is a second level sublist This is a paragraph with no number or bullet at the start. Simply press the backspace key once when you are at the start of the text. To create a blank line use a ‘soft return’ by pressing Shift and Return. i. This is a third level sublist ii. This is a third level sublistExiting a list
To end the list, simply press the bullet or number button again. Or press Return on the start of a new line - each press of the Return key takes you back out one level and when you are the first level pressing Return will take you out of the list completely.Adjusting your indented list
You can make various adjustments easily, such as the number format, font size and color, indent positions and margins. Place the caret within the text of your list and right click on your mouse. From the drop down menu that will be displayed, select ‘List properties’. The List properties dialog is modal, which means it will stay open as you make edits to your list items and you can instantly see your changes as you make them.Formatting your numbered lists
Using the options at the top of the List properties, you can choose the numbering scheme to be used for each of your lists from a variety of numbering schemes. You can also enter the value that should be used for the very first entry in the list. Then the number is automatically incremented for the second and subsequent entries in the list. Click on the text in your list that you wish to adjust and then choose your number format and the starting value. You can also link separate numbered lists so that the numbering of the second list carries on from the last number used in the previous list. This allows you to insert gaps, graphics, paragraphs etc. in the middle of lists. Place the caret in the text of the second list and then check the ‘Link to previous list’ checkbox. 1. This is a numbered list 2. This is a numbered list a. This is a second level sublist b. This is a second level sublist This is a paragraph with no bullet at the start. Simply press the backspace key once when you are at the start of the text. 3. The is a second list 4. I have linked it to the first listBullet / number font size and color
With the List Properties open, click on some text within the list that you wish to adjust. The adjustment will be made to the bullet or number; it will not change the font size or color of your text. • To change the font size of the bullet or number, select a size from the drop down list or select the arrow on the right which will display a slider control. • To change the color of the bullet or number click the Edit button to display the color picker. Once you have opened the color editor in this way you can select your color from the picker or click on any of the colors on the color line. 1. This is a numbered list with the number set to 12pt and colored red. 2. This is a numbered list a. This is a second level sublist with the ‘numbered’ bullet set to 8pt and colored blue b. This is a second level sublistPosition on the page
Occasionally, you may wish to adjust the position of your list. Click within the list that you wish to adjust and open the List properties, if it is not already open.Indent
Select this option to adjust the space between the numbers or bullets and the start of the list text. • This is a bulleted list with a small indent • This is a bulleted list 1. This is a numbered list with a large indent 2. This is a numbered listMargin
Select this option to adjust the space to the left of the bullet or number. This is normally used to adjust the horizontal offsets of sub-lists. 1. This is a numbered list 2. This is a numbered list a. This is a second level sublist with an increased margin b. This is a second level sublistVertical Offset
Depending upon which symbols you choose for your bullets (see below) you may find that the vertical position varies to that of the text or you may simply choose to have your numbered bullets offset. To realign the bullet select the Vertical offset option and use the up and down arrows to move the bullets or numbers up or down relative to the text.Using symbols and graphics as bullet
points
You can change the bullets in your list to be any symbol or graphic. Numbered lists can be changed to use any graphic but not symbols.Symbol bullets
Select the Replace with symbol option in the List properties which will open the symbol picker. The symbols are displayed in several sections. If you choose any of the Material Icon symbols, you will probably need to adjust the vertical position of the symbol - see above. Font Awesome symbols don’t generally need an offset. Xara offers symbols from Font Awesome and a collection of Google Material Design Icons making more than 1500 symbols for you to choose from.Graphical bullets
Using graphics for your bullets in lists can be very attractive. You can select from the many bullet designs in the Online Content Catalog. Or you can design your own bullet using any of the normal drawing or text tools in Xara Designer (I used the Shape Tool to create a simple star and then I added a transparency fill and changed the color). Select your graphic and copy it to the clipboard (Ctrl+C or Edit>Copy) and then highlight the list you want to apply the style to using the Text Tool. Right click on the list and open the List properties then choose Replace from clipboard. The design will now appear as a bullet for each of the list items. This list has a graphic bullet This list has a graphic bulletGraphical bullets in numbered lists
Firstly, create your graphic using any of the normal drawing or text tools and then add some text, for example: Next group your graphic and text and then copy it to the clipboard (Ctrl+C or Edit>Copy). Now, in the Text Tool right click on the list to open the List properties and then select Replace from clipboard. This is a numbered list This is a numbered list As you see, lists are a very useful way to format text and the Xara titles offer lots of flexibility. If you don’t already own one, download the free trial of Designer Pro X, Photo & Graphic Designer or Xara Web Designer Premium – and give it a try!


Copyright © 2017 Xara Group Limited.
Page created with Xara Designer Pro

Lists are an important element of many documents. They are used in
articles, company reports, literature, websites and especially,
presentations. Xara Designer has always been good at lists and each
release improves on the previous. With the latest Update Service
release we have revamped the user interface and made the entire
process more user friendly and easier to use.
To follow this tutorial and experiment with lists you’ll need a current
version of Photo & Graphic Designer or Web Designer Premium or
Designer Pro X - if you don’t already own one then download the trial
version of Designer Pro X, Photo & Graphic Designer or Xara Web
Designer Premium and give it a try!
The basics
With the Text Tool selected, on the InfoBar you will see the four buttons that are relevant to making lists – bulleted list, numbered list, outdent and indent. These controls work in the same way as most text editors. The first two buttons control the two types of lists: Bulleted list – this can be a simple bullet point or more decorative using any graphic you design or any symbol from the symbol library. Numbered list – these can be alphabetical, numerical or using roman numerals. You can turn any text into a list by selecting the text and then selecting one of the list buttons. Each paragraph of text will become a separate bullet. If you press Return to finish a line at the end of one bullet point, the next line starts with a bullet point too. Indent - All lists have the capability of supporting a hierarchy of lists within lists, known as sublists. To make a list become a sublist, select the list and then select the ‘indent’ button. • This is a bulleted list • This is a bulleted list o This is a second level sublist o This is a second level sublist • This is a third level sublist • This is a third level sublist Similarly numbered lists have indented sub lists with different numbering styles to indicate that it is a sublist. 1. This is a numbered list 2. This is a numbered list a. This is a second level sublist b. This is a second level sublist i. This is a third level sublist ii. This is a third level sublist Outdent - To return a sublist to a higher level select the ‘outdent’ button. Tip: Key short cuts - With the caret at the beginning of the line – indent = Tab / outdent = Shift+TabTo make a new list
Press the bullet or the number button and it goes into list mode, so now every time you press Return it starts a new bullet point. To exit press the button again to turn the list mode off, or use the short cut by pressing your Return key twice. This removes the last empty bulleted line and enables you to start entering normal text again.To create a sub list
With the caret at the start of the line of text, press the indent button or your ‘tab’ key. This indents the current bulleted line and changes the bullet character to a different style, to distinguish it from the parent bullet. If you are in a numbered list, the first sub level defaults to be alphabetical and the second sub level will be roman numbers. Pressing Return will keep you at the current sub level.Going back a level:
To move a bullet point from a sub list into its parent bulleted list simply place the carot at the beginning of the line of text and then select the outdent button, or press Shift + Tab. To move several bullet points from a sub list into its parent bulleted list select the bulleted text and then select the outdent button, or press Shift + Tab. Tip - Tab and Shift+Tab have to be done whilst at the beginning of the list item, whereas you can use the indent or outdent button with the caret anywhere within the list.Making an entry with no bullet or
number
Every time you press the Return key it starts a new list item, however it’s common that you may want a normal paragraph within your list that has no bullet or number at the front. There are 2 ways to do this: • If you’re at the start of a new list item you can just press the backspace key once and now your paragraph will be bullet- less and at the right indent level (ie. the same indent as the bullet list). • Secondly, you can enter a soft return - press Shift + Return. A soft return is the same as a normal return, ie. it starts a new line but it’s actually part of the same paragraph, hence it has no new bullet/number. It can be used when you want to insert a blank line between paragraphs. 1. This is a numbered list 2. This is a numbered list a. This is a second level sublist b. This is a second level sublist This is a paragraph with no number or bullet at the start. Simply press the backspace key once when you are at the start of the text. To create a blank line use a ‘soft return’ by pressing Shift and Return. i. This is a third level sublist ii. This is a third level sublistExiting a list
To end the list, simply press the bullet or number button again. Or press Return on the start of a new line - each press of the Return key takes you back out one level and when you are the first level pressing Return will take you out of the list completely.Adjusting
your
indented
list
You can make various adjustments easily, such as the number format, font size and color, indent positions and margins. Place the caret within the text of your list and right click on your mouse. From the drop down menu that will be displayed, select ‘List properties’. The List properties dialog is modal, which means it will stay open as you make edits to your list items and you can instantly see your changes as you make them.Formatting your numbered lists
Using the options at the top of the List properties, you can choose the numbering scheme to be used for each of your lists from a variety of numbering schemes. You can also enter the value that should be used for the very first entry in the list. Then the number is automatically incremented for the second and subsequent entries in the list. Click on the text in your list that you wish to adjust and then choose your number format and the starting value. You can also link separate numbered lists so that the numbering of the second list carries on from the last number used in the previous list. This allows you to insert gaps, graphics, paragraphs etc. in the middle of lists. Place the caret in the text of the second list and then check the ‘Link to previous list’ checkbox. 1. This is a numbered list 2. This is a numbered list a. This is a second level sublist b. This is a second level sublist This is a paragraph with no bullet at the start. Simply press the backspace key once when you are at the start of the text. 3. The is a second list 4. I have linked it to the first listBullet / number font size and color
With the List Properties open, click on some text within the list that you wish to adjust. The adjustment will be made to the bullet or number; it will not change the font size or color of your text. • To change the font size of the bullet or number, select a size from the drop down list or select the arrow on the right which will display a slider control. • To change the color of the bullet or number click the Edit button to display the color picker. Once you have opened the color editor in this way you can select your color from the picker or click on any of the colors on the color line. 1. This is a numbered list with the number set to 12pt and colored red. 2. This is a numbered list a. This is a second level sublist with the ‘numbered’ bullet set to 8pt and colored blue b. This is a second level sublistPosition on the page
Occasionally, you may wish to adjust the position of your list. Click within the list that you wish to adjust and open the List properties, if it is not already open.Indent
Select this option to adjust the space between the numbers or bullets and the start of the list text. • This is a bulleted list with a small indent • This is a bulleted list 1. This is a numbered list with a large indent 2. This is a numbered listMargin
Select this option to adjust the space to the left of the bullet or number. This is normally used to adjust the horizontal offsets of sub- lists. 1. This is a numbered list 2. This is a numbered list a. This is a second level sublist with an increased margin b. This is a second level sublistVertical Offset
Depending upon which symbols you choose for your bullets (see below) you may find that the vertical position varies to that of the text or you may simply choose to have your numbered bullets offset. To realign the bullet select the Vertical offset option and use the up and down arrows to move the bullets or numbers up or down relative to the text.Using symbols
and graphics as
bullet points
You can change the bullets in your list to be any symbol or graphic. Numbered lists can be changed to use any graphic but not symbols.Symbol
bullets
Select the Replace with symbol option in the List properties which will open the symbol picker. The symbols are displayed in several sections. If you choose any of the Material Icon symbols, you will probably need to adjust the vertical position of the symbol - see above. Font Awesome symbols don’t generally need an offset. Xara offers symbols from Font Awesome and a collection of Google Material Design Icons making more than 1500 symbols for you to choose from.Graphical bullets
Using graphics for your bullets in lists can be very attractive. You can select from the many bullet designs in the Online Content Catalog. Or you can design your own bullet using any of the normal drawing or text tools in Xara Designer (I used the Shape Tool to create a simple star and then I added a transparency fill and changed the color). Select your graphic and copy it to the clipboard (Ctrl+C or Edit>Copy) and then highlight the list you want to apply the style to using the Text Tool. Right click on the list and open the List properties then choose Replace from clipboard. The design will now appear as a bullet for each of the list items. This list has a graphic bullet This list has a graphic bulletGraphical bullets in numbered lists
Firstly, create your graphic using any of the normal drawing or text tools and then add some text, for example: Next group your graphic and text and then copy it to the clipboard (Ctrl+C or Edit>Copy). Now, in the Text Tool right click on the list to open the List properties and then select Replace from clipboard. This is a numbered list This is a numbered list As you see, lists are a very useful way to format text and the Xara titles offer lots of flexibility. If you don’t already own one, download the free trial of Designer Pro X, Photo & Graphic Designer or Xara Web Designer Premium – and give it a try!


Copyright © 2017 Xara Group Limited.
Page created with Xara Designer Pro
WORKING WITH LISTS
WORKING WITH LISTS
WORKING WITH LISTS