


Website Tools
Xara Xtreme 4 introduced some tools and functions for creating a web page or small website. These tools worked and with a few workarounds were
quite effective. Roll over buttons and pop up images could be created by creating some special layers. And workarounds were found to provide more
flexibility.
Then Xara introduced Xara Web Designer, which built upon these tools. Many functions such as pop up images, mouse over buttons and effects, and
automatic updating of certain items on all pages became simpler and more direct. A lot of thought went into Web Designer and all these innovations
found in Xara Web Designer are also been included in Xara Xtreme 5.0. But Xara Xtreme 5.0 has moved the bar higher introducing new features and
new capabilities as the Xara R & D team continues to make Xara a powerful website creation tool.
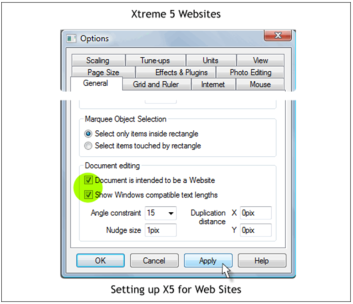
For openers, there are two new settings in the General tabbed section of the Options dialog (Utilities > Options... or right click on the page and select
Page Options). The two options shown above set up Xtreme 5.0 for website creation and make subtle changes designed to optimize web page creation.
The second checked item, Show Windows Compatible Text Lengths takes into account how most browsers display text and inherent browser limitations
and makes adjustments to the text to ensure that what you design is what you get.
I admit to being a throwback as you can see in the settings above. I have always used Ctrl D instead of Ctrl K (Clone) to make an in place duplicate. Old
habits die hard as they say. Except in Xtreme 5, Ctrl D is now consistent with Photoshop’s Remove Mask command so I had to change the keyboard
shortcut back using the Customize Key Shortcuts in the Utilities dialog.
There is a special Website Control Bar for website work which will be familiar to users of Web Designer. By default, this is disabled. But if you open the
Control Bars dialog (Window dialog), and scroll down a bit, you will see it. Check the Website check box and close the dialog. The tool bar, shown
above top right, containing a set of tools for working with your website design will be added to the Infobar.
The functions are explained below.
Export and Preview Website
This function creates a temporary HTML document and displays your page in a special browser. This is useful for seeing how your page will look in a
browser and for testing your buttons and other effects.
Export Website
Use this function when you have completed your page to create a permanent set of HTML files. These files will later be uploaded to your website host’s
server via FTP (File Transfer Protocol).
Link
A menu of link options.
Website Properties
The main dialog of tools and settings and effects including Link.
Export Selections as JPEG and PNG
In Web Designer, there is no Create Bitmap Copy function, so you need these buttons to export a selection as a JPEG or 8-bit PNG.
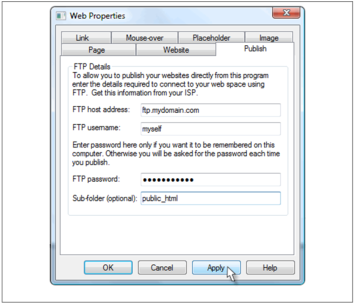
Publish to FTP Site
Once you have created your web page or website, and you have entered your web host log in information, user id, password, and so forth in the Publish
tabbed section of the Web Properties dialog, this button uploads your page or website to your web host’s computer.
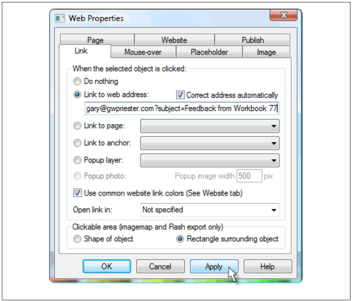
Here is the Web Properties dialog. In the Link tabbed section you can link to a web address, http://www.xaraxone.com for example, or you can link to
an image that is posted on the web. If you enter an e-mail address, Xara creates a link that opens the visitor’s e-mail program and inserts your e-mail
address in a new message. If you have checked Correct Address Automatically, Xtreme will automatically add things in the HTML file such as mailto: in
front of an e-mail address.
TIP: If you add an e-mail link to text such as Send e-mail instead of the actual e-mail address, Xtreme encodes the e-mail address to hide it from those
insidious spambots that scour the web harvesting e-mail addresses to add to Spam lists.
You can add a link to another page, to an anchor (text or an image), to a Pop Up Layer or to a larger version of a small thumbnail image (Popup Photo).
You can also specify alternate website link colors (usually blue) and designate an optional place in which to Open link in, such as in a new window.
IMPORTANT: Xtreme will not automatically apply any links or information until you press Apply. So always remember to press APPLY. If necessary, affix a
post-it note to that effect on your forehead or glasses.
Here’s a sample of FTP information entered in the Publish tabbed section. Your web host can tell you what needs to go here if you are not sure. Please
do not use this information.
Placeholders are a very convenient way to add predesigned content to your website. For example, you can create a form on websites such as
Jotform.com or emailmeform.com, generate a script for that form on the website, then copy and paste the script into the Replace with HTML Code
text entry box. You need a placeholder, which is just a simple rectangle to the approximate size of what will replace the placeholder on export. Select
the placeholder object then link to a replacement file or add a replacement script.
You can also create a placeholder for a Flash animation or a graphic image which will replace the placeholder image in your visitor’s browser.
Remember to press APPLY. A P P L Y
The Image tab section is where you can add Alt text to an image that will appear when the visitor lets her or his mouse hover over the image for a
moment or two. This is a good place to add a copyright line to your image.
By default, Xtreme will determine what format to export your selection. But in some cases you may wish to override this.
Did I remind you to press APPLY to apply your changes?
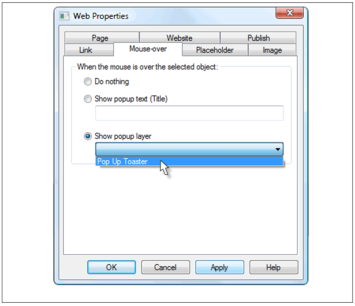
In the Mouse-over section you can have text appear when the visitor mouses over an image, or you can activate a popup layer. This is a good way to pop
up a small shape containing explanatory text.
This is different from linking to a pop up layer in that a mouse over disappears as soon as you mouse off the image. With a link to a popup layer, the
popup layer remains until the visitor clicks another link or object.
In the Page and Website tab sections you can add a title for your page and for your home page, add meta tags such as Description and Keywords to help
search engines find your site, author’s name and copyright and other important information.
And what do you need to press to APPLY each change?
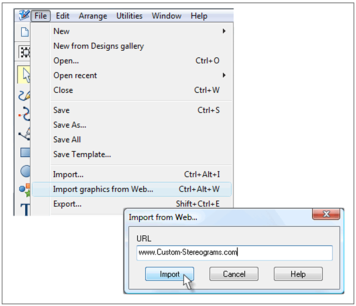
In the File menu is an option to Import Graphics from Web... This imports all of the images on the specified page into your Xtreme page. This is a
useful function if you need to recreate an existing website. Xtreme however does not import the HTML script. So you need to place the images on the
page yourself. And if the website has mouse over buttons or pop up images these will not import.
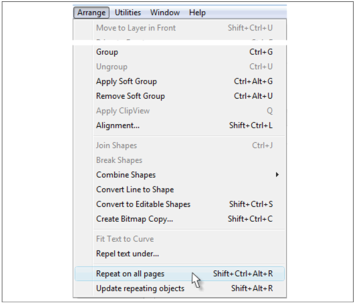
There are some very powerful new features that have been added to the Arrange menu.
Soft Group Let’s say you have a navigation button with three different button states: (MouseOff, MouseOver, MouseDown). Each of the button states is a
group consisting of a rectangle and some text. You can Apply Soft Group to these three groups which lets you edit all three buttons at one time. For
example, if the button text reads Contact Information and you decide to change the text to Contact Us, if you change the text once, the text for the
other buttons in the soft group will automatically change at the same time.
Repeat on All Pages places a copy of a selected object, a banner or a navigation bar for example, on all the pages of your site. This automatically
becomes a “repeating object”. If you edit the color, position, link, or text and press Update Repeating Objects, all instances of that object are
automatically updated throughout your site.
In the past, you could hold down the Shift key, and drag a bitmap image from a folder or from the desktop and drop it onto another photo, a rectangle,
some text, or an irregular shape, and the bitmap image would replace or be applied to that photo or object.
I use Shift drag and drop all of the time to replace a cloned photo with a new photo. This not only resizes the dropped photo to the desired size, it
retains attributes such as transparency type.
Not so any more. Now if you have a photo of a Chevrolet, and you clone that photo (two Chevrolets), and then hold down the Shift key, drag and drop a
photo of a Ford on top of the Chevy, you will have two copies of the Ford. The Chevy will be replaced. Ouch!
There’s a good side to this as well. Let’s say the photo appears on each page inside the banner. When you Shift drag and drop a new photo onto the
banner, it is automatically replaced in every instance of that photo. Not only that, but if the photo is used as a fill in a variety of different shapes and
sizes, it is resized accordingly. On every page in which it appears.
OK, you ask, and well you might, what if I do not want to replace even so much as one instance of the
existing photo? I want my photos of both the Chevy and the Ford. Not a problem. Instead of holding
down the Shift key, hold down the Ctrl key before you drop the photo. A requester such as the one
shown above (in two halves to fit on the page) appears with the options to: Replace All, Replace All on
this Page (presuming the image appears on other pages too), or Replace Just This Photo.
I wanted to test out some of the new features and as it so happens, I needed a new artist’s gallery
format for a local artist website that I handle. Here’s a link to the new gallery format. Normally, each
artist’s gallery consists of a home page, an artist’s statement, a contact information page, and 8 gallery
pages. That’s 11 pages in all. I got it all down to one page.
The thumbnail images link to larger images on separate pop up layers. The artist’s statement and the
contact information are also on separate pop up layers and linked to with the navigation buttons. The
last button links back to the main website. Very tidy if I do say so myself.
Gary W. Priester


© Gary Priester 2009


