
The Xara Designer titles - Photo & Graphic Designer, Page & Layout Designer, Web Designer and Designer Pro - all provide comprehensive control over applying, creating and
altering the colors of objects. For simple documents, you can just choose colors from the Color Line or the on-screen color palette. For more advanced color editing there's
named colors, graduated color, tints, shades, linked colors and contoning. Many documents and web templates provided are based on one theme color and several other colors
that work well together to form a complete color scheme.
We're going to show you how to edit your colors easily and effectively. If you don’t already own one of the Designer titles why not download the free trial version of Xara Photo &
Graphic Designer and follow this tutorial.
We’ll start with an explanation of the important core functions - the Color Line, the Color Line Context menu and the Color Editor.
The Color Line
The Color Line is displayed at the bottom of the editor window. It shows you the current fill and line colors, provides access to the color editor and provides a palette of pre- defined colors. The Color Line 1. Color swatch - The outer rectangle of the color swatch shows the outline color and the center rectangle shows the fill color. These are the colors of any selected objects, or the current color attributes if no objects are selected. 2. Color editor - click to display the Color editor. 3. Color picker - The eye-dropper can be used to pick a color from any part of the document or any part of the computer screen including colors visible in other software. 4. No color - Clicking this applies a ‘no color fill’. A shift-click applies ‘no color’ to a line. The No Color button can also be used to restore the original colors to a photo which has had a contone color applied. 5. Current Fill color - A diamond marker in the top left denotes the fill color of the currently selected object 6. Current Line color - A diamond marker in the top right denotes the line color of the currently selected object. By default, there is a 'Standard Palette' of 46 pre-defined colors. There are 5 shades of 7 standard hues and 10 shades of gray, black and white. Standard Palette colors are not editable as they are designed as a simple, limited selection of colors to apply to objects. Xara Designer Pro users also have access to the PANTONE® color palettes. If the length of the Color Line exceeds the window, you can scroll through the Color Line with the scroll bar below or by holding down the Alt key and dragging the Color Line.Applying Line and Fill colors
To change the color of some text or an object simply select the text or object and then click on a color on the color line or click-drag the color onto the text/object. To set the line or outline color, drop the color on the line and not in the center. To change the page background color hold on ‘Ctrl’ and drag a color onto the background. When dragging colors, an indicator beside the pointer tells you what will be affected when you drop the color, ie. set flat fill color, line color, start or end color of a graduated fill or the page background.The Color Line Context Menu
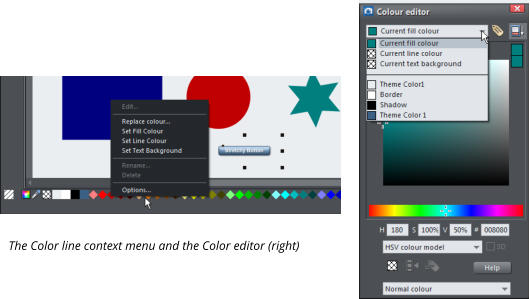
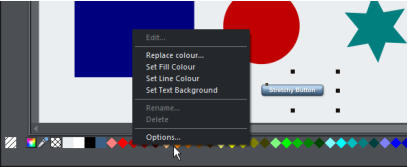
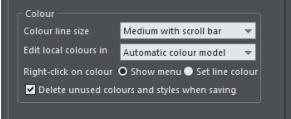
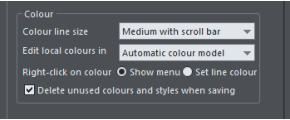
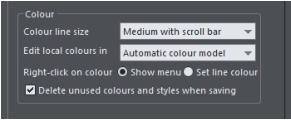
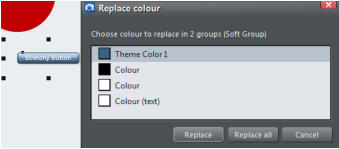
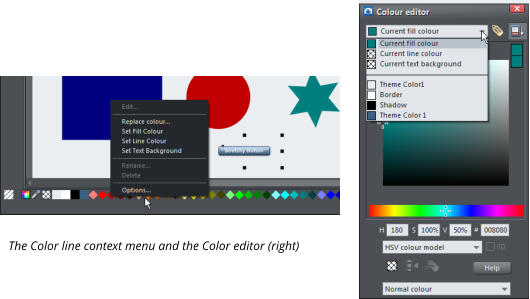
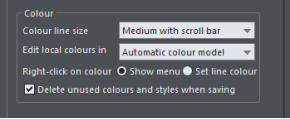
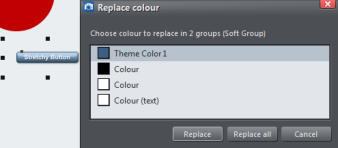
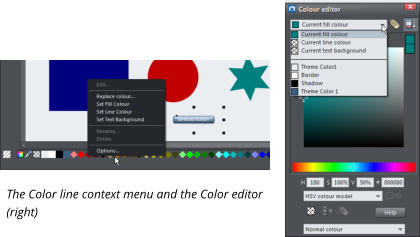
Right click on a color on the Color Line to show a context sensitive menu: Color Line Context Menu Edit / Rename and Delete - note, these are not available for the 46 pre-defined palette colors Replace Color - this option is only shown when the selected object has multiple component parts or multiple colors, such as a button group, text panels, logos and other graphics. Simply select the color that you wish to change. Replace Color option in the Color Line Context Menu Tip: You can replace the use of Named Colors with unnamed/local colors, or vice-versa. So for example, you could take a graphic that uses Theme Color 1 and replace it with Theme Color 2. From then on, editing Theme Color 2 in your document would change the button color too. Or replace Theme Color 1 with a local color, so the button is no longer linked to any theme colors at all. And you can use this facility to quickly apply Named Colors to graphics that were not originally designed to use Named Colors at all. Set Fill color / Set Line color - set the fill or line color of the selected object with this color. Set Text Background - set the the color for a text background - like a highlighter. Options - this opens the ‘Page Options’ > ‘View’ tab where you can change the appearance and attributes of the Color line. Options to change the attributes of the Color Line If the selected object is a bitmap, the fill and line color options are supplemented with options to Set contone dark color / Set contone light color.Selecting the ‘No color’ swatch Context Menu
When right clicking the "no color" swatch, the fill and line color options are replaced by: Clear fill color / Clear line color / Clear text background. This sets the selected object's relative attributes to "no color". When applied to a contoned photo/bitmap, this restores the original image colors.The Color Editor
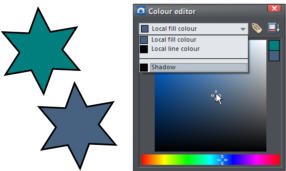
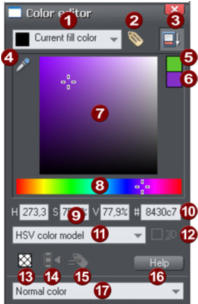
The Color Editor allows you to select from any color of the spectrum. Unlike most graphics programs the Color Editor can remain on screen while you continue to work. It changes to reflect the color of the selected objects. Select the text, line or object that you want to color and access the Color Editor using one of these methods: • Choose ‘Utilities’ > ‘Color editor’. • Click ‘Ctrl+ E’. • Click the ‘Edit color’ icon or double click on the ‘Current line and fill color’ icon on the Color line. • With an object selected, right click the object and choose Fill Color. 1. Shows what you are editing 2. New named color 3. Show/hide advanced options 4. Eye dropper color picker 5. Previous color 6. Current color 7. Color panel (color model dependent) 8. HSV hue selector 9. Numeric values (color model dependent) 10. RGB hex color value 11. Color model (HSV, RGB, CMYK or grayscale) 12. 3D editor mode option (only RGB & CMYK) 13. No color patch (only available when editing local color) 14. Make Named Color local to Frame/Layer 15. Rename named color 16. Color editor help 17. Type of color: Normal, Spot (if available), Tint, Shade or Linked The full color editor - click Hide Advanced Options to display the smaller, simpler versionPrevious and Current Color
As you drag on the color editor the two small color swatches in the upper right of the color editor show the current color and the previous (before you started changing the color). This is useful if you want to make a small change and want to compare the old and new colors. Changing the color of the star objectSpecifying Exact Colors
You can enter precise RGB (or HSV or CMYK) color values by number or percentage. The most common requirement for web graphics is to enter a hexadecimal RGB color and you can do this with the color editor showing either HSV colors (the default) or showing RGB colors. Percentages are used by default, but you can change which format is used: Go to Utilities > Options and display the Units tab, then click the appropriate radio button in the Color units section.Using the Eye-dropper to Pick Colors
Instead of selecting hues and shades on the Color Editor you can instead pick a color from any part of the document or any part of the computer screen - even from other windows and programs. You can access the eye-dropper from the Color Editor or the Color line. Just click and drag on the eye dropper icon . As you drag you see the Color Editor continuously picks up the color under the eye-dropper. Release the mouse button when you have the desired color. This is an easy and quick way to use the same color again or copy colors from photos or from one object to another. The color sampler shows a small pop-up at the mouse pointer which indicates the color that is being sampled at that point. This will either be the palette color name, the name of a Named Color, or the color model and color value.Copying Colors and Styles
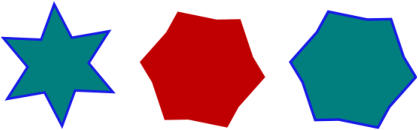
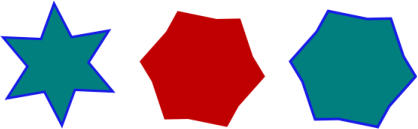
When creating a new object, such as a shape, the object will adopt the color attributes of the last color used. If you wish to copy attributes from one object to another, select the object from which you wish to copy the attributes and copy the selection to the clipboard. using ‘Ctrl + C’ (or ’Edit’ > ‘Copy’). Select the object(s) to which you want to apply the attributes and paste the attributes with ‘Ctrl + Shift + A’ (or ‘Edit’ > ‘Paste format/attributes’). The attributes remain on the clipboard until overwritten by a cut or copy operation. This lets you repeat paste attributes as many times as required. The star has a specific fill and line color. Copying and then pasting its attributes onto the red star polygon in the middle, results in the star polygon to the right.Graduated Colors
To create a graduated color fill, select the fill tool and drag the ends of the arrows to set the graduated area. Select the handle at the ‘blunt’ end of the arrow and click on a color on the color line to add it. Then click on the arrow point to change the color at that end. Instead of just fading from one color to another, you can create a multicolor object. To introduce another color, double click on the fill arrow to create a new fill handle and then select a color. (To remove a fill stage handle, just click on it to select it, and press ‘Del’). You can drag the end of the arrow to change the direction of the graduated fill. Using the Fill tool you will have access to 11 different fill effects, such as linear, elliptical, diamond and conical. Creating a graduated fillColors on the Screen and on the Printer
One problem with computer screens is that their colors do not match the available colors on a printer. Screens emit combinations of red, green and blue. The brightness control has a dramatic effect on displayed colors. Printed images reflect combinations of cyan, magenta, yellow and black. As an example, pure green on computer screen is a fluorescent bright color that is impossible to reproduce accurately on any printer. Similarly pure blue on a computer screen will often print as a much darker purple-blue. Technically, the range of colors on a computer screen (known as the "color gamut") is far greater than that on a printer. So there will always be differences between screen and print colors. Xara provides the ability to simulate how printed colors will look. Select the 'Windows -> Show printer colors -> Simulate print colors' menu to get a better idea of how your colors will look when printed. This is an approximation only since printers vary slightly, but it is far more accurate than normal screen colors. Tip: To get bright blue on a printer, select a color on screen that is almost pure cyan (a printer's cyan is much more blue than screen cyan).Next Month
Next month we’ll explore local, theme and Named Colors, creating tints, shades and linked colors, contoning photos, and creating your own color schemes.The Xara Designer Titles
Xara Photo & Graphic Designer is a high-powered general purpose graphics creation tool, able to create graphic designs of all types, from web graphics to page layouts such as posters and flyers, cartoons, and the most complex illustrations. Xara Web Designer is a great choice for both novices and professional web designers, in fact anyone wanting a high quality website, without the need to know HTML coding, scripting or the usual technical jargon. Xara Designer Pro is the ultimate all-in-one creative software, that provides powerful vector illustration, photo editing, page layout and website design, in one unrivaled WYSIWYG design tool. Download the free trial of Xara Photo & Graphic Designer and/or Xara Web Designer or Xara Designer Pro and give it a go!
Copyright © 2016 Xara Group Limited, a MAGIX company.
Page created with Xara Designer Pro


The Xara Designer titles - Photo & Graphic Designer, Page & Layout Designer, Web Designer and Designer Pro - all provide comprehensive
control over applying, creating and altering the colors of objects. For simple documents, you can just choose colors from the Color Line or the
on-screen color palette. For more advanced color editing there's named colors, graduated color, tints, shades, linked colors and contoning.
Many documents and web templates provided are based on one theme color and several other colors that work well together to form a
complete color scheme.
We're going to show you how to edit your colors easily and effectively. If you don’t already own one of the Designer titles why not download the
free trial version of Xara Photo & Graphic Designer and follow this tutorial.
We’ll start with an explanation of the important core functions - the Color Line, the Color Line Context menu and the Color Editor.
The Color Line
The Color Line is displayed at the bottom of the editor window. It shows you the current fill and line colors, provides access to the color editor and provides a palette of pre-defined colors. The Color Line 1. Color swatch - The outer rectangle of the color swatch shows the outline color and the center rectangle shows the fill color. These are the colors of any selected objects, or the current color attributes if no objects are selected. 2. Color editor - click to display the Color editor. 3. Color picker - The eye-dropper can be used to pick a color from any part of the document or any part of the computer screen including colors visible in other software. 4. No color - Clicking this applies a ‘no color fill’. A shift-click applies ‘no color’ to a line. The No Color button can also be used to restore the original colors to a photo which has had a contone color applied. 5. Current Fill color - A diamond marker in the top left denotes the fill color of the currently selected object 6. Current Line color - A diamond marker in the top right denotes the line color of the currently selected object. By default, there is a 'Standard Palette' of 46 pre-defined colors. There are 5 shades of 7 standard hues and 10 shades of gray, black and white. Standard Palette colors are not editable as they are designed as a simple, limited selection of colors to apply to objects. Xara Designer Pro users also have access to the PANTONE® color palettes. If the length of the Color Line exceeds the window, you can scroll through the Color Line with the scroll bar below or by holding down the Alt key and dragging the Color Line.Applying Line and Fill colors
To change the color of some text or an object simply select the text or object and then click on a color on the color line or click-drag the color onto the text/object. To set the line or outline color, drop the color on the line and not in the center. To change the page background color hold on ‘Ctrl’ and drag a color onto the background. When dragging colors, an indicator beside the pointer tells you what will be affected when you drop the color, ie. set flat fill color, line color, start or end color of a graduated fill or the page background.The Color Line Context Menu
Right click on a color on the Color Line to show a context sensitive menu: Color Line Context Menu Edit / Rename and Delete - note, these are not available for the 46 pre-defined palette colors Replace Color - this option is only shown when the selected object has multiple component parts or multiple colors, such as a button group, text panels, logos and other graphics. Simply select the color that you wish to change. Replace Color option in the Color Line Context Menu Tip: You can replace the use of Named Colors with unnamed/local colors, or vice-versa. So for example, you could take a graphic that uses Theme Color 1 and replace it with Theme Color 2. From then on, editing Theme Color 2 in your document would change the button color too. Or replace Theme Color 1 with a local color, so the button is no longer linked to any theme colors at all. And you can use this facility to quickly apply Named Colors to graphics that were not originally designed to use Named Colors at all. Set Fill color / Set Line color - set the fill or line color of the selected object with this color. Set Text Background - set the the color for a text background - like a highlighter. Options - this opens the ‘Page Options’ > ‘View’ tab where you can change the appearance and attributes of the Color line. Options to change the attributes of the Color Line If the selected object is a bitmap, the fill and line color options are supplemented with options to Set contone dark color / Set contone light color.Selecting the ‘No color’ swatch Context Menu
When right clicking the "no color" swatch, the fill and line color options are replaced by: Clear fill color / Clear line color / Clear text background. This sets the selected object's relative attributes to "no color". When applied to a contoned photo/bitmap, this restores the original image colors.The Color Editor
The Color Editor allows you to select from any color of the spectrum. Unlike most graphics programs the Color Editor can remain on screen while you continue to work. It changes to reflect the color of the selected objects. Select the text, line or object that you want to color and access the Color Editor using one of these methods: • Choose ‘Utilities’ > ‘Color editor’. • Click ‘Ctrl+ E’. • Click the ‘Edit color’ icon or double click on the ‘Current line and fill color’ icon on the Color line. • With an object selected, right click the object and choose Fill Color. 1. Shows what you are editing 2. New named color 3. Show/hide advanced options 4. Eye dropper color picker 5. Previous color 6. Current color 7. Color panel (color model dependent) 8. HSV hue selector 9. Numeric values (color model dependent) 10. RGB hex color value 11. Color model (HSV, RGB, CMYK or grayscale) 12. 3D editor mode option (only RGB & CMYK) 13. No color patch (only available when editing local color) 14. Make Named Color local to Frame/Layer 15. Rename named color 16. Color editor help 17. Type of color: Normal, Spot (if available), Tint, Shade or Linked The full color editor - click Hide Advanced Options to display the smaller, simpler versionPrevious and Current Color
As you drag on the color editor the two small color swatches in the upper right of the color editor show the current color and the previous (before you started changing the color). This is useful if you want to make a small change and want to compare the old and new colors. Changing the color of the star objectSpecifying Exact Colors
You can enter precise RGB (or HSV or CMYK) color values by number or percentage. The most common requirement for web graphics is to enter a hexadecimal RGB color and you can do this with the color editor showing either HSV colors (the default) or showing RGB colors. Percentages are used by default, but you can change which format is used: Go to Utilities > Options and display the Units tab, then click the appropriate radio button in the Color units section.Using the Eye-dropper to Pick Colors
Instead of selecting hues and shades on the Color Editor you can instead pick a color from any part of the document or any part of the computer screen - even from other windows and programs. You can access the eye-dropper from the Color Editor or the Color line. Just click and drag on the eye dropper icon . As you drag you see the Color Editor continuously picks up the color under the eye-dropper. Release the mouse button when you have the desired color. This is an easy and quick way to use the same color again or copy colors from photos or from one object to another. The color sampler shows a small pop-up at the mouse pointer which indicates the color that is being sampled at that point. This will either be the palette color name, the name of a Named Color, or the color model and color value.Copying Colors and Styles
When creating a new object, such as a shape, the object will adopt the color attributes of the last color used. If you wish to copy attributes from one object to another, select the object from which you wish to copy the attributes and copy the selection to the clipboard. using ‘Ctrl + C’ (or ’Edit’ > ‘Copy’). Select the object(s) to which you want to apply the attributes and paste the attributes with ‘Ctrl + Shift + A’ (or ‘Edit’ > ‘Paste format/attributes’). The attributes remain on the clipboard until overwritten by a cut or copy operation. This lets you repeat paste attributes as many times as required. The star has a specific fill and line color. Copying and then pasting its attributes onto the red star polygon in the middle, results in the star polygon to the right.Graduated Colors
To create a graduated color fill, select the fill tool and drag the ends of the arrows to set the graduated area. Select the handle at the ‘blunt’ end of the arrow and click on a color on the color line to add it. Then click on the arrow point to change the color at that end. Instead of just fading from one color to another, you can create a multicolor object. To introduce another color, double click on the fill arrow to create a new fill handle and then select a color. (To remove a fill stage handle, just click on it to select it, and press ‘Del’). You can drag the end of the arrow to change the direction of the graduated fill. Using the Fill tool you will have access to 11 different fill effects, such as linear, elliptical, diamond and conical. Creating a graduated fillColors on the Screen and on the Printer
One problem with computer screens is that their colors do not match the available colors on a printer. Screens emit combinations of red, green and blue. The brightness control has a dramatic effect on displayed colors. Printed images reflect combinations of cyan, magenta, yellow and black. As an example, pure green on computer screen is a fluorescent bright color that is impossible to reproduce accurately on any printer. Similarly pure blue on a computer screen will often print as a much darker purple-blue. Technically, the range of colors on a computer screen (known as the "color gamut") is far greater than that on a printer. So there will always be differences between screen and print colors. Xara provides the ability to simulate how printed colors will look. Select the 'Windows -> Show printer colors -> Simulate print colors' menu to get a better idea of how your colors will look when printed. This is an approximation only since printers vary slightly, but it is far more accurate than normal screen colors. Tip: To get bright blue on a printer, select a color on screen that is almost pure cyan (a printer's cyan is much more blue than screen cyan).Next Month
Next month we’ll explore local, theme and Named Colors, creating tints, shades and linked colors, contoning photos, and creating your own color schemes.The Xara Designer Titles
Xara Photo & Graphic Designer is a high-powered general purpose graphics creation tool, able to create graphic designs of all types, from web graphics to page layouts such as posters and flyers, cartoons, and the most complex illustrations. Xara Web Designer is a great choice for both novices and professional web designers, in fact anyone wanting a high quality website, without the need to know HTML coding, scripting or the usual technical jargon. Xara Designer Pro is the ultimate all-in-one creative software, that provides powerful vector illustration, photo editing, page layout and website design, in one unrivaled WYSIWYG design tool. Download the free trial of Xara Photo & Graphic Designer and/or Xara Web Designer or Xara Designer Pro and give it a go!


Copyright © 2015 Xara Group Limited, a MAGIX company.
Page created with Xara Designer Pro

The Xara Designer titles - Photo & Graphic Designer, Page & Layout Designer, Web Designer and Designer
Pro - all provide comprehensive control over applying, creating and altering the colors of objects. For
simple documents, you can just choose colors from the Color Line or the on-screen color palette. For more
advanced color editing there's named colors, graduated color, tints, shades, linked colors and contoning.
Many documents and web templates provided are based on one theme color and several other colors that
work well together to form a complete color scheme.
We're going to show you how to edit your colors easily and effectively. If you don’t already own one of the
Designer titles why not download the free trial version of Xara Photo & Graphic Designer and follow this
tutorial.
We’ll start with an explanation of the important core functions - the Color Line, the Color Line Context menu
and the Color Editor.
The Color Line
The Color Line is displayed at the bottom of the editor window. It shows you the current fill and line colors, provides access to the color editor and provides a palette of pre-defined colors. The Color Line 1. Color swatch - The outer rectangle of the color swatch shows the outline color and the center rectangle shows the fill color. These are the colors of any selected objects, or the current color attributes if no objects are selected. 2. Color editor - click to display the Color editor. 3. Color picker - The eye-dropper can be used to pick a color from any part of the document or any part of the computer screen including colors visible in other software. 4. No color - Clicking this applies a ‘no color fill’. A shift-click applies ‘no color’ to a line. The No Color button can also be used to restore the original colors to a photo which has had a contone color applied. 5. Current Fill color - A diamond marker in the top left denotes the fill color of the currently selected object 6. Current Line color - A diamond marker in the top right denotes the line color of the currently selected object. By default, there is a 'Standard Palette' of 46 pre-defined colors. There are 5 shades of 7 standard hues and 10 shades of gray, black and white. Standard Palette colors are not editable as they are designed as a simple, limited selection of colors to apply to objects. Xara Designer Pro users also have access to the PANTONE® color palettes. If the length of the Color Line exceeds the window, you can scroll through the Color Line with the scroll bar below or by holding down the Alt key and dragging the Color Line.Applying Line and Fill colors
To change the color of some text or an object simply select the text or object and then click on a color on the color line or click-drag the color onto the text/object. To set the line or outline color, drop the color on the line and not in the center. To change the page background color hold on ‘Ctrl’ and drag a color onto the background. When dragging colors, an indicator beside the pointer tells you what will be affected when you drop the color, ie. set flat fill color, line color, start or end color of a graduated fill or the page background.The Color Line Context Menu
Right click on a color on the Color Line to show a context sensitive menu: Color Line Context Menu Edit / Rename and Delete - note, these are not available for the 46 pre-defined palette colors Replace Color - this option is only shown when the selected object has multiple component parts or multiple colors, such as a button group, text panels, logos and other graphics. Simply select the color that you wish to change. Replace Color option in the Color Line Context Menu Tip: You can replace the use of Named Colors with unnamed/local colors, or vice-versa. So for example, you could take a graphic that uses Theme Color 1 and replace it with Theme Color 2. From then on, editing Theme Color 2 in your document would change the button color too. Or replace Theme Color 1 with a local color, so the button is no longer linked to any theme colors at all. And you can use this facility to quickly apply Named Colors to graphics that were not originally designed to use Named Colors at all. Set Fill color / Set Line color - set the fill or line color of the selected object with this color. Set Text Background - set the the color for a text background - like a highlighter. Options - this opens the ‘Page Options’ > ‘View’ tab where you can change the appearance and attributes of the Color line. Options to change the attributes of the Color Line If the selected object is a bitmap, the fill and line color options are supplemented with options to Set contone dark color / Set contone light color.Selecting the ‘No color’ swatch Context Menu
When right clicking the "no color" swatch, the fill and line color options are replaced by: Clear fill color / Clear line color / Clear text background. This sets the selected object's relative attributes to "no color". When applied to a contoned photo/bitmap, this restores the original image colors.The Color Editor
The Color Editor allows you to select from any color of the spectrum. Unlike most graphics programs the Color Editor can remain on screen while you continue to work. It changes to reflect the color of the selected objects. Select the text, line or object that you want to color and access the Color Editor using one of these methods: • Choose ‘Utilities’ > ‘Color editor’. • Click ‘Ctrl+ E’. • Click the ‘Edit color’ icon or double click on the ‘Current line and fill color’ icon on the Color line. • With an object selected, right click the object and choose Fill Color. 1. Shows what you are editing 2. New named color 3. Show/hide advanced options 4. Eye dropper color picker 5. Previous color 6. Current color 7. Color panel (color model dependent) 8. HSV hue selector 9. Numeric values (color model dependent) 10. RGB hex color value 11. Color model (HSV, RGB, CMYK or grayscale) 12. 3D editor mode option (only RGB & CMYK) 13. No color patch (only available when editing local color) 14. Make Named Color local to Frame/Layer 15. Rename named color 16. Color editor help 17. Type of color: Normal, Spot (if available), Tint, Shade or Linked The full color editor - click Hide Advanced Options to display the smaller, simpler versionPrevious and Current Color
As you drag on the color editor the two small color swatches in the upper right of the color editor show the current color and the previous (before you started changing the color). This is useful if you want to make a small change and want to compare the old and new colors. Changing the color of the star objectSpecifying Exact Colors
You can enter precise RGB (or HSV or CMYK) color values by number or percentage. The most common requirement for web graphics is to enter a hexadecimal RGB color and you can do this with the color editor showing either HSV colors (the default) or showing RGB colors. Percentages are used by default, but you can change which format is used: Go to Utilities > Options and display the Units tab, then click the appropriate radio button in the Color units section.Using the Eye-dropper to Pick Colors
Instead of selecting hues and shades on the Color Editor you can instead pick a color from any part of the document or any part of the computer screen - even from other windows and programs. You can access the eye-dropper from the Color Editor or the Color line. Just click and drag on the eye dropper icon . As you drag you see the Color Editor continuously picks up the color under the eye-dropper. Release the mouse button when you have the desired color. This is an easy and quick way to use the same color again or copy colors from photos or from one object to another. The color sampler shows a small pop-up at the mouse pointer which indicates the color that is being sampled at that point. This will either be the palette color name, the name of a Named Color, or the color model and color value.Copying Colors and Styles
When creating a new object, such as a shape, the object will adopt the color attributes of the last color used. If you wish to copy attributes from one object to another, select the object from which you wish to copy the attributes and copy the selection to the clipboard. using ‘Ctrl + C’ (or ’Edit’ > ‘Copy’). Select the object(s) to which you want to apply the attributes and paste the attributes with ‘Ctrl + Shift + A’ (or ‘Edit’ > ‘Paste format/attributes’). The attributes remain on the clipboard until overwritten by a cut or copy operation. This lets you repeat paste attributes as many times as required. The star has a specific fill and line color. Copying and then pasting its attributes onto the red star polygon in the middle, results in the star polygon to the right.Graduated Colors
To create a graduated color fill, select the fill tool and drag the ends of the arrows to set the graduated area. Select the handle at the ‘blunt’ end of the arrow and click on a color on the color line to add it. Then click on the arrow point to change the color at that end. Instead of just fading from one color to another, you can create a multicolor object. To introduce another color, double click on the fill arrow to create a new fill handle and then select a color. (To remove a fill stage handle, just click on it to select it, and press ‘Del’). You can drag the end of the arrow to change the direction of the graduated fill. Using the Fill tool you will have access to 11 different fill effects, such as linear, elliptical, diamond and conical. Creating a graduated fillColors on the Screen and on the Printer
One problem with computer screens is that their colors do not match the available colors on a printer. Screens emit combinations of red, green and blue. The brightness control has a dramatic effect on displayed colors. Printed images reflect combinations of cyan, magenta, yellow and black. As an example, pure green on computer screen is a fluorescent bright color that is impossible to reproduce accurately on any printer. Similarly pure blue on a computer screen will often print as a much darker purple-blue. Technically, the range of colors on a computer screen (known as the "color gamut") is far greater than that on a printer. So there will always be differences between screen and print colors. Xara provides the ability to simulate how printed colors will look. Select the 'Windows -> Show printer colors -> Simulate print colors' menu to get a better idea of how your colors will look when printed. This is an approximation only since printers vary slightly, but it is far more accurate than normal screen colors. Tip: To get bright blue on a printer, select a color on screen that is almost pure cyan (a printer's cyan is much more blue than screen cyan).Next Month
Next month we’ll explore local, theme and Named Colors, creating tints, shades and linked colors, contoning photos, and creating your own color schemes.The Xara Designer Titles
Xara Photo & Graphic Designer is a high-powered general purpose graphics creation tool, able to create graphic designs of all types, from web graphics to page layouts such as posters and flyers, cartoons, and the most complex illustrations. Xara Web Designer is a great choice for both novices and professional web designers, in fact anyone wanting a high quality website, without the need to know HTML coding, scripting or the usual technical jargon. Xara Designer Pro is the ultimate all-in-one creative software, that provides powerful vector illustration, photo editing, page layout and website design, in one unrivaled WYSIWYG design tool. Download the free trial of Xara Photo & Graphic Designer and/or Xara Web Designer or Xara Designer Pro and give it a go!


Copyright © 2015 Xara Group Limited, a MAGIX company.
Page created with Xara Designer Pro

The Xara Designer titles - Photo & Graphic Designer, Page & Layout
Designer, Web Designer and Designer Pro - all provide
comprehensive control over applying, creating and altering the
colors of objects. For simple documents, you can just choose colors
from the Color Line or the on-screen color palette. For more
advanced color editing there's named colors, graduated color, tints,
shades, linked colors and contoning. Many documents and web
templates provided are based on one theme color and several other
colors that work well together to form a complete color scheme.
We're going to show you how to edit your colors easily and
effectively. If you don’t already own one of the Designer titles why
not download the free trial version of Xara Photo & Graphic Designer
and follow this tutorial.
We’ll start with an explanation of the important core functions - the
Color Line, the Color Line Context menu and the Color Editor.
The Color Line
The Color Line is displayed at the bottom of the editor window. It shows you the current fill and line colors, provides access to the color editor and provides a palette of pre-defined colors. The Color Line 1. Color swatch - The outer rectangle of the color swatch shows the outline color and the center rectangle shows the fill color. These are the colors of any selected objects, or the current color attributes if no objects are selected. 2. Color editor - click to display the Color editor. 3. Color picker - The eye-dropper can be used to pick a color from any part of the document or any part of the computer screen including colors visible in other software. 4. No color - Clicking this applies a ‘no color fill’. A shift-click applies ‘no color’ to a line. The No Color button can also be used to restore the original colors to a photo which has had a contone color applied. 5. Current Fill color - A diamond marker in the top left denotes the fill color of the currently selected object 6. Current Line color - A diamond marker in the top right denotes the line color of the currently selected object. By default, there is a 'Standard Palette' of 46 pre-defined colors. There are 5 shades of 7 standard hues and 10 shades of gray, black and white. Standard Palette colors are not editable as they are designed as a simple, limited selection of colors to apply to objects. Xara Designer Pro users also have access to the PANTONE® color palettes. If the length of the Color Line exceeds the window, you can scroll through the Color Line with the scroll bar below or by holding down the Alt key and dragging the Color Line.Applying Line and Fill colors
To change the color of some text or an object simply select the text or object and then click on a color on the color line or click-drag the color onto the text/object. To set the line or outline color, drop the color on the line and not in the center. To change the page background color hold on ‘Ctrl’ and drag a color onto the background. When dragging colors, an indicator beside the pointer tells you what will be affected when you drop the color, ie. set flat fill color, line color, start or end color of a graduated fill or the page background.The Color Line Context Menu
Right click on a color on the Color Line to show a context sensitive menu: Color Line Context Menu Edit / Rename and Delete - note, these are not available for the 46 pre-defined palette colors Replace Color - this option is only shown when the selected object has multiple component parts or multiple colors, such as a button group, text panels, logos and other graphics. Simply select the color that you wish to change. Replace Color option in the Color Line Context Menu Tip: You can replace the use of Named Colors with unnamed/local colors, or vice-versa. So for example, you could take a graphic that uses Theme Color 1 and replace it with Theme Color 2. From then on, editing Theme Color 2 in your document would change the button color too. Or replace Theme Color 1 with a local color, so the button is no longer linked to any theme colors at all. And you can use this facility to quickly apply Named Colors to graphics that were not originally designed to use Named Colors at all. Set Fill color / Set Line color - set the fill or line color of the selected object with this color. Set Text Background - set the the color for a text background - like a highlighter. Options - this opens the ‘Page Options’ > ‘View’ tab where you can change the appearance and attributes of the Color line. Options to change the attributes of the Color Line If the selected object is a bitmap, the fill and line color options are supplemented with options to Set contone dark color / Set contone light color.Selecting the ‘No color’ swatch Context Menu
When right clicking the "no color" swatch, the fill and line color options are replaced by: Clear fill color / Clear line color / Clear text background. This sets the selected object's relative attributes to "no color". When applied to a contoned photo/bitmap, this restores the original image colors.The Color Editor
The Color Editor allows you to select from any color of the spectrum. Unlike most graphics programs the Color Editor can remain on screen while you continue to work. It changes to reflect the color of the selected objects. Select the text, line or object that you want to color and access the Color Editor using one of these methods: • Choose ‘Utilities’ > ‘Color editor’. • Click ‘Ctrl+ E’. • Click the ‘Edit color’ icon or double click on the ‘Current line and fill color’ icon on the Color line. • With an object selected, right click the object and choose Fill Color. 1. Shows what you are editing 2. New named color 3. Show/hide advanced options 4. Eye dropper color picker 5. Previous color 6. Current color 7. Color panel (color model dependent) 8. HSV hue selector 9. Numeric values (color model dependent) 10. RGB hex color value 11. Color model (HSV, RGB, CMYK or grayscale) 12. 3D editor mode option (only RGB & CMYK) 13. No color patch (only available when editing local color) 14. Make Named Color local to Frame/Layer 15. Rename named color 16. Color editor help 17. Type of color: Normal, Spot (if available), Tint, Shade or Linked The full color editor - click Hide Advanced Options to display the smaller, simpler versionPrevious and Current Color
As you drag on the color editor the two small color swatches in the upper right of the color editor show the current color and the previous (before you started changing the color). This is useful if you want to make a small change and want to compare the old and new colors. Changing the color of the star objectSpecifying Exact Colors
You can enter precise RGB (or HSV or CMYK) color values by number or percentage. The most common requirement for web graphics is to enter a hexadecimal RGB color and you can do this with the color editor showing either HSV colors (the default) or showing RGB colors. Percentages are used by default, but you can change which format is used: Go to Utilities > Options and display the Units tab, then click the appropriate radio button in the Color units section.Using the Eye-dropper to Pick Colors
Instead of selecting hues and shades on the Color Editor you can instead pick a color from any part of the document or any part of the computer screen - even from other windows and programs. You can access the eye-dropper from the Color Editor or the Color line. Just click and drag on the eye dropper icon . As you drag you see the Color Editor continuously picks up the color under the eye- dropper. Release the mouse button when you have the desired color. This is an easy and quick way to use the same color again or copy colors from photos or from one object to another. The color sampler shows a small pop-up at the mouse pointer which indicates the color that is being sampled at that point. This will either be the palette color name, the name of a Named Color, or the color model and color value.Copying Colors and Styles
When creating a new object, such as a shape, the object will adopt the color attributes of the last color used. If you wish to copy attributes from one object to another, select the object from which you wish to copy the attributes and copy the selection to the clipboard. using ‘Ctrl + C’ (or ’Edit’ > ‘Copy’). Select the object(s) to which you want to apply the attributes and paste the attributes with ‘Ctrl + Shift + A’ (or ‘Edit’ > ‘Paste format/attributes’). The attributes remain on the clipboard until overwritten by a cut or copy operation. This lets you repeat paste attributes as many times as required. The star has a specific fill and line color. Copying and then pasting its attributes onto the red star polygon in the middle, results in the star polygon to the right.Graduated Colors
To create a graduated color fill, select the fill tool and drag the ends of the arrows to set the graduated area. Select the handle at the ‘blunt’ end of the arrow and click on a color on the color line to add it. Then click on the arrow point to change the color at that end. Instead of just fading from one color to another, you can create a multicolor object. To introduce another color, double click on the fill arrow to create a new fill handle and then select a color. (To remove a fill stage handle, just click on it to select it, and press ‘Del’). You can drag the end of the arrow to change the direction of the graduated fill. Using the Fill tool you will have access to 11 different fill effects, such as linear, elliptical, diamond and conical. Creating a graduated fillColors on the Screen and on the
Printer
One problem with computer screens is that their colors do not match the available colors on a printer. Screens emit combinations of red, green and blue. The brightness control has a dramatic effect on displayed colors. Printed images reflect combinations of cyan, magenta, yellow and black. As an example, pure green on computer screen is a fluorescent bright color that is impossible to reproduce accurately on any printer. Similarly pure blue on a computer screen will often print as a much darker purple-blue. Technically, the range of colors on a computer screen (known as the "color gamut") is far greater than that on a printer. So there will always be differences between screen and print colors. Xara provides the ability to simulate how printed colors will look. Select the 'Windows -> Show printer colors -> Simulate print colors' menu to get a better idea of how your colors will look when printed. This is an approximation only since printers vary slightly, but it is far more accurate than normal screen colors. Tip: To get bright blue on a printer, select a color on screen that is almost pure cyan (a printer's cyan is much more blue than screen cyan).Next Month
Next month we’ll explore local, theme and Named Colors, creating tints, shades and linked colors, contoning photos, and creating your own color schemes.The Xara Designer Titles
Xara Photo & Graphic Designer is a high-powered general purpose graphics creation tool, able to create graphic designs of all types, from web graphics to page layouts such as posters and flyers, cartoons, and the most complex illustrations. Xara Web Designer is a great choice for both novices and professional web designers, in fact anyone wanting a high quality website, without the need to know HTML coding, scripting or the usual technical jargon. Xara Designer Pro is the ultimate all-in-one creative software, that provides powerful vector illustration, photo editing, page layout and website design, in one unrivaled WYSIWYG design tool. Download the free trial of Xara Photo & Graphic Designer and/or Xara Web Designer or Xara Designer Pro and give it a go!


Copyright © 2015 Xara Group Limited, a MAGIX company.
Page created with Xara Designer Pro
EDITING COLORS - PART 1
EDITING COLORS - PART 1
EDITING COLORS - PART 1
EDITING COLORS - PART 1