


 © Xara Group Limited


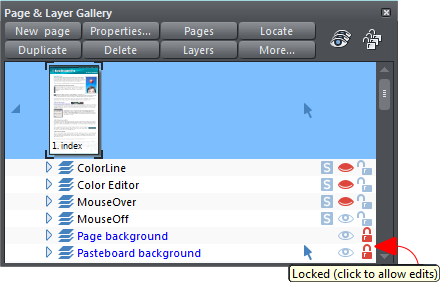
 The new layers are locked by default. If you unlock the 'page background' layer by clicking on the lock icon you can make some subtle but effective
changes to the page.
For example you can edit the soft shadow of the page; select the page background first (you should see 'one rectangle on layer page background'
on the status line), then select the Shadow tool and position the shadow by dragging on the page in the usual manner.
You can also give the page a graduated color fill. Select the page then the Fill tool and drag down the page, drop the colors onto the start and
end of the fill line in the usual way. Note: You can’t give the pasteboard a grad color fill, only the page.
You can also give the page rounded corners using the Rectangle tool - select the page, then the Rectangle tool and click on the ‘curved corners’
icon on the InfoBar.
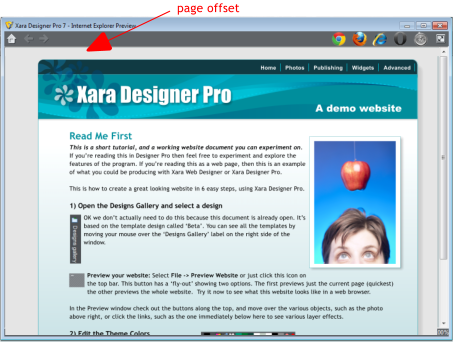
One other change you can make, if you have a pasteboard color set, is the vertical offset of the page relative to the top of the browser window, which
you can adjust by setting the ruler page origin.
Normally, if you have set the page and page background to different colors, when you preview you'll see that the page extends right to the top of the
browser window. You can't see any of the background color above your page. If you want to change that, you can add an offset so that there is some
space above your page in the web browser.
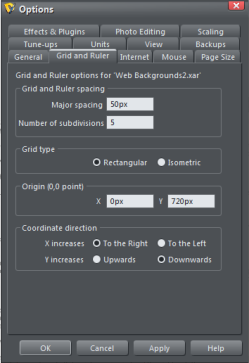
To add an offset, you change the page origin. Normally the page origin is set to be the top left corner of your page, so by moving the origin up 20
pixels, for example, you add a 20 pixel margin to the top of your page when it's viewed in a web browser. Go to Utilities > Options, select the Grid &
Ruler tab and increase the value of the Y coordinate of the origin point. This is normally set to the vertical size of your page, so just increase it by the
margin size you would like. So for example if your page is 700 pixels tall, change the Y value of the origin coordinate from 700 to 720, in order to add a
20 pixel offset.
Note: the offset change is per page, so if you want to do multiple pages you will need to do them individually.
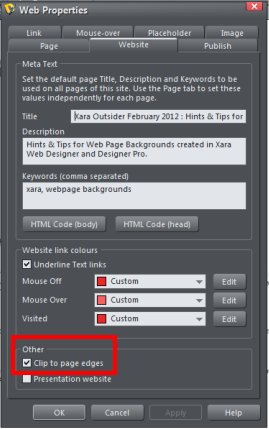
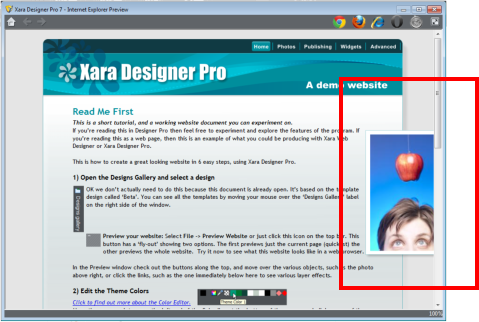
I want to show you one other handy feature that was added in V7. Web Designer, Web Designer Premium and Designer Pro 7 include a new option in the
Website tab of the Website Properties dialog that allows you to choose whether or not to clip objects to web page edges. If you do not clip, then any
objects overlapping your page on to the pasteboard background will be displayed in full, rather than cropped to the page border.
Clip to page edges is enabled by default. If you have objects in your website that overlap the web page borders, click this checkbox to crop these
objects so that only the portion on the page is visible. De-select this checkbox if you would like the object to flow over the page edge, so that even the
portion that overlaps the pasteboard is displayed.
In addition, any animated transitions you apply will now start from the browser window edge rather than the page border, which might be very handy
for presentations, for example, where you have bullet points coming in from the right or left.
The new layers are locked by default. If you unlock the 'page background' layer by clicking on the lock icon you can make some subtle but effective
changes to the page.
For example you can edit the soft shadow of the page; select the page background first (you should see 'one rectangle on layer page background'
on the status line), then select the Shadow tool and position the shadow by dragging on the page in the usual manner.
You can also give the page a graduated color fill. Select the page then the Fill tool and drag down the page, drop the colors onto the start and
end of the fill line in the usual way. Note: You can’t give the pasteboard a grad color fill, only the page.
You can also give the page rounded corners using the Rectangle tool - select the page, then the Rectangle tool and click on the ‘curved corners’
icon on the InfoBar.
One other change you can make, if you have a pasteboard color set, is the vertical offset of the page relative to the top of the browser window, which
you can adjust by setting the ruler page origin.
Normally, if you have set the page and page background to different colors, when you preview you'll see that the page extends right to the top of the
browser window. You can't see any of the background color above your page. If you want to change that, you can add an offset so that there is some
space above your page in the web browser.
To add an offset, you change the page origin. Normally the page origin is set to be the top left corner of your page, so by moving the origin up 20
pixels, for example, you add a 20 pixel margin to the top of your page when it's viewed in a web browser. Go to Utilities > Options, select the Grid &
Ruler tab and increase the value of the Y coordinate of the origin point. This is normally set to the vertical size of your page, so just increase it by the
margin size you would like. So for example if your page is 700 pixels tall, change the Y value of the origin coordinate from 700 to 720, in order to add a
20 pixel offset.
Note: the offset change is per page, so if you want to do multiple pages you will need to do them individually.
I want to show you one other handy feature that was added in V7. Web Designer, Web Designer Premium and Designer Pro 7 include a new option in the
Website tab of the Website Properties dialog that allows you to choose whether or not to clip objects to web page edges. If you do not clip, then any
objects overlapping your page on to the pasteboard background will be displayed in full, rather than cropped to the page border.
Clip to page edges is enabled by default. If you have objects in your website that overlap the web page borders, click this checkbox to crop these
objects so that only the portion on the page is visible. De-select this checkbox if you would like the object to flow over the page edge, so that even the
portion that overlaps the pasteboard is displayed.
In addition, any animated transitions you apply will now start from the browser window edge rather than the page border, which might be very handy
for presentations, for example, where you have bullet points coming in from the right or left.