There are times when you might want to change the color or adjust some part of your photo, for example to adjust the brightness or blueness
of the blue sky, or you may wish to change the color of a flower, without affecting other parts of the picture.
Note: This tutorial has been updated to cover changes to the photo tools in Photo & Graphic Designer and Designer Pro in 2016.
Xara Photo & Graphic Designer and Designer Pro have a fast and easy way of doing ‘select by color’. You can simply click on the color you
want to select, and now use any of the Photo Enhance adjustment options to adjust only that color. You can adjust the brightness, saturation
and re-color options, amongst others (see our previous tutorial about the Photo Enhance options).
Normally this color-select method will include all pixels in a photo that are the selected color (or tone of that color but you can adjust this). If
you want to restrict the selection to just a given region of the photo, you can use the Region and Mask tools before you select the color to limit
the area.
Download the trial version of Xara Photo & Graphic Designer or Xara Designer Pro, and I will show you how easy it is to change colors of parts
of your photo like this…
With a few clicks you can re-color items in your photos.
Open up Xara Photo & Graphic Designer or Designer Pro X and then drag a photo onto the page.
In the Photo Enhance Tool
there’s a Color-Select icon on the right end of the InfoBar.
The right end of the Photo Enhance Tool InfoBar has the color-select control.
After selecting this control, all subsequent clicks will select the color you click on. You will initially see a checker-board flash that indicates the
region being selected.
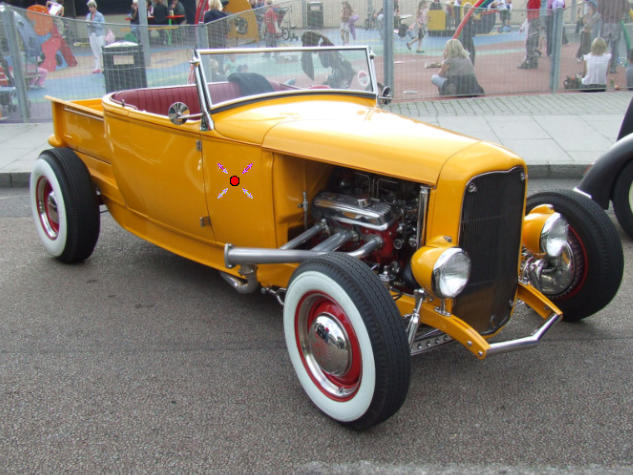
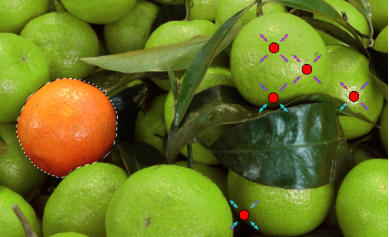
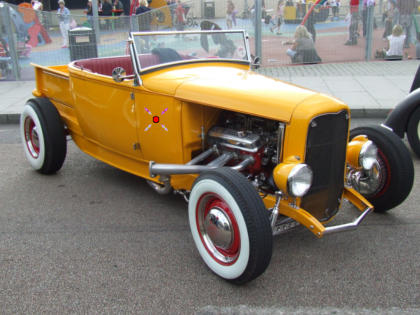
Below, I have clicked on the orange color of the car. One color-select control point is placed on the image and the average color of the pixels
under the selection, ie. within the red circle is now selected.
The size of the circular control point can be adjusted by dragging any of the 4 arrows surrounding the control point.
The selected orange color that I wish to change
If I hold or drag the color-select handle, the selection is shown with a checkerboard pattern. In the following image you can see most of the
orange is selected, but the paler and darker shades are not selected (no checkerboard).
The color selection showing that most of the orange is selected, but the paler and darker shades are
not selected (areas where there is no checkerboard).
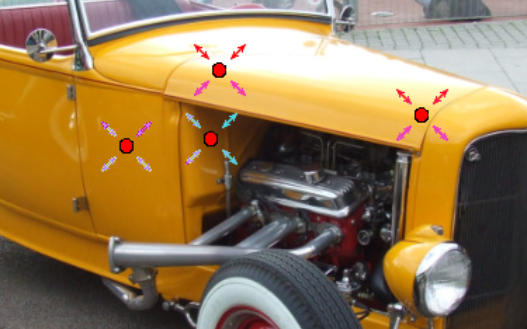
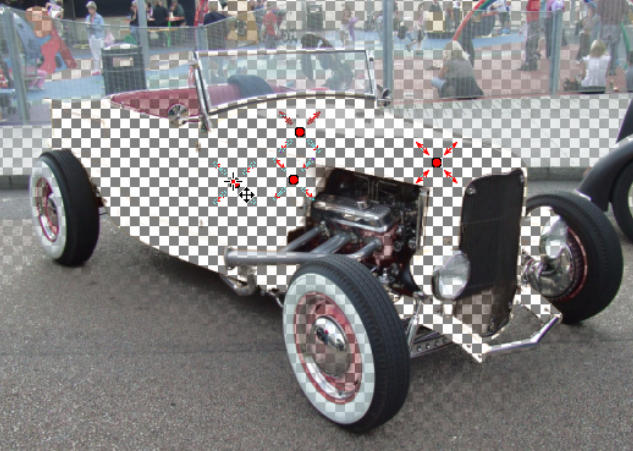
To ensure you have all shades of the color selected simply make some further clicks on the desired area to add multiple color-select handles.
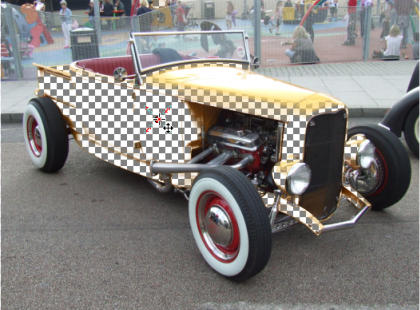
Below, I’ve clicked a number of paler and darker shades of the orange car, to ensure I’m getting all the shades.
Multiple color-select points are used to select a wider range of orange shades from this car
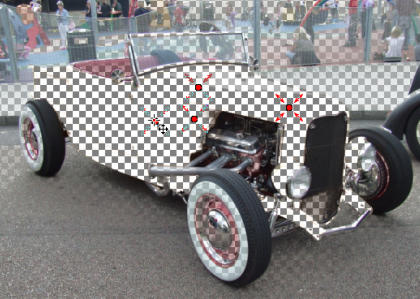
When I click and hold on any handle, now I can see all shades of orange are selected (including some pixels in the background).
With multiple color-select points, all shades of the orange are now selected.
Now with the selection made, I can simply change any of the existing Photo Enhance controls and these will affect only the color-selected
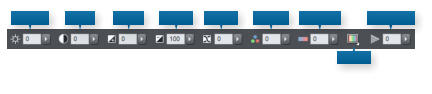
pixels. These are the Photo Enhance controls:
The Photo Enhance Tool options that can be applied to the color selection
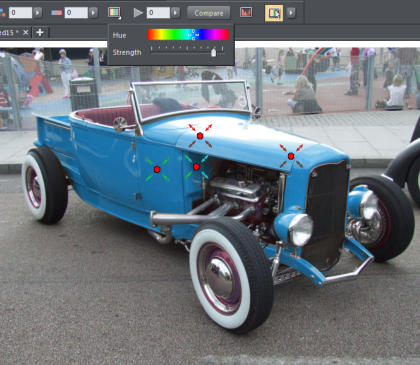
The Color Tint control is used to re-color the pixels selected. In the following image you can see the Hue is set to blue, and the strength set
quite high in order to change the orange to blue. Other hues would need varying strength values. The more dramatic the color change (and
changing orange to blue is about as dramatic as it gets) typically the higher the Strength value needed.
Using the Color Tint to change the car from orange to blue
Adjusting the Color Select Effects
Like most Xara photo edit operations, color-select is non-destructive. Although it looks as if I have permanently altered the orange pixels to be blue, in fact, this is not a permanent once-only operation. The color-select handles and the applied effect are temporary ‘on the fly’ and remembered along with the photo, when saved. This means that you can adjust the effect later (even after saving / loading), or you can delete the effect entirely, and reset the photo, if you wish. When you load a document that has a color-select adjustment, just make sure you have the color-select control on to show the color- select points in the document. When you click and hold on any color-select point, the checkerboard is shown. You can also now drag the handle, and the checkerboard selection is updated as you drag. So this is great way to interactively ensure you have the right regions selected.Color Select Handle Options
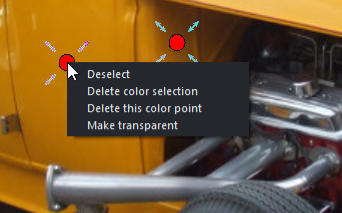
When the color-select handles are active, they are shown red, as above. Active color-select points mean that subsequent Enhance operations will apply to the color-selected pixels only. Additional clicks will add more handles to this color selection. The color-select handles are circles, and it uses the average color within the circular control handle. By enlarging or reducing the circle size you can control exactly which colors are selected. Of course you can zoom in also to more precisely control things. You can right-click on a handle to access additional options, thus: Right-click menu on one of the color-select points. ‘Deselect’ will de-activate the color-selection (the handles turn black). Now any subsequent color-select operations will be taken to be a new color-select, separate form the last one. This is useful if you want to change different colors in your image. Click on a black handle to make it (and all handles part of the selection) active (and now red). The ‘Delete color selection’ will remove the whole color-selection. ‘Delete this color point’ does as it suggests and deletes just the point you right clicked on. The final option ‘Make transparent’ (make sure you have downloaded the latest v10 free patch, which adds this option) will erase the color- selected pixels, so these parts of the photo now become transparent.Before / After Compare
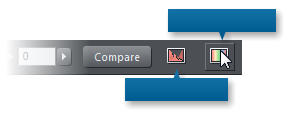
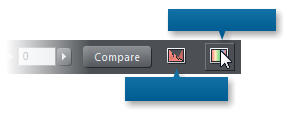
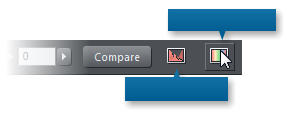
As with all Enhance operations the Compare button on the right end of the InfoBar allows you to toggle between the before and after state. So in the above case if I select the photo - make sure the color-select mode is on, and have the handles active (red) - then pressing Compare will show the before state, pressing it again will revert to the current enhancement values.Adjusting the Color Selection Tolerance
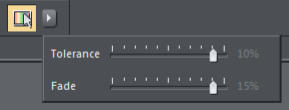
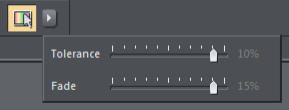
When you have a color-selection active, there’s a drop-down control (small right arrow) next to the color-select mode control on the InfoBar: Click the right arrow adjacent to the color-select control, and a pop-up provides adjustments of the Tolerance and Fade. The Tolerance adjusts the width of the range of colors included. The Fade control adjusts how the edge cases blend with the background. So a low Tolerance means only colors very close to the picked ones are selected. A higher Tolerance means a wider range of shades of the picked color are included. Selecting a range of shades (as I have done on the car) is typically a balance between adding more control points to select a wider range of shades, and the Tolerance value. I could have had fewer color-select points and a higher Tolerance, but it’s usually easiest to leave the Tolerance and fade values as they are and just add additional color-select points to select the range of desired colors. A case for reducing the Tolerance value would be when you only want the precise color selected, with no lighter or darker shades.Regions and Masking
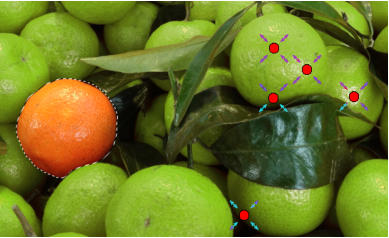
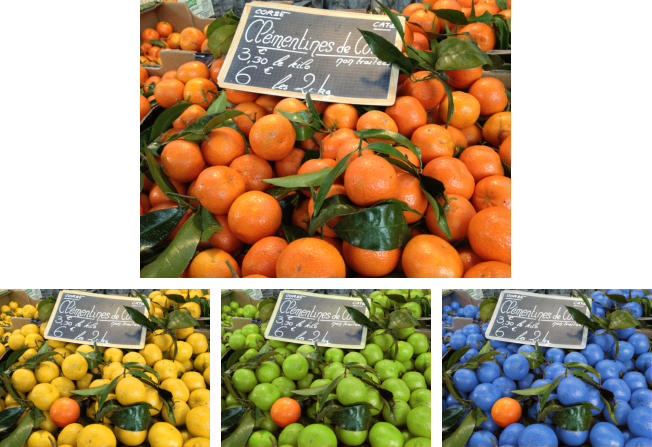
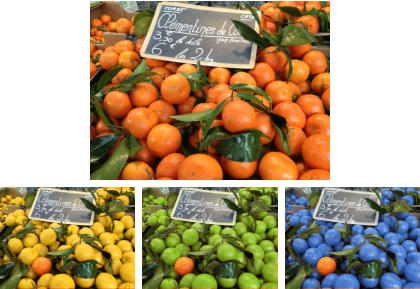
You can use the Region or Mask tools before you do a color-select to omit regions of the photo from the color selection. The Region and Mask tools This example shows the color of the Clementines changed, but in this case, one fruit has been masked so that it is not changed. Turn your oranges into lemons, limes or blues. I used the Mask Painter Tool to paint a mask around one of the Clementine fruits before I started the color-select operation. This means that when I select the orange color all orange pixels outside the mask area are selected. Alternatively, you could use the Region Painter tool to select a region before you try the color-select. In this case only the pixels inside the region would be picked (the opposite way round from the mask). I masked one fruit before using the color-select feature to change the orange to green. The green fruits look totally realistic because I used several color-select points (shown), to ensure all the required shades of orange were selected, before I used the Tint Control to change the orange to lime-green.Advanced
You might notice that the Photo is described on the Status line as a ‘Photo-group’. This is because of the non-destructive nature of the color- select process. A Photo-group is a photo that contains various edits ‘inside’ the photo. You can retrospectively adjust these edits, even remove them completely to recover the original un-touched photo. For most purposes an edited photo-group operates exactly as a normal photo. If you select it and apply an Enhance value or scale or rotate it, for example, the edit applies to the whole image. But you can drill-down into the photo-group to select just the edited regions inside. In the Selector Tool, hold down the Ctrl key and when you click, for example, on the green fruit in the above example then the status line will now show ‘1 color-selection region’ as being selected. This is inside the photo. If you now press Delete, it will delete this – and restore the green fruit back to its original orange. Xara’s unique non-destructive nature maintains the high quality of your original photo regardless of how many times you open-edit-save it- which explains why many people use Xara Photo and Graphic Designer or Designer Pro as their primary, general purpose image editor. If you are not already one of them, download Xara Photo & Graphic Designer or Designer Pro and try it! This is the fourth part of a series of guides to editing photos in Xara. 1. Beginner’s Guide to Photo Editing in Xara The basics of opening photos, zooming, sizing photos, and saving. 2. Summary of the Photo Tools A summary of the tools on the Photo Tool fly-out menu. 3. Photo Enhance options An overview of the ‘work-horse’ range of Enhance options. 4. Changing colors in photos How to select and enhance or adjust specific colors. 5. A real-world example Combining many of the techniques described above, to transform a poor photo. In addition there are more detailed guides covering other photo tools: The Shadow and Highlight controls Intelligent Photo Rescaling and Zooming Erasing Backgrounds and Combining Photos Brightness Levels and Color Balance Panoramic Photos For more tutorials by Xara and third parties, check out our Resource index, which offers a searchable and browsable list of movies and tutorials created by Xara and third parties.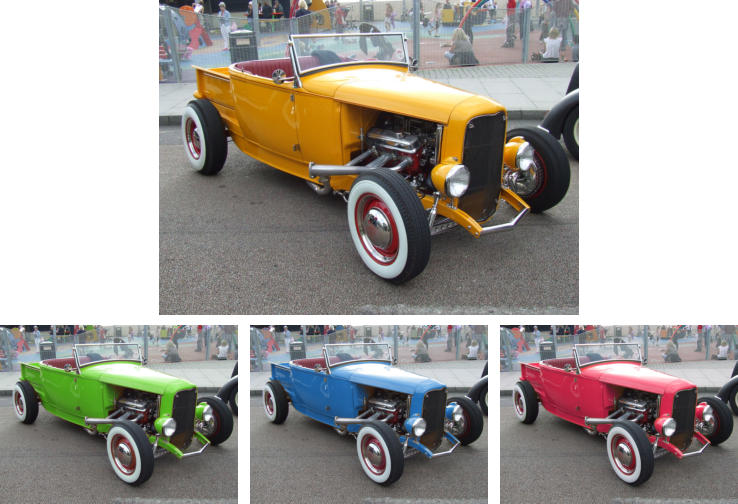


Copyright © 2016 Xara Group Limited.
Page created with Xara Designer Pro
Color Select Mode
Levels Histogram


Brightness
Contrast
Shadows
Highlights
Saturation
Warm / Cold
Sharpen / Blur
Color Tint
X-Process


There are times when you might want to change the color or adjust some part of your photo, for example
to adjust the brightness or blueness of the blue sky, or you may wish to change the color of a flower,
without affecting other parts of the picture.
Note: This tutorial has been updated to cover changes to the photo tools in Photo & Graphic Designer and
Designer Pro in 2016.
Xara Photo & Graphic Designer and Designer Pro have a fast and easy way of doing ‘select by color’. You
can simply click on the color you want to select, and now use any of the Photo Enhance adjustment
options to adjust only that color. You can adjust the brightness, saturation and re-color options, amongst
others (see our previous tutorial about the Photo Enhance options).
Normally this color-select method will include all pixels in a photo that are the selected color (or tone of
that color but you can adjust this). If you want to restrict the selection to just a given region of the photo,
you can use the Region and Mask tools before you select the color to limit the area.
Download the trial version of Xara Photo & Graphic Designer or Xara Designer Pro, and I will show you how
easy it is to change colors of parts of your photo like this…
With a few clicks you can re-color items in your photos.
Open up Xara Photo & Graphic Designer or Designer Pro X and then drag a photo onto the page.
In the Photo Enhance Tool
there’s a Color-Select icon on the right end of the InfoBar.
The right end of the Photo Enhance Tool InfoBar has the color-select control.
After selecting this control, all subsequent clicks will select the color you click on. You will initially see a
checker-board flash that indicates the region being selected.
Below, I have clicked on the orange color of the car. One color-select control point is placed on the image
and the average color of the pixels under the selection, ie. within the red circle is now selected.
The size of the circular control point can be adjusted by dragging any of the 4 arrows surrounding the
control point.
The selected orange color that I wish to change
If I hold or drag the color-select handle, the selection is shown with a checkerboard pattern. In the following
image you can see most of the orange is selected, but the paler and darker shades are not selected (no
checkerboard).
The color selection showing that most of the orange is selected, but the paler and darker shades are
not selected (areas where there is no checkerboard).
To ensure you have all shades of the color selected simply make some further clicks on the desired area to
add multiple color-select handles. Below, I’ve clicked a number of paler and darker shades of the orange
car, to ensure I’m getting all the shades.
Multiple color-select points are used to select a wider range of orange shades from this car
When I click and hold on any handle, now I can see all shades of orange are selected (including some
pixels in the background).
With multiple color-select points, all shades of the orange are now selected.
Now with the selection made, I can simply change any of the existing Photo Enhance controls and these
will affect only the color-selected pixels. These are the Photo Enhance controls:
The Photo Enhance Tool options that can be applied to the color selection
The Color Tint control is used to re-color the pixels selected. In the following image you can see the Hue is
set to blue, and the strength set quite high in order to change the orange to blue. Other hues would need
varying strength values. The more dramatic the color change (and changing orange to blue is about as
dramatic as it gets) typically the higher the Strength value needed.
Using the Color Tint to change the car from orange to blue
Adjusting the Color Select Effects
Like most Xara photo edit operations, color-select is non-destructive. Although it looks as if I have permanently altered the orange pixels to be blue, in fact, this is not a permanent once-only operation. The color-select handles and the applied effect are temporary ‘on the fly’ and remembered along with the photo, when saved. This means that you can adjust the effect later (even after saving / loading), or you can delete the effect entirely, and reset the photo, if you wish. When you load a document that has a color-select adjustment, just make sure you have the color-select control on to show the color-select points in the document. When you click and hold on any color-select point, the checkerboard is shown. You can also now drag the handle, and the checkerboard selection is updated as you drag. So this is great way to interactively ensure you have the right regions selected.Color Select Handle Options
When the color-select handles are active, they are shown red, as above. Active color-select points mean that subsequent Enhance operations will apply to the color-selected pixels only. Additional clicks will add more handles to this color selection. The color-select handles are circles, and it uses the average color within the circular control handle. By enlarging or reducing the circle size you can control exactly which colors are selected. Of course you can zoom in also to more precisely control things. You can right-click on a handle to access additional options, thus: Right-click menu on one of the color-select points. ‘Deselect’ will de-activate the color-selection (the handles turn black). Now any subsequent color-select operations will be taken to be a new color-select, separate form the last one. This is useful if you want to change different colors in your image. Click on a black handle to make it (and all handles part of the selection) active (and now red). The ‘Delete color selection’ will remove the whole color-selection. ‘Delete this color point’ does as it suggests and deletes just the point you right clicked on. The final option ‘Make transparent’ (make sure you have downloaded the latest v10 free patch, which adds this option) will erase the color-selected pixels, so these parts of the photo now become transparent.Before / After Compare
As with all Enhance operations the Compare button on the right end of the InfoBar allows you to toggle between the before and after state. So in the above case if I select the photo - make sure the color-select mode is on, and have the handles active (red) - then pressing Compare will show the before state, pressing it again will revert to the current enhancement values.Adjusting the Color Selection Tolerance
When you have a color-selection active, there’s a drop-down control (small right arrow) next to the color- select mode control on the InfoBar: Click the right arrow adjacent to the color-select control, and a pop-up provides adjustments of the Tolerance and Fade. The Tolerance adjusts the width of the range of colors included. The Fade control adjusts how the edge cases blend with the background. So a low Tolerance means only colors very close to the picked ones are selected. A higher Tolerance means a wider range of shades of the picked color are included. Selecting a range of shades (as I have done on the car) is typically a balance between adding more control points to select a wider range of shades, and the Tolerance value. I could have had fewer color-select points and a higher Tolerance, but it’s usually easiest to leave the Tolerance and fade values as they are and just add additional color-select points to select the range of desired colors. A case for reducing the Tolerance value would be when you only want the precise color selected, with no lighter or darker shades.Regions and Masking
You can use the Region or Mask tools before you do a color-select to omit regions of the photo from the color selection. The Region and Mask tools This example shows the color of the Clementines changed, but in this case, one fruit has been masked so that it is not changed. Turn your oranges into lemons, limes or blues. I used the Mask Painter Tool to paint a mask around one of the Clementine fruits before I started the color-select operation. This means that when I select the orange color all orange pixels outside the mask area are selected. Alternatively, you could use the Region Painter tool to select a region before you try the color-select. In this case only the pixels inside the region would be picked (the opposite way round from the mask). I masked one fruit before using the color- select feature to change the orange to green. The green fruits look totally realistic because I used several color-select points (shown), to ensure all the required shades of orange were selected, before I used the Tint Control to change the orange to lime- green.Advanced
You might notice that the Photo is described on the Status line as a ‘Photo-group’. This is because of the non-destructive nature of the color-select process. A Photo-group is a photo that contains various edits ‘inside’ the photo. You can retrospectively adjust these edits, even remove them completely to recover the original un-touched photo. For most purposes an edited photo-group operates exactly as a normal photo. If you select it and apply an Enhance value or scale or rotate it, for example, the edit applies to the whole image. But you can drill-down into the photo-group to select just the edited regions inside. In the Selector Tool, hold down the Ctrl key and when you click, for example, on the green fruit in the above example then the status line will now show ‘1 color-selection region’ as being selected. This is inside the photo. If you now press Delete, it will delete this – and restore the green fruit back to its original orange. Xara’s unique non-destructive nature maintains the high quality of your original photo regardless of how many times you open-edit-save it- which explains why many people use Xara Photo and Graphic Designer or Designer Pro as their primary, general purpose image editor. If you are not already one of them, download Xara Photo & Graphic Designer or Designer Pro and try it! This is the fourth part of a series of guides to editing photos in Xara. 1. Beginner’s Guide to Photo Editing in Xara The basics of opening photos, zooming, sizing photos, and saving. 2. Summary of the Photo Tools A summary of the tools on the Photo Tool fly-out menu. 3. Photo Enhance options An overview of the ‘work-horse’ range of Enhance options. 4. Changing colors in photos How to select and enhance or adjust specific colors. 5. A real-world example Combining many of the techniques described above, to transform a poor photo. In addition there are more detailed guides covering other photo tools: The Shadow and Highlight controls Intelligent Photo Rescaling and Zooming Erasing Backgrounds and Combining Photos Brightness Levels and Color Balance Panoramic Photos For more tutorials by Xara and third parties, check out our Resource index, which offers a searchable and browsable list of movies and tutorials created by Xara and third parties.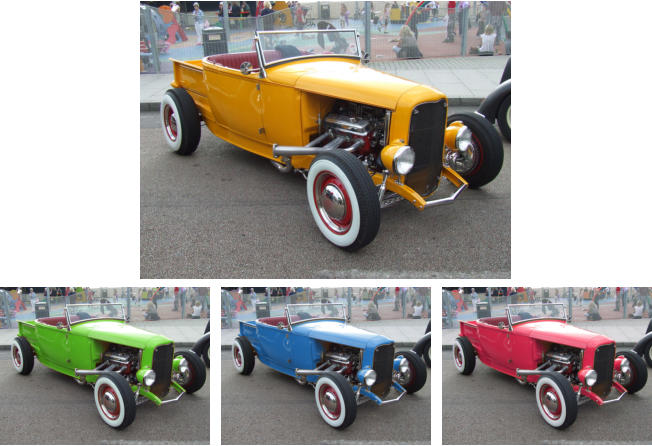


Brightnes
s
Contras
t
Shadow
s
Highlight
s
Saturatio
n
Warm /
Cold
Sharpen /
Blur
Color
Tint
X-
Process
Color Select Mode
Levels Histogram
Copyright © 2016 Xara Group Limited.
Page created with Xara Designer Pro

There are times when you might want to change the color or adjust
some part of your photo, for example to adjust the brightness or
blueness of the blue sky, or you may wish to change the color of a
flower, without affecting other parts of the picture.
Note: This tutorial has been updated to cover changes to the photo
tools in Photo & Graphic Designer and Designer Pro in 2016.
Xara Photo & Graphic Designer and Designer Pro have a fast and
easy way of doing ‘select by color’. You can simply click on the color
you want to select, and now use any of the Photo Enhance
adjustment options to adjust only that color. You can adjust the
brightness, saturation and re-color options, amongst others (see our
previous tutorial about the Photo Enhance options).
Normally this color-select method will include all pixels in a photo
that are the selected color (or tone of that color but you can adjust
this). If you want to restrict the selection to just a given region of the
photo, you can use the Region and Mask tools before you select the
color to limit the area.
Download the trial version of Xara Photo & Graphic Designer or Xara
Designer Pro, and I will show you how easy it is to change colors of
parts of your photo like this…
With a few clicks you can re-color items in your photos.
Open up Xara Photo & Graphic Designer or Designer Pro X and then
drag a photo onto the page.
In the Photo Enhance Tool
there’s a Color-Select icon on the
right end of the InfoBar.
The right end of the Photo Enhance Tool InfoBar has the color-select
control.
After selecting this control, all subsequent clicks will select the color
you click on. You will initially see a checker-board flash that indicates
the region being selected.
Below, I have clicked on the orange color of the car. One color-select
control point is placed on the image and the average color of the
pixels under the selection, ie. within the red circle is now selected.
The size of the circular control point can be adjusted by dragging any
of the 4 arrows surrounding the control point.
The selected orange color that I wish to change
If I hold or drag the color-select handle, the selection is shown with a
checkerboard pattern. In the following image you can see most of
the orange is selected, but the paler and darker shades are not
selected (no checkerboard).
The color selection showing that most of the orange is selected, but
the paler and darker shades are
not selected (areas where there is no checkerboard).
To ensure you have all shades of the color selected simply make
some further clicks on the desired area to add multiple color-select
handles. Below, I’ve clicked a number of paler and darker shades of
the orange car, to ensure I’m getting all the shades.
Multiple color-select points are used to select a wider range of orange
shades from this car
When I click and hold on any handle, now I can see all shades of
orange are selected (including some pixels in the background).
With multiple color-select points, all shades of the orange are now
selected.
Now with the selection made, I can simply change any of the existing
Photo Enhance controls and these will affect only the color-selected
pixels. These are the Photo Enhance controls:
The Photo Enhance Tool options that can be applied to the color
selection
The Color Tint control is used to re-color the pixels selected. In the
following image you can see the Hue is set to blue, and the strength
set quite high in order to change the orange to blue. Other hues
would need varying strength values. The more dramatic the color
change (and changing orange to blue is about as dramatic as it gets)
typically the higher the Strength value needed.
Using the Color Tint to change the car from orange to blue
Adjusting the Color Select Effects
Like most Xara photo edit operations, color-select is non-destructive. Although it looks as if I have permanently altered the orange pixels to be blue, in fact, this is not a permanent once-only operation. The color-select handles and the applied effect are temporary ‘on the fly’ and remembered along with the photo, when saved. This means that you can adjust the effect later (even after saving / loading), or you can delete the effect entirely, and reset the photo, if you wish. When you load a document that has a color-select adjustment, just make sure you have the color-select control on to show the color-select points in the document. When you click and hold on any color-select point, the checkerboard is shown. You can also now drag the handle, and the checkerboard selection is updated as you drag. So this is great way to interactively ensure you have the right regions selected.Color Select Handle Options
When the color-select handles are active, they are shown red, as above. Active color-select points mean that subsequent Enhance operations will apply to the color-selected pixels only. Additional clicks will add more handles to this color selection. The color-select handles are circles, and it uses the average color within the circular control handle. By enlarging or reducing the circle size you can control exactly which colors are selected. Of course you can zoom in also to more precisely control things. You can right-click on a handle to access additional options, thus: Right-click menu on one of the color-select points. ‘Deselect’ will de-activate the color-selection (the handles turn black). Now any subsequent color-select operations will be taken to be a new color-select, separate form the last one. This is useful if you want to change different colors in your image. Click on a black handle to make it (and all handles part of the selection) active (and now red). The ‘Delete color selection’ will remove the whole color-selection. ‘Delete this color point’ does as it suggests and deletes just the point you right clicked on. The final option ‘Make transparent’ (make sure you have downloaded the latest v10 free patch, which adds this option) will erase the color-selected pixels, so these parts of the photo now become transparent.Before / After Compare
As with all Enhance operations the Compare button on the right end of the InfoBar allows you to toggle between the before and after state. So in the above case if I select the photo - make sure the color- select mode is on, and have the handles active (red) - then pressing Compare will show the before state, pressing it again will revert to the current enhancement values.Adjusting the Color Selection Tolerance
When you have a color-selection active, there’s a drop-down control (small right arrow) next to the color-select mode control on the InfoBar: Click the right arrow adjacent to the color-select control, and a pop-up provides adjustments of the Tolerance and Fade. The Tolerance adjusts the width of the range of colors included. The Fade control adjusts how the edge cases blend with the background. So a low Tolerance means only colors very close to the picked ones are selected. A higher Tolerance means a wider range of shades of the picked color are included. Selecting a range of shades (as I have done on the car) is typically a balance between adding more control points to select a wider range of shades, and the Tolerance value. I could have had fewer color- select points and a higher Tolerance, but it’s usually easiest to leave the Tolerance and fade values as they are and just add additional color-select points to select the range of desired colors. A case for reducing the Tolerance value would be when you only want the precise color selected, with no lighter or darker shades.Regions and Masking
You can use the Region or Mask tools before you do a color-select to omit regions of the photo from the color selection. The Region and Mask tools This example shows the color of the Clementines changed, but in this case, one fruit has been masked so that it is not changed. Turn your oranges into lemons, limes or blues. I used the Mask Painter Tool to paint a mask around one of the Clementine fruits before I started the color-select operation. This means that when I select the orange color all orange pixels outside the mask area are selected. Alternatively, you could use the Region Painter tool to select a region before you try the color-select. In this case only the pixels inside the region would be picked (the opposite way round from the mask). I masked one fruit before using the color-select feature to change the orange to green. The green fruits look totally realistic because I used several color- select points (shown), to ensure all the required shades of orange were selected, before I used the Tint Control to change the orange to lime-green.Advanced
You might notice that the Photo is described on the Status line as a ‘Photo-group’. This is because of the non-destructive nature of the color-select process. A Photo-group is a photo that contains various edits ‘inside’ the photo. You can retrospectively adjust these edits, even remove them completely to recover the original un-touched photo. For most purposes an edited photo-group operates exactly as a normal photo. If you select it and apply an Enhance value or scale or rotate it, for example, the edit applies to the whole image. But you can drill-down into the photo-group to select just the edited regions inside. In the Selector Tool, hold down the Ctrl key and when you click, for example, on the green fruit in the above example then the status line will now show ‘1 color-selection region’ as being selected. This is inside the photo. If you now press Delete, it will delete this – and restore the green fruit back to its original orange. Xara’s unique non-destructive nature maintains the high quality of your original photo regardless of how many times you open-edit- save it- which explains why many people use Xara Photo and Graphic Designer or Designer Pro as their primary, general purpose image editor. If you are not already one of them, download Xara Photo & Graphic Designer or Designer Pro and try it! This is the fourth part of a series of guides to editing photos in Xara. 1. Beginner’s Guide to Photo Editing in Xara The basics of opening photos, zooming, sizing photos, and saving. 2. Summary of the Photo Tools A summary of the tools on the Photo Tool fly-out menu. 3. Photo Enhance options An overview of the ‘work-horse’ range of Enhance options. 4. Changing colors in photos How to select and enhance or adjust specific colors. 5. A real-world example Combining many of the techniques described above, to transform a poor photo. In addition there are more detailed guides covering other photo tools: The Shadow and Highlight controls Intelligent Photo Rescaling and Zooming Erasing Backgrounds and Combining Photos Brightness Levels and Color Balance Panoramic Photos For more tutorials by Xara and third parties, check out our Resource index, which offers a searchable and browsable list of movies and tutorials created by Xara and third parties.


Bright
ness
Cont
rast
Shad
ows
Highli
ghts
Satur
ation
Warm /
Cold
Sharpen
/ Blur
Color
Tint
X-
Proce
ss

Color Select Mode
Levels Histogram
Copyright © 2016 Xara Group Limited.
Page created with Xara Designer Pro
PHOTO EDITING PT4: CHANGING COLORS IN PHOTOS
PHOTO EDITING PT4: CHANGING PHOTO COLORS
PHOTO EDITING 4: CHANGING PHOTO COLORS