
Practically every team in your company needs documents – sales & marketing, but also management, finance, support, etc. They want great
looking documents and they want them to match the company branding. But the chances are they don’t feel they have the skills to create them
and, all too often, the design department is too busy to do them.
Here’s where Xara Cloud comes in, and you’ve got two great options; either your in-house designer can create a set of master documents for
your teams to edit in Xara Cloud (using Xara Cloud or our desktop software Xara Designer Pro), or you can jump straight in and use Xara’s
ready-made templates to customize with your own branding and content.
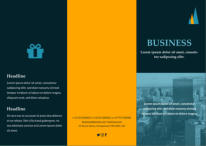
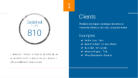
Some example documents from Xara Cloud.
Shared editing in Xara Cloud
It’s common to have two or more people work on a document, and this is usually done by passing the file amongst the contributors. But this ‘pass-the-parcel’ approach is time wasting and error prone. No one else can touch the document while someone else is working on it. Google Docs allows multiple people to edit a document at the same time but it has very few graphical features and very limited page layout options. Xara Cloud offers one-click sharing of your documents. What’s more, if you use the Share-Edit feature colleagues can work on the same document at the same time, where edits can be seen live, as-they-happen, by everyone editing the document. With the comment feature, collaborators sharing the document can easily see which comment applies to which text.Your brand colors
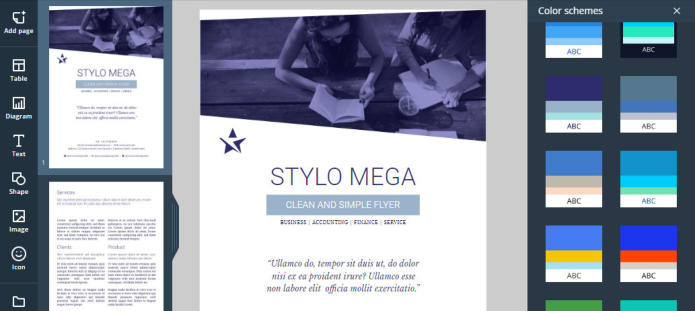
Xara Cloud offers a unique re-coloring system where a single click can re-color the whole document. There’s a set of palettes or you can customize the colors to be your company brand. The same tri-fold brochure design, in different color schemes. If these are problems you face and solutions that you need, then read on! In this tutorial I’ll show you how to create a typical flyer using Xara Cloud. You can sign up and and give Xara Cloud a go for free.The scenario
I want to create a double sided flyer for my ‘Chiltern Estates’ company. I’m going to do this by customizing a Xara template to be in my company branding, with my text and photos and other content. I would like to share the editing with a colleague and then save it as a PDF to print and distribute. I will create the front page in my company branding, changing the theme colors, text and header photo. In the second part, I will share the editing with my colleague so we can work on the other side of the flyer together, and I’ll show you how to add lots of different types of content to the document. Front page of my flyerGetting started
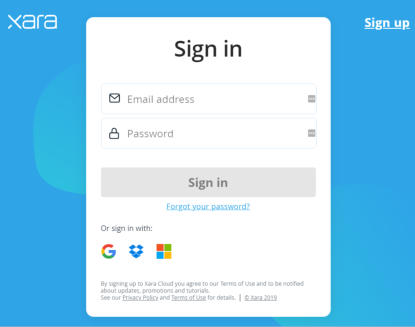
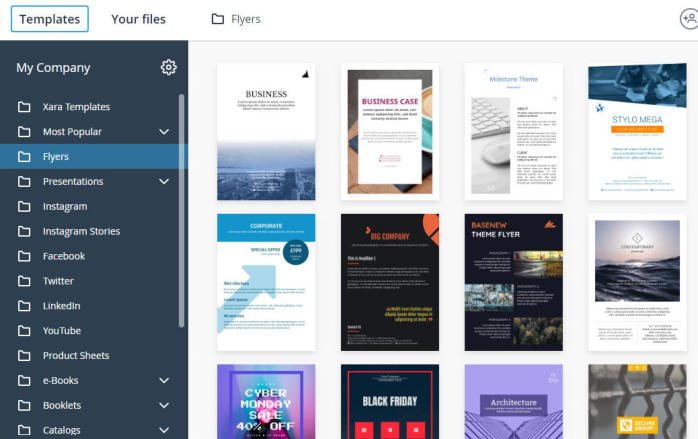
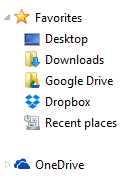
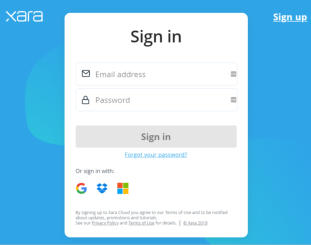
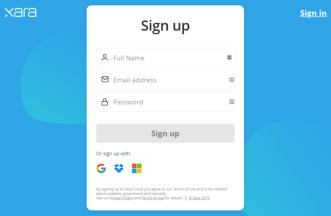
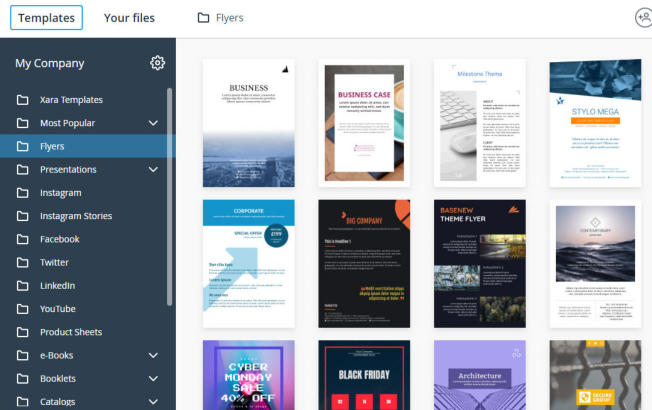
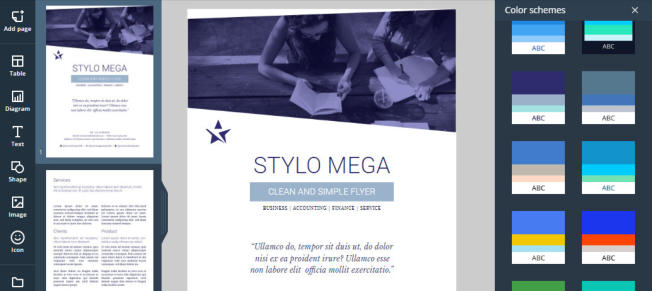
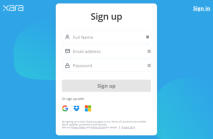
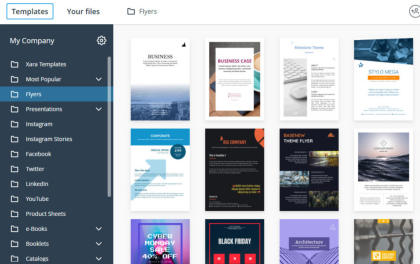
Xara Cloud is a cloud-based app - it works in your web browser, and its files are stored in your preferred cloud drive e.g. Dropbox (2GB free), Google Drive (15GB free) or Microsoft OneDrive (5GB free) (Note: OneDrive is pre-installed with Windows 8.1 and 10, but you will need to download it for Windows 7). You need to be signed-up for one of these services. Each of these services gives you storage space in the cloud, and they also offer desktop utility that allows you to sync files across machines and devices. They are great for sharing files in your team - you probably use one of these already to share files. Above: shows part of my Windows File Explorer with Google Drive, Dropbox and OneDrive installed Now you can get started with Xara Cloud! Now go to cloud.ixara.com to sign up to Xara Cloud. You can Sign Up with the credentials of your Google Drive, Dropbox or OneDrive account, or if you prefer to use an email adddress and password simply select Sign Up to set up a new Xara Cloud account. You can then sign in with those Xara Cloud account details in future.. If you select one of the cloud drive services to sign in, you’ll be asked to give permission to access Xara with these credentials (first time only). For future sign ins you simply click the cloud drive icon. First time users might be offered a guided tour - we will skip the guided tour (to see it later, you can find it in the Settings menu). Once you’ve signed in, you can pick a design from the selection of design categories (which is rapidly growing), or you can start with a blank template. Choose your templates in the File Picker I selected the Flyers category and chose the Stylo Flyer Portrait, which is a two page document for the front and back of the flyer. This opens in the Editor, and since I’m going to start by customizing the colors I selected Color Schemes on the right hand side. The selected template is opened in the editor and a new Color Scheme selected.Changing the color scheme
The first step is to select your color scheme. Try it - click on a few of the color schemes to see the change. Most template designs have a primary and secondary color. On the color palette thumbnails the top color is the primary color, the second one is the secondary color. The ABC shows you the text color and page background, which is usually dark text on a white background. The color schemes outlined in black, have a dark page background, and pale text. As you change the color scheme notice that the top image of this document is in a tone of one of the theme colors (I will show you how to change individual theme colors later).Navigating your document and understanding the work space
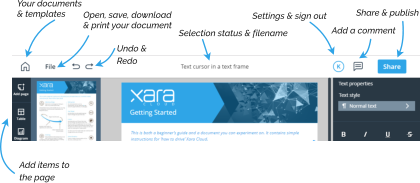
On both touch and mouse systems, you can push pages around (scroll) by simply dragging anywhere on the page. When over selected text (where a drag would normally select some text) you can press the mouse center button (the wheel) and drag to pan the document. You can even ‘throw’ the page for rapid scrolling. There’s a shortcut of holding the Shift key and using the scroll wheel to zoom in and out. Try it on the document. The flyer is a multi-page document so you will see the page thumbnails on the left; simply click a page to scroll to that page. For longer documents, scroll the page thumbnail area using the mouse wheel or drag on the thumbnails. You can resize the thumbnail panel by dragging on the projecting ‘drag handle’. Tap this handle to hide or show the page thumbnails. The editor is remarkably simple to use. The key controls are in a bar at the top of the workspace. The Xara Cloud controlsChanging text styles
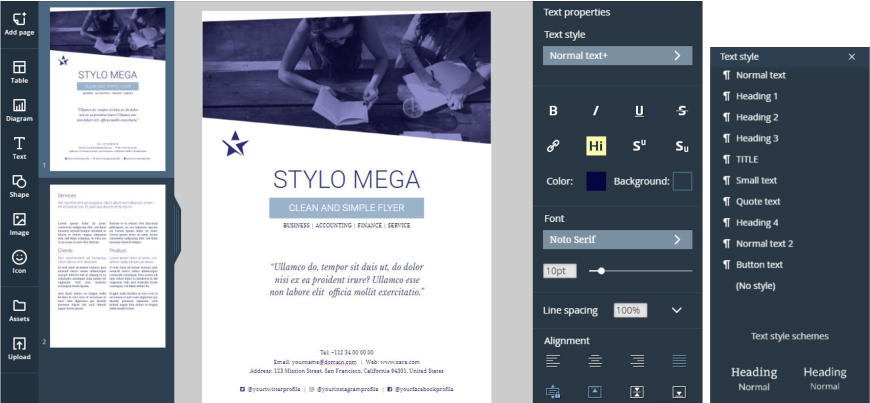
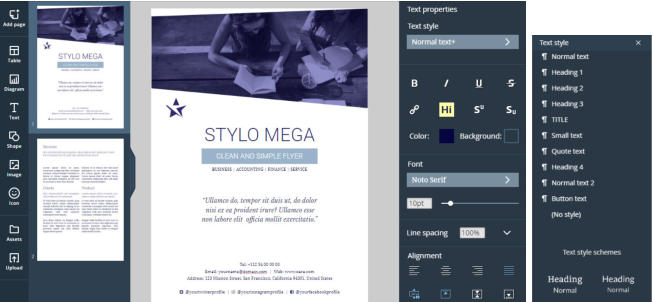
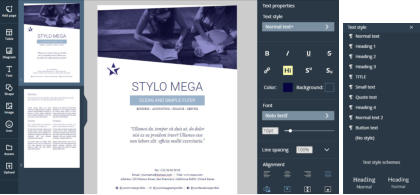
This template has a serif typeface for the body text but your company may prefer a sans-serif typeface. To change it, click or tap on some body text which places a text cursor and displays a Text Properties panel with all the text controls on the right hand side. Click on the arrow alongside the text style, which will open a menu showing the text styles used in the document with the option to choose another text style scheme. The Text properties panel leads to the Text styles optionsEditing your document
Editing the text and images in your document is very easy. Click or tap an item to be able to edit it. Press Esc to clear any selection, or click on the background.Editing the text
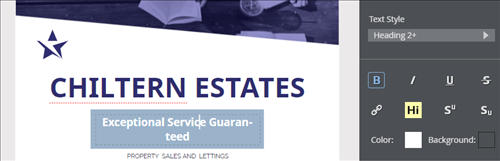
The text controls include all the usual bold, italic, etc. or you can use the normal keyboard shortcut like Ctrl-B for bold. A list of key shortcuts can be found in the Settings menu. The yellow Hi icon will add a background to your text to highlight it. There’s also alignment, list and indent controls. You can select text in the normal ways - click drag over the text, double click to select a word and triple click to select the whole line.Editing the text panel
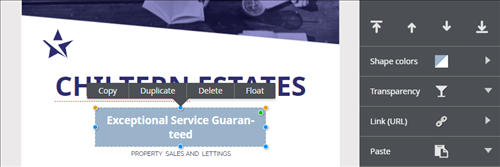
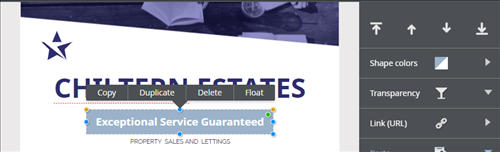
Many of the template designs use text panels (and you can add your own of course) which are text boxes with a colored background. Whilst editing the text on your page, you may have noticed that the text ‘Clean and Simple Flyer’ is on a text panel. If you have extended the text (I entered ‘Exceptional Service Guaranteed’) you will notice that it has run onto a second line, like mine, but don’t worry - this is a ‘SmartShape’ Text Panel, which means that all the editing controls are built into the shape. Simply click on the outside edge of the panel to see the editing handles, drag on the blue round handle in the center of the right side to widen the text panel and note that it automatically re-centers itself on the page. The SmartShape Text panel Text panel selected, showing the editing handles Drag the right hand handle to resize the Text panel to be widerReplacing the header photo
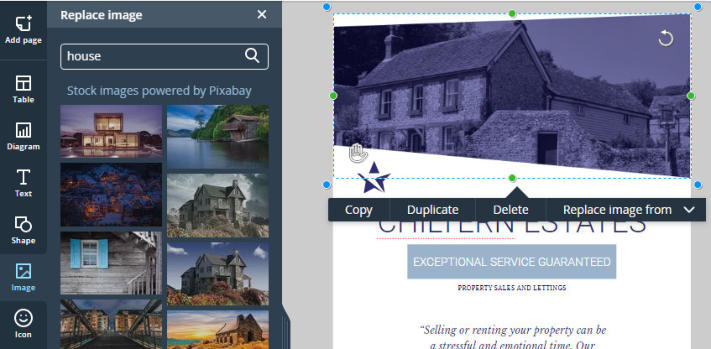
Next we’ll look at the header image as I need to replace it. You can replace images in four ways: Drag and drop an image file from your File Explorer onto an image, or click the image and select the ‘Replace image from..’ menu option where you can either select an alternative photo from your local disc, or pick an image from your cloud drive, or select from the range of over a million completely free stock photos in Xara Cloud. To add a stock photo click the Replace image from… menu option and select Free stock photos. I searched for ‘House’ since I am preparing a flyer for a Real Estate Agent. Click on the desired photo and it will appear on the page, automatically adjusted to your theme color. Select the image and you’ll see the edit handles and a context menu. You can see that this is a Smart photo, as it has the edit handles on it. I want to move the photo up slightly so I select the ‘hand’ control in the bottom left of the photo and drag to reposition the photo. In addition to the resize and crop handles on the sides, you’ll see a rotating arrow symbol in the top right corner of the image. Dragging on this will resize and rotate the image within its frame. Drag diagonally outwards to resize or rotate - this clips the image, but while dragging you can see the size of the whole image. Note - When uploading an image from your local computer the image is resized before upload to be HD resolution. This speeds up the upload process. If your photos are stored in Google Drive, Dropbox or OneDrive, you can select to import it from your cloud drive which will only take a second or two even for full resolution images.Symbols and icons
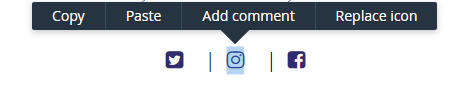
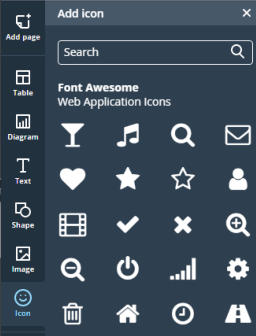
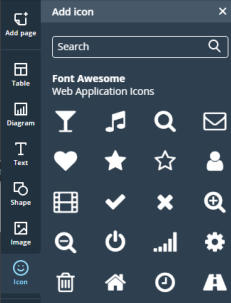
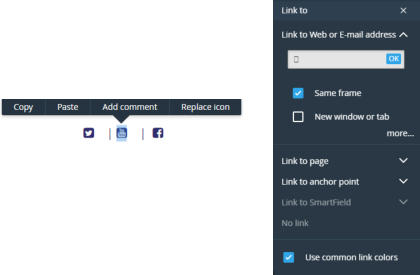
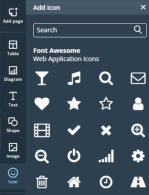
There are three social media symbols at the bottom of the page. I’m going to replace the Instagram symbol with a YouTube one, and then increase the spacing between them. When you select one of the symbols you will see that they have been included inline with this column of text so you can use the usual text controls to adjust the alignment and spacing. Just click on the space and use the space-bar on your computer, as you would with text. Replacing the social media icon with another one from our library of thousands Tip: Because these icons are inline with the text and behave like text characters you can change their size by selecting them and then changing the font size with the font size slider. Many icons and symbols in the templates are stand alone graphics that are sometimes grouped together and sometimes just a simple symbol (like the star on the top left of this design) that can be moved, resized and re-colored as required. To replace the icon, in either case, select it and select ‘Replace icon’ - a side panel will open to show all the options. There are thousands to choose from but you can use the search box to find exactly what you’re looking for. I searched for YouTube and selected one of those on offer.Adding links
As these icons are inline in the text when I select an icon, you’ll see the text properties panel and there you can see a link option Click on the link icon to see the options for linking the graphic. Linking objects or textEditing colors
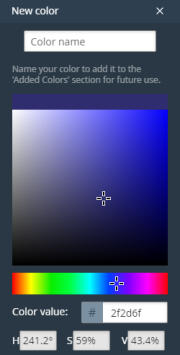
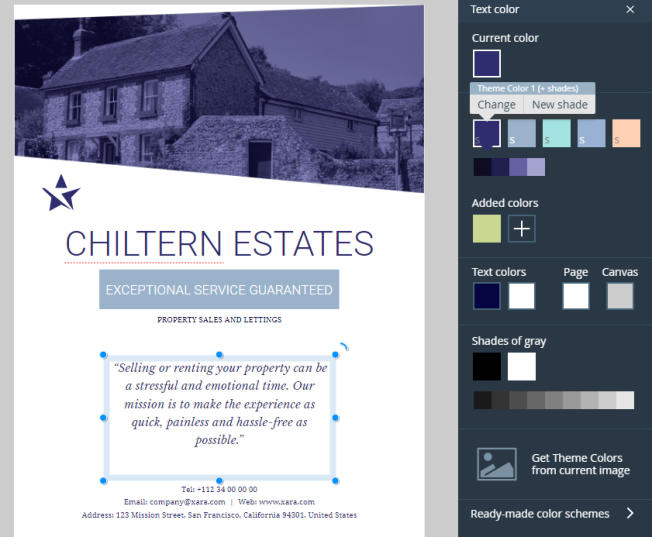
Xara Cloud uses an amazingly powerful Color Scheme system to control your theme colors. Let’s say you want to change the theme color of the text to match your company branding. Simply select some of the text, then click or tap the purple color patch in the properties panel on the right, to see a palette of all the colors in this document. The palette of colors available in this document. The selected color is called ‘Theme Color 1’. Select the ‘Change’ menu option to change this color throughout the document. The purple color of the selected text is highlighted, and you can see by the small color patch under it that it has some linked shades. When you change the parent Theme Color, all linked shades will change also, as will all occurrences of this color throughout your document. If you want to create a completely new color click on the + symbol and you will see the color editor where you can choose your new color, or paste a RGB hex color value (e.g. you company color). See the movies about color editing and ready-made color schemes Tip: It’s generally regarded as good design to limit your color palette in a document, and to re-use colors or shades of the same color.Re-coloring photos
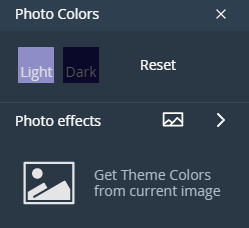
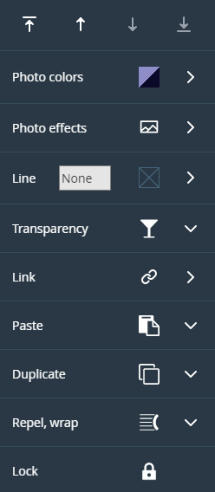
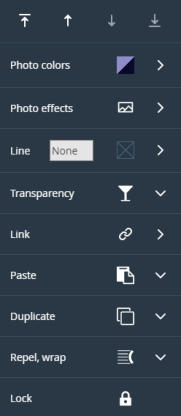
The photo in this design is colored based on the Theme Colors used in this document. When you select the photo you get a variety of options in the right-side property panel. These include controls to set the photo colors, photo effects (e.g. brightness, contrast etc and photo filters) and photo transparency. If you select the Photo Colors option you can set both the light and dark tones of your photo (technically to make it a contone or duotone image). You can base these colors on the Theme Color of your document, or any color you like. Select the Reset option to reset it to full color. You’ll also find the powerful ‘get colors from photo’ feature, which can base the theme colors of your document on you photo.Saving your edits and connecting your cloud drive for the first time
When you’re satisfied with the design it’s time to save it. The document you are editing is on Xara servers in the cloud. When you click Save (File menu, top left) or type Ctrl+S, it saves the document back to your cloud drive. Note: If you signed up to Xara Cloud with an email address and password, rather than using your cloud drive credentials, you may not yet have linked your cloud drive so you will have the opportunity to do so when saving your first document. Click on File in the top left corner of the editor and then select Save. If you haven’t yet connected a cloud drive select Add new cloud drive and you will see the options for Google Drive, Dropbox or Microsoft OneDrive. Select your cloud drive of choice. The first time you connect a new cloud drive you will be asked to give access permission to save files to this drive. Once you have connected a cloud drive, you can save the file, choose your folder then give the document a name and click Save. Note: You can even connect multiple accounts on the same drive, for example, if you have a personal OneDrive account as well as a business account.Backups
An additional benefit of your file being saved to your cloud drive is that Dropbox and Google Drive maintain older versions of your files which provides an easy way of viewing and reverting back to earlier versions, so it’s a safe and easy way of maintaining multiple versions of your document files.Creating your company documents, Part 2
In Part 2 I cover how to share editing of your document, add and respond to comments from team members, manipulate and enhance photos, add and customize SmartShapes, create a PDF to print or distribute, and share a link with your customers.The Xara Cloud templates
The Xara Cloud templates include all the common business documents, including social media headings, presentations, CVs, flyers, catalogs product sheets, e-books and web banners. You can browse the templates and start editing immediately by selecting Use It here.Try Xara for free
You can try Xara Cloud for yourself, the trial is completely free! If you’d like to try the unique offline/online experience offered by Xara, whereby you can edit your documents either online or offline, you can also download a free trial of Xara Designer Pro X.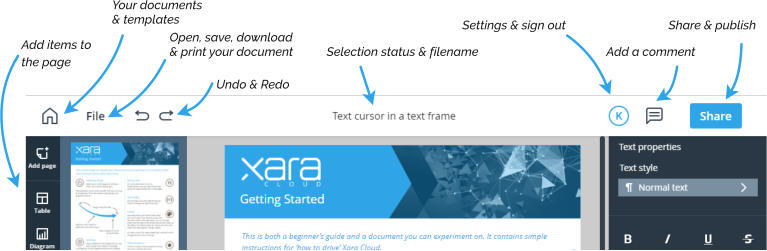


Copyright © 2019 Xara Group Limited.
Page created with Xara Designer Pro


Practically every team in your company needs documents – sales & marketing, but also management,
finance, support, etc. They want great looking documents and they want them to match the company
branding. But the chances are they don’t feel they have the skills to create them and, all too often, the
design department is too busy to do them.
Here’s where Xara Cloud comes in, and you’ve got two great options; either your in-house designer can
create a set of master documents for your teams to edit in Xara Cloud (using Xara Cloud or our desktop
software Xara Designer Pro), or you can jump straight in and use Xara’s ready-made templates to
customize with your own branding and content.
Some example documents from Xara Cloud.
Shared editing in Xara Cloud
It’s common to have two or more people work on a document, and this is usually done by passing the file amongst the contributors. But this ‘pass-the-parcel’ approach is time wasting and error prone. No one else can touch the document while someone else is working on it. Google Docs allows multiple people to edit a document at the same time but it has very few graphical features and very limited page layout options. Xara Cloud offers one-click sharing of your documents. What’s more, if you use the Share-Edit feature colleagues can work on the same document at the same time, where edits can be seen live, as-they- happen, by everyone editing the document. With the comment feature, collaborators sharing the document can easily see which comment applies to which text.Your brand colors
Xara Cloud offers a unique re-coloring system where a single click can re-color the whole document. There’s a set of palettes or you can customize the colors to be your company brand. The same tri-fold brochure design, in different color schemes. If these are problems you face and solutions that you need, then read on! In this tutorial I’ll show you how to create a typical flyer using Xara Cloud. You can sign up and and give Xara Cloud a go for free.The scenario
I want to create a double sided flyer for my ‘Chiltern Estates’ company. I’m going to do this by customizing a Xara template to be in my company branding, with my text and photos and other content. I would like to share the editing with a colleague and then save it as a PDF to print and distribute. I will create the front page in my company branding, changing the theme colors, text and header photo. In the second part, I will share the editing with my colleague so we can work on the other side of the flyer together, and I’ll show you how to add lots of different types of content to the document. Front page of my flyerGetting started
Xara Cloud is a cloud-based app - it works in your web browser, and its files are stored in your preferred cloud drive e.g. Dropbox (2GB free), Google Drive (15GB free) or Microsoft OneDrive (5GB free) (Note: OneDrive is pre-installed with Windows 8.1 and 10, but you will need to download it for Windows 7). You need to be signed-up for one of these services. Each of these services gives you storage space in the cloud, and they also offer desktop utility that allows you to sync files across machines and devices. They are great for sharing files in your team - you probably use one of these already to share files. Above: shows part of my Windows File Explorer with Google Drive, Dropbox and OneDrive installed Now you can get started with Xara Cloud! Now go to cloud.ixara.com to sign up to Xara Cloud. You can Sign Up with the credentials of your Google Drive, Dropbox or OneDrive account, or if you prefer to use an email adddress and password simply select Sign Up to set up a new Xara Cloud account. You can then sign in with those Xara Cloud account details in future.. If you select one of the cloud drive services to sign in, you’ll be asked to give permission to access Xara with these credentials (first time only). For future sign ins you simply click the cloud drive icon. First time users might be offered a guided tour - we will skip the guided tour (to see it later, you can find it in the Settings menu). Once you’ve signed in, you can pick a design from the selection of design categories (which is rapidly growing), or you can start with a blank template. Choose your templates in the File Picker I selected the Flyers category and chose the Stylo Flyer Portrait, which is a two page document for the front and back of the flyer. This opens in the Editor, and since I’m going to start by customizing the colors I selected Color Schemes on the right hand side. The selected template is opened in the editor and a new Color Scheme selected.Changing the color scheme
The first step is to select your color scheme. Try it - click on a few of the color schemes to see the change. Most template designs have a primary and secondary color. On the color palette thumbnails the top color is the primary color, the second one is the secondary color. The ABC shows you the text color and page background, which is usually dark text on a white background. The color schemes outlined in black, have a dark page background, and pale text. As you change the color scheme notice that the top image of this document is in a tone of one of the theme colors (I will show you how to change individual theme colors later).Navigating your document and understanding the work space
On both touch and mouse systems, you can push pages around (scroll) by simply dragging anywhere on the page. When over selected text (where a drag would normally select some text) you can press the mouse center button (the wheel) and drag to pan the document. You can even ‘throw’ the page for rapid scrolling. There’s a shortcut of holding the Shift key and using the scroll wheel to zoom in and out. Try it on the document. The flyer is a multi-page document so you will see the page thumbnails on the left; simply click a page to scroll to that page. For longer documents, scroll the page thumbnail area using the mouse wheel or drag on the thumbnails. You can resize the thumbnail panel by dragging on the projecting ‘drag handle’. Tap this handle to hide or show the page thumbnails. The editor is remarkably simple to use. The key controls are in a bar at the top of the workspace. The Xara Cloud controlsChanging text styles
This template has a serif typeface for the body text but your company may prefer a sans-serif typeface. To change it, click or tap on some body text which places a text cursor and displays a Text Properties panel with all the text controls on the right hand side. Click on the arrow alongside the text style, which will open a menu showing the text styles used in the document with the option to choose another text style scheme. The Text properties panel leads to the Text styles optionsEditing your document
Editing the text and images in your document is very easy. Click or tap an item to be able to edit it. Press Esc to clear any selection, or click on the background.Editing the text
The text controls include all the usual bold, italic, etc. or you can use the normal keyboard shortcut like Ctrl- B for bold. A list of key shortcuts can be found in the Settings menu. The yellow Hi icon will add a background to your text to highlight it. There’s also alignment, list and indent controls. You can select text in the normal ways - click drag over the text, double click to select a word and triple click to select the whole line.Editing the text panel
Many of the template designs use text panels (and you can add your own of course) which are text boxes with a colored background. Whilst editing the text on your page, you may have noticed that the text ‘Clean and Simple Flyer’ is on a text panel. If you have extended the text (I entered ‘Exceptional Service Guaranteed’) you will notice that it has run onto a second line, like mine, but don’t worry - this is a ‘SmartShape’ Text Panel, which means that all the editing controls are built into the shape. Simply click on the outside edge of the panel to see the editing handles, drag on the blue round handle in the center of the right side to widen the text panel and note that it automatically re-centers itself on the page. The SmartShape Text panel Text panel selected, showing the editing handles Drag the right hand handle to resize the Text panel to be widerReplacing the header photo
Next we’ll look at the header image as I need to replace it. You can replace images in four ways: Drag and drop an image file from your File Explorer onto an image, or click the image and select the ‘Replace image from..’ menu option where you can either select an alternative photo from your local disc, or pick an image from your cloud drive, or select from the range of over a million completely free stock photos in Xara Cloud. To add a stock photo click the Replace image from… menu option and select Free stock photos. I searched for ‘House’ since I am preparing a flyer for a Real Estate Agent. Click on the desired photo and it will appear on the page, automatically adjusted to your theme color. Select the image and you’ll see the edit handles and a context menu. You can see that this is a Smart photo, as it has the edit handles on it. I want to move the photo up slightly so I select the ‘hand’ control in the bottom left of the photo and drag to reposition the photo. In addition to the resize and crop handles on the sides, you’ll see a rotating arrow symbol in the top right corner of the image. Dragging on this will resize and rotate the image within its frame. Drag diagonally outwards to resize or rotate - this clips the image, but while dragging you can see the size of the whole image. Note - When uploading an image from your local computer the image is resized before upload to be HD resolution. This speeds up the upload process. If your photos are stored in Google Drive, Dropbox or OneDrive, you can select to import it from your cloud drive which will only take a second or two even for full resolution images.Symbols and icons
There are three social media symbols at the bottom of the page. I’m going to replace the Instagram symbol with a YouTube one, and then increase the spacing between them. When you select one of the symbols you will see that they have been included inline with this column of text so you can use the usual text controls to adjust the alignment and spacing. Just click on the space and use the space-bar on your computer, as you would with text. Replacing the social media icon with another one from our library of thousands Tip: Because these icons are inline with the text and behave like text characters you can change their size by selecting them and then changing the font size with the font size slider. Many icons and symbols in the templates are stand alone graphics that are sometimes grouped together and sometimes just a simple symbol (like the star on the top left of this design) that can be moved, resized and re-colored as required. To replace the icon, in either case, select it and select ‘Replace icon’ - a side panel will open to show all the options. There are thousands to choose from but you can use the search box to find exactly what you’re looking for. I searched for YouTube and selected one of those on offer.Adding links
As these icons are inline in the text when I select an icon, you’ll see the text properties panel and there you can see a link option Click on the link icon to see the options for linking the graphic. Linking objects or textEditing colors
Xara Cloud uses an amazingly powerful Color Scheme system to control your theme colors. Let’s say you want to change the theme color of the text to match your company branding. Simply select some of the text, then click or tap the purple color patch in the properties panel on the right, to see a palette of all the colors in this document. The palette of colors available in this document. The selected color is called ‘Theme Color 1’. Select the ‘Change’ menu option to change this color throughout the document. The purple color of the selected text is highlighted, and you can see by the small color patch under it that it has some linked shades. When you change the parent Theme Color, all linked shades will change also, as will all occurrences of this color throughout your document. If you want to create a completely new color click on the + symbol and you will see the color editor where you can choose your new color, or paste a RGB hex color value (e.g. you company color). See the movies about color editing and ready-made color schemes Tip: It’s generally regarded as good design to limit your color palette in a document, and to re-use colors or shades of the same color.Re-coloring photos
The photo in this design is colored based on the Theme Colors used in this document. When you select the photo you get a variety of options in the right-side property panel. These include controls to set the photo colors, photo effects (e.g. brightness, contrast etc and photo filters) and photo transparency. If you select the Photo Colors option you can set both the light and dark tones of your photo (technically to make it a contone or duotone image). You can base these colors on the Theme Color of your document, or any color you like. Select the Reset option to reset it to full color. You’ll also find the powerful ‘get colors from photo’ feature, which can base the theme colors of your document on you photo.Saving your edits and connecting your cloud drive for the first time
When you’re satisfied with the design it’s time to save it. The document you are editing is on Xara servers in the cloud. When you click Save (File menu, top left) or type Ctrl+S, it saves the document back to your cloud drive. Note: If you signed up to Xara Cloud with an email address and password, rather than using your cloud drive credentials, you may not yet have linked your cloud drive so you will have the opportunity to do so when saving your first document. Click on File in the top left corner of the editor and then select Save. If you haven’t yet connected a cloud drive select Add new cloud drive and you will see the options for Google Drive, Dropbox or Microsoft OneDrive. Select your cloud drive of choice. The first time you connect a new cloud drive you will be asked to give access permission to save files to this drive. Once you have connected a cloud drive, you can save the file, choose your folder then give the document a name and click Save. Note: You can even connect multiple accounts on the same drive, for example, if you have a personal OneDrive account as well as a business account.Backups
An additional benefit of your file being saved to your cloud drive is that Dropbox and Google Drive maintain older versions of your files which provides an easy way of viewing and reverting back to earlier versions, so it’s a safe and easy way of maintaining multiple versions of your document files.Creating your company documents, Part 2
In Part 2 I cover how to share editing of your document, add and respond to comments from team members, manipulate and enhance photos, add and customize SmartShapes, create a PDF to print or distribute, and share a link with your customers.The Xara Cloud templates
The Xara Cloud templates include all the common business documents, including social media headings, presentations, CVs, flyers, catalogs product sheets, e-books and web banners. You can browse the templates and start editing immediately by selecting Use It here.Try Xara for free
You can try Xara Cloud for yourself, the trial is completely free! If you’d like to try the unique offline/online experience offered by Xara, whereby you can edit your documents either online or offline, you can also download a free trial of Xara Designer Pro X.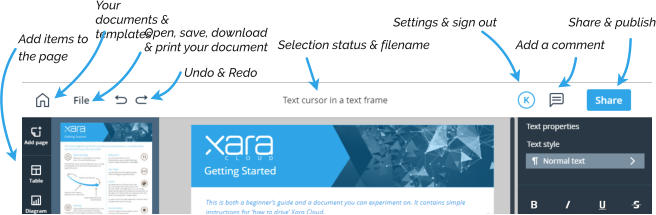


Copyright © 2019 Xara Group Limited.
Page created with Xara Designer Pro


Practically every team in your company needs documents – sales &
marketing, but also management, finance, support, etc. They want
great looking documents and they want them to match the company
branding. But the chances are they don’t feel they have the skills to
create them and, all too often, the design department is too busy to
do them.
Here’s where Xara Cloud comes in, and you’ve got two great options;
either your in-house designer can create a set of master documents
for your teams to edit in Xara Cloud (using Xara Cloud or our desktop
software Xara Designer Pro), or you can jump straight in and use
Xara’s ready-made templates to customize with your own branding
and content.
Some example documents from Xara Cloud.
Shared editing in Xara Cloud
It’s common to have two or more people work on a document, and this is usually done by passing the file amongst the contributors. But this ‘pass-the-parcel’ approach is time wasting and error prone. No one else can touch the document while someone else is working on it. Google Docs allows multiple people to edit a document at the same time but it has very few graphical features and very limited page layout options. Xara Cloud offers one-click sharing of your documents. What’s more, if you use the Share-Edit feature colleagues can work on the same document at the same time, where edits can be seen live, as-they- happen, by everyone editing the document. With the comment feature, collaborators sharing the document can easily see which comment applies to which text.Your brand colors
Xara Cloud offers a unique re-coloring system where a single click can re-color the whole document. There’s a set of palettes or you can customize the colors to be your company brand. The same tri-fold brochure design, in different color schemes. If these are problems you face and solutions that you need, then read on! In this tutorial I’ll show you how to create a typical flyer using Xara Cloud. You can sign up and and give Xara Cloud a go for free.The scenario
I want to create a double sided flyer for my ‘Chiltern Estates’ company. I’m going to do this by customizing a Xara template to be in my company branding, with my text and photos and other content. I would like to share the editing with a colleague and then save it as a PDF to print and distribute. I will create the front page in my company branding, changing the theme colors, text and header photo. In the second part, I will share the editing with my colleague so we can work on the other side of the flyer together, and I’ll show you how to add lots of different types of content to the document. Front page of my flyerGetting started
Xara Cloud is a cloud-based app - it works in your web browser, and its files are stored in your preferred cloud drive e.g. Dropbox (2GB free), Google Drive (15GB free) or Microsoft OneDrive (5GB free) (Note: OneDrive is pre-installed with Windows 8.1 and 10, but you will need to download it for Windows 7). You need to be signed-up for one of these services. Each of these services gives you storage space in the cloud, and they also offer desktop utility that allows you to sync files across machines and devices. They are great for sharing files in your team - you probably use one of these already to share files. Above: shows part of my Windows File Explorer with Google Drive, Dropbox and OneDrive installed Now you can get started with Xara Cloud! Now go to cloud.ixara.com to sign up to Xara Cloud. You can Sign Up with the credentials of your Google Drive, Dropbox or OneDrive account, or if you prefer to use an email adddress and password simply select Sign Up to set up a new Xara Cloud account. You can then sign in with those Xara Cloud account details in future.. If you select one of the cloud drive services to sign in, you’ll be asked to give permission to access Xara with these credentials (first time only). For future sign ins you simply click the cloud drive icon. First time users might be offered a guided tour - we will skip the guided tour (to see it later, you can find it in the Settings menu). Once you’ve signed in, you can pick a design from the selection of design categories (which is rapidly growing), or you can start with a blank template. Choose your templates in the File Picker I selected the Flyers category and chose the Stylo Flyer Portrait, which is a two page document for the front and back of the flyer. This opens in the Editor, and since I’m going to start by customizing the colors I selected Color Schemes on the right hand side. The selected template is opened in the editor and a new Color Scheme selected.Changing the color scheme
The first step is to select your color scheme. Try it - click on a few of the color schemes to see the change. Most template designs have a primary and secondary color. On the color palette thumbnails the top color is the primary color, the second one is the secondary color. The ABC shows you the text color and page background, which is usually dark text on a white background. The color schemes outlined in black, have a dark page background, and pale text. As you change the color scheme notice that the top image of this document is in a tone of one of the theme colors (I will show you how to change individual theme colors later).Navigating your document and understanding
the work space
On both touch and mouse systems, you can push pages around (scroll) by simply dragging anywhere on the page. When over selected text (where a drag would normally select some text) you can press the mouse center button (the wheel) and drag to pan the document. You can even ‘throw’ the page for rapid scrolling. There’s a shortcut of holding the Shift key and using the scroll wheel to zoom in and out. Try it on the document. The flyer is a multi-page document so you will see the page thumbnails on the left; simply click a page to scroll to that page. For longer documents, scroll the page thumbnail area using the mouse wheel or drag on the thumbnails. You can resize the thumbnail panel by dragging on the projecting ‘drag handle’. Tap this handle to hide or show the page thumbnails. The editor is remarkably simple to use. The key controls are in a bar at the top of the workspace. The Xara Cloud controlsChanging text styles
This template has a serif typeface for the body text but your company may prefer a sans-serif typeface. To change it, click or tap on some body text which places a text cursor and displays a Text Properties panel with all the text controls on the right hand side. Click on the arrow alongside the text style, which will open a menu showing the text styles used in the document with the option to choose another text style scheme. The Text properties panel leads to the Text styles optionsEditing your document
Editing the text and images in your document is very easy. Click or tap an item to be able to edit it. Press Esc to clear any selection, or click on the background.Editing the text
The text controls include all the usual bold, italic, etc. or you can use the normal keyboard shortcut like Ctrl-B for bold. A list of key shortcuts can be found in the Settings menu. The yellow Hi icon will add a background to your text to highlight it. There’s also alignment, list and indent controls. You can select text in the normal ways - click drag over the text, double click to select a word and triple click to select the whole line.Editing the text panel
Many of the template designs use text panels (and you can add your own of course) which are text boxes with a colored background. Whilst editing the text on your page, you may have noticed that the text ‘Clean and Simple Flyer’ is on a text panel. If you have extended the text (I entered ‘Exceptional Service Guaranteed’) you will notice that it has run onto a second line, like mine, but don’t worry - this is a ‘SmartShape’ Text Panel, which means that all the editing controls are built into the shape. Simply click on the outside edge of the panel to see the editing handles, drag on the blue round handle in the center of the right side to widen the text panel and note that it automatically re-centers itself on the page. The SmartShape Text panel Text panel selected, showing the editing handles Drag the right hand handle to resize the Text panel to be widerReplacing the header photo
Next we’ll look at the header image as I need to replace it. You can replace images in four ways: Drag and drop an image file from your File Explorer onto an image, or click the image and select the ‘Replace image from..’ menu option where you can either select an alternative photo from your local disc, or pick an image from your cloud drive, or select from the range of over a million completely free stock photos in Xara Cloud. To add a stock photo click the Replace image from… menu option and select Free stock photos. I searched for ‘House’ since I am preparing a flyer for a Real Estate Agent. Click on the desired photo and it will appear on the page, automatically adjusted to your theme color. Select the image and you’ll see the edit handles and a context menu. You can see that this is a Smart photo, as it has the edit handles on it. I want to move the photo up slightly so I select the ‘hand’ control in the bottom left of the photo and drag to reposition the photo. In addition to the resize and crop handles on the sides, you’ll see a rotating arrow symbol in the top right corner of the image. Dragging on this will resize and rotate the image within its frame. Drag diagonally outwards to resize or rotate - this clips the image, but while dragging you can see the size of the whole image. Note - When uploading an image from your local computer the image is resized before upload to be HD resolution. This speeds up the upload process. If your photos are stored in Google Drive, Dropbox or OneDrive, you can select to import it from your cloud drive which will only take a second or two even for full resolution images.Symbols and icons
There are three social media symbols at the bottom of the page. I’m going to replace the Instagram symbol with a YouTube one, and then increase the spacing between them. When you select one of the symbols you will see that they have been included inline with this column of text so you can use the usual text controls to adjust the alignment and spacing. Just click on the space and use the space-bar on your computer, as you would with text. Replacing the social media icon with another one from our library of thousands Tip: Because these icons are inline with the text and behave like text characters you can change their size by selecting them and then changing the font size with the font size slider. Many icons and symbols in the templates are stand alone graphics that are sometimes grouped together and sometimes just a simple symbol (like the star on the top left of this design) that can be moved, resized and re-colored as required. To replace the icon, in either case, select it and select ‘Replace icon’ - a side panel will open to show all the options. There are thousands to choose from but you can use the search box to find exactly what you’re looking for. I searched for YouTube and selected one of those on offer.Adding links
As these icons are inline in the text when I select an icon, you’ll see the text properties panel and there you can see a link option Click on the link icon to see the options for linking the graphic. Linking objects or textEditing colors
Xara Cloud uses an amazingly powerful Color Scheme system to control your theme colors. Let’s say you want to change the theme color of the text to match your company branding. Simply select some of the text, then click or tap the purple color patch in the properties panel on the right, to see a palette of all the colors in this document. The palette of colors available in this document. The selected color is called ‘Theme Color 1’. Select the ‘Change’ menu option to change this color throughout the document. The purple color of the selected text is highlighted, and you can see by the small color patch under it that it has some linked shades. When you change the parent Theme Color, all linked shades will change also, as will all occurrences of this color throughout your document. If you want to create a completely new color click on the + symbol and you will see the color editor where you can choose your new color, or paste a RGB hex color value (e.g. you company color). See the movies about color editing and ready-made color schemes Tip: It’s generally regarded as good design to limit your color palette in a document, and to re-use colors or shades of the same color.Re-coloring photos
The photo in this design is colored based on the Theme Colors used in this document. When you select the photo you get a variety of options in the right-side property panel. These include controls to set the photo colors, photo effects (e.g. brightness, contrast etc and photo filters) and photo transparency. If you select the Photo Colors option you can set both the light and dark tones of your photo (technically to make it a contone or duotone image). You can base these colors on the Theme Color of your document, or any color you like. Select the Reset option to reset it to full color. You’ll also find the powerful ‘get colors from photo’ feature, which can base the theme colors of your document on you photo.Saving your edits and connecting your cloud
drive for the first time
When you’re satisfied with the design it’s time to save it. The document you are editing is on Xara servers in the cloud. When you click Save (File menu, top left) or type Ctrl+S, it saves the document back to your cloud drive. Note: If you signed up to Xara Cloud with an email address and password, rather than using your cloud drive credentials, you may not yet have linked your cloud drive so you will have the opportunity to do so when saving your first document. Click on File in the top left corner of the editor and then select Save. If you haven’t yet connected a cloud drive select Add new cloud drive and you will see the options for Google Drive, Dropbox or Microsoft OneDrive. Select your cloud drive of choice. The first time you connect a new cloud drive you will be asked to give access permission to save files to this drive. Once you have connected a cloud drive, you can save the file, choose your folder then give the document a name and click Save. Note: You can even connect multiple accounts on the same drive, for example, if you have a personal OneDrive account as well as a business account.Backups
An additional benefit of your file being saved to your cloud drive is that Dropbox and Google Drive maintain older versions of your files which provides an easy way of viewing and reverting back to earlier versions, so it’s a safe and easy way of maintaining multiple versions of your document files.Creating your company documents, Part 2
In Part 2 I cover how to share editing of your document, add and respond to comments from team members, manipulate and enhance photos, add and customize SmartShapes, create a PDF to print or distribute, and share a link with your customers.The Xara Cloud templates
The Xara Cloud templates include all the common business documents, including social media headings, presentations, CVs, flyers, catalogs product sheets, e-books and web banners. You can browse the templates and start editing immediately by selecting Use It here.Try Xara for free
You can try Xara Cloud for yourself, the trial is completely free! If you’d like to try the unique offline/online experience offered by Xara, whereby you can edit your documents either online or offline, you can also download a free trial of Xara Designer Pro X.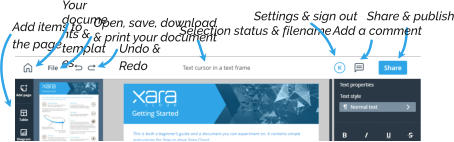


Copyright © 2019 Xara Group Limited.
Page created with Xara Designer Pro


CREATING YOUR COMPANY DOCUMENTS - PART 1
CREATING YOUR COMPANY DOCUMENTS - PART 1
CREATING YOUR COMPANY DOCUMENTS
PART 1