Step 8:The ‘Include my website in the user gallery’ checkbox is only enabled if you have added a valid website URL. Select this option if you would like your website to be considered for inclusion in Xara’s gallery of websites created by Designer Pro or Web Designer. Visit the gallery at https://www.xara.com/websitegallery or click the ‘More Info’ button in the Publish tab to learn more.Step 9: Select the ‘Save details in current document’ checkbox (Designer Pro and Web Designer Premium only) to save the publish details you have provided with the current document. When you enable the ‘Save details in current document’ checkbox, the ‘Save password in document’ checkbox also becomes selectable. Select this checkbox to also save the FTP password with the current document, if you are sure that is what you want. This is not recommended because it means anyone who gets a copy of your design file can publish to your website without knowing or entering your password! Step 10: You can also opt to save the publish details on your computer in a named profile. Click the ‘Save in profile’ button and enter a suitable profile name. Now you can select the profile from the profile list at the top of the dialog, so you can use them in other documents without having to re-enter them.Note: You can delete a profile by selecting it in the ‘Profile’ list and clicking the ‘Delete’ button next to it. Step 11: Normally leave the ‘Re-publish changed files only’ checkbox selected. This makes re-publishing much quicker in most cases because only files changed since the last publish are re-published.Step 12: (Optional)Click the ‘Explore web space’ button to browse, view and delete files you have uploaded to your FTP server.Step 13: Click ‘OK’. Designer Pro/Web Designer displays a dialog confirming the publish details that it is about to use for publishing. Click ‘Publish’.After publishing, you can display your website in a website gallery of Xara users


 Step 8: The ‘Include my website in the user gallery’ checkbox is only enabled if you have added a valid website URL. Select this option if you would like
your website to be considered for inclusion in Xara’s gallery of websites created by Designer Pro or Web Designer. Visit the gallery at
https://www.xara.com/websitegallery or click the ‘More Info’ button in the Publish tab to learn more.
Step 9: Select the ‘Save details in current document’ checkbox (Designer Pro and Web Designer Premium only) to save the publish details you have
provided with the current document. When you enable the ‘Save details in current document’ checkbox, the ‘Save password in document’ checkbox
also becomes selectable. Select this checkbox to also save the FTP password with the current document, if you are sure that is what you want. This is
not recommended because it means anyone who gets a copy of your design file can publish to your website without knowing or entering your password!
Step 10: You can also opt to save the publish details on your computer in a named profile. Click the ‘Save in profile’ button and enter a suitable profile
name. Now you can select the profile from the profile list at the top of the dialog, so you can use them in other documents without having to re-enter
them.
Note: You can delete a profile by selecting it in the ‘Profile’ list and clicking the ‘Delete’ button next to it.
Step 11: Normally leave the ‘Re-publish changed files only’ checkbox selected. This makes re-publishing much quicker in most cases because only files
changed since the last publish are re-published.
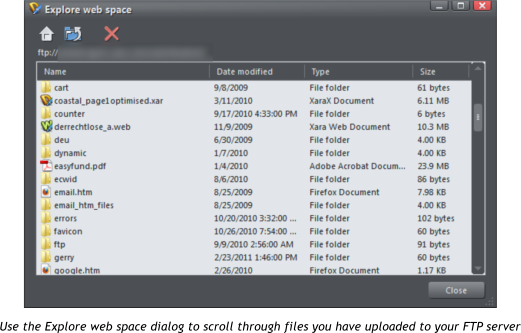
Step 12: (Optional) Click the ‘Explore web space’ button to browse, view and delete files you have uploaded to your FTP server.
Step 13: Click ‘OK’. Designer Pro/Web Designer displays a dialog confirming the publish details that it is about to use for publishing. Click ‘Publish’.
Step 8: The ‘Include my website in the user gallery’ checkbox is only enabled if you have added a valid website URL. Select this option if you would like
your website to be considered for inclusion in Xara’s gallery of websites created by Designer Pro or Web Designer. Visit the gallery at
https://www.xara.com/websitegallery or click the ‘More Info’ button in the Publish tab to learn more.
Step 9: Select the ‘Save details in current document’ checkbox (Designer Pro and Web Designer Premium only) to save the publish details you have
provided with the current document. When you enable the ‘Save details in current document’ checkbox, the ‘Save password in document’ checkbox
also becomes selectable. Select this checkbox to also save the FTP password with the current document, if you are sure that is what you want. This is
not recommended because it means anyone who gets a copy of your design file can publish to your website without knowing or entering your password!
Step 10: You can also opt to save the publish details on your computer in a named profile. Click the ‘Save in profile’ button and enter a suitable profile
name. Now you can select the profile from the profile list at the top of the dialog, so you can use them in other documents without having to re-enter
them.
Note: You can delete a profile by selecting it in the ‘Profile’ list and clicking the ‘Delete’ button next to it.
Step 11: Normally leave the ‘Re-publish changed files only’ checkbox selected. This makes re-publishing much quicker in most cases because only files
changed since the last publish are re-published.
Step 12: (Optional) Click the ‘Explore web space’ button to browse, view and delete files you have uploaded to your FTP server.
Step 13: Click ‘OK’. Designer Pro/Web Designer displays a dialog confirming the publish details that it is about to use for publishing. Click ‘Publish’.


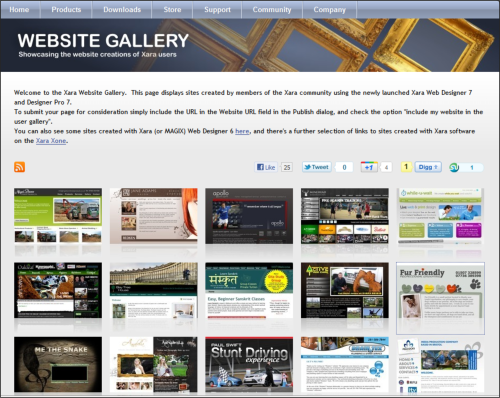 After publishing, you can display your website in a website gallery of Xara users