
If you want an easy way to create great looking shapes, that look as if they’ve been designed by a graphics professional, and with no need to
learn new tools, then take a look at the Xara SmartShapes selection.
Although SmartShapes include a range of everyday shapes that you can drop into your documents and websites, the system also supports
objects that are much more complex than simple shapes. What’s cool about SmartShapes is that the editing functions are built into the shape.
There are a set of control handles on the item that can be dragged to adjust and customize the object.
The other innovative aspect of SmartShapes is that they are available and work exactly the same way in our web-based Xara Online Designer.
Choose from Arrows, Ellipses, Polygons, Stars, Text Panels, Photo Text Panels, Speech Bubbles, Spirals, Charts, Timelines and many other
shapes.
This tutorial, Part 1 of 3 on SmartShapes, covers the most basic SmartShapes. I’ll show you how to quickly create great looking Arrows,
Rectangles, Ovals, Pie Shapes and Spirals.
To try it, download the trial version of Photo & Graphic Designer, Xara Web Designer Premium or Designer Pro X,
Arrows
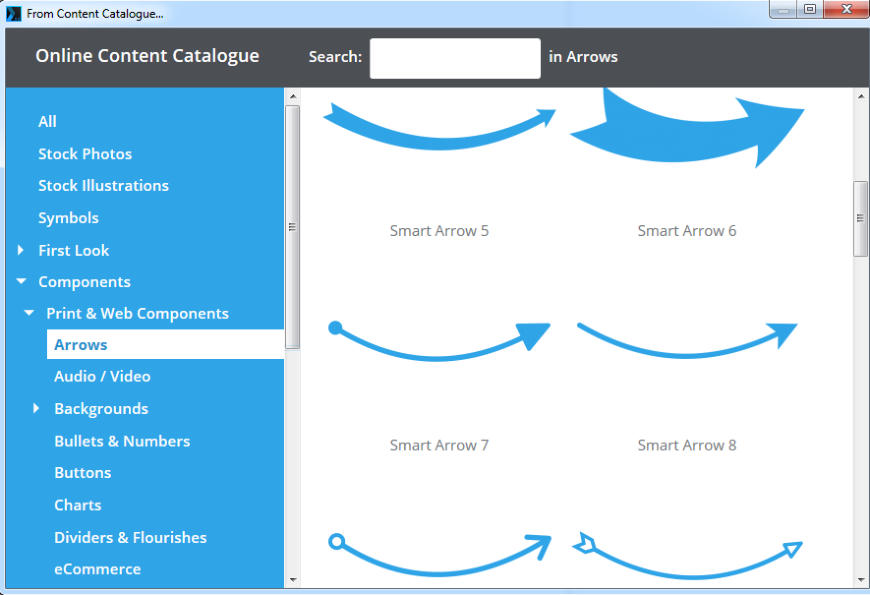
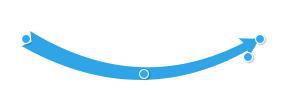
There are many different arrow designs, so they are in a category of their own. To find them select the menu option Insert > Shape > Arrows. There are 2 types of arrows – the first six are ‘fat’ arrows, with limited customization, and the rest are ‘fully configurable’ arrows, where you can also change the arrow head or tail design. Some of the Smart Arrows on offer Click on Smart Arrow 5 to bring it into your document. (If you’re not using a blank document you might be prompted whether to match the shape to the style of your document.) You’ll see that the Quickshape tool is active. Tip: When the Quickshape is active there is an ‘insert’ button on the Quickshape InfoBar that enables you to instantly add more SmartShapes. The edit handles on the tip of the head and tail of the arrow allow you to drag the head and tail into the exact position that you want them. The handle on the base of the arrow head will define the width of the arrow and the central handle enables you to adjust the curvature of the arrow. Whilst dragging the central handle it will snap to be exactly straight when you get near to straight, making it easy to get straight line arrows. You can drag all of these edit handles in every direction to move up or down or left or right. Smart Arrow 5 configured to be thicker with a different curvature With the SmartShape Tool still selected click on the ‘Insert’ button on the InfoBar. Select Arrows and then select Smart Arrow 9. On this arrow you will see there are 2 additional green edit handles. These allow you to change the style of the arrow head and tail. Drag the green handle and it will cycle through all the options for the style of head or tail. When you change the width of the arrow, you’ll notice that the tail now has an additional blue handle which enables you to change the width of the tail independent of the width of the arrow and head. You can change the color of the arrow in the normal way - simply by clicking on a color on the bottom color line, whilst the arrow is selected. Smart Arrow 9 configured to be thicker, with a change of style of head and tail that has been also been widened Let’s move on to some other SmartShapes. You can find these under the Insert menu > Shapes. To find the SmartShapes, use the Insert menu, or your Local Designs Gallery or the Online Content CatalogRectangles
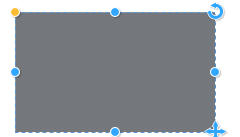
Rectangles are a commonly required shape. Insert a rectangle onto the page and see the handles on the 4 sides that allow you to resize the sides independently. If you hold down the Shift key and drag on the handle on the right side it will do a symmetrical resize, ie. stretch both left and right sides equally. The handle in the bottom right will resize the complete rectangle. If you hold down the Ctrl key and drag the bottom right handle it will enable you to change the aspect ratio of the rectangle. Drag inward on the yellow handle in the top left to curve the corners. Lastly, drag the top right handle to rotate the rectangle. When rotating the rectangle it will snap to positions of 0, 45, 90 degrees, etc. often making it difficult to set it to, for example, 1 degree. However, if select the Ctrl key at the same time as the rotate handle it will disable the auto snap and make it easier to find the exact angle required. Before and after rectangle that has been resized and tilted, with rounded cornersOvals
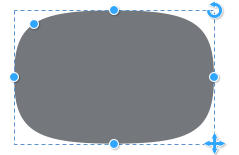
The Oval SmartShape is unusual in that it creates a different style of rounded rectangle. The side, bottom right corner, and rotate handles behave in the same way as those of the rectangle. The top left handle determines the rounding which will allow you to round the corners inwards or outwards. The unusual oval shape with the corners pulled out to create a banner effectPie Charts
The pie segment is an interesting and useful shape and enables you to create simple pie charts really quickly. It’s quite common to highlight a particular segment to ‘pull it out of the pie’, such as the simple two and three segment pie charts below. Here’s how to create them: Insert a pie segment onto the page and then press ‘Ctrl + K’ which will create an exact copy on top of the one that you have inserted on the page. Now click on a color on the color line to change the color of this duplicate segment - this will help to identify the two different segments. Click on the ‘Arc length’ edit handle in the bottom right and drag the colored segment around clockwise to meet its other end - this will create a nearly complete circle. Keep dragging in a clockwise direction until you reveal all of the initial gray segment - like this example: The initial segment revealed after dragging the ‘Arc length’ of the duplicated segment clockwise Click on the gray pie segment and adjust it as desired - I changed mine to 20 degrees. Now click on the larger segment and adjust it so that it snaps to the smaller segment. The larger segment extended to meet the 0 degree line of the small segment, which has now been reduced to 20 degrees Select the smaller segment again and move it outward from the larger segment. This will emphasize the small segment. Repeat this to add as many segments as you require. To finish the pie chart, simply add your own labels using the Text Tool. Examples of two and three section pie chartsSpirals (Web Designer & Designer Pro only)
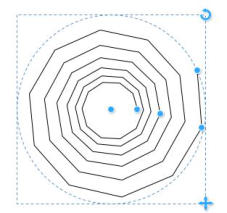
Now we shall have a bit of fun as I show you how to create amazing spirals. As with all SmartShapes, there’s no special ‘spiral tool’ you just add a spiral shape to the page, and drag a few handles to customize it. Insert a spiral shape onto the page. Pulling the start and end handles of the spiral in a circle will wind it around on the outside or inside of the center point. Pulling outward or inward on these handles will set the spacing between the lines of the spiral so that they are wider or narrower. Here are the edit functions of the spiral: The handle under the start handle can be moved to add sides to the shape. The first spiral has been set to have 10 sides and the second spiral is set to have 5 sides It’s easy to add some creative effects to a spiral. Firstly, insert a spiral on the page and then select the Freehand tool . Click on the line of the spiral to select it and then adjust the thickness of the line - I set mine to 24pt. Then add a brush style - I chose the Acrylic 1. A spiral shape with the line set to 24pt and the brush stroke set to Acrylic 1 Here’s another effect - this time I selected Acrylic 2 and set the brush width to be 36pt. I also added a tapered style of brush stroke called Blip. A spiral shape with the line set to 36pt, brush stroke set to Acrylic 2, with a tapered brush stroke I’ve shown you just a few of the SmartShapes - there are plenty more for you to experiment with! If you don’t already own one of the Designer titles, then why not download the free trial of Photo & Graphic Designer, Xara Web Designer Premium or Designer Pro X, – and give it a try! In the next tutorial in this SmartShape series I’ll show you how to create Text and Photo Panels, and the third tutorial I’ll take a look at Charts and Percentage Rings.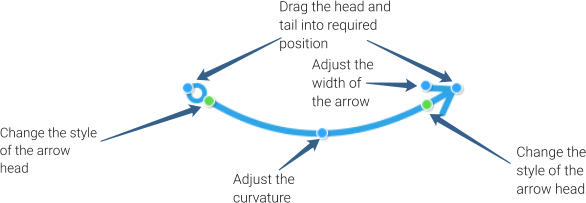


Copyright © 2017 Xara Group Limited.
Page created with Xara Designer Pro


20%

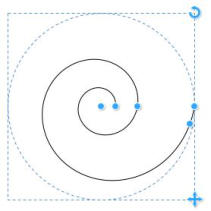

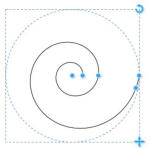
Wind the start or end
handle anti-clockwise
around the center to add to
the spiral. Or un-wind it by
dragging clockwise.

Drag this to make it a
smooth or multi-sided
spiral.


This handle adjusts
the spacing of the
spiral.
To relocate the spiral
on the page drag this
center handle.


If you want an easy way to create great looking shapes, that look as if they’ve been designed by a graphics
professional, and with no need to learn new tools, then take a look at the Xara SmartShapes selection.
Although SmartShapes include a range of everyday shapes that you can drop into your documents and
websites, the system also supports objects that are much more complex than simple shapes. What’s cool
about SmartShapes is that the editing functions are built into the shape. There are a set of control handles
on the item that can be dragged to adjust and customize the object.
The other innovative aspect of SmartShapes is that they are available and work exactly the same way in
our web-based Xara Online Designer.
Choose from Arrows, Ellipses, Polygons, Stars, Text Panels, Photo Text Panels, Speech Bubbles, Spirals,
Charts, Timelines and many other shapes.
This tutorial, Part 1 of 3 on SmartShapes, covers the most basic SmartShapes. I’ll show you how to quickly
create great looking Arrows, Rectangles, Ovals, Pie Shapes and Spirals.
To try it, download the trial version of Photo & Graphic Designer, Xara Web Designer Premium or Designer
Pro X,
Arrows
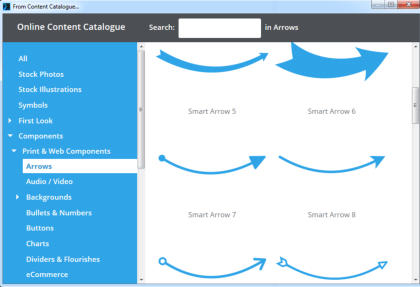
There are many different arrow designs, so they are in a category of their own. To find them select the menu option Insert > Shape > Arrows. There are 2 types of arrows – the first six are ‘fat’ arrows, with limited customization, and the rest are ‘fully configurable’ arrows, where you can also change the arrow head or tail design. Some of the Smart Arrows on offer Click on Smart Arrow 5 to bring it into your document. (If you’re not using a blank document you might be prompted whether to match the shape to the style of your document.) You’ll see that the Quickshape tool is active. Tip: When the Quickshape is active there is an ‘insert’ button on the Quickshape InfoBar that enables you to instantly add more SmartShapes. The edit handles on the tip of the head and tail of the arrow allow you to drag the head and tail into the exact position that you want them. The handle on the base of the arrow head will define the width of the arrow and the central handle enables you to adjust the curvature of the arrow. Whilst dragging the central handle it will snap to be exactly straight when you get near to straight, making it easy to get straight line arrows. You can drag all of these edit handles in every direction to move up or down or left or right. Smart Arrow 5 configured to be thicker with a different curvature With the SmartShape Tool still selected click on the ‘Insert’ button on the InfoBar. Select Arrows and then select Smart Arrow 9. On this arrow you will see there are 2 additional green edit handles. These allow you to change the style of the arrow head and tail. Drag the green handle and it will cycle through all the options for the style of head or tail. When you change the width of the arrow, you’ll notice that the tail now has an additional blue handle which enables you to change the width of the tail independent of the width of the arrow and head. You can change the color of the arrow in the normal way - simply by clicking on a color on the bottom color line, whilst the arrow is selected. Smart Arrow 9 configured to be thicker, with a change of style of head and tail that has been also been widened Let’s move on to some other SmartShapes. You can find these under the Insert menu > Shapes. To find the SmartShapes, use the Insert menu, or your Local Designs Gallery or the Online Content CatalogRectangles
Rectangles are a commonly required shape. Insert a rectangle onto the page and see the handles on the 4 sides that allow you to resize the sides independently. If you hold down the Shift key and drag on the handle on the right side it will do a symmetrical resize, ie. stretch both left and right sides equally. The handle in the bottom right will resize the complete rectangle. If you hold down the Ctrl key and drag the bottom right handle it will enable you to change the aspect ratio of the rectangle. Drag inward on the yellow handle in the top left to curve the corners. Lastly, drag the top right handle to rotate the rectangle. When rotating the rectangle it will snap to positions of 0, 45, 90 degrees, etc. often making it difficult to set it to, for example, 1 degree. However, if select the Ctrl key at the same time as the rotate handle it will disable the auto snap and make it easier to find the exact angle required. Before and after rectangle that has been resized and tilted, with rounded cornersOvals
The Oval SmartShape is unusual in that it creates a different style of rounded rectangle. The side, bottom right corner, and rotate handles behave in the same way as those of the rectangle. The top left handle determines the rounding which will allow you to round the corners inwards or outwards. The unusual oval shape with the corners pulled out to create a banner effectPie Charts
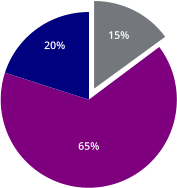
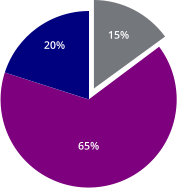
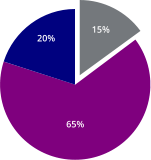
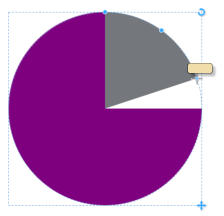
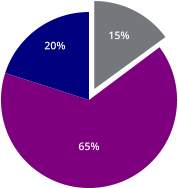
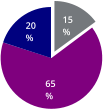
The pie segment is an interesting and useful shape and enables you to create simple pie charts really quickly. It’s quite common to highlight a particular segment to ‘pull it out of the pie’, such as the simple two and three segment pie charts below. Here’s how to create them: Insert a pie segment onto the page and then press ‘Ctrl + K’ which will create an exact copy on top of the one that you have inserted on the page. Now click on a color on the color line to change the color of this duplicate segment - this will help to identify the two different segments. Click on the ‘Arc length’ edit handle in the bottom right and drag the colored segment around clockwise to meet its other end - this will create a nearly complete circle. Keep dragging in a clockwise direction until you reveal all of the initial gray segment - like this example: The initial segment revealed after dragging the ‘Arc length’ of the duplicated segment clockwise Click on the gray pie segment and adjust it as desired - I changed mine to 20 degrees. Now click on the larger segment and adjust it so that it snaps to the smaller segment. The larger segment extended to meet the 0 degree line of the small segment, which has now been reduced to 20 degrees Select the smaller segment again and move it outward from the larger segment. This will emphasize the small segment. Repeat this to add as many segments as you require. To finish the pie chart, simply add your own labels using the Text Tool. Examples of two and three section pie chartsSpirals (Web Designer & Designer Pro only)
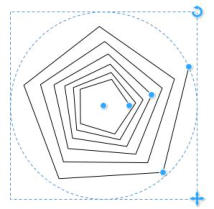
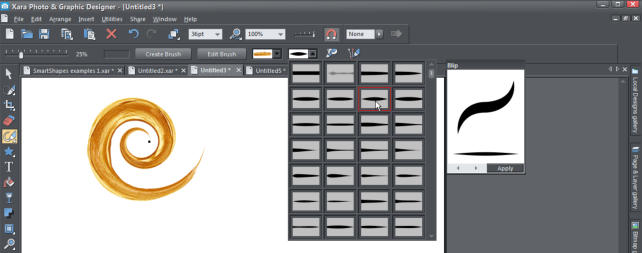
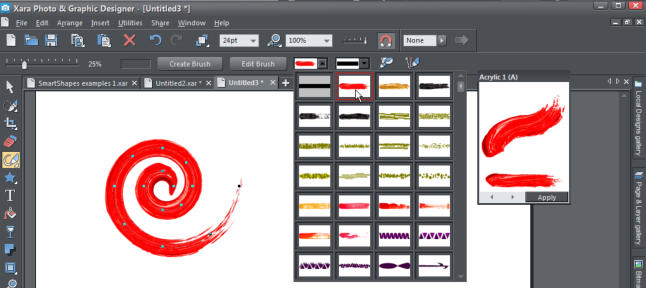
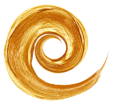
Now we shall have a bit of fun as I show you how to create amazing spirals. As with all SmartShapes, there’s no special ‘spiral tool’ you just add a spiral shape to the page, and drag a few handles to customize it. Insert a spiral shape onto the page. Pulling the start and end handles of the spiral in a circle will wind it around on the outside or inside of the center point. Pulling outward or inward on these handles will set the spacing between the lines of the spiral so that they are wider or narrower. Here are the edit functions of the spiral: The handle under the start handle can be moved to add sides to the shape. The first spiral has been set to have 10 sides and the second spiral is set to have 5 sides It’s easy to add some creative effects to a spiral. Firstly, insert a spiral on the page and then select the Freehand tool . Click on the line of the spiral to select it and then adjust the thickness of the line - I set mine to 24pt. Then add a brush style - I chose the Acrylic 1. A spiral shape with the line set to 24pt and the brush stroke set to Acrylic 1 Here’s another effect - this time I selected Acrylic 2 and set the brush width to be 36pt. I also added a tapered style of brush stroke called Blip. A spiral shape with the line set to 36pt, brush stroke set to Acrylic 2, with a tapered brush stroke I’ve shown you just a few of the SmartShapes - there are plenty more for you to experiment with! If you don’t already own one of the Designer titles, then why not download the free trial of Photo & Graphic Designer, Xara Web Designer Premium or Designer Pro X, – and give it a try! In the next tutorial in this SmartShape series I’ll show you how to create Text and Photo Panels, and the third tutorial I’ll take a look at Charts and Percentage Rings.


Wind the start or end
handle anti-clockwise
around the center to add to
the spiral. Or un-wind it by
dragging clockwise.

Drag this to make it a
smooth or multi-sided
spiral.


This handle adjusts
the spacing of the
spiral.
To relocate the spiral
on the page drag this
center handle.

20%
Copyright © 2017 Xara Group Limited.
Page created with Xara Designer Pro

If you want an easy way to create great looking shapes, that look as
if they’ve been designed by a graphics professional, and with no
need to learn new tools, then take a look at the Xara SmartShapes
selection.
Although SmartShapes include a range of everyday shapes that you
can drop into your documents and websites, the system also
supports objects that are much more complex than simple shapes.
What’s cool about SmartShapes is that the editing functions are built
into the shape. There are a set of control handles on the item that
can be dragged to adjust and customize the object.
The other innovative aspect of SmartShapes is that they are
available and work exactly the same way in our web-based Xara
Online Designer.
Choose from Arrows, Ellipses, Polygons, Stars, Text Panels, Photo
Text Panels, Speech Bubbles, Spirals, Charts, Timelines and many
other shapes.
This tutorial, Part 1 of 3 on SmartShapes, covers the most basic
SmartShapes. I’ll show you how to quickly create great looking
Arrows, Rectangles, Ovals, Pie Shapes and Spirals.
To try it, download the trial version of Photo & Graphic Designer, Xara
Web Designer Premium or Designer Pro X,
Arrows
There are many different arrow designs, so they are in a category of their own. To find them select the menu option Insert > Shape > Arrows. There are 2 types of arrows – the first six are ‘fat’ arrows, with limited customization, and the rest are ‘fully configurable’ arrows, where you can also change the arrow head or tail design. Some of the Smart Arrows on offer Click on Smart Arrow 5 to bring it into your document. (If you’re not using a blank document you might be prompted whether to match the shape to the style of your document.) You’ll see that the Quickshape tool is active. Tip: When the Quickshape is active there is an ‘insert’ button on the Quickshape InfoBar that enables you to instantly add more SmartShapes. The edit handles on the tip of the head and tail of the arrow allow you to drag the head and tail into the exact position that you want them. The handle on the base of the arrow head will define the width of the arrow and the central handle enables you to adjust the curvature of the arrow. Whilst dragging the central handle it will snap to be exactly straight when you get near to straight, making it easy to get straight line arrows. You can drag all of these edit handles in every direction to move up or down or left or right. Smart Arrow 5 configured to be thicker with a different curvature With the SmartShape Tool still selected click on the ‘Insert’ button on the InfoBar. Select Arrows and then select Smart Arrow 9. On this arrow you will see there are 2 additional green edit handles. These allow you to change the style of the arrow head and tail. Drag the green handle and it will cycle through all the options for the style of head or tail. When you change the width of the arrow, you’ll notice that the tail now has an additional blue handle which enables you to change the width of the tail independent of the width of the arrow and head. You can change the color of the arrow in the normal way - simply by clicking on a color on the bottom color line, whilst the arrow is selected. Smart Arrow 9 configured to be thicker, with a change of style of head and tail that has been also been widened Let’s move on to some other SmartShapes. You can find these under the Insert menu > Shapes. To find the SmartShapes, use the Insert menu, or your Local Designs Gallery or the Online Content CatalogRectangles
Rectangles are a commonly required shape. Insert a rectangle onto the page and see the handles on the 4 sides that allow you to resize the sides independently. If you hold down the Shift key and drag on the handle on the right side it will do a symmetrical resize, ie. stretch both left and right sides equally. The handle in the bottom right will resize the complete rectangle. If you hold down the Ctrl key and drag the bottom right handle it will enable you to change the aspect ratio of the rectangle. Drag inward on the yellow handle in the top left to curve the corners. Lastly, drag the top right handle to rotate the rectangle. When rotating the rectangle it will snap to positions of 0, 45, 90 degrees, etc. often making it difficult to set it to, for example, 1 degree. However, if select the Ctrl key at the same time as the rotate handle it will disable the auto snap and make it easier to find the exact angle required. Before and after rectangle that has been resized and tilted, with rounded cornersOvals
The Oval SmartShape is unusual in that it creates a different style of rounded rectangle. The side, bottom right corner, and rotate handles behave in the same way as those of the rectangle. The top left handle determines the rounding which will allow you to round the corners inwards or outwards. The unusual oval shape with the corners pulled out to create a banner effectPie Charts
The pie segment is an interesting and useful shape and enables you to create simple pie charts really quickly. It’s quite common to highlight a particular segment to ‘pull it out of the pie’, such as the simple two and three segment pie charts below. Here’s how to create them: Insert a pie segment onto the page and then press ‘Ctrl + K’ which will create an exact copy on top of the one that you have inserted on the page. Now click on a color on the color line to change the color of this duplicate segment - this will help to identify the two different segments. Click on the ‘Arc length’ edit handle in the bottom right and drag the colored segment around clockwise to meet its other end - this will create a nearly complete circle. Keep dragging in a clockwise direction until you reveal all of the initial gray segment - like this example: The initial segment revealed after dragging the ‘Arc length’ of the duplicated segment clockwise Click on the gray pie segment and adjust it as desired - I changed mine to 20 degrees. Now click on the larger segment and adjust it so that it snaps to the smaller segment. The larger segment extended to meet the 0 degree line of the small segment, which has now been reduced to 20 degrees Select the smaller segment again and move it outward from the larger segment. This will emphasize the small segment. Repeat this to add as many segments as you require. To finish the pie chart, simply add your own labels using the Text Tool. Examples of two and three section pie chartsSpirals (Web Designer & Designer Pro only)
Now we shall have a bit of fun as I show you how to create amazing spirals. As with all SmartShapes, there’s no special ‘spiral tool’ you just add a spiral shape to the page, and drag a few handles to customize it. Insert a spiral shape onto the page. Pulling the start and end handles of the spiral in a circle will wind it around on the outside or inside of the center point. Pulling outward or inward on these handles will set the spacing between the lines of the spiral so that they are wider or narrower. Here are the edit functions of the spiral: The handle under the start handle can be moved to add sides to the shape. The first spiral has been set to have 10 sides and the second spiral is set to have 5 sides It’s easy to add some creative effects to a spiral. Firstly, insert a spiral on the page and then select the Freehand tool . Click on the line of the spiral to select it and then adjust the thickness of the line - I set mine to 24pt. Then add a brush style - I chose the Acrylic 1. A spiral shape with the line set to 24pt and the brush stroke set to Acrylic 1 Here’s another effect - this time I selected Acrylic 2 and set the brush width to be 36pt. I also added a tapered style of brush stroke called Blip. A spiral shape with the line set to 36pt, brush stroke set to Acrylic 2, with a tapered brush stroke I’ve shown you just a few of the SmartShapes - there are plenty more for you to experiment with! If you don’t already own one of the Designer titles, then why not download the free trial of Photo & Graphic Designer, Xara Web Designer Premium or Designer Pro X, – and give it a try! In the next tutorial in this SmartShape series I’ll show you how to create Text and Photo Panels, and the third tutorial I’ll take a look at Charts and Percentage Rings.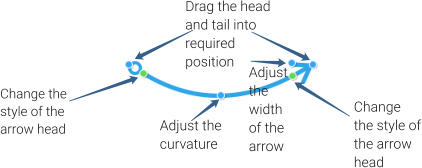


Wind the start or
end handle anti-
clockwise around
the center to add
to the spiral. Or un-
wind it by dragging
clockwise.

Drag this to
make it a
smooth or
multi-sided
spiral.


This handle
adjusts the
spacing of the
spiral.
To relocate the
spiral on the
page drag this
center handle.

20%
Copyright © 2017 Xara Group Limited.
Page created with Xara Designer Pro
WORK SMARTER WITH THE XARA SMARTSHAPES!
WORK SMARTER WITH XARA SMARTSHAPES!
WORK SMARTER WITH XARA SMARTSHAPES!