
© Xara Group Limited

You will see a tool-bar down the left and as you select each of the tools you will notice that the options on the top (called the Infobar) will change
accordingly. To work on this graphic you may wish to increase the zoom to make it larger and easier to see the individual elements.
1. Firstly, ungroup both graphics by marquee-selecting both objects - in the Selector tool just drag from outside the top left to below the bottom right
of the objects. As you drag you'll see a red border rectangle. Then select Ctrl+U to ungroup.
Select the pumpkin's black ellipse and select Ctrl+K to clone it (this will place a copy on top of the existing black ellipse). Click on the orange
Glow A color on the color line to fill the cloned ellipse in an orange color. We need to increase its size so, in the W% field on the Infobar, enter
the value 130 and press the RETURN key to set the width to 130%. With the orange ellipse still selected, use Ctrl+K to clone it, then select the yellow
Glow C color on the color line and set the width to 90%.
Select Ctrl+B to send the yellow ellipse to the back then select Ctrl+B to send the orange ellipse to the back. It should look like this:
2. Hold down the Shift key and click the left mouse button (called shift-select) to select the pumpkin eyes, nose and mouth, then select Ctrl+G to
group all 4 objects. Clone the group and fill with the 'Glow C Link' color. Select Ctrl+Shift+B to move it back one level, then nudge it down by 4 pixels
using the down arrow key on your keyboard, to create the cut-out effect.
Now we will change the background to black. With the Selector tool click to select the outside line of the large outer rectangle, then Ctrl-B to
move it to the back, then click on the black on the color line to change it from white to black.
3. Now we shall add a glow into the pumpkin. Select the black ellipse, then select the Fill tool and 'Elliptical' from the tool's Infobar. You will see
2 lines at 90 degrees with arrows on the ends - you can drag these arrows to adjust the length of the fade of the fill. Click on the center square
where the lines meet and then click on Glow A color on the color line.
Now we will do the same effect for the face shapes. Select the face, then select the Fill tool and elliptical. Click on the center square and select
Glow C color, then click on the outer square and select Glow A color.
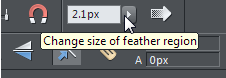
4. We will now soften the edges a little. Select the yellow group of 4 face shapes, then hold down the Shift key and click on the orange set of 4 face
shapes so that all 8 shapes are selected. Using the 'feather' option at the top right of the Infobar adjust it to add approximately 2 pixels.
Now select the black pumpkin ellipse and add 5.5 pixels of feathering.
Tip: Shift+click will add to the current selected object. Alt+click will select the object under the currently selected object.