


 © Xara Group 2011


 Advanced options
 Name icon

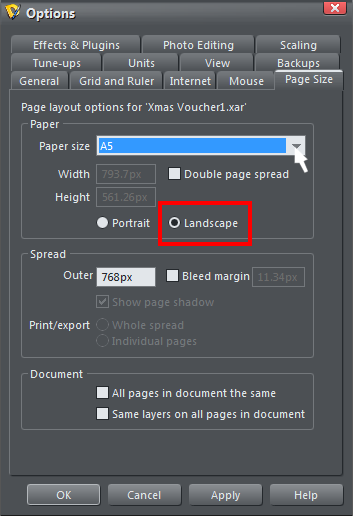
 Upon opening Designer Pro, it will open a blank A4 page. I want my invite to be A5 so I go to File, then Page Options and within the Page Size tab I
select the A5 from the drop down list and the 'landscape' orientation.
To change the color of the page background drag the medium-dark red 'diamond' on the bottom color line onto the page and it will turn red.
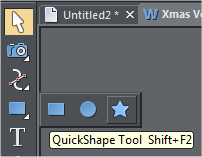
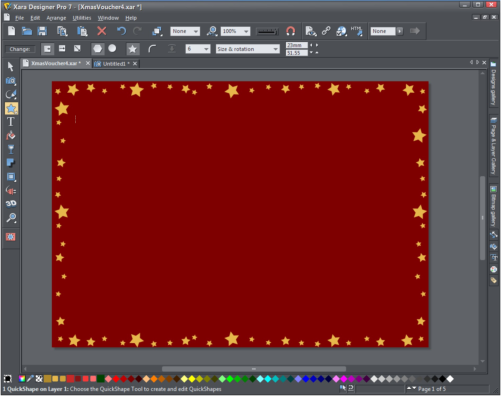
Time for some fun with the stars! First, add a star using the Quickshape tool. Select the star shape then click on the page and drag the mouse out to
form the star in the size that you want.
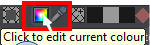
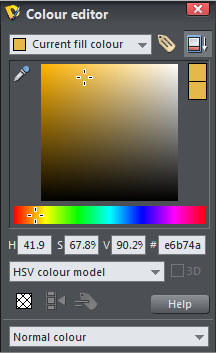
Now give it a gold color by selecting the color editor which is the multi-colored square in the bottom left (or you can use
Ctrl E or right click your mouse and choose Fill color). Select the top right corner box to open the advanced options. Enter
the hex color of #e6b74a and give it a label by selecting the Name button in the top right of the color editor and naming it
Gold - now, every time that you want to use that color you will identify it easily on the bottom color line as its name will appear when you hover over
it.
Now I will sprinkle the stars around the border of the voucher. There are a few shortcuts for creating the border:
•
I could use Ctrl C and Ctrl V to copy the stars but there is a shortcut using right-mouse-button-drag - simply right click with your mouse, hold it
down and drag off the star that you are copying, letting go in the position where you want the copy to drop. To change the size I simply select a
star and drag the corner handles in or out.
•
To replicate a group of stars, click above the first one in the top left and then drag to create a marker rectangle around several stars. Click Ctrl
G, to group them. Now select the group and create a copy with right-mouse-button-drag.To ungroup them select the group and use Ctrl U.
•
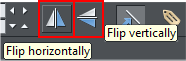
Another quick tip is to select the group and flip them horizontally or vertically using the flip tool on the
InfoBar at the top. Using this method you could create the top row of stars, copy it and then flip it over to
instantly create the bottom line.
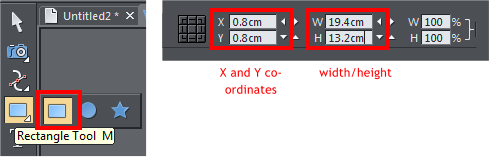
To add a white foreground select the Quickshape tool again, but this time select the rectangle, then click on the page and drag the mouse to create a
rectangle of 19.4cm wide by 13.2cm tall (you can adjust the width/height by entering the number in the width/height fields in the top InfoBar). Select
the rectangle and then use the arrows on the set of X and Y co-ordinates to set the positions at 0.8cm which will center it on the page.
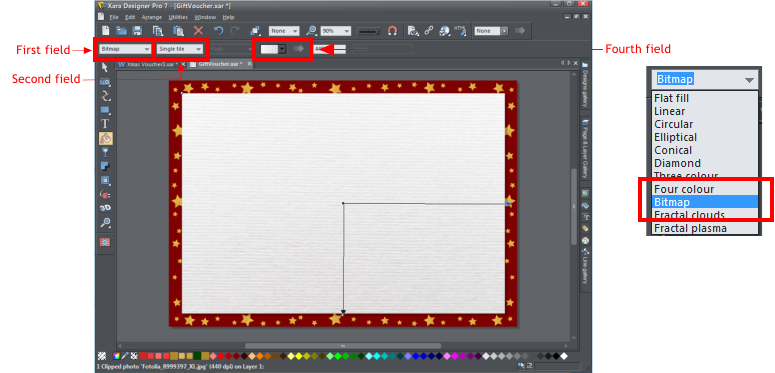
We have supplied you with a paper texture in the Christmas clipart which you’ll find in the Designs Gallery folder. To add this effect, select the Fill tool
and change the fill type to bitmap in the first field on the top InfoBar, then drag and drop the 'paper.jpg' onto the rectangle from the fourth field.
With the Shadow tool selected, select the wall shadow to add a soft shadow of about 0.16cm blur and 74% transparency that will lift it slightly off the
background.
Upon opening Designer Pro, it will open a blank A4 page. I want my invite to be A5 so I go to File, then Page Options and within the Page Size tab I
select the A5 from the drop down list and the 'landscape' orientation.
To change the color of the page background drag the medium-dark red 'diamond' on the bottom color line onto the page and it will turn red.
Time for some fun with the stars! First, add a star using the Quickshape tool. Select the star shape then click on the page and drag the mouse out to
form the star in the size that you want.
Now give it a gold color by selecting the color editor which is the multi-colored square in the bottom left (or you can use
Ctrl E or right click your mouse and choose Fill color). Select the top right corner box to open the advanced options. Enter
the hex color of #e6b74a and give it a label by selecting the Name button in the top right of the color editor and naming it
Gold - now, every time that you want to use that color you will identify it easily on the bottom color line as its name will appear when you hover over
it.
Now I will sprinkle the stars around the border of the voucher. There are a few shortcuts for creating the border:
•
I could use Ctrl C and Ctrl V to copy the stars but there is a shortcut using right-mouse-button-drag - simply right click with your mouse, hold it
down and drag off the star that you are copying, letting go in the position where you want the copy to drop. To change the size I simply select a
star and drag the corner handles in or out.
•
To replicate a group of stars, click above the first one in the top left and then drag to create a marker rectangle around several stars. Click Ctrl
G, to group them. Now select the group and create a copy with right-mouse-button-drag.To ungroup them select the group and use Ctrl U.
•
Another quick tip is to select the group and flip them horizontally or vertically using the flip tool on the
InfoBar at the top. Using this method you could create the top row of stars, copy it and then flip it over to
instantly create the bottom line.
To add a white foreground select the Quickshape tool again, but this time select the rectangle, then click on the page and drag the mouse to create a
rectangle of 19.4cm wide by 13.2cm tall (you can adjust the width/height by entering the number in the width/height fields in the top InfoBar). Select
the rectangle and then use the arrows on the set of X and Y co-ordinates to set the positions at 0.8cm which will center it on the page.
We have supplied you with a paper texture in the Christmas clipart which you’ll find in the Designs Gallery folder. To add this effect, select the Fill tool
and change the fill type to bitmap in the first field on the top InfoBar, then drag and drop the 'paper.jpg' onto the rectangle from the fourth field.
With the Shadow tool selected, select the wall shadow to add a soft shadow of about 0.16cm blur and 74% transparency that will lift it slightly off the
background.