How often have you admired a landscape or grand scene, only to find that your camera can't take the wide angle photo? Worry not! There is a
quick and easy way to solve the problem. Simply take a series of photos and stitch them together. Stitching them together is as simple as a
single click of a button using Xara Photo & Graphic Designer or Xara Designer Pro and I will show you how.
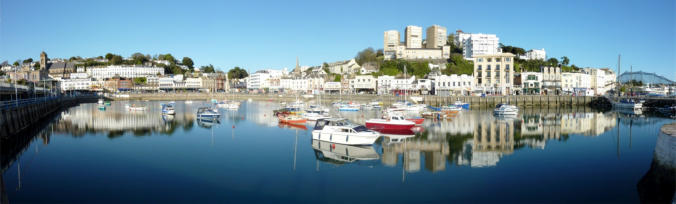
Below is the final panorama:
But first… here are some guidelines for taking your photos for a panorama. Stand still with feet firmly balanced in one position. Hold your
camera level and take your photos by swinging it around its centre to keep it as close to the start position as possible. Imagine that you are the
tripod stand from which your camera is rotating.
Ensure that you have sufficient overlap in the photos. If you have a manual metering mode you may wish to select it to ensure that the
exposure on all of your series of photos remains constant. But don't worry if you don't have it on manual, you'll be amazed at the results in Xara
Photo & Graphic Designer.
Now to create the panorama. Xara Photo & Graphic Designer can stitch up to 6 photos into one panorama. Load your photos by dragging them
from your computer folder. Drop the first one onto the program’s title bar to open it as a photo document (or drag it into the empty black editor).
Photo documents are designed specifically for storing photo data so that no matter what changes you make, you can always return to the
original (or ‘master’) high quality image.
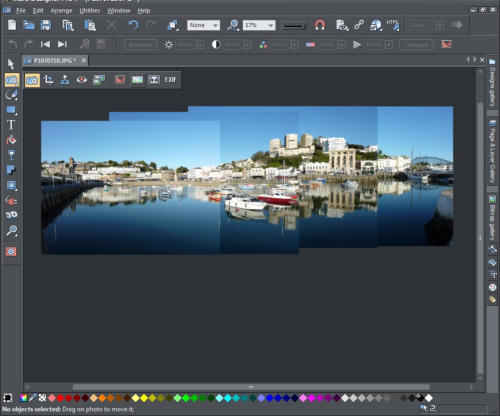
Position the photos in the correct order so that they overlap in roughly the right place. Don’t worry if the photos don’t line up horizontally at the
top and bottom. (If your photos are too large, you may need to drag the corner handles to reduce them in size, in which case simply resize them
to roughly the same height). With the Selector tool selected, make a lasso rectangle around all the photos to select them all. Now go to the
Panorama tool in the Photo tool fly out bar (in the top left of the editing area in the screenshots) and click. That’s it!
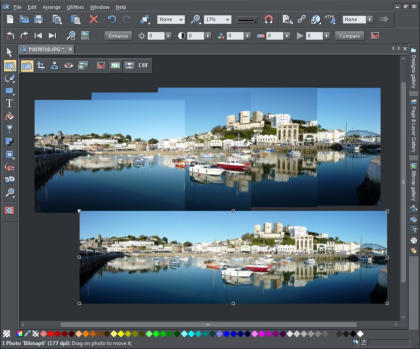
You will see the progress bar identifying the various steps in the top right as Xara Photo & Designer goes into action. It automatically detects
the joins and creates seamless blended edges to give you the perfect panorama. Once stitched it places the new image below the existing
images.
Let's look at some of the detail to see the stitching. You really can't tell that this is several photos joined together and even the sky and water
have both blended to give a consistent color.
To save your panorama, select it and click File > Export as JPG. Your original photo and the panorama will be saved along with a copy of the
original in a Masters folder.
Xara Photo & Graphic Designer and Xara Designer Pro incorporate a fast and non-destructive set of photo tools. As well as the panorama tool
described above these include:
•
Enhance Photo, which you can use to crop images, adjust brightness, color and contrast and sharpen or blur photos
•
Clip, which provides more advanced cropping options
•
Clone, a quick and easy way of removing and replacing unwanted objects in your images
•
Red Eye Removal, which, as its name suggests, reduces and removes red eyes in your photos taken with flash photography
•
Content Aware Photo Resize, which allows you to stretch or squash photos without distortion, retaining the photo's natural proportions
•
Brightness Levels dialog, which can lighten or darken a whole image or just parts of it
•
Perspective Correction, this can automatically correct common perspective defects in a photo
•
EXIF, which shows the embedded EXIF value of a JPEG image.


Copyright © 2011 Xara Group Limited.
Page created with Xara Designer Pro
How often have you admired a landscape or grand scene, only to find that your camera can't take the wide
angle photo? Worry not! There is a quick and easy way to solve the problem. Simply take a series of photos
and stitch them together. Stitching them together is as simple as a single click of a button using Xara
Photo & Graphic Designer or Xara Designer Pro and I will show you how.
Below is the final panorama:
But first… here are some guidelines for taking your photos for a panorama. Stand still with feet firmly
balanced in one position. Hold your camera level and take your photos by swinging it around its centre to
keep it as close to the start position as possible. Imagine that you are the tripod stand from which your
camera is rotating.
Ensure that you have sufficient overlap in the photos. If you have a manual metering mode you may wish
to select it to ensure that the exposure on all of your series of photos remains constant. But don't worry if
you don't have it on manual, you'll be amazed at the results in Xara Photo & Graphic Designer.
Now to create the panorama. Xara Photo & Graphic Designer can stitch up to 6 photos into one panorama.
Load your photos by dragging them from your computer folder. Drop the first one onto the program’s title
bar to open it as a photo document (or drag it into the empty black editor). Photo documents are designed
specifically for storing photo data so that no matter what changes you make, you can always return to the
original (or ‘master’) high quality image.
Position the photos in the correct order so that they overlap in roughly the right place. Don’t worry if the
photos don’t line up horizontally at the top and bottom. (If your photos are too large, you may need to drag
the corner handles to reduce them in size, in which case simply resize them to roughly the same height).
With the Selector tool selected, make a lasso rectangle around all the photos to select them all. Now go to
the Panorama tool in the Photo tool fly out bar (in the top left of the editing area in the screenshots) and
click. That’s it!
You will see the progress bar identifying the various steps in the top right as Xara Photo & Designer goes
into action. It automatically detects the joins and creates seamless blended edges to give you the perfect
panorama. Once stitched it places the new image below the existing images.
Let's look at some of the detail to see the stitching. You really can't tell that this is several photos joined
together and even the sky and water have both blended to give a consistent color.
To save your panorama, select it and click File > Export as JPG. Your original photo and the panorama will
be saved along with a copy of the original in a Masters folder.
Xara Photo & Graphic Designer and Xara Designer Pro incorporate a fast and non-destructive set of photo
tools. As well as the panorama tool described above these include:
•
Enhance Photo, which you can use to crop images, adjust brightness, color and contrast and sharpen
or blur photos
•
Clip, which provides more advanced cropping options
•
Clone, a quick and easy way of removing and replacing unwanted objects in your images
•
Red Eye Removal, which, as its name suggests, reduces and removes red eyes in your photos taken
with flash photography
•
Content Aware Photo Resize, which allows you to stretch or squash photos without distortion, retaining
the photo's natural proportions
•
Brightness Levels dialog, which can lighten or darken a whole image or just parts of it
•
Perspective Correction, this can automatically correct common perspective defects in a photo
•
EXIF, which shows the embedded EXIF value of a JPEG image.


Copyright © 2011 Xara Group Limited.
Page created with Xara Designer Pro
How often have you admired a landscape or grand scene, only to
find that your camera can't take the wide angle photo? Worry not!
There is a quick and easy way to solve the problem. Simply take a
series of photos and stitch them together. Stitching them together is
as simple as a single click of a button using Xara Photo & Graphic
Designer or Xara Designer Pro and I will show you how.
Below is the final panorama:
But first… here are some guidelines for taking your photos for a
panorama. Stand still with feet firmly balanced in one position. Hold
your camera level and take your photos by swinging it around its
centre to keep it as close to the start position as possible. Imagine
that you are the tripod stand from which your camera is rotating.
Ensure that you have sufficient overlap in the photos. If you have a
manual metering mode you may wish to select it to ensure that the
exposure on all of your series of photos remains constant. But don't
worry if you don't have it on manual, you'll be amazed at the results
in Xara Photo & Graphic Designer.
Now to create the panorama. Xara Photo & Graphic Designer can
stitch up to 6 photos into one panorama. Load your photos by
dragging them from your computer folder. Drop the first one onto the
program’s title bar to open it as a photo document (or drag it into the
empty black editor). Photo documents are designed specifically for
storing photo data so that no matter what changes you make, you
can always return to the original (or ‘master’) high quality image.
Position the photos in the correct order so that they overlap in
roughly the right place. Don’t worry if the photos don’t line up
horizontally at the top and bottom. (If your photos are too large, you
may need to drag the corner handles to reduce them in size, in which
case simply resize them to roughly the same height). With the
Selector tool selected, make a lasso rectangle around all the photos
to select them all. Now go to the Panorama tool in the Photo tool fly
out bar (in the top left of the editing area in the screenshots) and
click. That’s it!
You will see the progress bar identifying the various steps in the top
right as Xara Photo & Designer goes into action. It automatically
detects the joins and creates seamless blended edges to give you
the perfect panorama. Once stitched it places the new image below
the existing images.
Let's look at some of the detail to see the stitching. You really can't
tell that this is several photos joined together and even the sky and
water have both blended to give a consistent color.
To save your panorama, select it and click File > Export as JPG. Your
original photo and the panorama will be saved along with a copy of
the original in a Masters folder.
Xara Photo & Graphic Designer and Xara Designer Pro incorporate a
fast and non-destructive set of photo tools. As well as the panorama
tool described above these include:
•
Enhance Photo, which you can use to crop images, adjust
brightness, color and contrast and sharpen or blur photos
•
Clip, which provides more advanced cropping options
•
Clone, a quick and easy way of removing and replacing unwanted
objects in your images
•
Red Eye Removal, which, as its name suggests, reduces and
removes red eyes in your photos taken with flash photography
•
Content Aware Photo Resize, which allows you to stretch or
squash photos without distortion, retaining the photo's natural
proportions
•
Brightness Levels dialog, which can lighten or darken a whole
image or just parts of it
•
Perspective Correction, this can automatically correct common
perspective defects in a photo
•
EXIF, which shows the embedded EXIF value of a JPEG image.


Copyright © 2011 Xara Group Limited.
Page created with Xara Designer Pro
CREATING PHOTO PANORAMAS
CREATING PHOTO PANORAMAS
CREATING PHOTO PANORAMAS