thinking outside the box
Creating Screenshots with Annotations and Blurred Areas


XARA TUTORIAL
Text here...


There are two ways to capture the screen. You can either use the Windows operating system screenshot capability or, for greater flexibility, you can use
the Screen Capture utility which is included in Xara Photo & Graphic Designer and Designer Pro.
Using Windows to capture screenshots
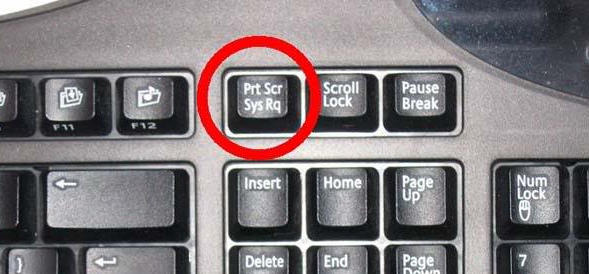
For a quick screenshot just press the "PrintScreen" key on your keyboard. This places a screen capture of the whole screen on the Windows clipboard.
Alternatively, press "Alt + PrintScreen" which will capture just the current active window.
The PrintScreen key is the easiest way to grab the screen.
To paste an image into Xara Photo & Graphic Designer, create a new blank document (which could be a A4 page or a 'blank photo') and then select
Ctrl+V to paste the image in. Make sure you have zoom set to 100% to see the image at full size. If the screen grab was very large (full window) you
may be prompted to reduce its size or paste the original - choose the original as you can crop unnecessary parts later.
Xara Screen capture utility
The Xara Photo & Graphic Designer Screen Capture utility offers some advantages over the method above, including the option to capture the mouse
pointer in the image and to capture transitory things on screen such as menus (which are usually cleared if you use the PrintScreen key method). To
demonstrate, I will capture a page from my website, blur some information and add an annotation
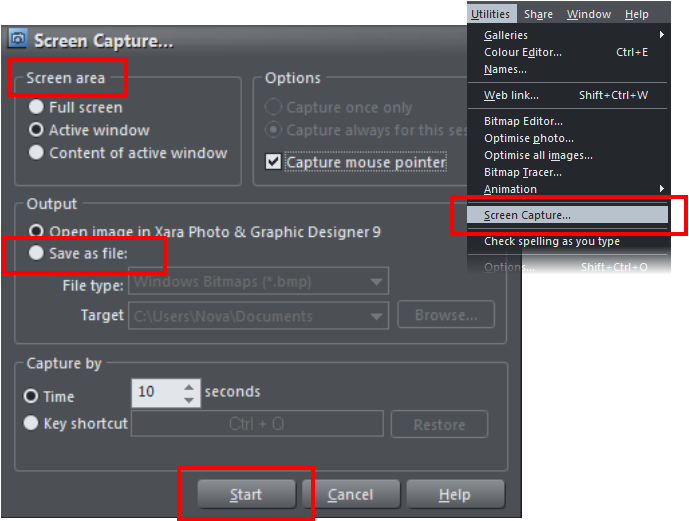
Open the Screen Capture by selecting the menu Utilities > Screen Capture which will display this dialog
Screen Capture dialog
You can choose the screen area you would like to capture - the full screen, the active window in its entirety or just the content of the active window
without the window border. I have chosen the 'active window' and I have also selected to have the mouse pointer showing in the screenshot. The output
section lets you choose how to handle the captured screen image. I have selected to open the image in Photo & Graphic Designer as I want to work on
the image before saving it.
There are two ways to initiate a screen capture, either by pressing a special key combination (which will close pop-up or temporary menus), or a
delayed timed capture, which grabs the complete screen after a set delay.
Capture by Time
You can use the timer to capture a screenshot from any other active program window, such as Word document or a page in your web browser. Just make
sure you click on it to make it active, before the screen capture is taken.
I have set the 'Time' to capture automatically in 10 seconds. This is best for cases where any keyboard presses change the display you want to capture,
such as a pop-up tooltips which disappear when you press a key.
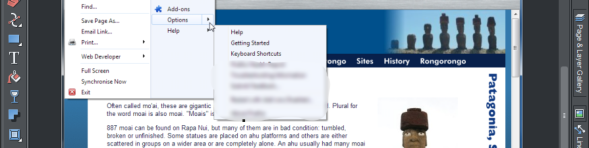
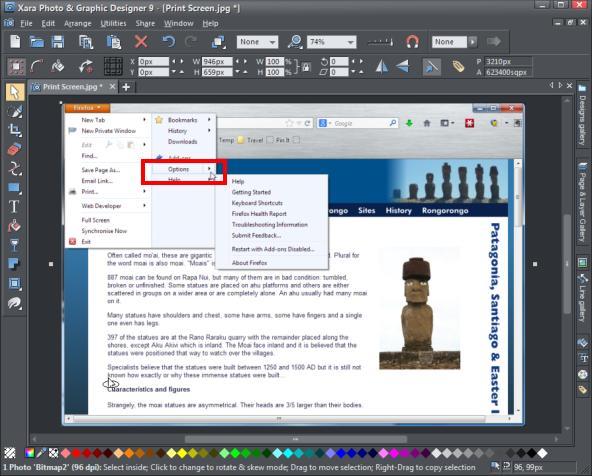
In my example, I will include the browser menu in my screenshot so I have set a 10 second delay to give me time to open the menu and position my
mouse pointer. Select 'start' and the dialog window will close and the timer will commence. The screenshot will be taken and it will be placed in Xara
Photo & Graphic Designer.
Captured screenshot showing the active browser window with the menu of options and mouse pointer.
If you do not need to do any more work on this screenshot, you can save it. Use the Selector tool and select the screenshot image. Select the menu File
-> Export PNG, or Ctrl+Shift+E and then in the save dialog, select the 'save as type' menu to be PNG.
Tip: Usually for the sharpest images it's best to save as a PNG. But if your screenshot is mainly a photo, then JPG may be better (a PNG will be sharp,
but the file size can be rather large when saving photos as PNGs).
Capture by Keyboard Shortcut
You can use this Screen Capture dialog to do the same as the Print Screen above, except that you can configure any key short-cut to do the capture,
and you can make it capture the mouse pointer as well.
You can choose to make this a once-only option, or that every time you press the capture key combination it will capture an image and place it in Photo
& Graphic Designer.
Tip: You can define almost any hot-key combination to trigger the screenshot. Just click in the key shortcut field and then press the desired key
combination, e.g. "Shift+W". The chosen shortcut appears in the key shortcut field. If it clashes with any defined Photo & Graphic Designer shortcut,
you'll be warned with a message appearing at the bottom of the dialog, but this doesn't matter if you are intending to take screenshots from a different
active window. Press 'Restore' to return to the previous selected shortcut.
Pressing the Start button closes the Screen capture dialog and activates the system-wide hotkey. Switch to the window you want to capture and press
the chosen key combination. This will capture the screen, or window, and place it on the page of the current open document in Photo & Graphic
Designer, and switch back to that program. If you have taken a whole screen or large window, it will zoom out, so you can see the whole thing.
Cropping your Screenshot
Now that you have the image inside Photo & Graphic Designer you can crop it using the normal methods of cropping images. You can either use
the Crop Tool or easier still, just double click on the image, which takes you into the Photo Tool, showing 8 crop handles around the image. You
can adjust it using these handles, or drag anywhere on the image to create a fresh crop.
Resizing your Screenshot
The captured image is always put into Photo & Graphic Designer at 100% size,1:1 to the original (but the zoom may have been adjusted). In almost all
cases you will want to save the capture at this 1:1 size in order for the image to remain pin-sharp. But you can resize it, using the Selector Tool and
dragging the corner handles.
Paint a Blur over Sections to Obscure Private Information
Select the Region Painter Tool and paint over the area you want to blur. You will see a dotted 'marching ants' outline showing the selected region.
Now select the Photo Enhance tool again and drag the Blur slider (right end of the Photo Tool Infobar) to the maximum left position and your
selected region is now blurred.
Drag the blur slider to -100 to blur the selected region
(Advanced use: You can edit the blur region, either enlarging or reducing it using the Shape Painter Tool. First make sure the 'shape inside' is
selected - it will be if you've just applied the blur operation. If it's not then you can Ctrl+Click on the blur region to select this blur region 'inside'
the edited photo. Now if you start painting on the blur region with this Shape Painter Tool it enlarges the shape, and thus the area that is
blurred. If you hold down Shift and paint over the blurred region, then it will erase or subtract from the shape, so reducing the blurred area).
Tip: Once you have a region of your image selected, you're not limited to just blurring it. You can use any of the Enhance sliders to adjust the
brightness, contrast, saturation, etc.
The blurred section of the screenshot
Highlighting areas and Adding Captions
To highlight an area on the screenshot you can draw a line around the area, just as you would with a marker pen and then add some text as an
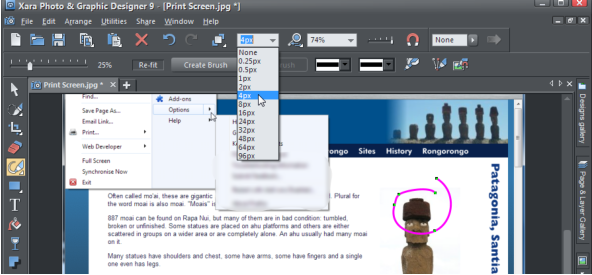
explanation. To draw a freehand line, go to the Drawing Tools and select the Freehand and Brush Tool. Set the width of the brush using the 'Set
line width' drop down list of options. Now draw your line. Whilst it is still selected, click on a color on the color line to change the color or you
can right click on any color and select 'Set line color'.
My highlight around the area of interest, drawn using the Freehand tool, with the line width set to 4px using the drop-down menu shown and then
colored pink.
Note: When drawing your freehand line, if you connect the start and the end points then the object will become a closed solid shape. In that case, if
you require just the outline then click on the 'checkered' color patch on the left of the color line to select 'no color' which will clear the fill color
and make the shape invisible. Then you will need to reselect the line width from the 'Set line width' drop down to make the outline visible. To
edit the shape of the curve, select the object, then select the Shape Tool and then drag on any point or part of the curve to redraw the
line/shape as required. Alternatively, you could just redraw on the line using the Freehand Tool.
To add some descriptive text to the image select the Text Tool, which offers all the usual word processing facilities and you will see a range of
controls on the InfoBar. Click on the image, and simply type your words, then highlight the text and click on a color on the color line.
See Using Fonts on your Website tutorial.
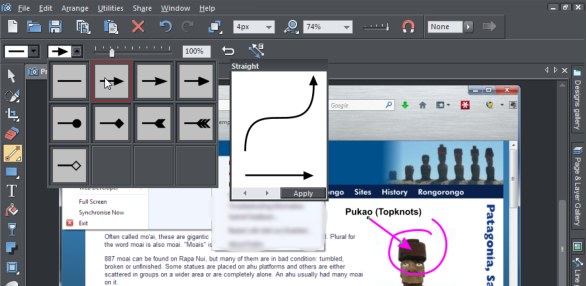
Drawing Arrows
Lastly, I shall add an arrow. In the Drawing Tools select the Straight Line Tool and drag a line to the desired length. Now select the 'Set line start arrow'
on the InfoBar and select an arrow head from the range on offer. You can adjust the thickness of the arrow line as described above, and the size and
style of arrow head.
The arrow drawn using the Straight Line Tool then selection of the arrow head.
Saving your Screenshot
To ensure you save not just the image, but any captions or annotations you applied around the image, in the Selector Tool either do a Select All (Ctrl+A)
or drag out a lasso rectangle around all the parts you want to save.
Now select file export (Ctrl+Shift+E) and select either PNG or JPG from the 'save as type' drop down on this export dialog.
Or, if you want to put your annotated screen capture into other program such as Word, just lasso select around all the parts, image, highlights and
annotations), now just Copy (Ctrl+C), switch into Word and just Paste (Ctrl+V). That's it.
There are many ways other ways in which you can annotate your images which I’ll try to cover in another tutorial.
For more tutorials by Xara and third parties, check out our Resource index, which offers a searchable and browsable list of movies and tutorials created
by Xara and third parties.