


This month I’m going to show you how to create a simple drop down menu in Xara Web Designer.
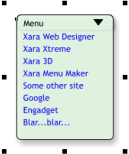
There are different ways to create such menus, but this is one of the easiest. This is my simple menu
button. Hover over it to see the drop down menu:
This menu uses the pop-up layer feature to display the menu, and then a mouse-over highlight for each of the entries.
The easiest way to create your own menu like this is to download the accompanying .web file and customize it as described
So, assuming you’ve downloaded the .web file, follow these steps. When you’re done customizing it you can copy the result
into any website document.
Remove the Soft Group
1. Using the Selector Tool, select the menu, the status line will say
something like; 13 objects (Soft Group) on 3 layers. Press Ctrl+Alt+U to
un-group.
Edit your menu entries
2. This uses a pop-up layer called ‘menu’. Open the Layer Gallery by
clicking the Layer Gallery icon (or Utilities > Galleries > Layer
Gallery), switch the Menu layer on by checking the box
next to it, and then edit the text entries using the Text
Tool. Triple click is the quickest way to select any
entry, and type your replacement text.
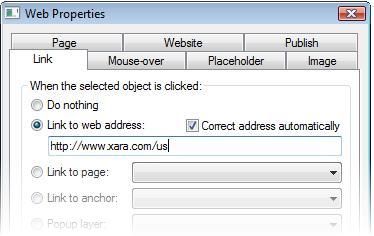
Apply a link to the menu
3. Now apply a link to each menu entry - select the
whole line again and apply a URL using the Link dialog
(or Utilities > Web properties). Select the Link tab
and enter the web address in the Link to web address
text box.
To extend or to reduce the menu, just edit the text links
as required, pressing return to add a new line, or select
and delete the text to remove entries.
Adjust the Background
4. Using the Selector Tool, click on the rounded rectangle (on the Menu Layer). The status line should
say: 1 rounded rectangle on Layer Menu. Now you can just drag on the bottom drag handle to resize.
You can also adjust the transparency of the background rectangle using the Transparency tool. You can
see the above example is very slightly transparent.
Rollover Highlights
5. Next, you need to update the rollover highlighting rectangles. If you switch on the ‘Mouseover menu’ layer you will see
there is a green rectangle over each menu entry (although it may look like one solid green block).
Now just copy these rectangles so that each menu entry has one placed over it. An easy way to copy one is to select
it and press Ctrl+K which makes an exact copy on top and then just use the arrow keys to move it down as required.
This ensures that it’s exactly aligned with the others.
This is how it works: It uses a little known feature of Web Designer of using a second ‘mouseover’ layer. You might be familiar
with the idea of the main MouseOff and MouseOver layers, where anything on the MouseOver layer is automatically displayed
as you move over a link on the MouseOff layer. But here the main menu layer is itself a pop-up. It’s only shown when you
move over the menu button. We want a second mouseover layer on top of the menu, so that as you traverse the menu each
entry is highlighted. So in this case we simply create a second layer with ‘mouseover’ in the title, placed above the menu.
Soft Group again
6. Switch all three layers on so you can see and edit them all (check both boxes), and in the Selector Tool drag around the
whole lot. The status line should say 14 objects on 3 layers again (or similar). Now select Arrange -> Apply Soft Group. Now
you can drag the whole thing around, even copy / paste it into any other web document.
Note: To edit any menu entry you do not need to remove the Soft Group. You can just click directly on the text in the Text
Tool and make any edit or URL change.
Secondly, this example shows the links underlined. You can control whether links are underlined or not in the Web Properties
dialog, Website tab - which is also where you can control the link colors (off, over and visited).
When Soft Grouped, you can edit the ‘Menu’ label text on the top, and it will change it on both the original button and the
menu layer.
Lastly the menu background and highlight color is controlled by the ‘Theme Color 1’ on the color line.


© Xara Group 2009
Created with Xara Web Designer


